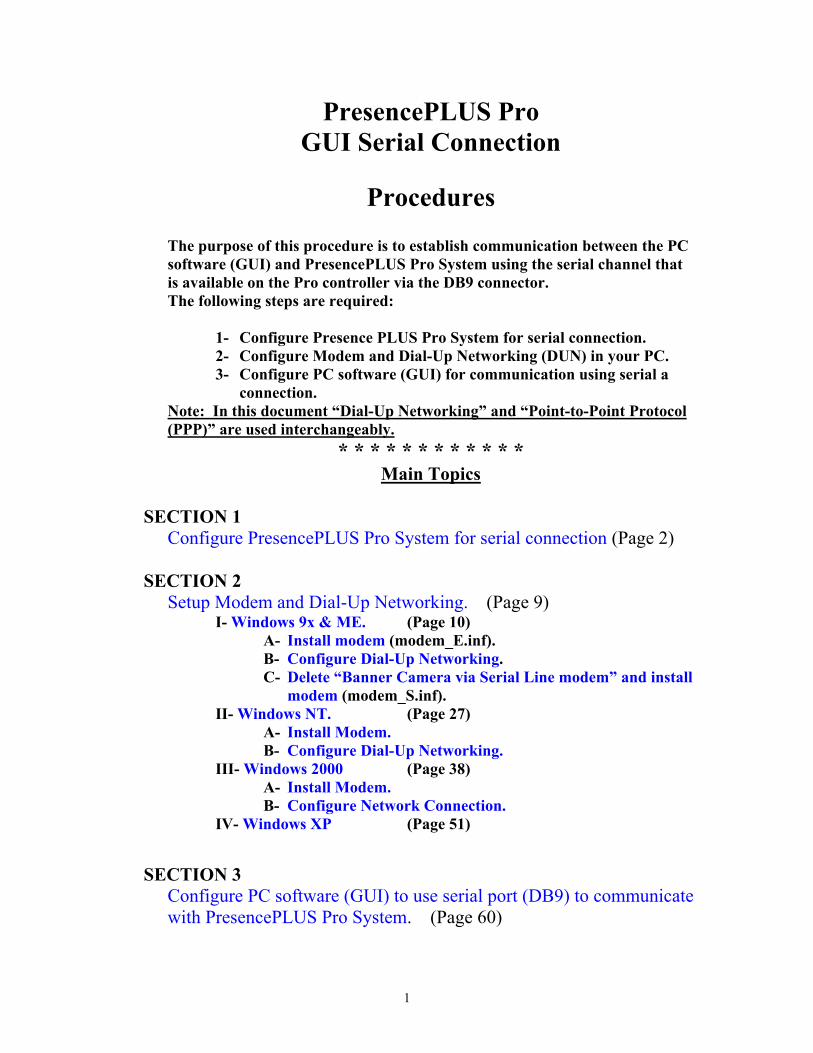
![[pl] Serial Zbiór amerkańskich opowiadań sf](https://static.fdocuments.pl/doc/165x107/5571f31c49795947648d83c7/pl-serial-zbior-amerkanskich-opowiadan-sf.jpg)
Serial Setup
65
PresencePLUS Pro GUI Serial Connection Procedures The purpose of this procedure is to establish communication between the PC software (GUI) and PresencePLUS Pro System using the serial channel that is available on the Pro controller via the DB9 connector. The following steps are required: 1- Configure Presence PLUS Pro System for serial connection. 2- Configure Modem and Dial-Up Networking (DUN) in your PC. 3- Configure PC software (GUI) for communication using serial a connection. Note: In this document “Dial-Up Networking” and “Point-to-Point Protocol (PPP)” are used interchangeably. * * * * * * * * * * * * Main Topics SECTION 1 Configure PresencePLUS Pro System for serial connection (Page 2) SECTION 2 Setup Modem and Dial-Up Networking. (Page 9) I- Windows 9x & ME. (Page 10) A- B- C- Install modem (modem_E.inf). Configure Dial-Up Networking. Delete “Banner Camera via Serial Line modem” and install modem (modem_S.inf). II- Windows NT. (Page 27) A- Install Modem. B- Configure Dial-Up Networking. III- Windows 2000 (Page 38) A- Install Modem. B- Configure Network Connection. IV- Windows XP (Page 51) SECTION 3 Configure PC software (GUI) to use serial port (DB9) to communicate with PresencePLUS Pro System. (Page 60) 1
-
Upload
carlos-mario-jimenez-ramirez -
Category
Documents
-
view
235 -
download
2
Transcript of Serial Setup
PresencePLUS Pro GUI Serial Connection
Procedures
The purpose of this procedure is to establish communication between the PC software (GUI) and PresencePLUS Pro System using the serial channel that is available on the Pro controller via the DB9 connector. The following steps are required:
1- Configure Presence PLUS Pro System for serial connection. 2- Configure Modem and Dial-Up Networking (DUN) in your PC. 3- Configure PC software (GUI) for communication using serial a
connection. Note: In this document “Dial-Up Networking” and “Point-to-Point Protocol (PPP)” are used interchangeably.
* * * * * * * * * * * * Main Topics
SECTION 1
Configure PresencePLUS Pro System for serial connection (Page 2)
SECTION 2 Setup Modem and Dial-Up Networking. (Page 9) I- Windows 9x & ME. (Page 10)
A- B- C-
Install modem (modem_E.inf). Configure Dial-Up Networking. Delete “Banner Camera via Serial Line modem” and install modem (modem_S.inf).
II- Windows NT. (Page 27) A- Install Modem. B- Configure Dial-Up Networking.
III- Windows 2000 (Page 38) A- Install Modem. B- Configure Network Connection.
IV- Windows XP (Page 51)
SECTION 3
Configure PC software (GUI) to use serial port (DB9) to communicate with PresencePLUS Pro System. (Page 60)
1
SECTION 1: Configure PresencePLUS Pro System for Serial Communication:
Note: Configuring the Pro system to communicate to the GUI via serial communication requires the Pro system to enable PPP. This will remove the Serial 1 option from the Communication Tool. If there are Inspections within the controller that have Serial 1 selected in the Communication Tool AND the Inspection is executed, the Communication Tool that has Serial 1 selected will FAIL.
The PPP state in PresencePLUS Pro configuration menu must be enabled for serial communication with GUI to operate. To view the menu perform the following steps: 1. Set up a hyper terminal (or similar serial terminal) connection with the following properties: Baud Rate : 115200 Data Bits : 8 Parity : None Stop Bits : 1 Flow Control : None
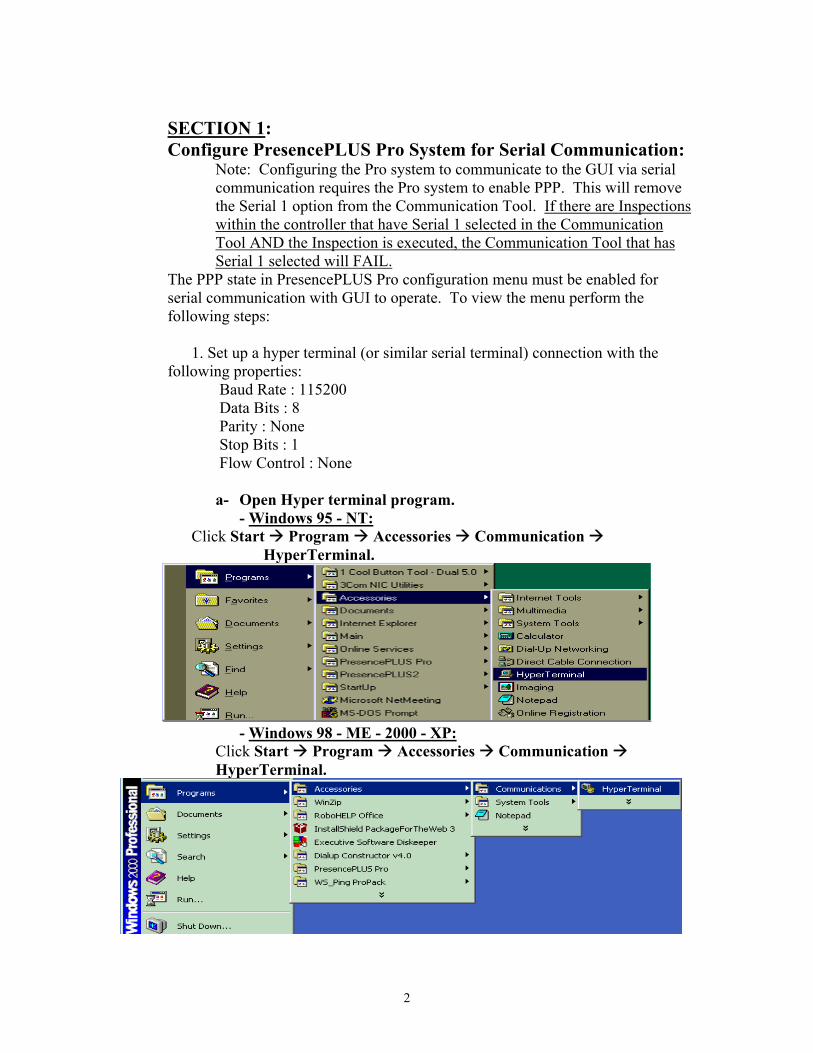
a- Open Hyper terminal program. - Windows 95 - NT:
Click Start Program Accessories Communication HyperTerminal.
- Windows 98 - ME - 2000 - XP:
Click Start Program Accessories Communication HyperTerminal.
2

Note: If your PC operating system is Windows 95, or 98, or NT : - Double click on the Hyper Terminal icon to open the program
- If you see the dialog box below, click No button then go to step b
b- Enter a name for connection, and then click OK button
3
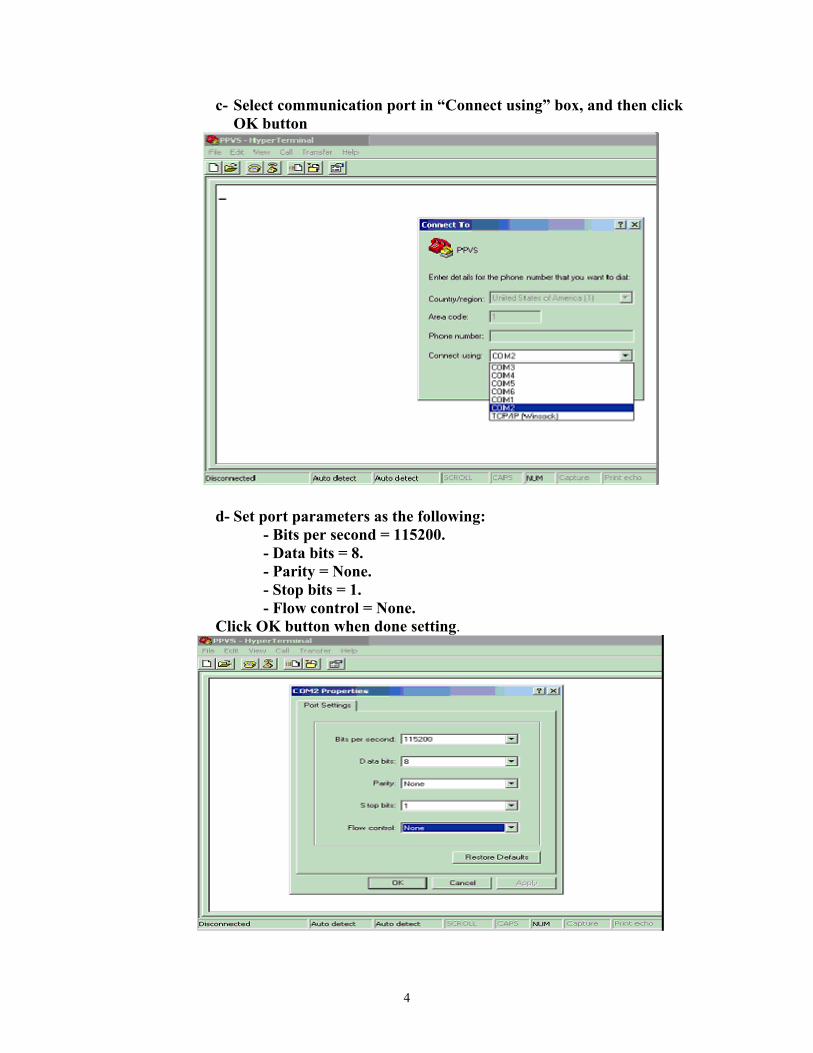
c- Select communication port in “Connect using” box, and then click OK button
d- Set port parameters as the following: - Bits per second = 115200. - Data bits = 8. - Parity = None. - Stop bits = 1. - Flow control = None.
Click OK button when done setting.
4
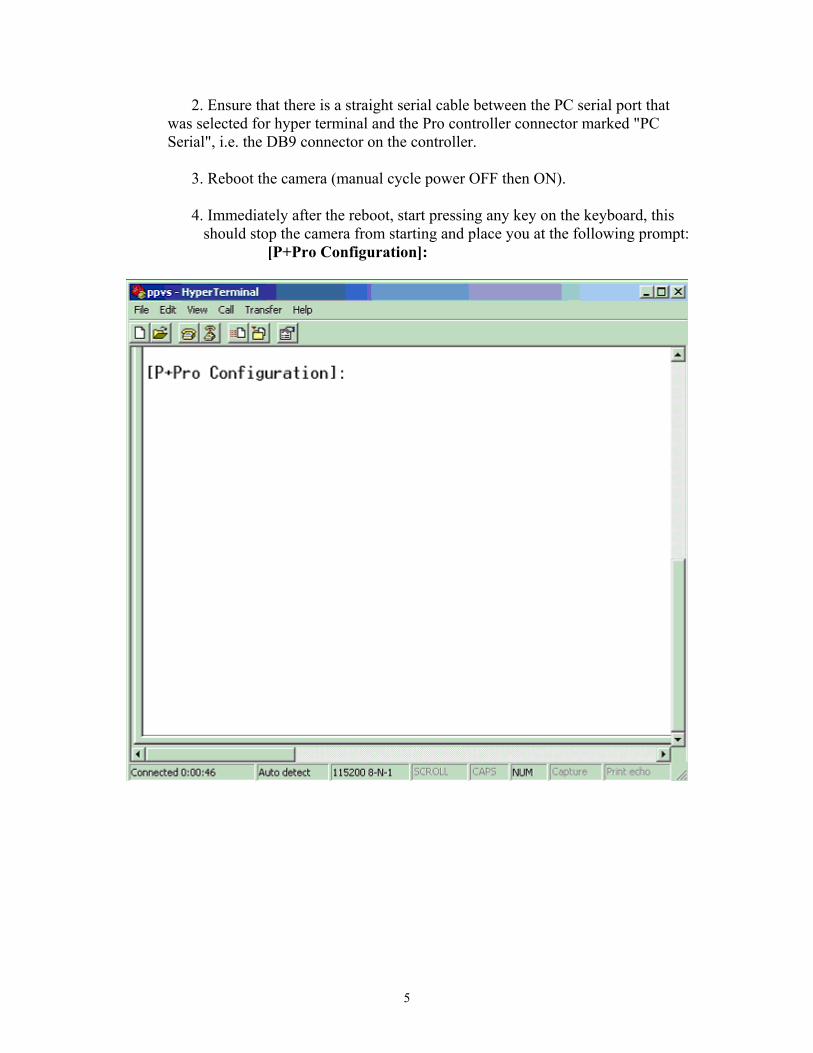
2. Ensure that there is a straight serial cable between the PC serial port that was selected for hyper terminal and the Pro controller connector marked "PC Serial", i.e. the DB9 connector on the controller. 3. Reboot the camera (manual cycle power OFF then ON). 4. Immediately after the reboot, start pressing any key on the keyboard, this
should stop the camera from starting and place you at the following prompt: [P+Pro Configuration]:
5
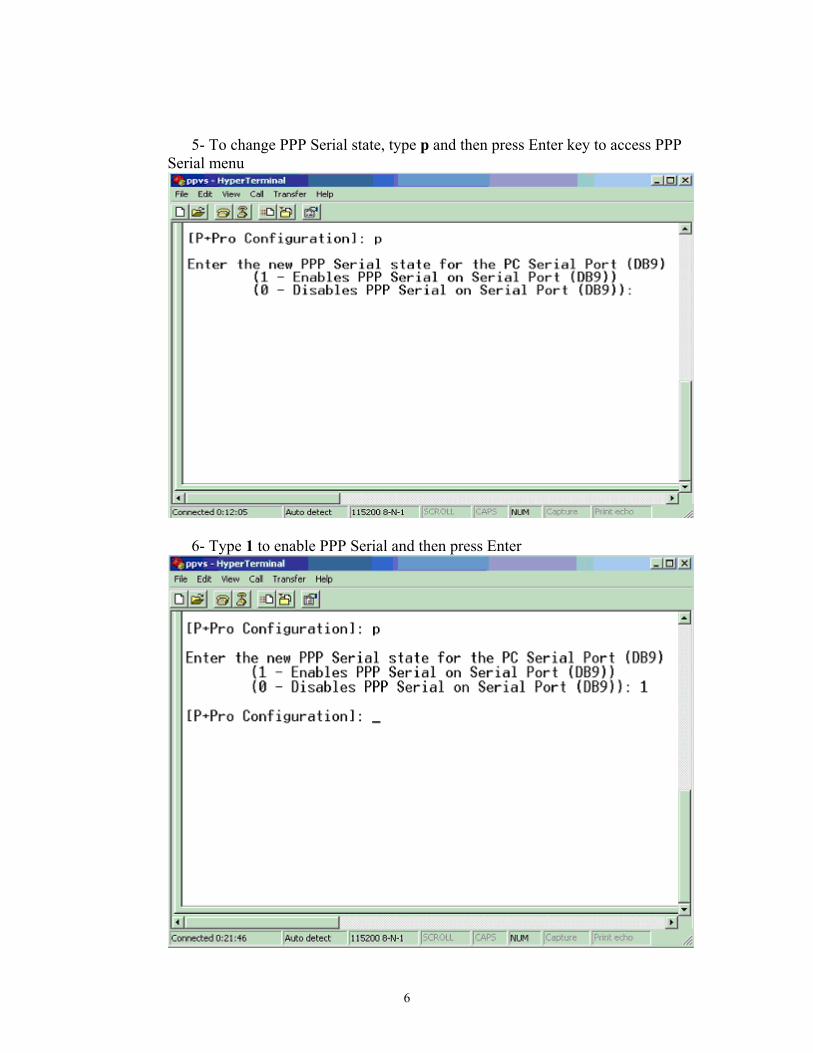
5- To change PPP Serial state, type p and then press Enter key to access PPP Serial menu
6- Type 1 to enable PPP Serial and then press Enter
6
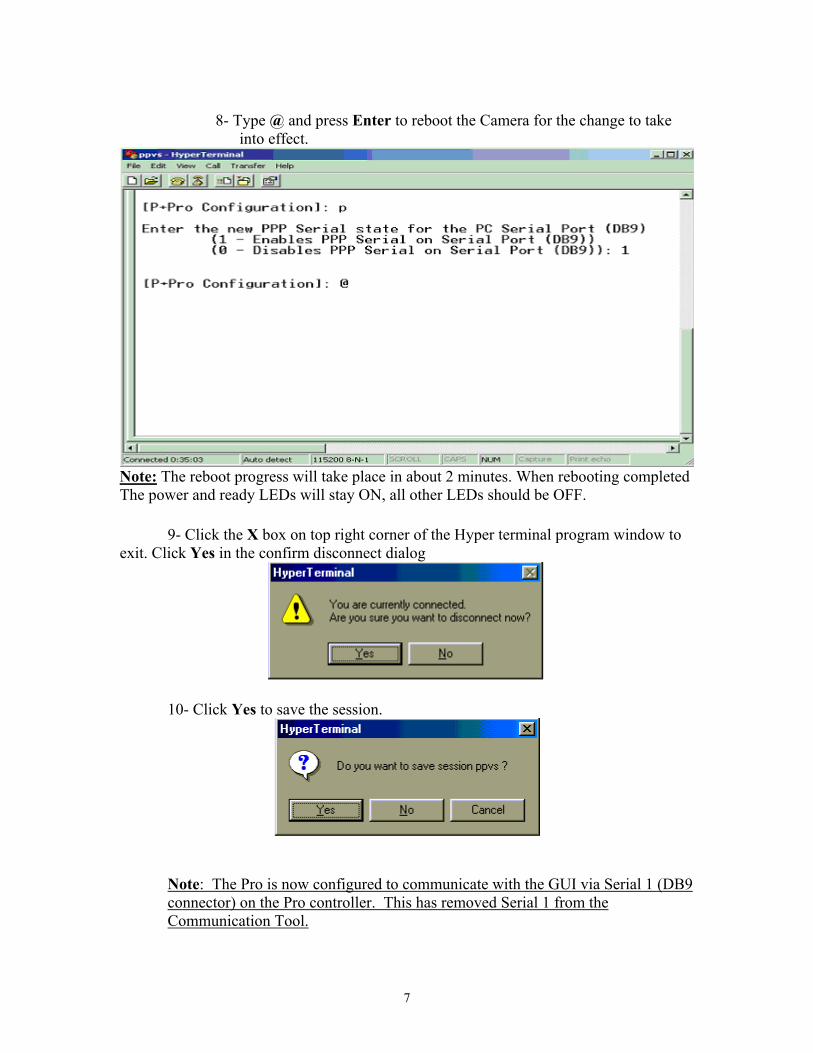
8- Type @ and press Enter to reboot the Camera for the change to take
into effect.
Note: The reboot progress will take place in about 2 minutes. When rebooting completed The power and ready LEDs will stay ON, all other LEDs should be OFF. 9- Click the X box on top right corner of the Hyper terminal program window to exit. Click Yes in the confirm disconnect dialog
10- Click Yes to save the session.
Note: The Pro is now configured to communicate with the GUI via Serial 1 (DB9 connector) on the Pro controller. This has removed Serial 1 from the Communication Tool.
7

Click on the links below to set up Modem and Dial-Up Networking, and to configure PC software to use serial port. Go to Setup Modem and Dial-Up Networking section Go to Configure PC software (GUI) to use serial port (DB9) section
8
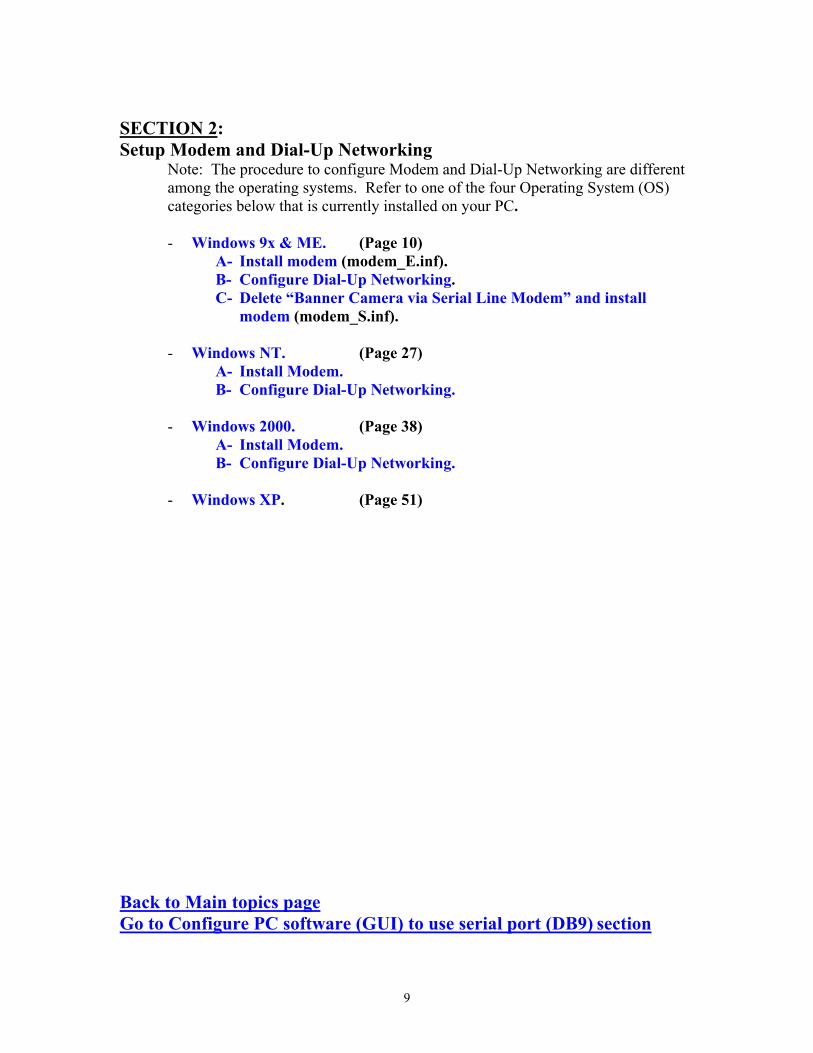
SECTION 2: Setup Modem and Dial-Up Networking
Note: The procedure to configure Modem and Dial-Up Networking are different among the operating systems. Refer to one of the four Operating System (OS) categories below that is currently installed on your PC.
- Windows 9x & ME. (Page 10)
A- B- C-
A- B-
A- B-
Install modem (modem_E.inf). Configure Dial-Up Networking. Delete “Banner Camera via Serial Line Modem” and install modem (modem_S.inf).
- Windows NT. (Page 27)
Install Modem. Configure Dial-Up Networking.
- Windows 2000. (Page 38)
Install Modem. Configure Dial-Up Networking.
- Windows XP. (Page 51)
Back to Main topics page Go to Configure PC software (GUI) to use serial port (DB9) section
9
I- Windows 9x & ME
Note: Ensure that “Dial-Up-Networking” is installed on your PC. If it is NOT installed please contact your system administrator to install it for you. Setup Modem and Dial-Up Networking for PresencePLUS Pro serial communication in Windows 95, 98 or ME requires three steps:
A- Install modem (modem_E.inf). B- Configure Dial-Up Networking. C- Delete “Banner Camera via Serial Line Modem” and install
modem (modem_S.inf).
10
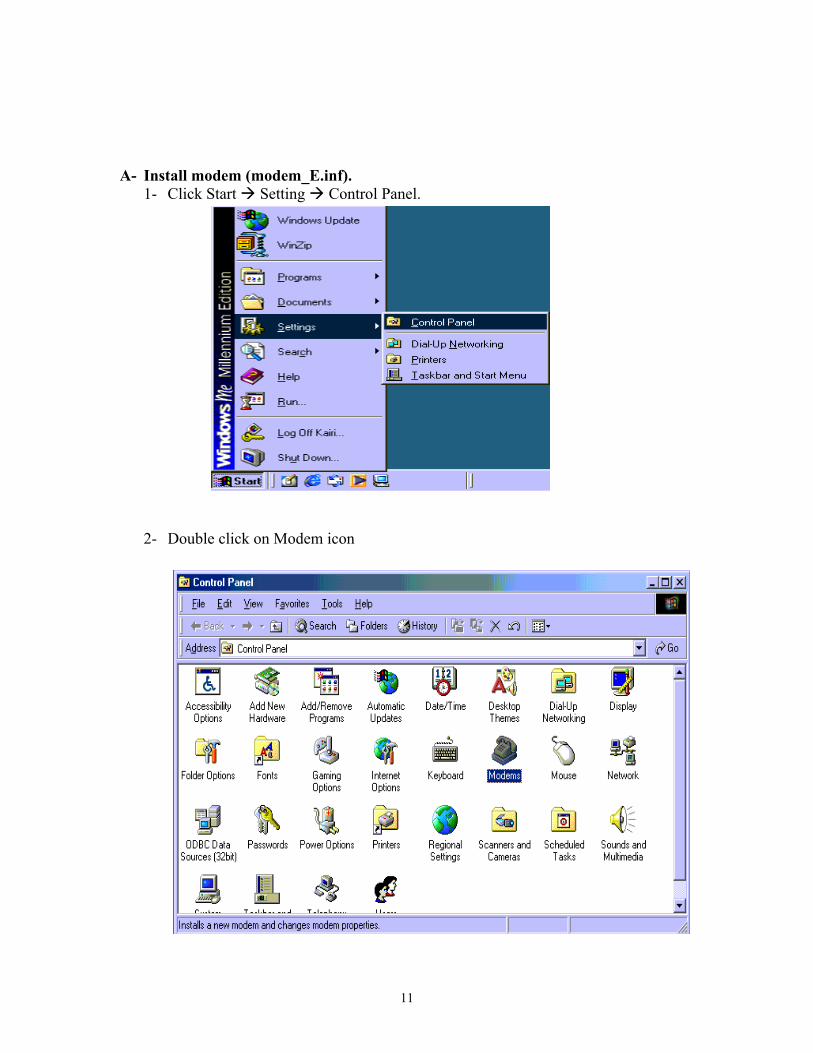
A- Install modem (modem_E.inf).
1- Click Start Setting Control Panel.
2- Double click on Modem icon
11
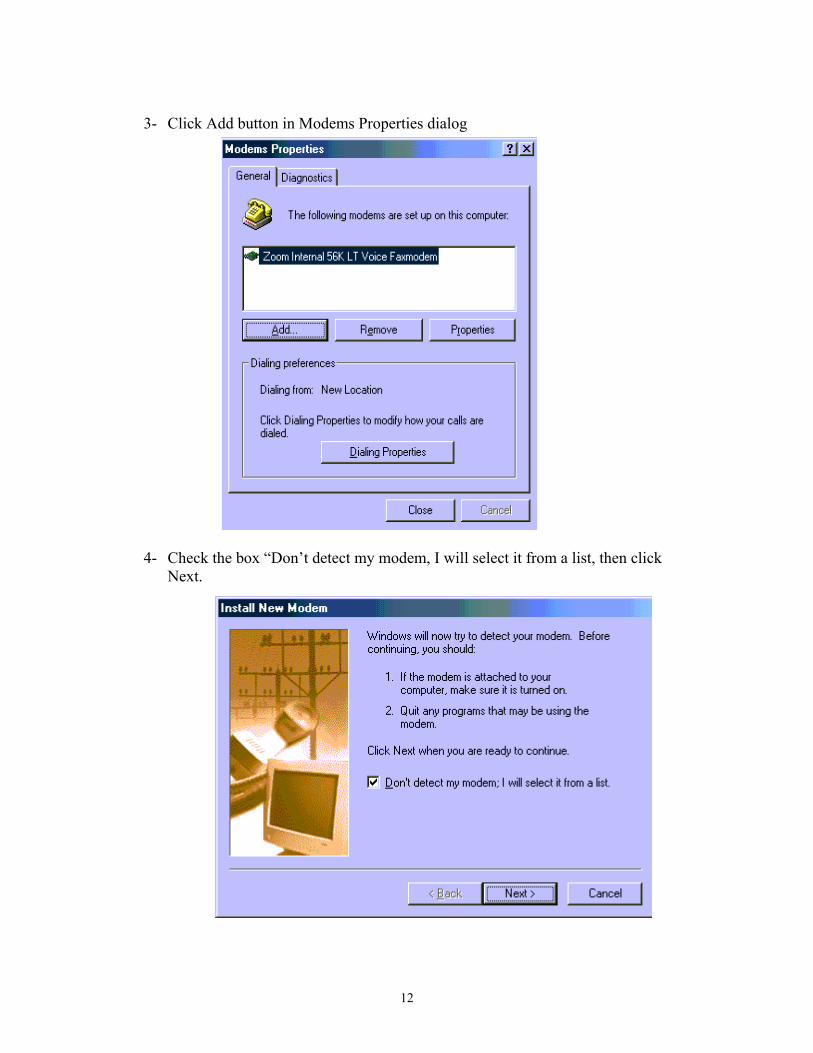
3- Click Add button in Modems Properties dialog
4- Check the box “Don’t detect my modem, I will select it from a list, then click
Next.
12
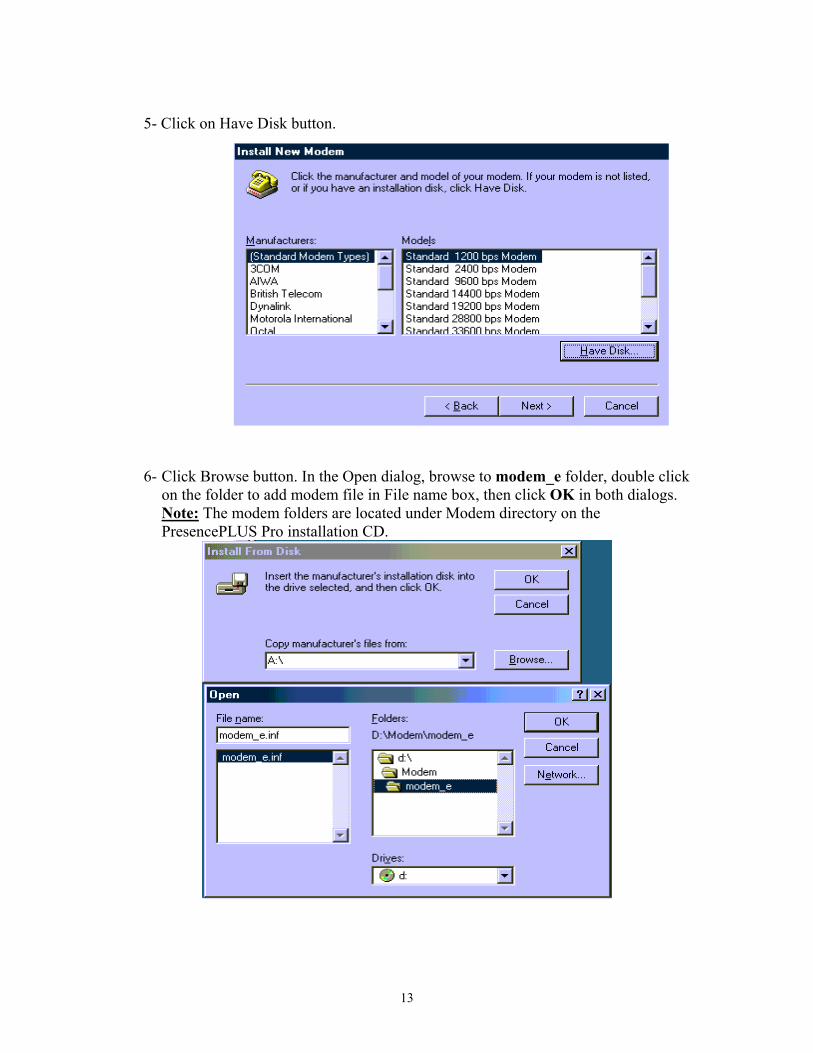
5- Click on Have Disk button.
6- Click Browse button. In the Open dialog, browse to modem_e folder, double click on the folder to add modem file in File name box, then click OK in both dialogs. Note: The modem folders are located under Modem directory on the PresencePLUS Pro installation CD.
13
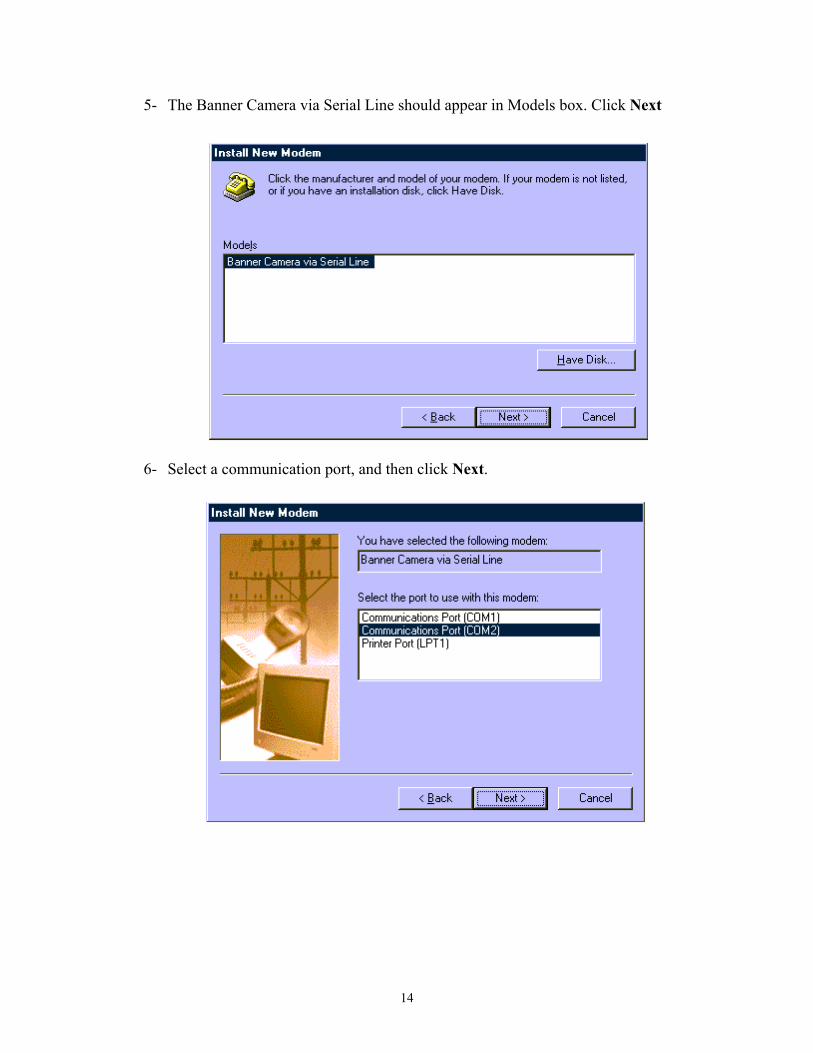
5- The Banner Camera via Serial Line should appear in Models box. Click Next
6- Select a communication port, and then click Next.
14
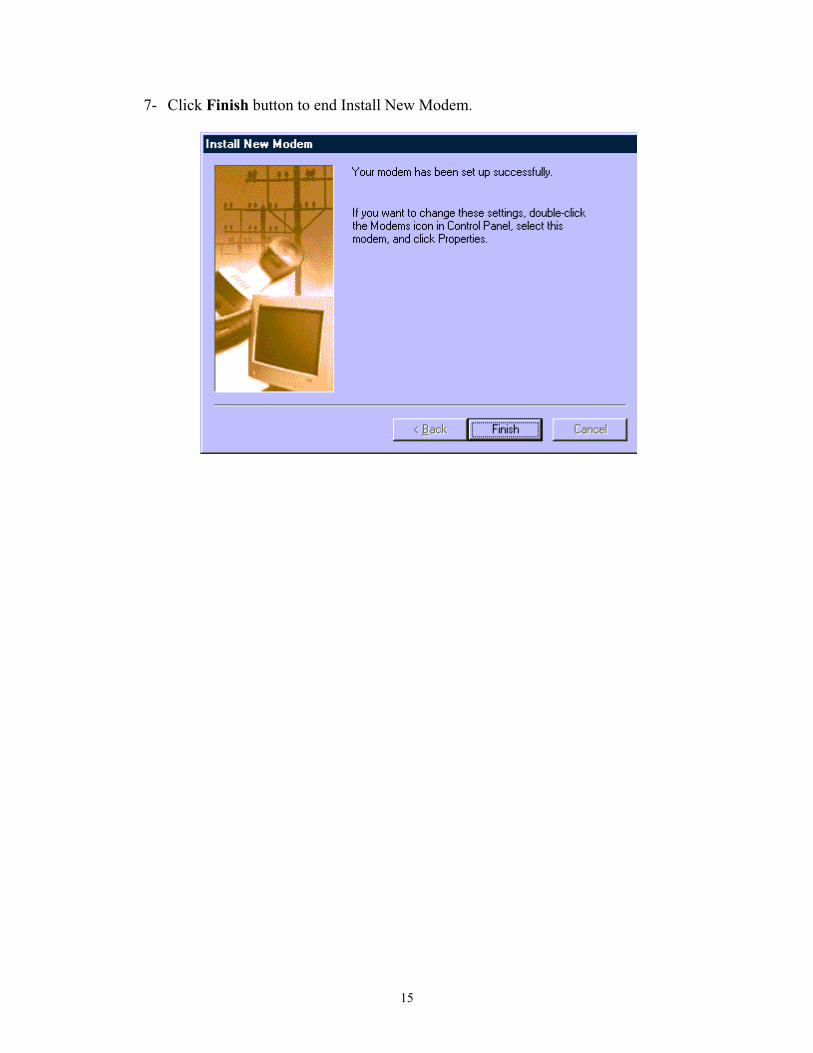
7- Click Finish button to end Install New Modem.
15
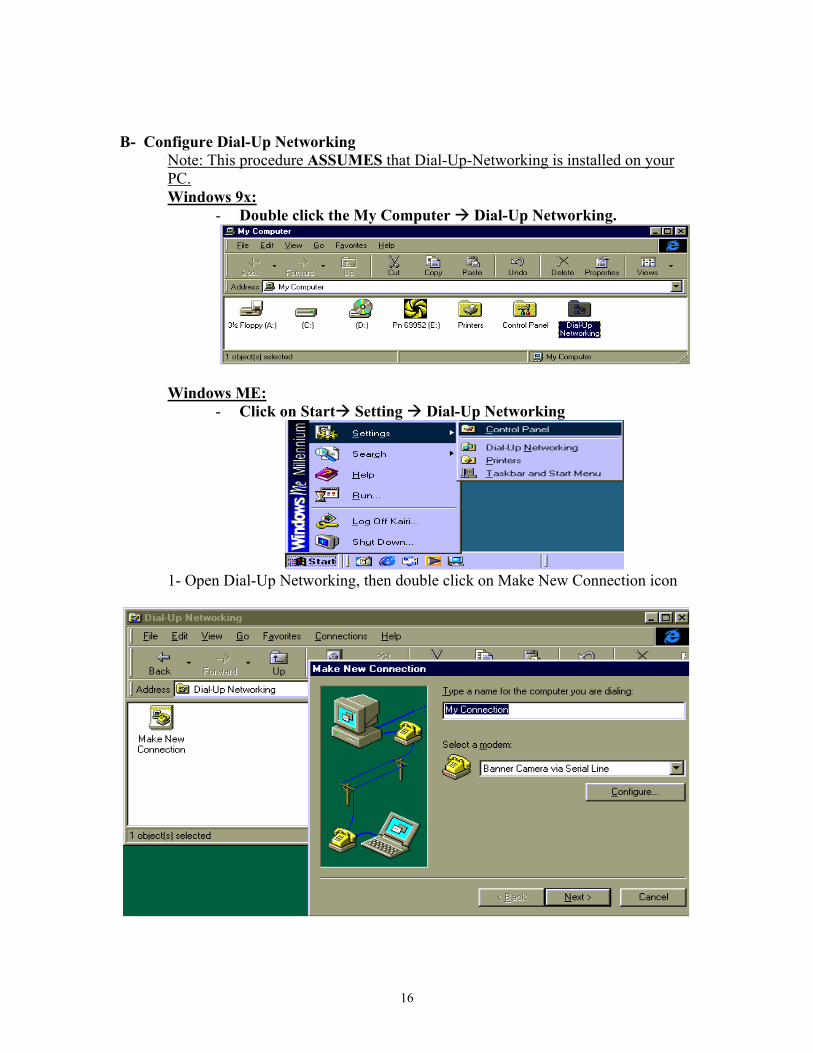
B- Configure Dial-Up Networking
Note: This procedure ASSUMES that Dial-Up-Networking is installed on your PC.
Windows 9x: - Double click the My Computer Dial-Up Networking.
Windows ME: - Click on Start Setting Dial-Up Networking
1- Open Dial-Up Networking, then double click on Make New Connection icon
16
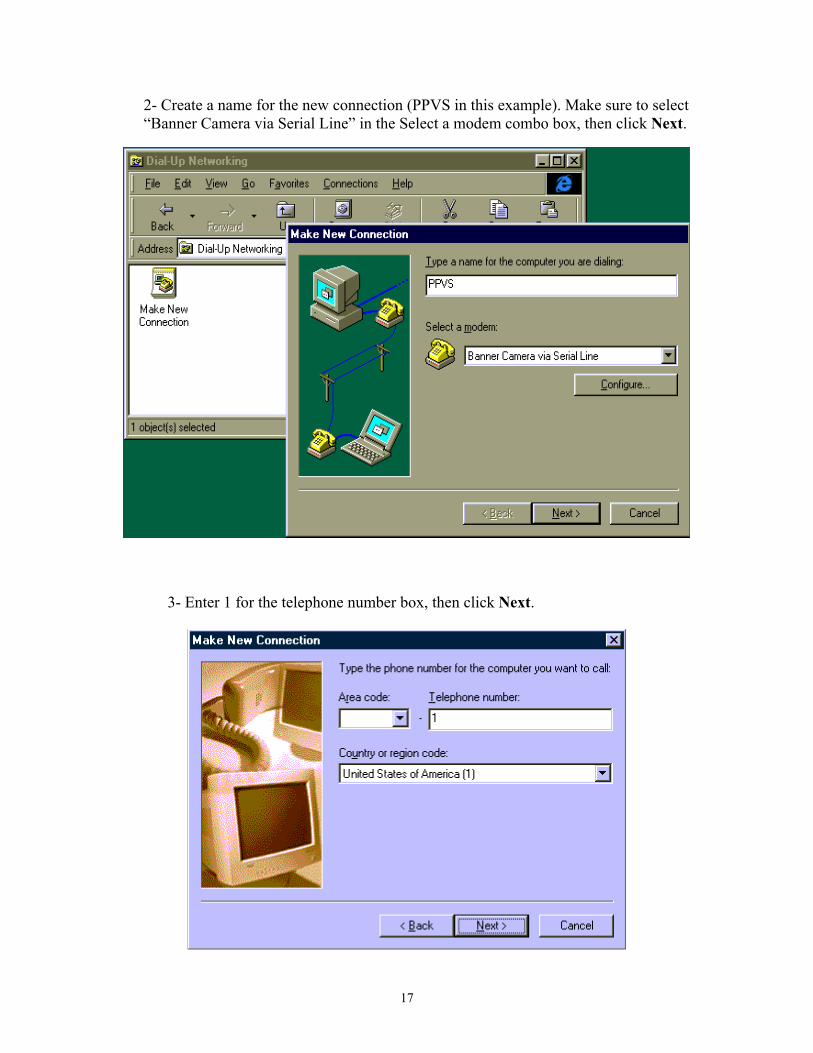
2- Create a name for the new connection (PPVS in this example). Make sure to select “Banner Camera via Serial Line” in the Select a modem combo box, then click Next.
3- Enter 1 for the telephone number box, then click Next.
17
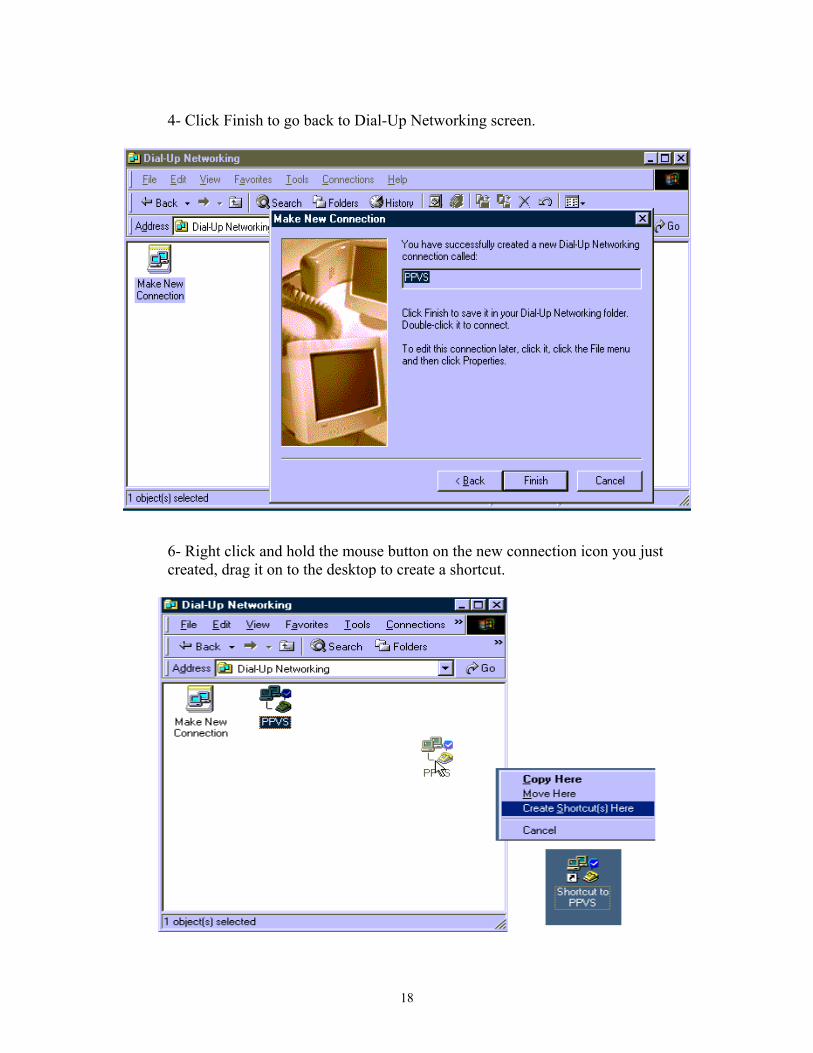
4- Click Finish to go back to Dial-Up Networking screen.
6- Right click and hold the mouse button on the new connection icon you just created, drag it on to the desktop to create a shortcut.
18
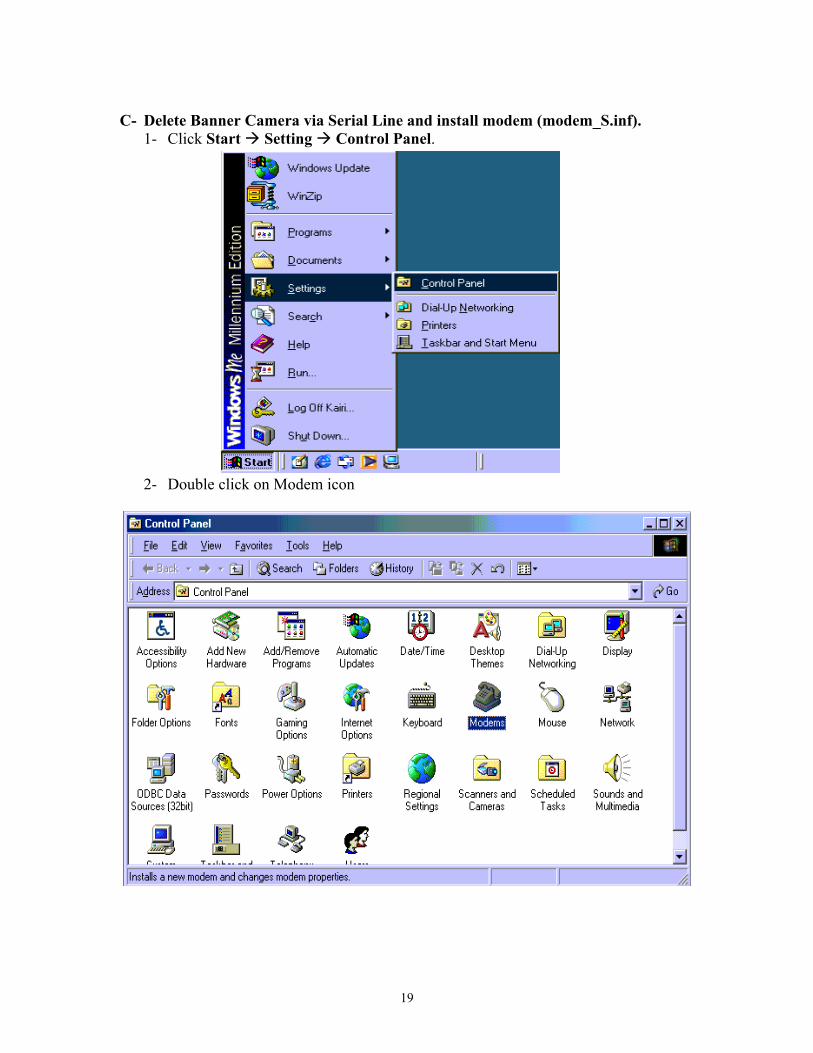
C- Delete Banner Camera via Serial Line and install modem (modem_S.inf).
1- Click Start Setting Control Panel.
2- Double click on Modem icon
19
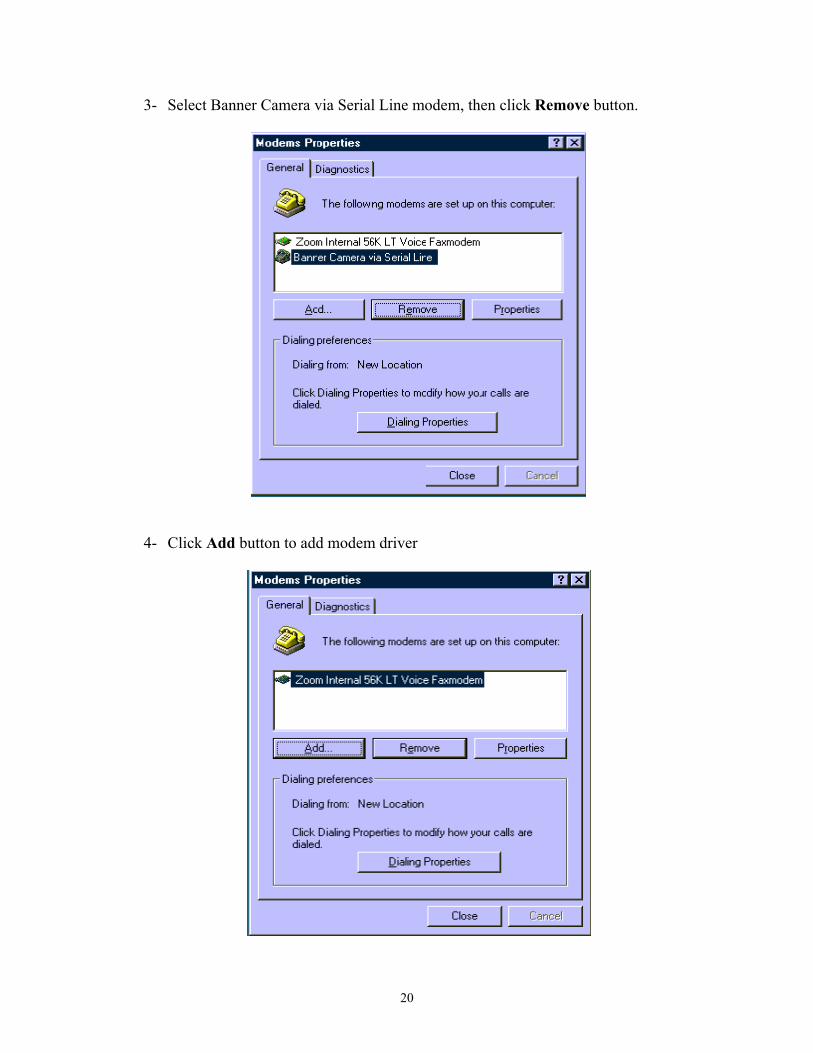
3- Select Banner Camera via Serial Line modem, then click Remove button.
4- Click Add button to add modem driver
20
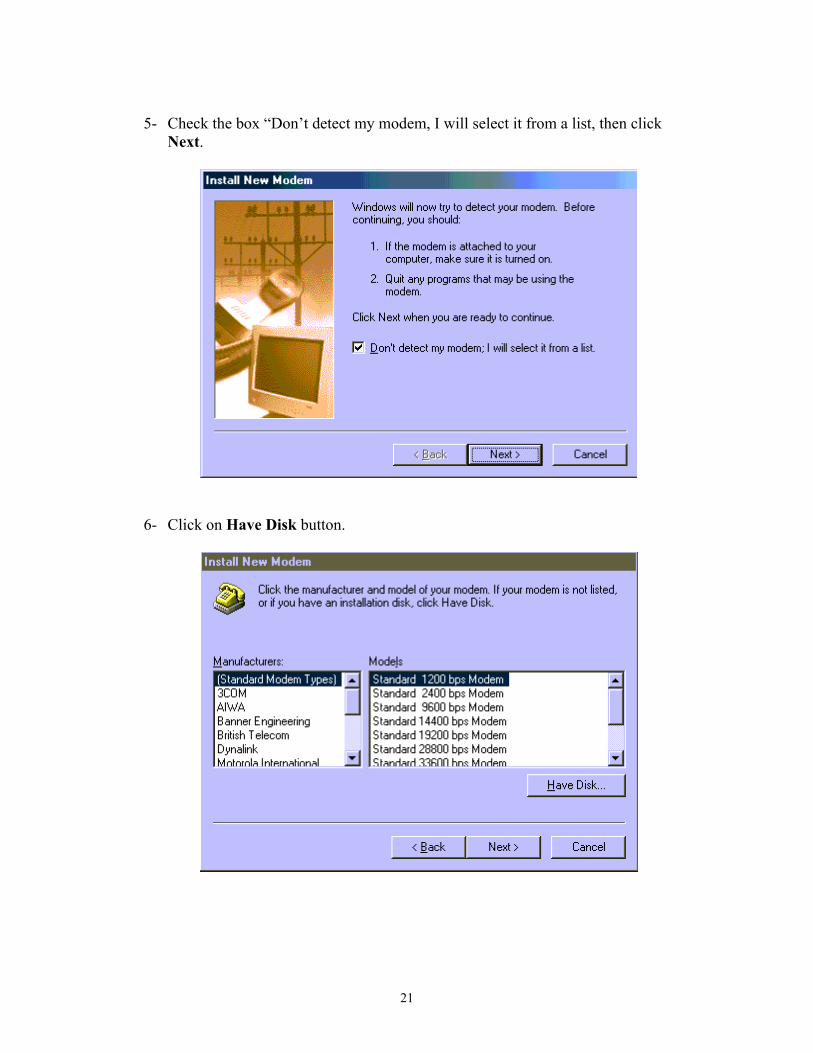
5- Check the box “Don’t detect my modem, I will select it from a list, then click
Next.
6- Click on Have Disk button.
21
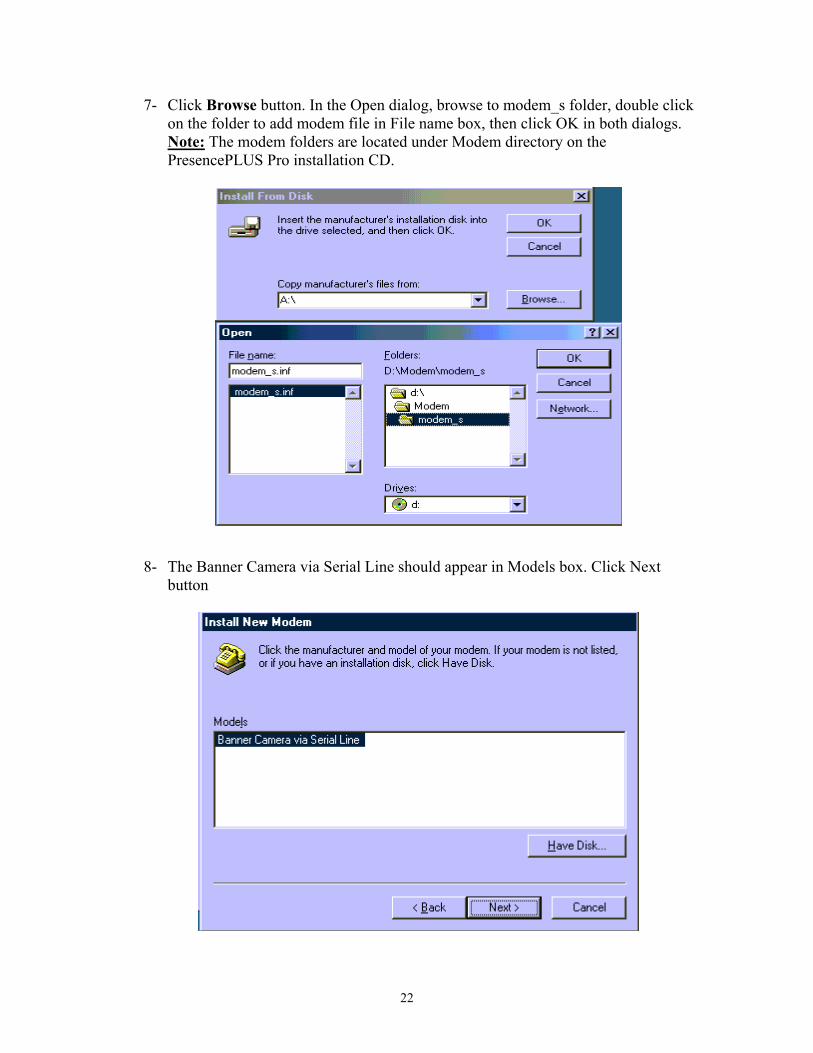
7- Click Browse button. In the Open dialog, browse to modem_s folder, double click on the folder to add modem file in File name box, then click OK in both dialogs. Note: The modem folders are located under Modem directory on the PresencePLUS Pro installation CD.
8- The Banner Camera via Serial Line should appear in Models box. Click Next button
22
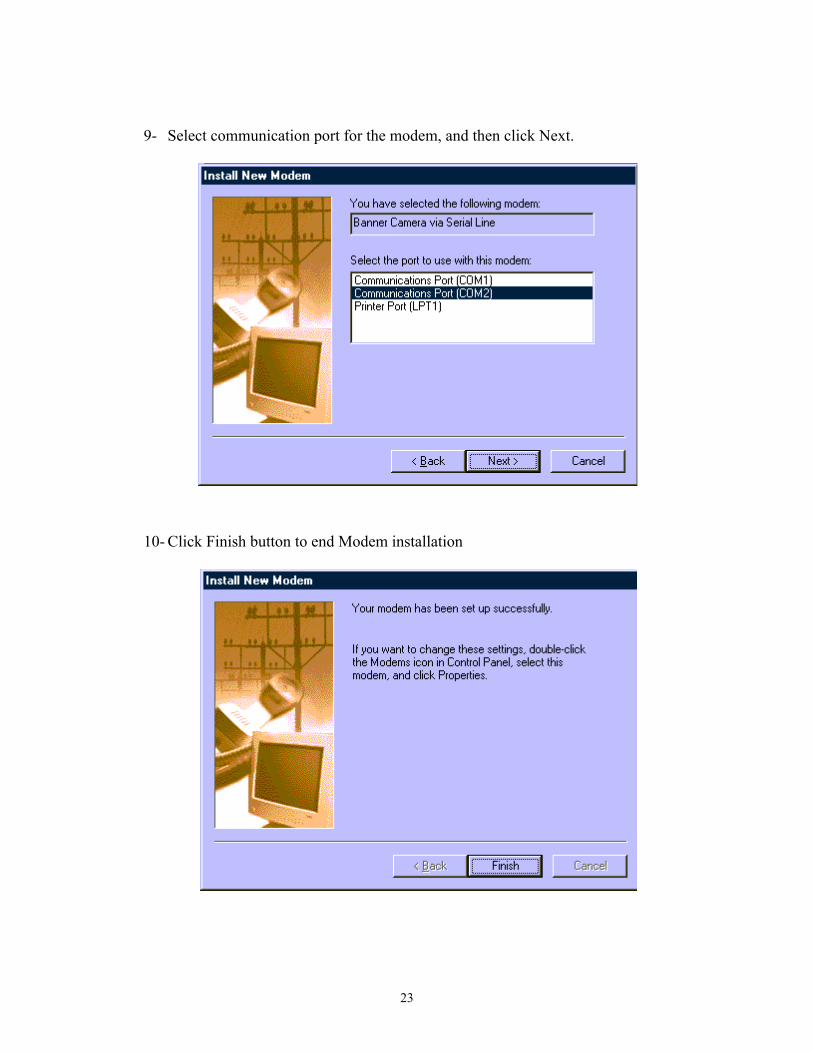
9- Select communication port for the modem, and then click Next.
10- Click Finish button to end Modem installation
23
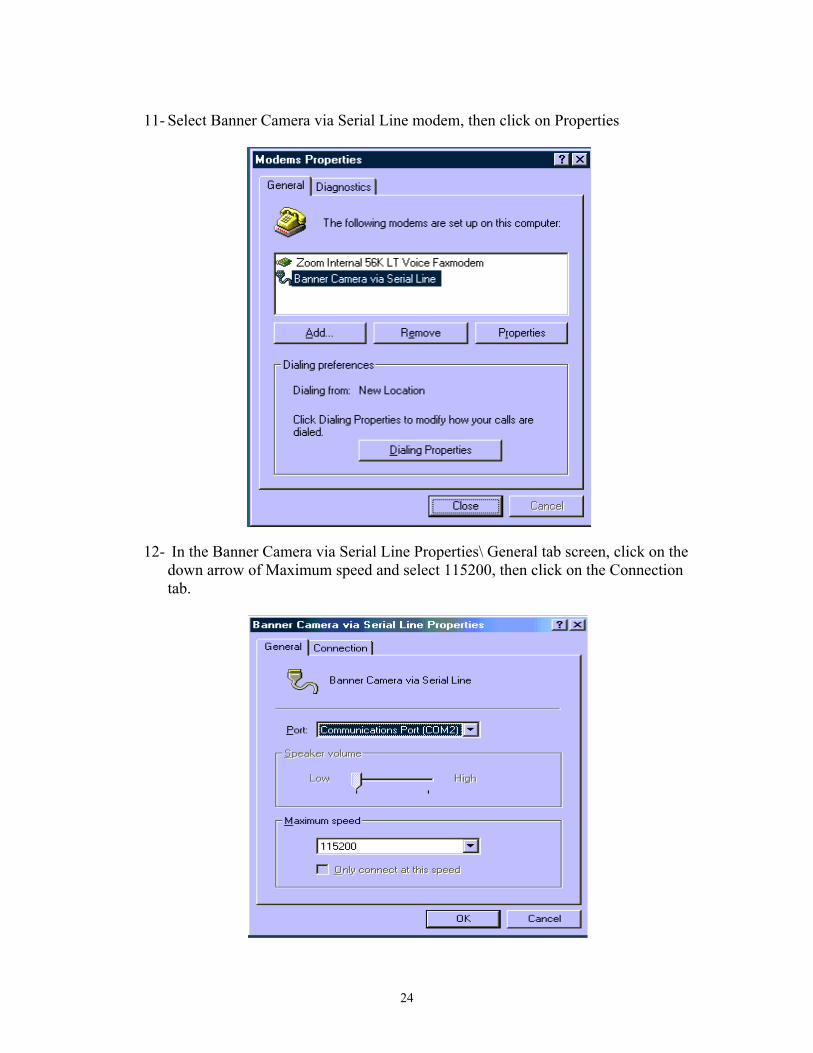
11- Select Banner Camera via Serial Line modem, then click on Properties
12- In the Banner Camera via Serial Line Properties\ General tab screen, click on the down arrow of Maximum speed and select 115200, then click on the Connection tab.
24
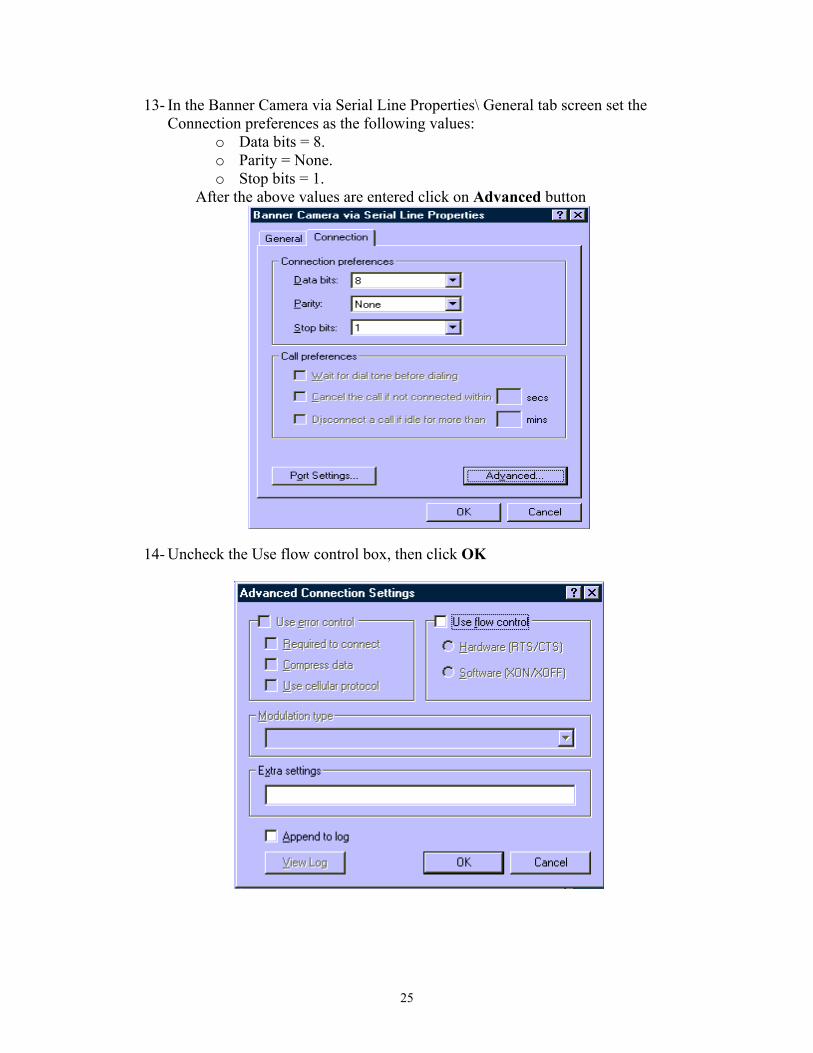
13- In the Banner Camera via Serial Line Properties\ General tab screen set the Connection preferences as the following values:
o Data bits = 8. o Parity = None. o Stop bits = 1.
After the above values are entered click on Advanced button
14- Uncheck the Use flow control box, then click OK
25
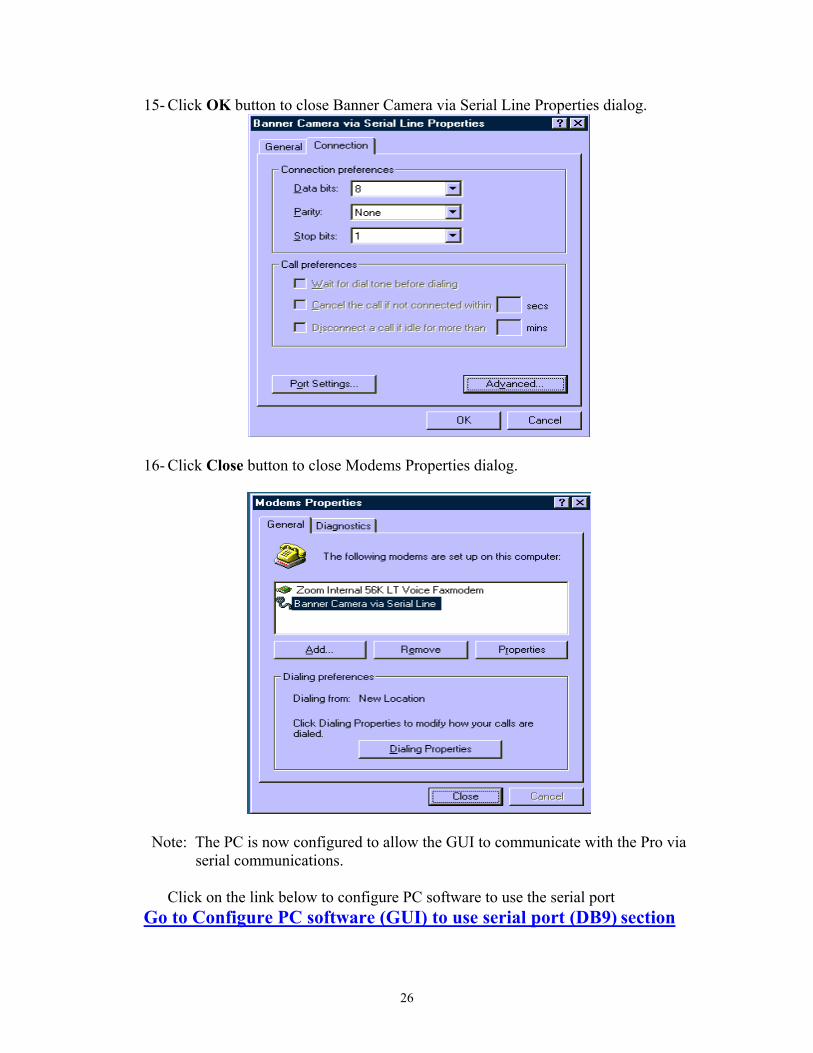
15- Click OK button to close Banner Camera via Serial Line Properties dialog.
16- Click Close button to close Modems Properties dialog.
Note: The PC is now configured to allow the GUI to communicate with the Pro via serial communications.
Click on the link below to configure PC software to use the serial port Go to Configure PC software (GUI) to use serial port (DB9) section
26
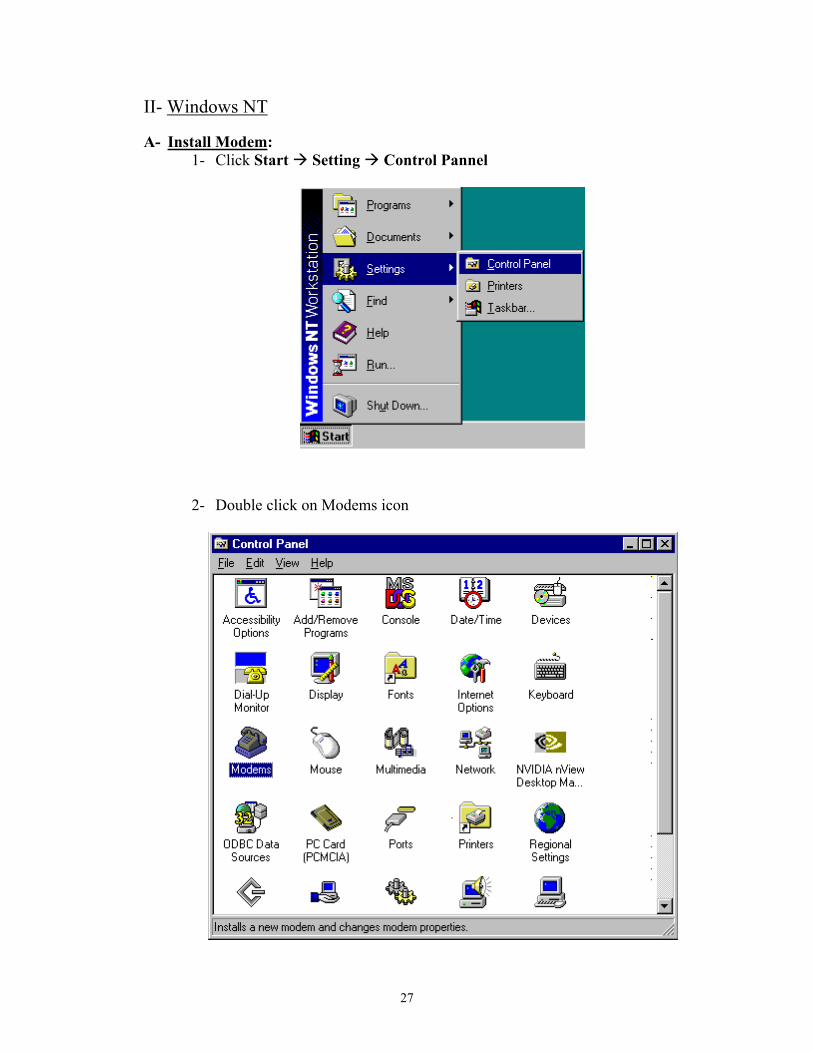
II- Windows NT A- Install Modem:
1- Click Start Setting Control Pannel
2- Double click on Modems icon
27
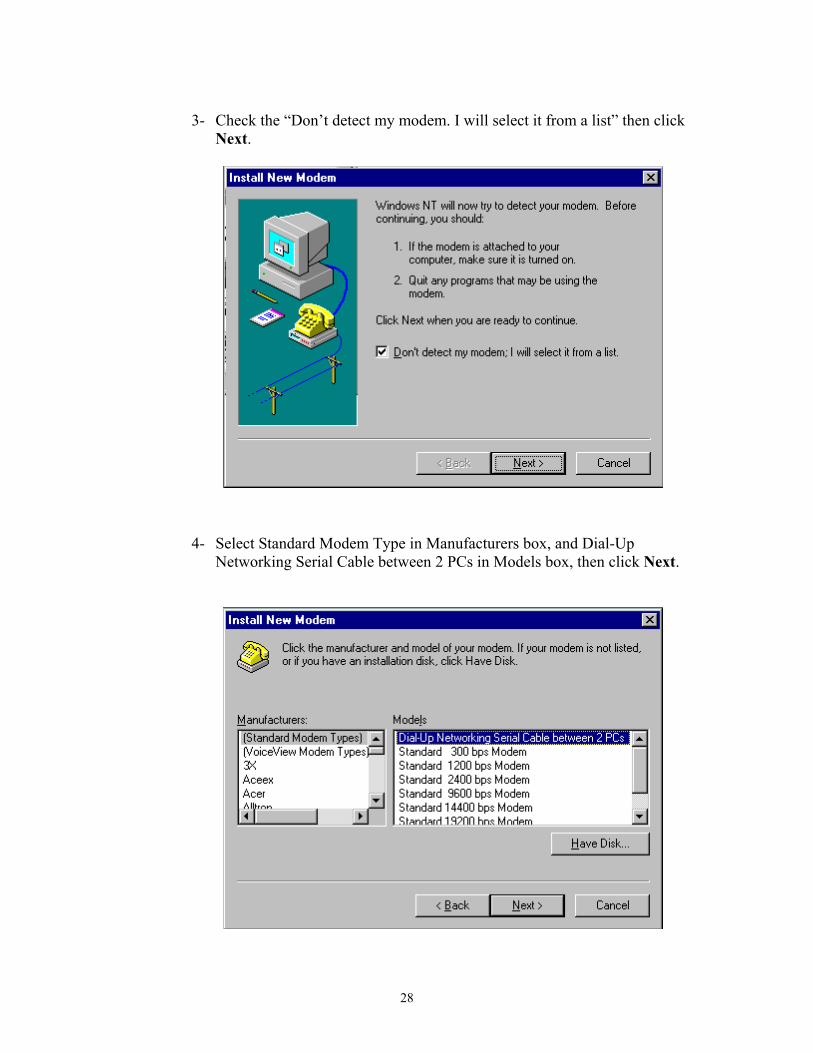
3- Check the “Don’t detect my modem. I will select it from a list” then click
Next.
4- Select Standard Modem Type in Manufacturers box, and Dial-Up Networking Serial Cable between 2 PCs in Models box, then click Next.
28
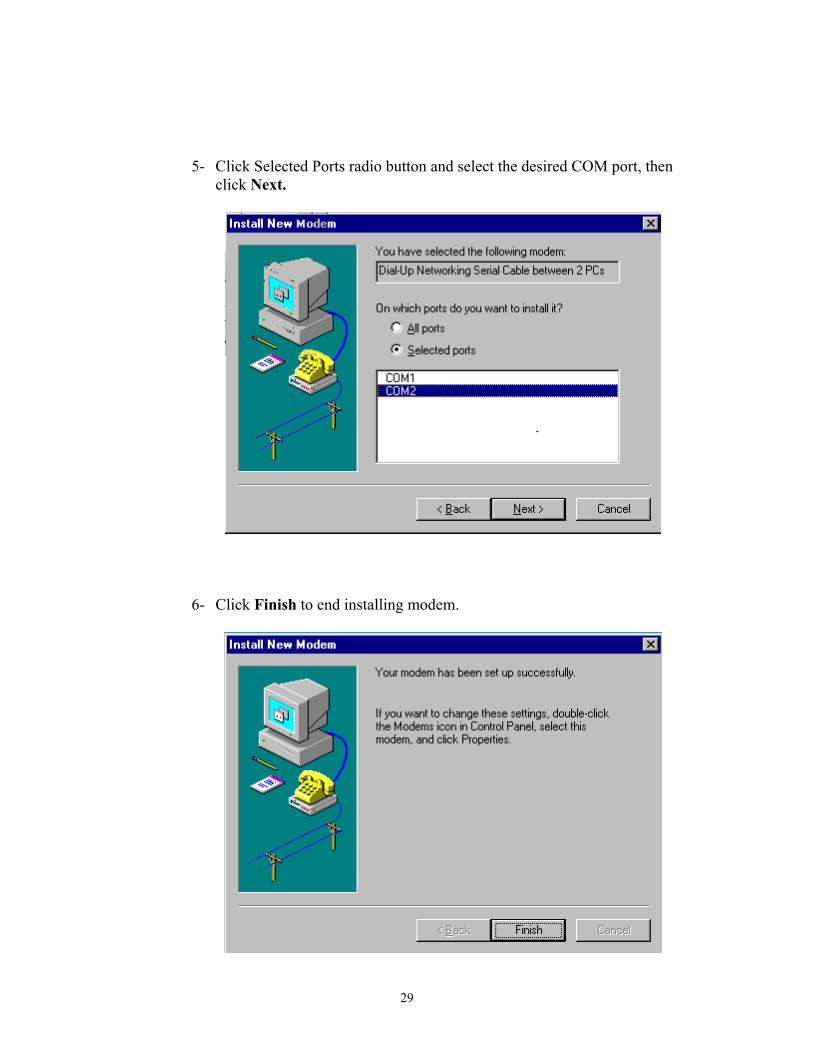
5- Click Selected Ports radio button and select the desired COM port, then click Next.
6- Click Finish to end installing modem.
29
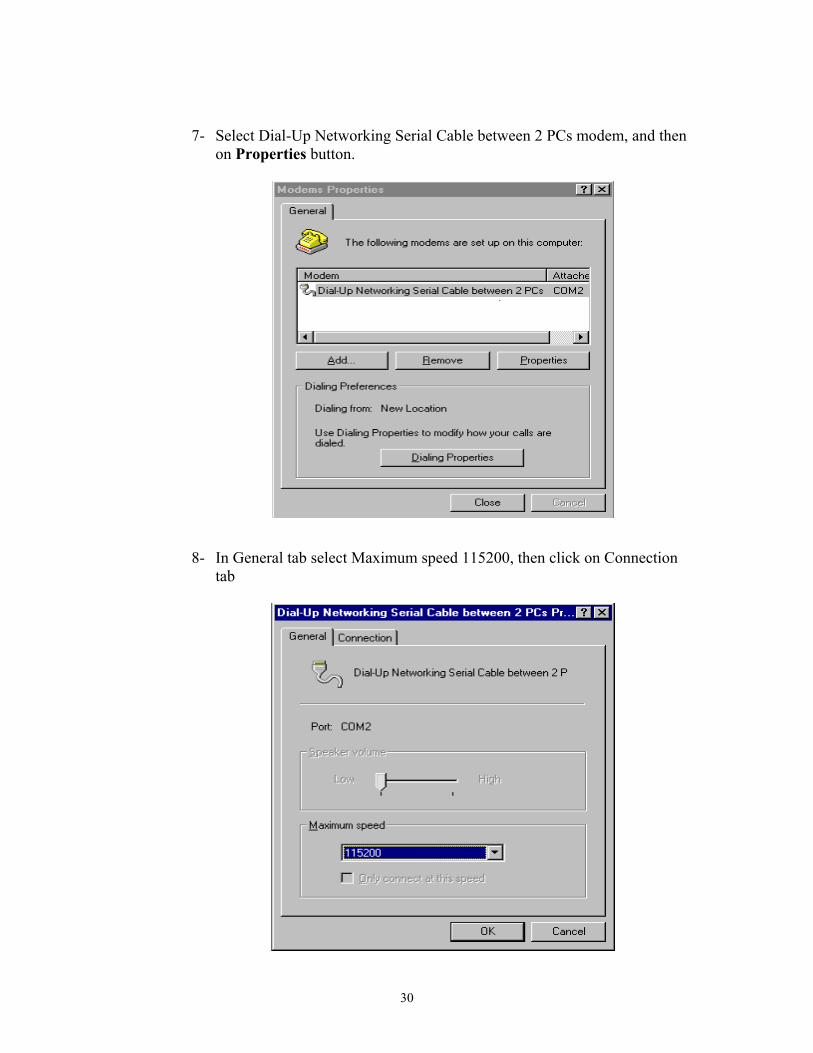
7- Select Dial-Up Networking Serial Cable between 2 PCs modem, and then on Properties button.
8- In General tab select Maximum speed 115200, then click on Connection tab
30
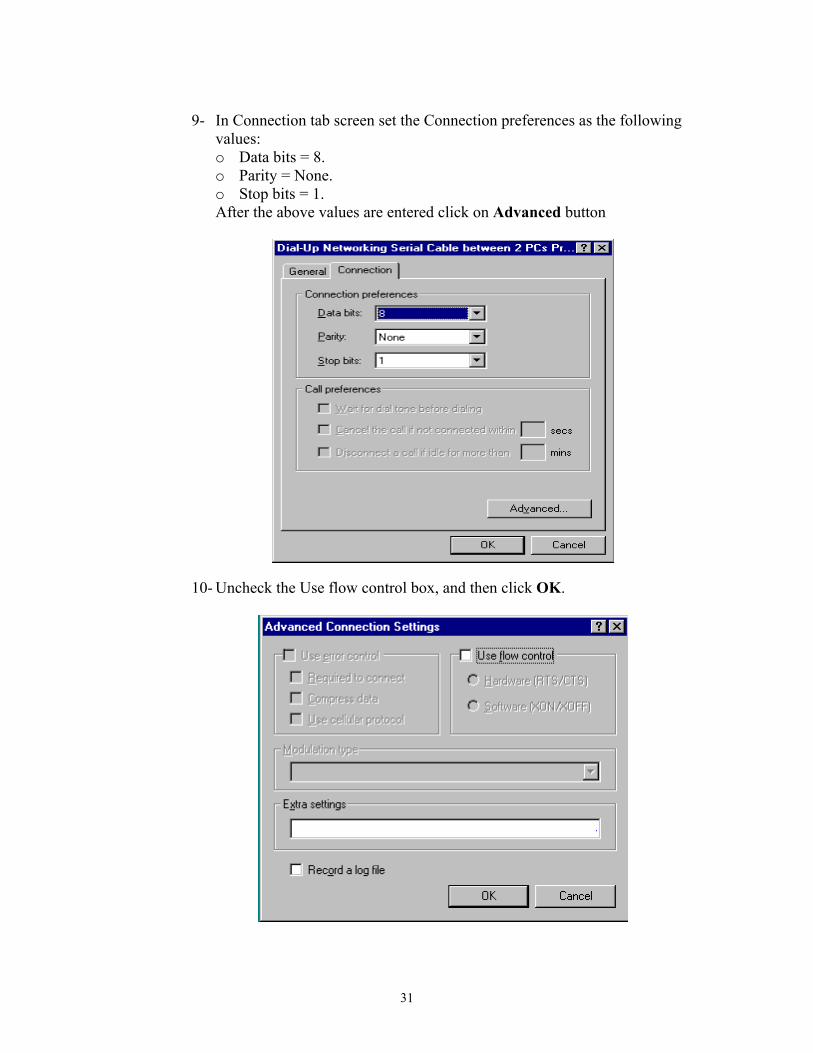
9- In Connection tab screen set the Connection preferences as the following
values: o Data bits = 8. o Parity = None. o Stop bits = 1.
After the above values are entered click on Advanced button
10- Uncheck the Use flow control box, and then click OK.
31
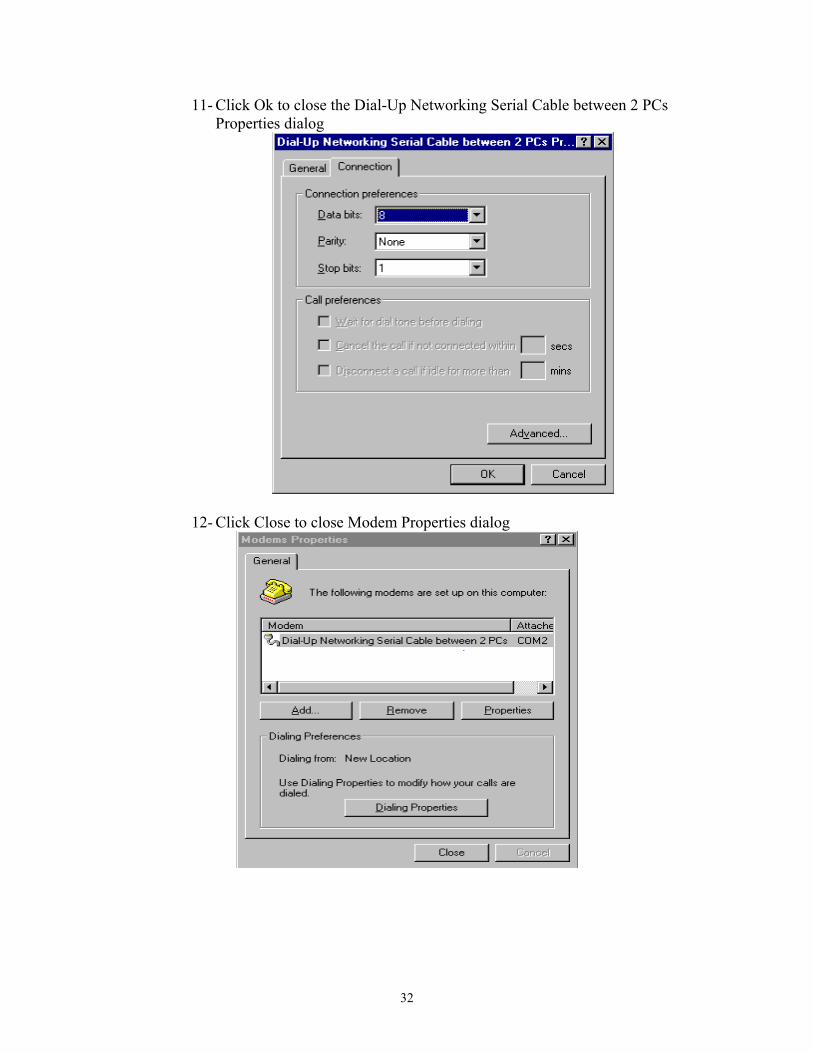
11- Click Ok to close the Dial-Up Networking Serial Cable between 2 PCs Properties dialog
12- Click Close to close Modem Properties dialog
32
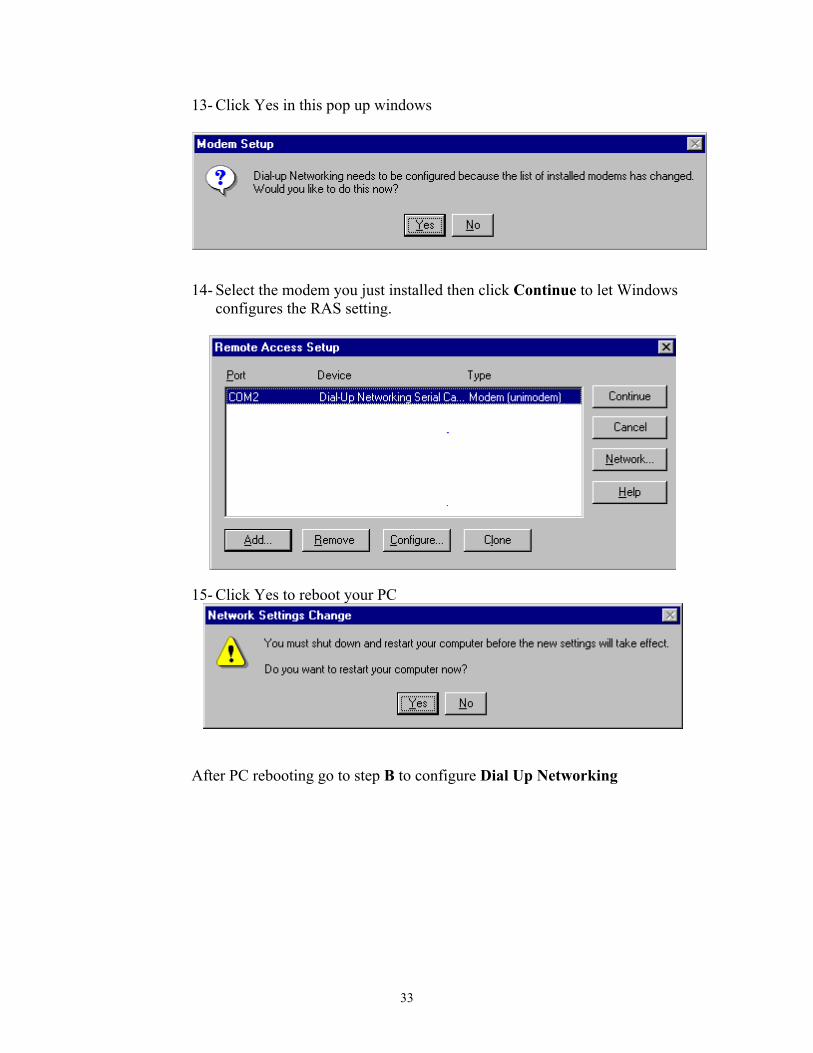
13- Click Yes in this pop up windows
14- Select the modem you just installed then click Continue to let Windows configures the RAS setting.
15- Click Yes to reboot your PC
After PC rebooting go to step B to configure Dial Up Networking
33
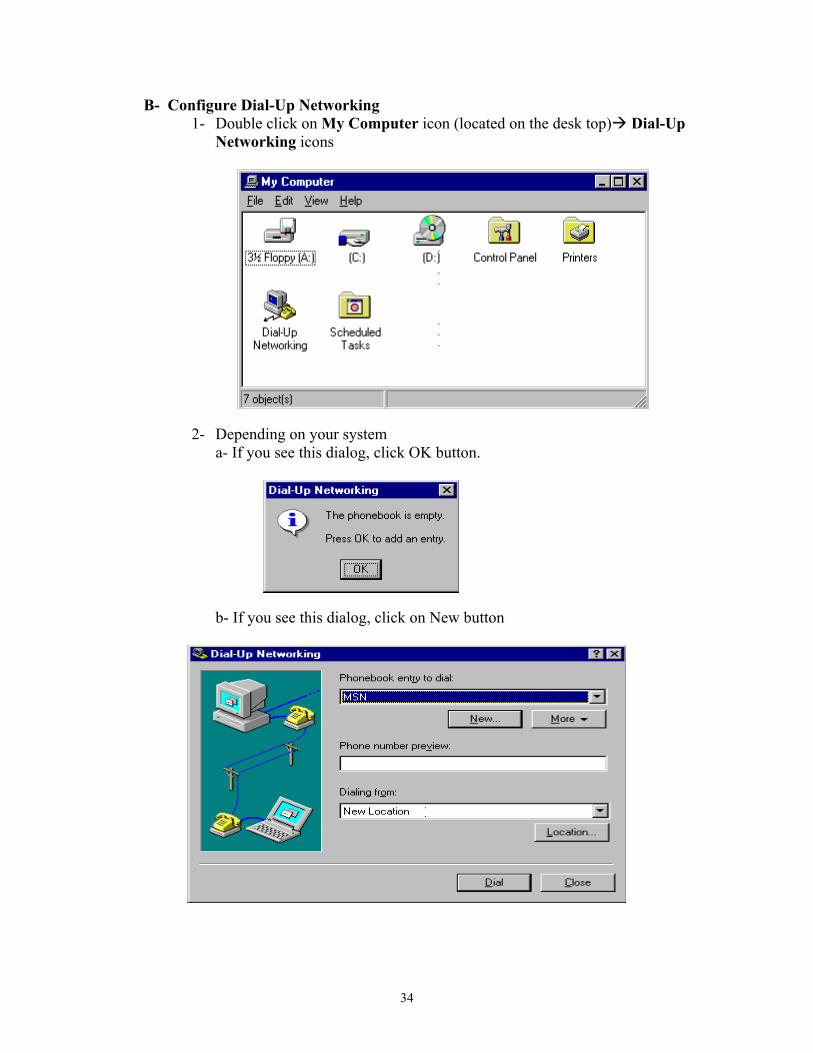
B- Configure Dial-Up Networking 1- Double click on My Computer icon (located on the desk top) Dial-Up
Networking icons
2- Depending on your system a- If you see this dialog, click OK button.
b- If you see this dialog, click on New button
34
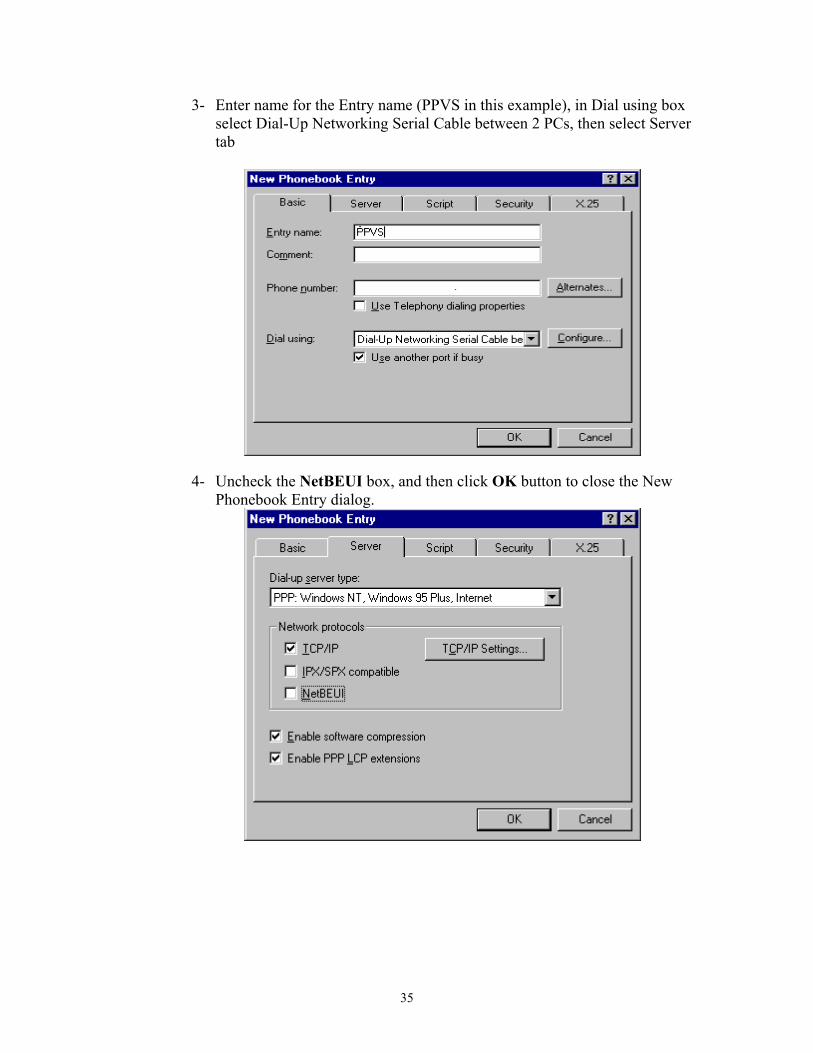
3- Enter name for the Entry name (PPVS in this example), in Dial using box select Dial-Up Networking Serial Cable between 2 PCs, then select Server tab
4- Uncheck the NetBEUI box, and then click OK button to close the New Phonebook Entry dialog.
35
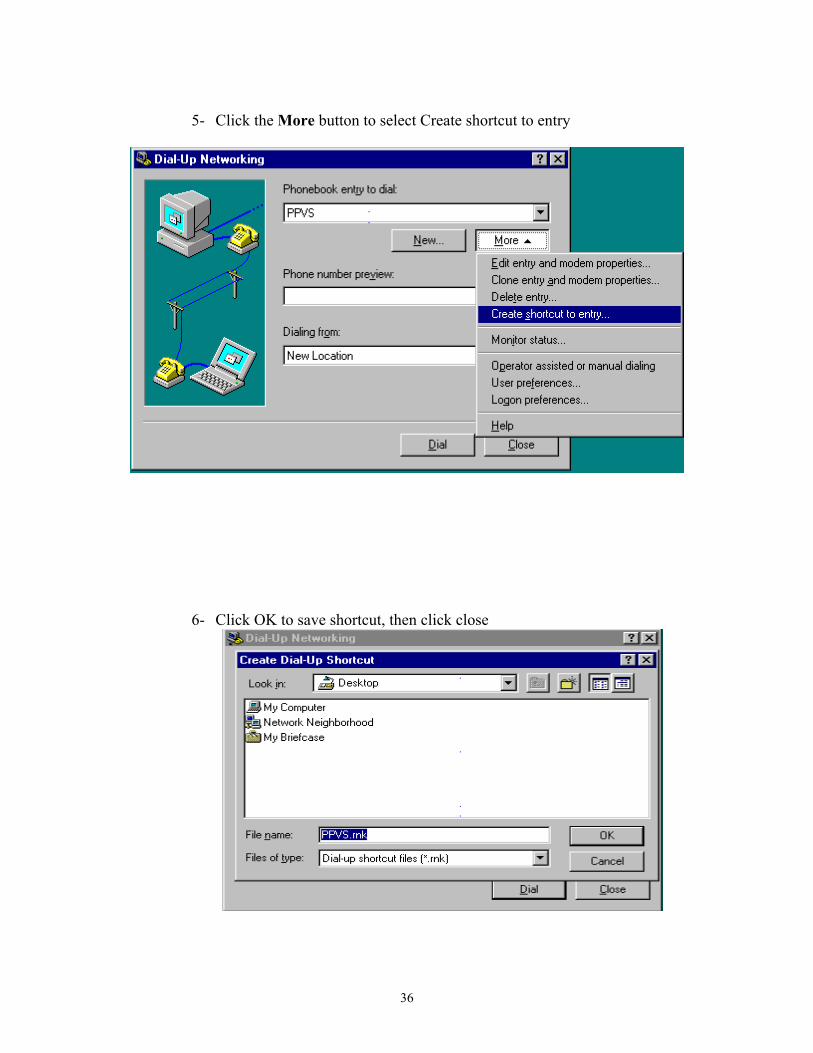
5- Click the More button to select Create shortcut to entry
6- Click OK to save shortcut, then click close
36

Note: The PC is now configured for Dial-Up-Networking. Click on the link below to configure PC software to use the serial port
Go to Configure PC software (GUI) to use serial port (DB9) section
37
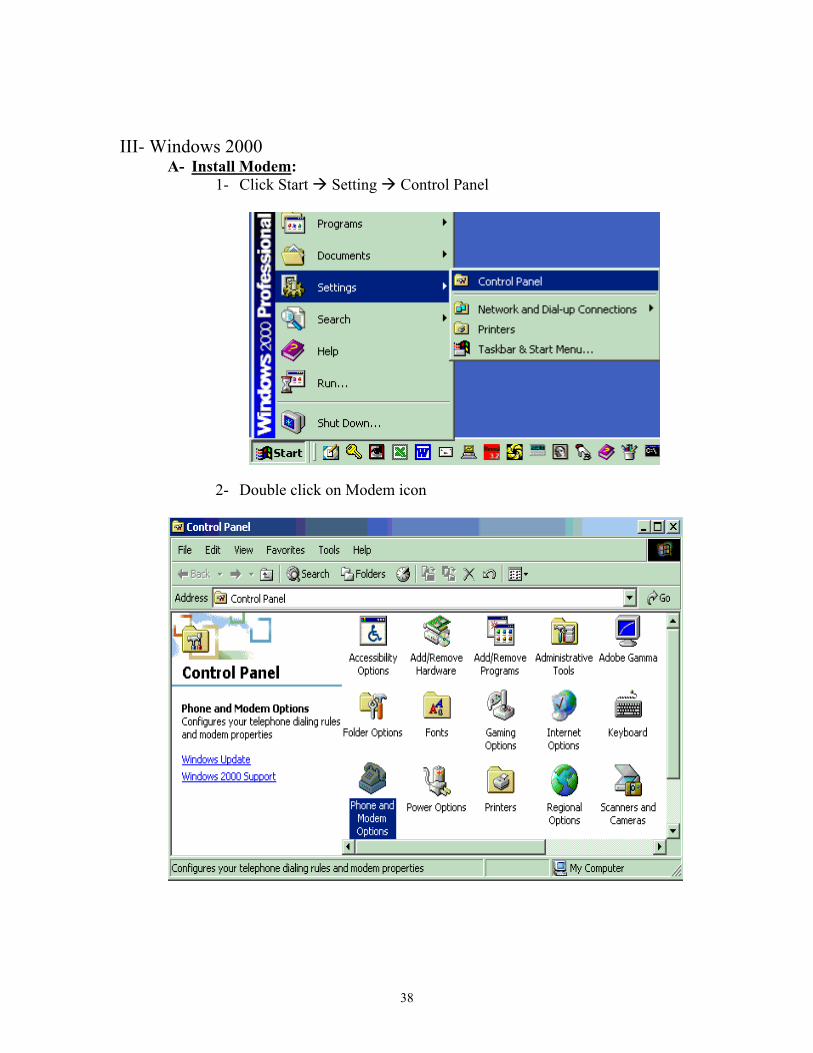
III- Windows 2000 A- Install Modem:
1- Click Start Setting Control Panel
2- Double click on Modem icon
38
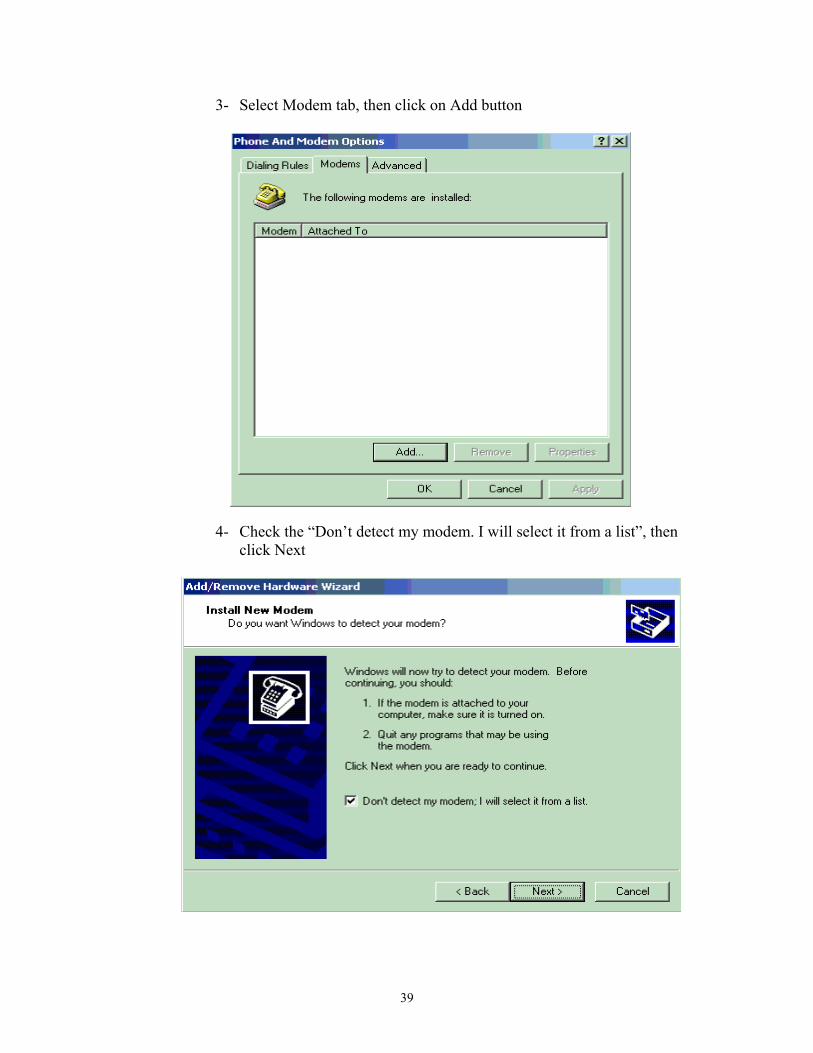
3- Select Modem tab, then click on Add button
4- Check the “Don’t detect my modem. I will select it from a list”, then click Next
39
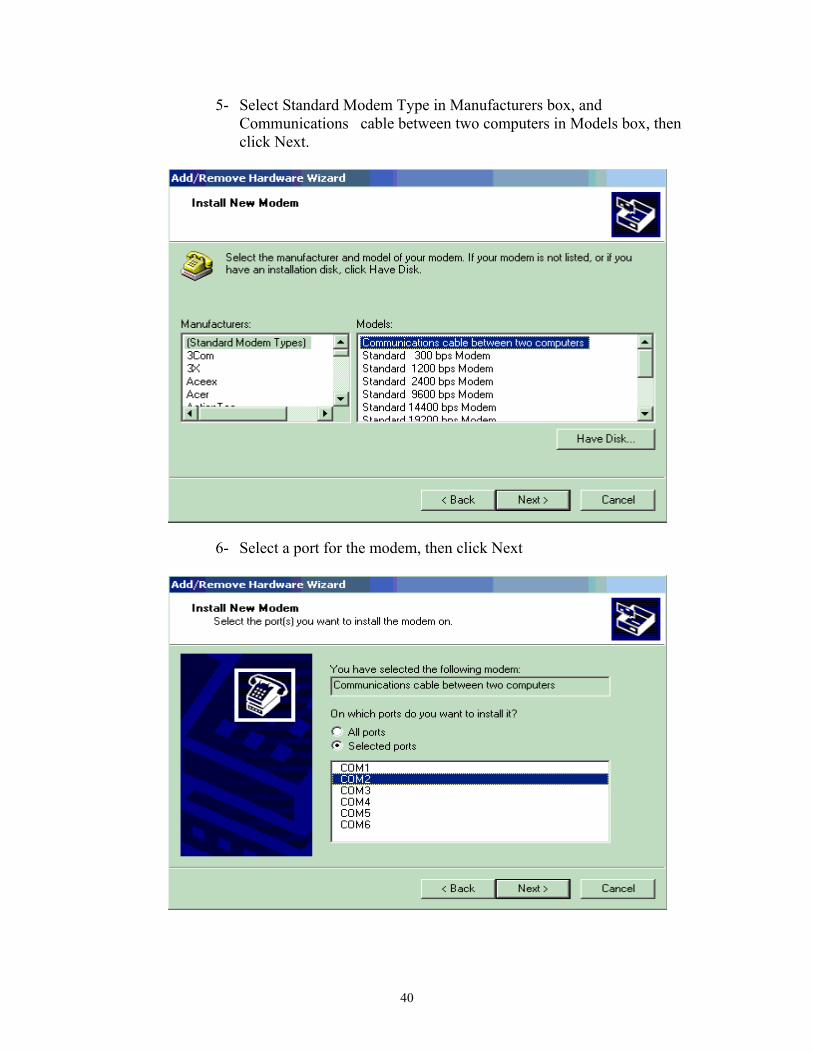
5- Select Standard Modem Type in Manufacturers box, and Communications cable between two computers in Models box, then click Next.
6- Select a port for the modem, then click Next
40
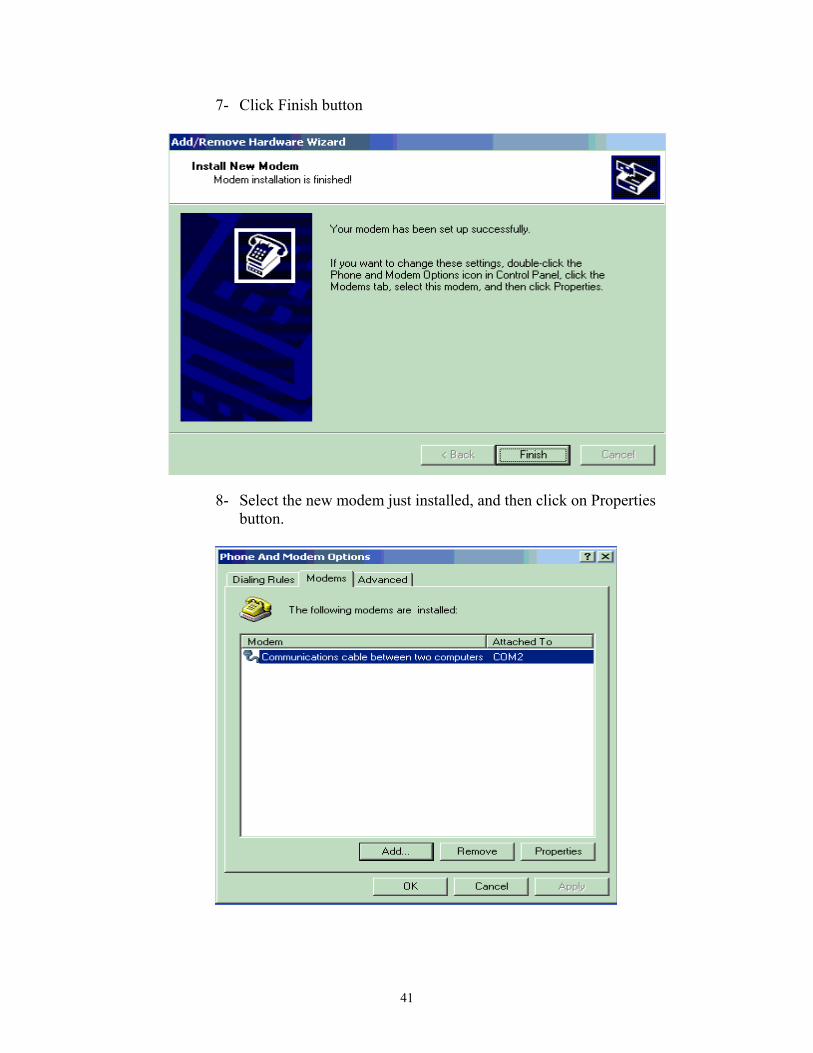
7- Click Finish button
8- Select the new modem just installed, and then click on Properties
button.
41
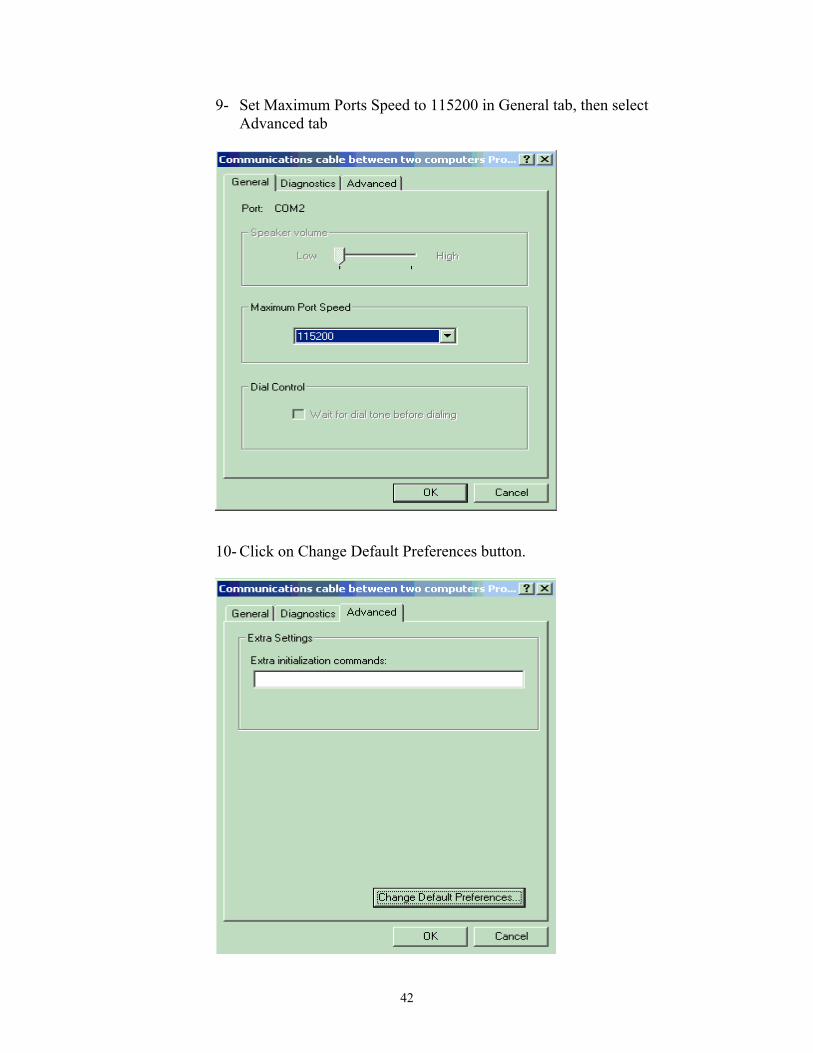
9- Set Maximum Ports Speed to 115200 in General tab, then select Advanced tab
10- Click on Change Default Preferences button.
42
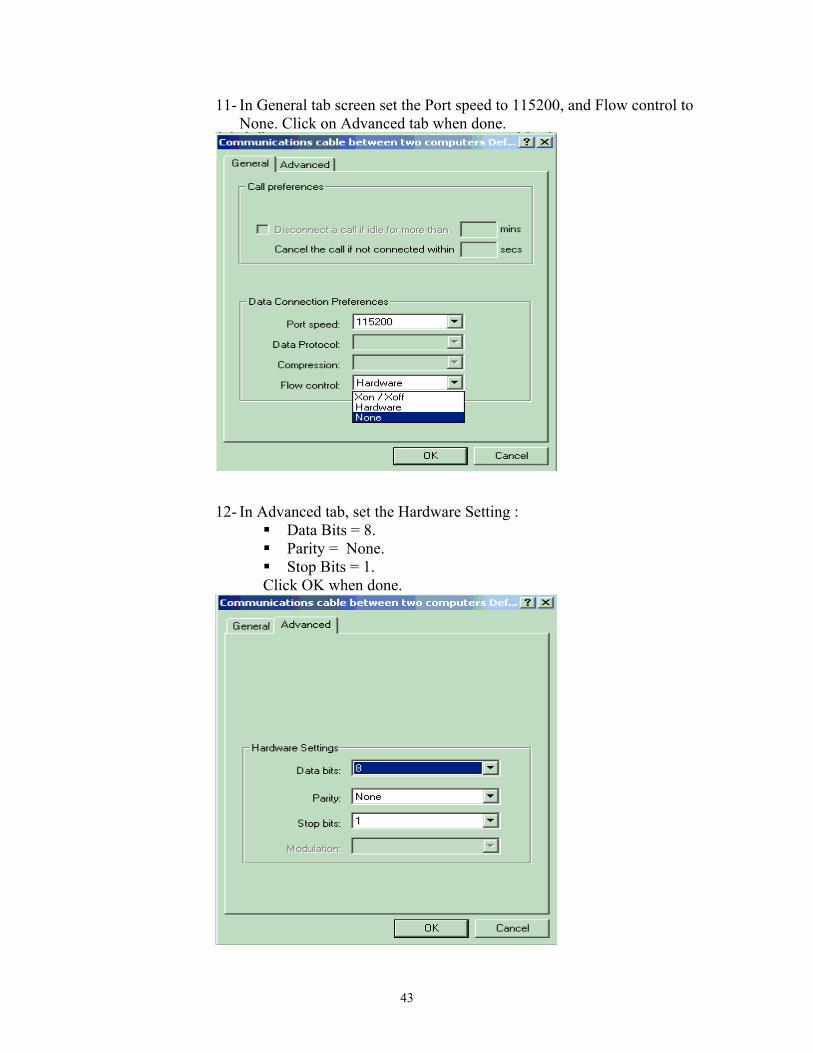
11- In General tab screen set the Port speed to 115200, and Flow control to None. Click on Advanced tab when done.
12- In Advanced tab, set the Hardware Setting :
Data Bits = 8. Parity = None. Stop Bits = 1.
Click OK when done.
43
13- Click OK again, and then click Close to end installing the modem.
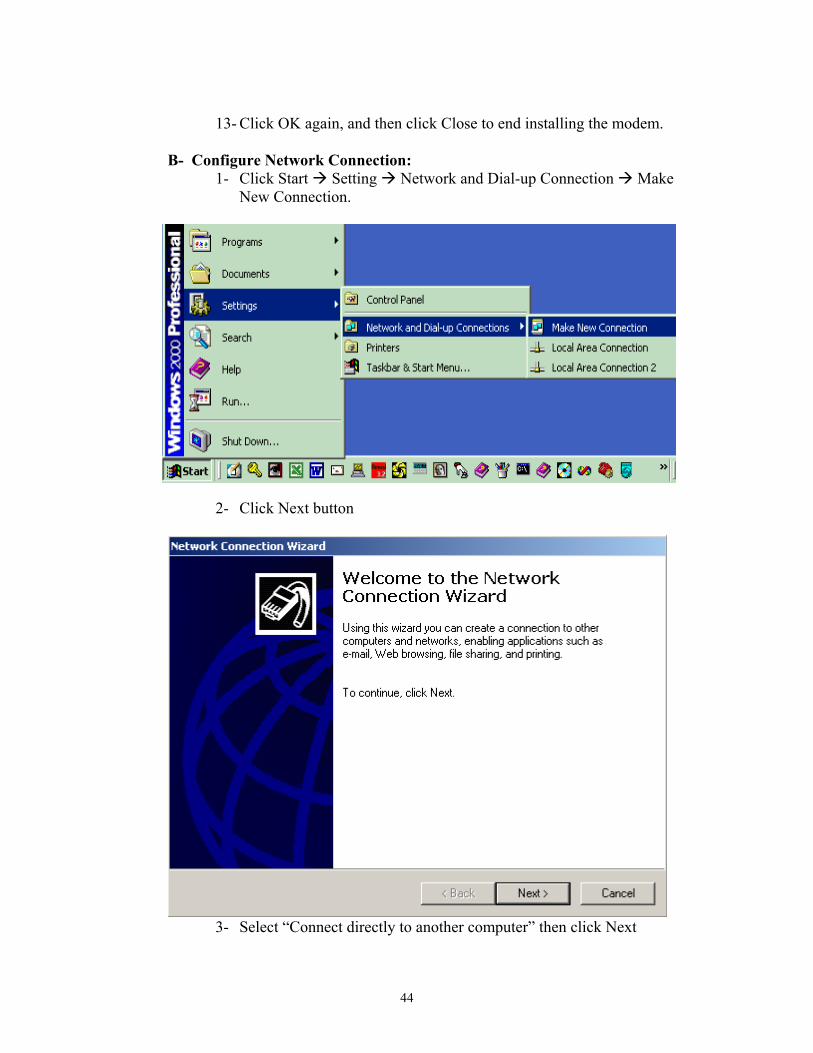
B- Configure Network Connection: 1- Click Start Setting Network and Dial-up Connection Make
New Connection.
2- Click Next button
3- Select “Connect directly to another computer” then click Next
44
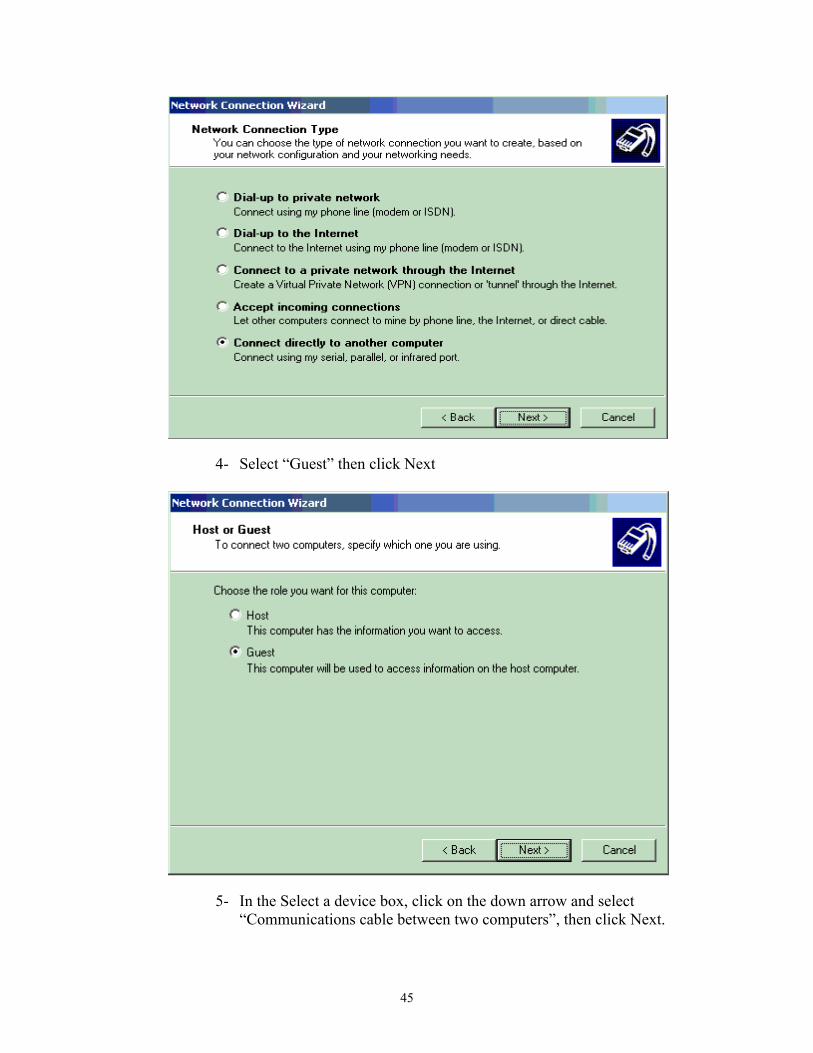
4- Select “Guest” then click Next
5- In the Select a device box, click on the down arrow and select
“Communications cable between two computers”, then click Next.
45
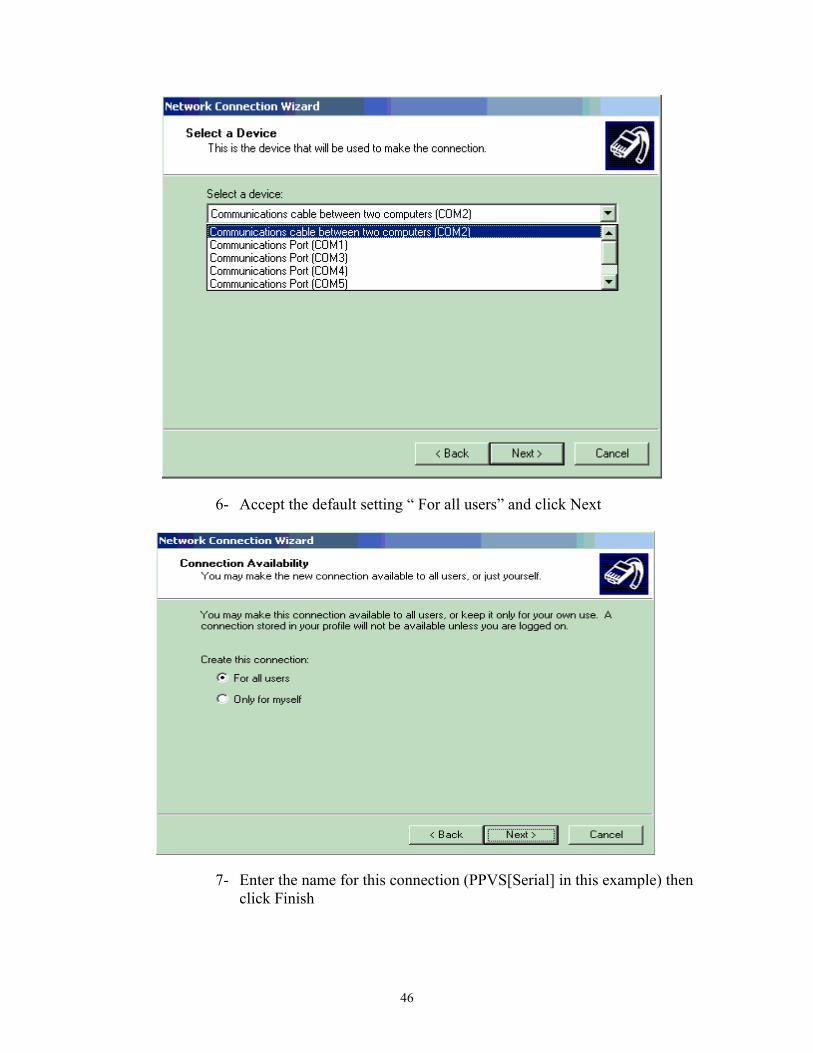
6- Accept the default setting “ For all users” and click Next
7- Enter the name for this connection (PPVS[Serial] in this example) then
click Finish
46

8- Click on Properties button
9- Click on Configure.. button
47
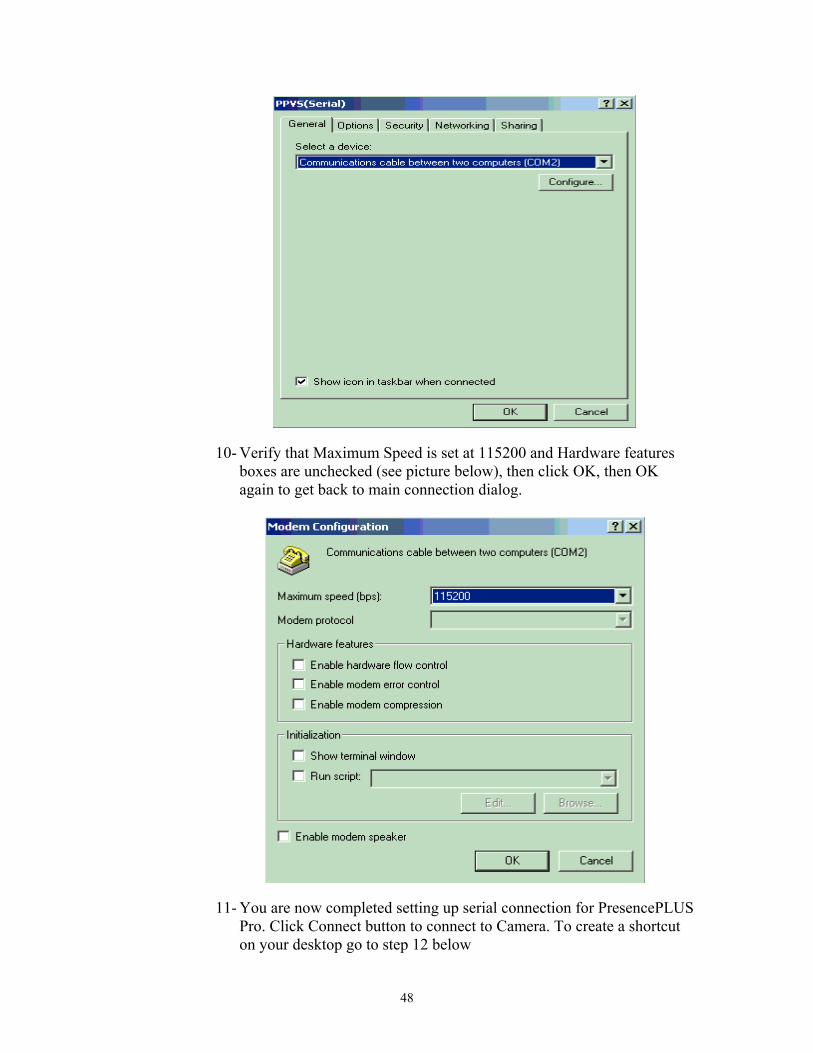
10- Verify that Maximum Speed is set at 115200 and Hardware features boxes are unchecked (see picture below), then click OK, then OK again to get back to main connection dialog.
11- You are now completed setting up serial connection for PresencePLUS Pro. Click Connect button to connect to Camera. To create a shortcut on your desktop go to step 12 below
48
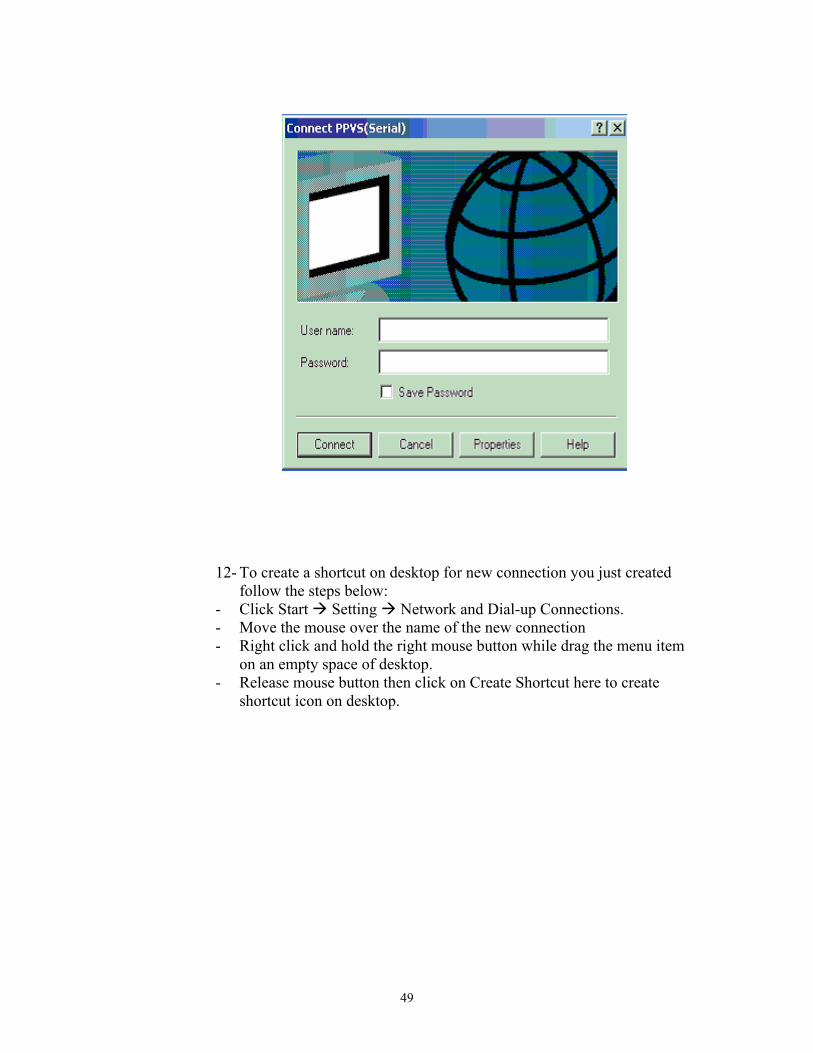
12- To create a shortcut on desktop for new connection you just created follow the steps below:
- Click Start Setting Network and Dial-up Connections. - Move the mouse over the name of the new connection - Right click and hold the right mouse button while drag the menu item
on an empty space of desktop. - Release mouse button then click on Create Shortcut here to create
shortcut icon on desktop.
49
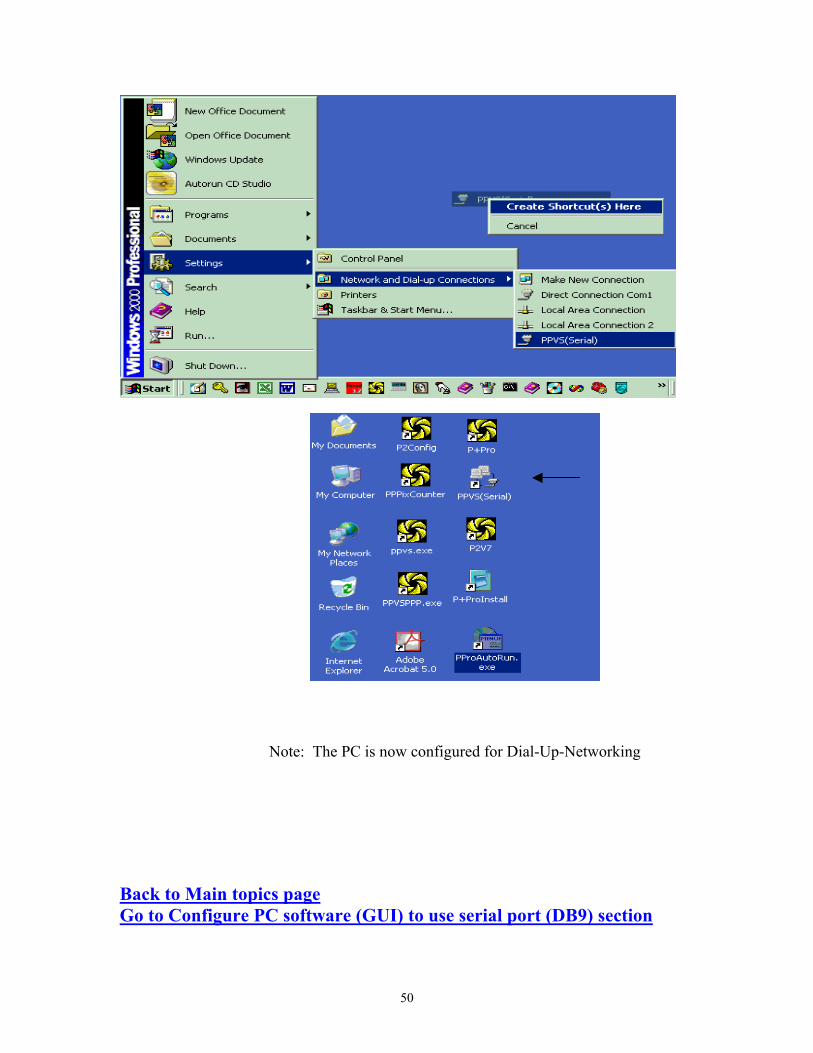
Note: The PC is now configured for Dial-Up-Networking
Back to Main topics page Go to Configure PC software (GUI) to use serial port (DB9) section
50
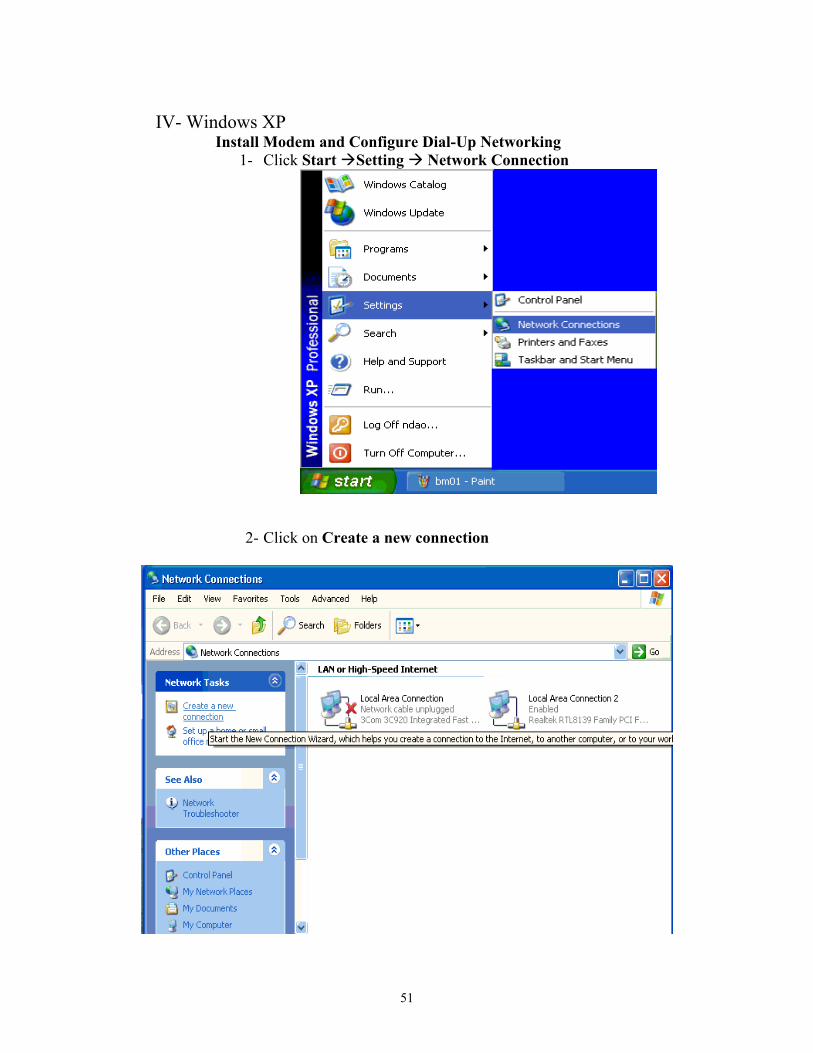
IV- Windows XP
Install Modem and Configure Dial-Up Networking 1- Click Start Setting Network Connection
2- Click on Create a new connection
51
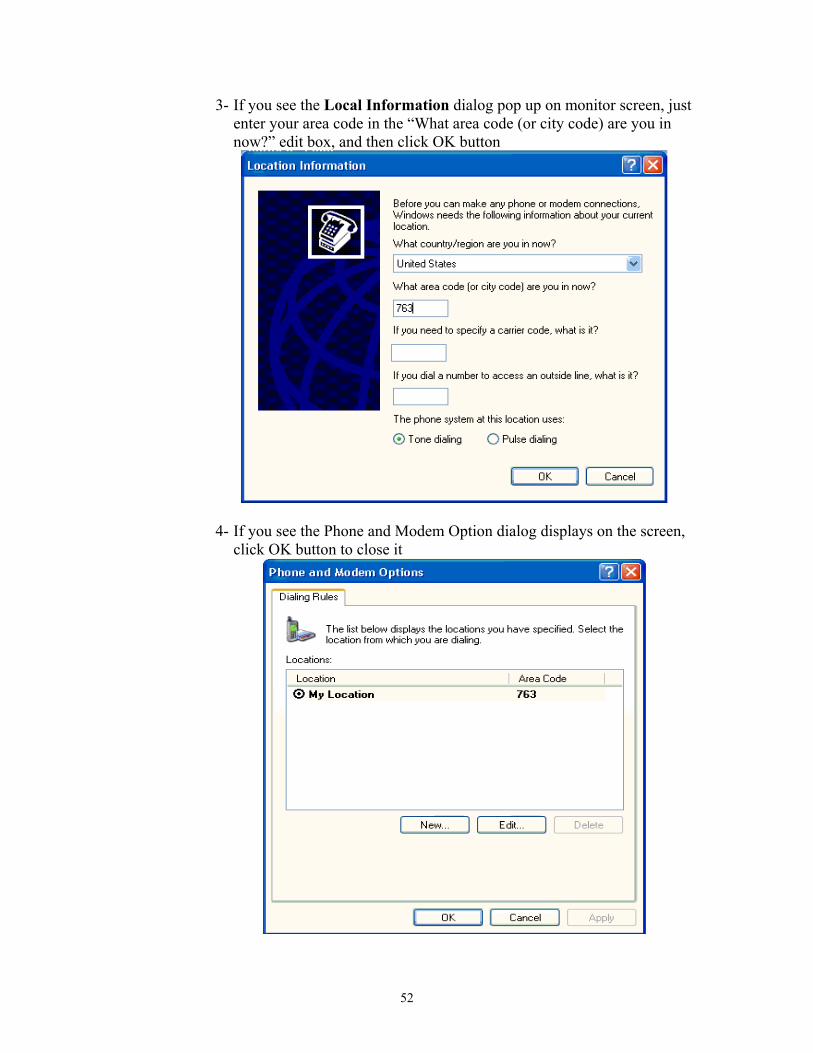
3- If you see the Local Information dialog pop up on monitor screen, just enter your area code in the “What area code (or city code) are you in now?” edit box, and then click OK button
4- If you see the Phone and Modem Option dialog displays on the screen, click OK button to close it
52
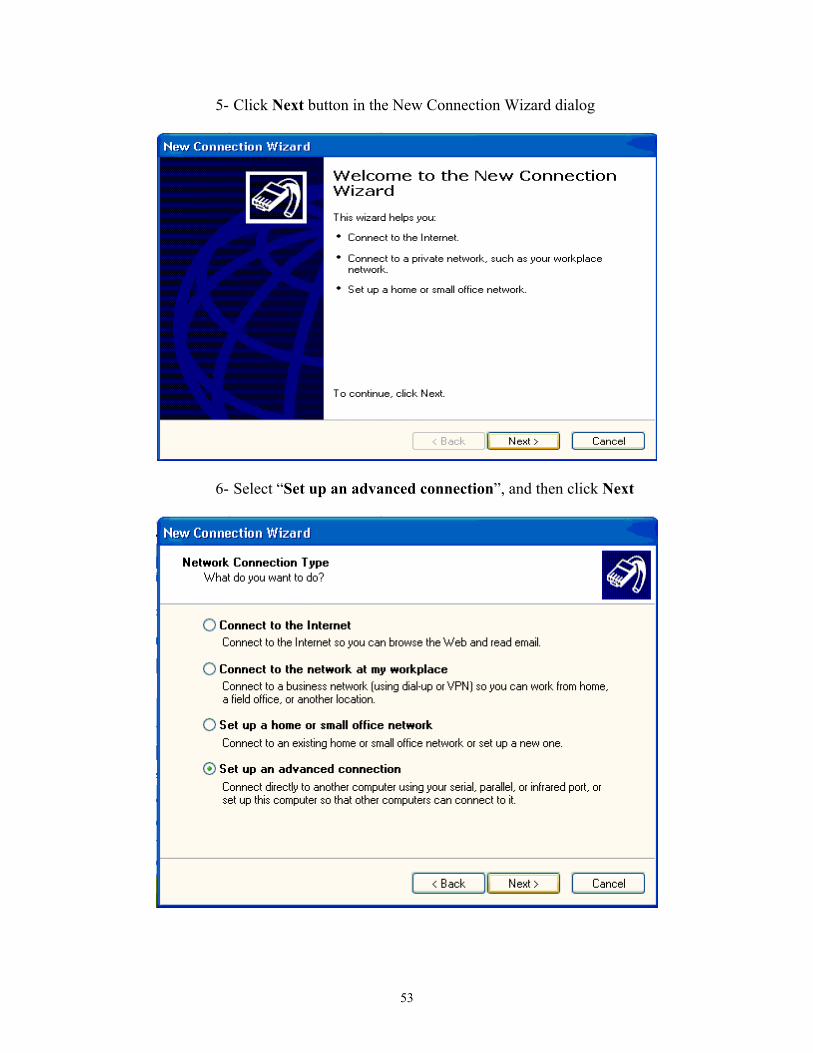
5- Click Next button in the New Connection Wizard dialog
6- Select “Set up an advanced connection”, and then click Next
53
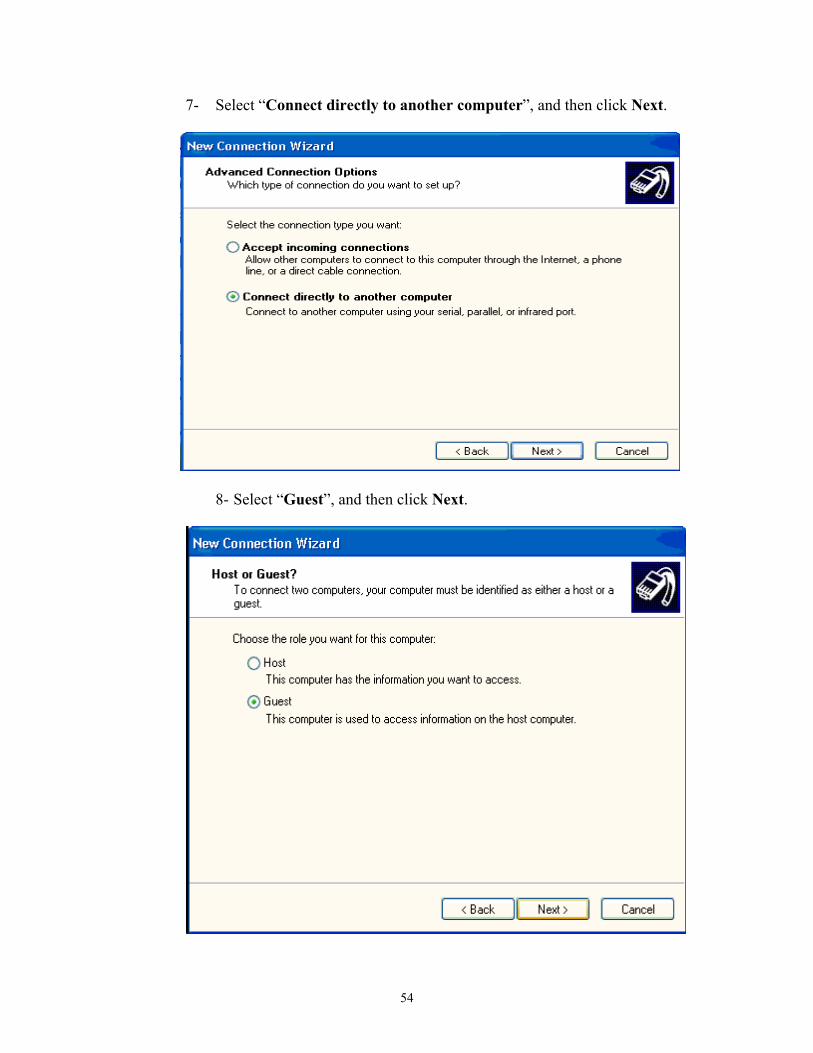
7- Select “Connect directly to another computer”, and then click Next.
8- Select “Guest”, and then click Next.
54

9- Type in the name in Computer Name field (PPVS (Serial) in this example), and then click Next
10- Select a communication port for this connection, and then click Next
55
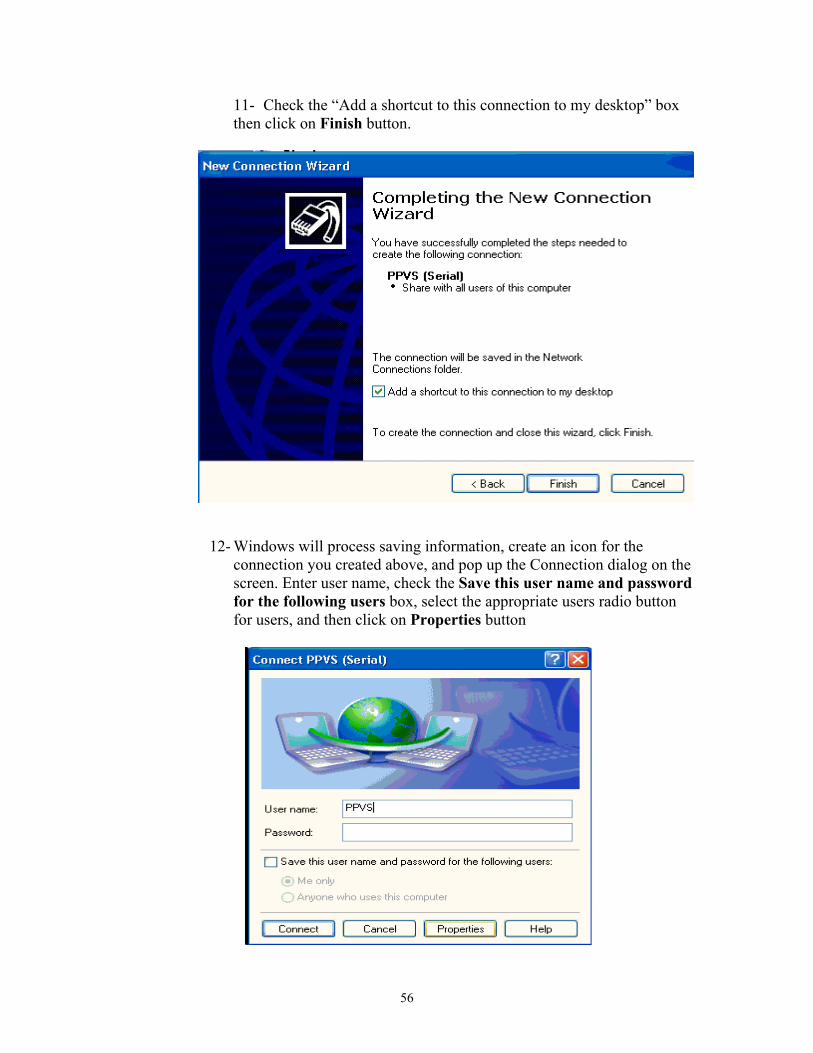
11- Check the “Add a shortcut to this connection to my desktop” box then click on Finish button.
12- Windows will process saving information, create an icon for the connection you created above, and pop up the Connection dialog on the screen. Enter user name, check the Save this user name and password for the following users box, select the appropriate users radio button for users, and then click on Properties button
56
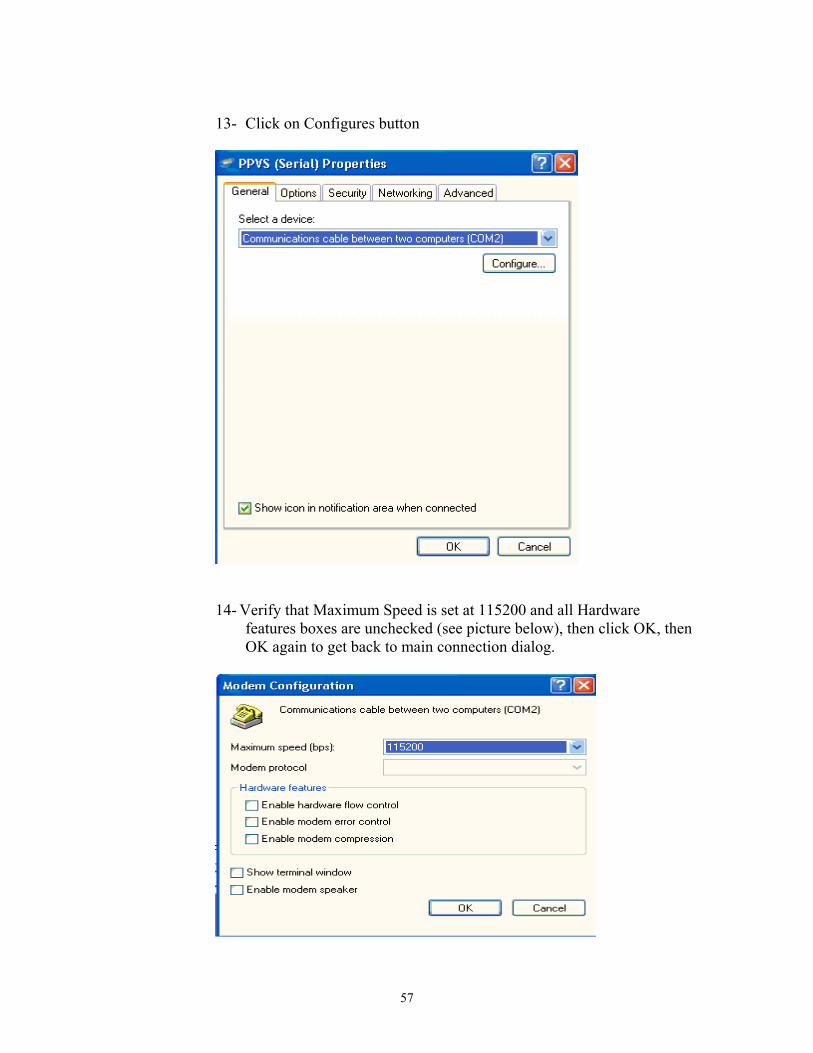
13- Click on Configures button
14- Verify that Maximum Speed is set at 115200 and all Hardware
features boxes are unchecked (see picture below), then click OK, then OK again to get back to main connection dialog.
57
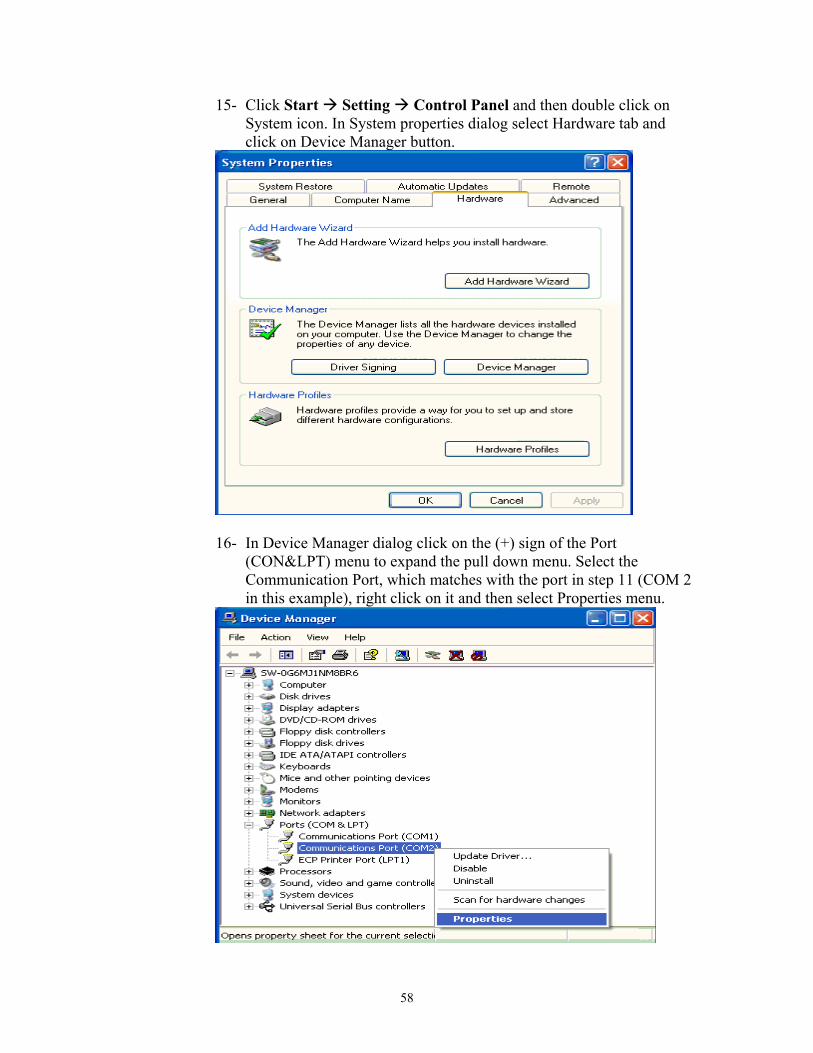
15- Click Start Setting Control Panel and then double click on System icon. In System properties dialog select Hardware tab and click on Device Manager button.
16- In Device Manager dialog click on the (+) sign of the Port
(CON&LPT) menu to expand the pull down menu. Select the Communication Port, which matches with the port in step 11 (COM 2 in this example), right click on it and then select Properties menu.
58
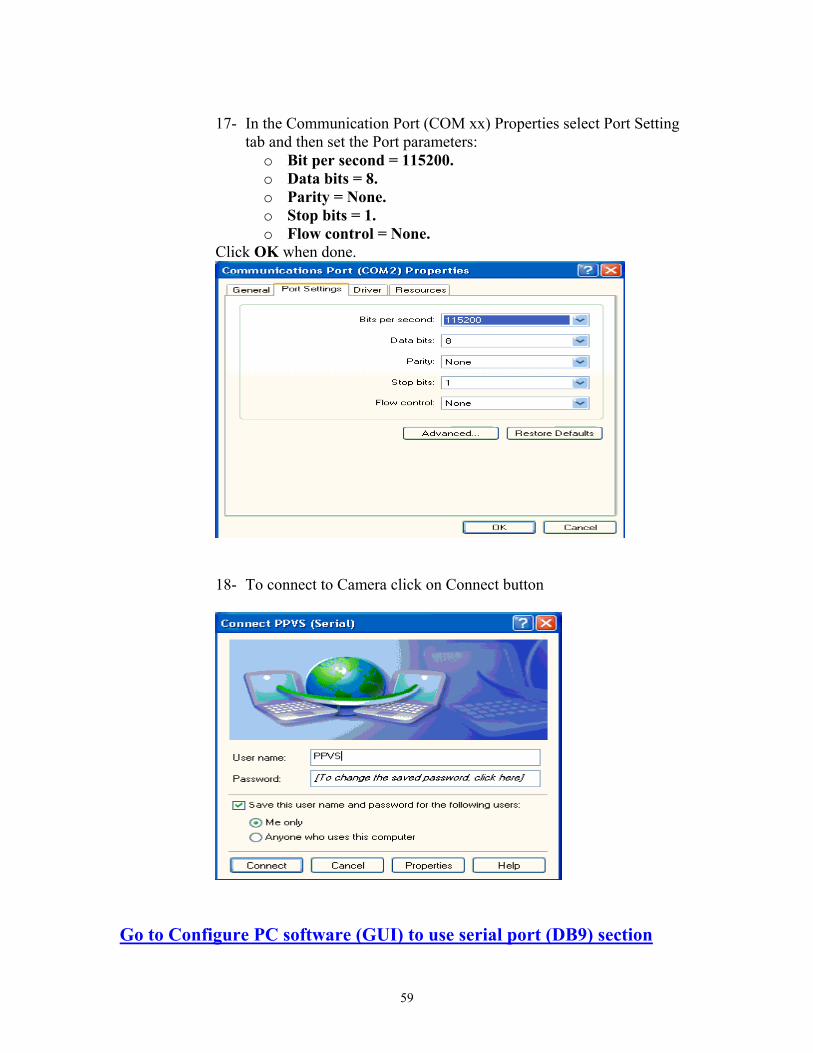
17- In the Communication Port (COM xx) Properties select Port Setting
tab and then set the Port parameters: o Bit per second = 115200. o Data bits = 8. o Parity = None. o Stop bits = 1. o Flow control = None.
Click OK when done.
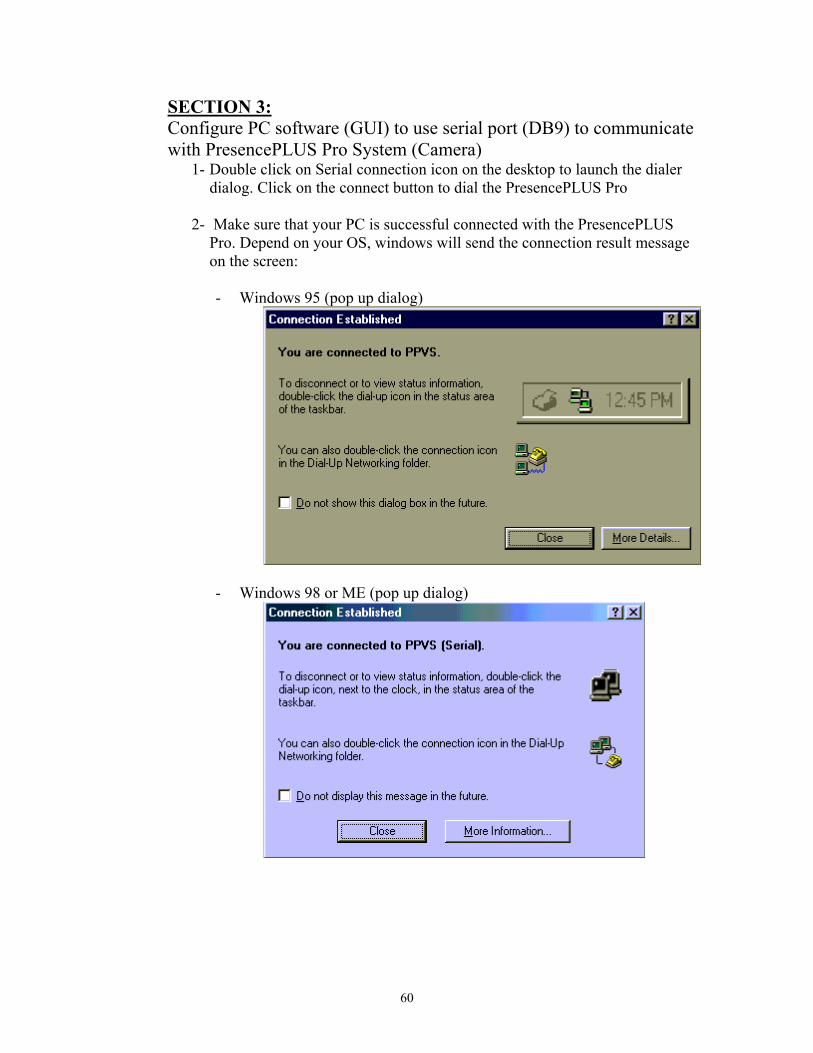
18- To connect to Camera click on Connect button
Go to Configure PC software (GUI) to use serial port (DB9) section
59
SECTION 3: Configure PC software (GUI) to use serial port (DB9) to communicate with PresencePLUS Pro System (Camera)
1- Double click on Serial connection icon on the desktop to launch the dialer dialog. Click on the connect button to dial the PresencePLUS Pro
2- Make sure that your PC is successful connected with the PresencePLUS
Pro. Depend on your OS, windows will send the connection result message on the screen:
- Windows 95 (pop up dialog)
- Windows 98 or ME (pop up dialog)
60
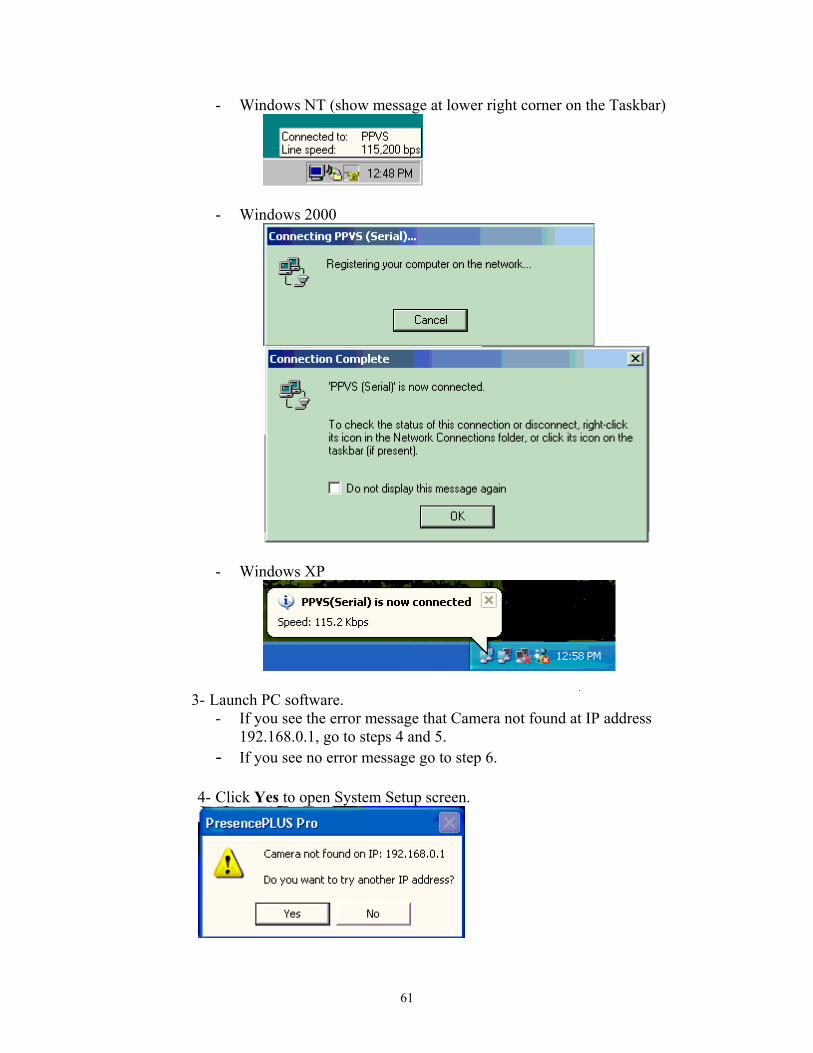
- Windows NT (show message at lower right corner on the Taskbar)
- Windows 2000
- Windows XP
3- Launch PC software. - If you see the error message that Camera not found at IP address
192.168.0.1, go to steps 4 and 5. - If you see no error message go to step 6.
4- Click Yes to open System Setup screen.
61
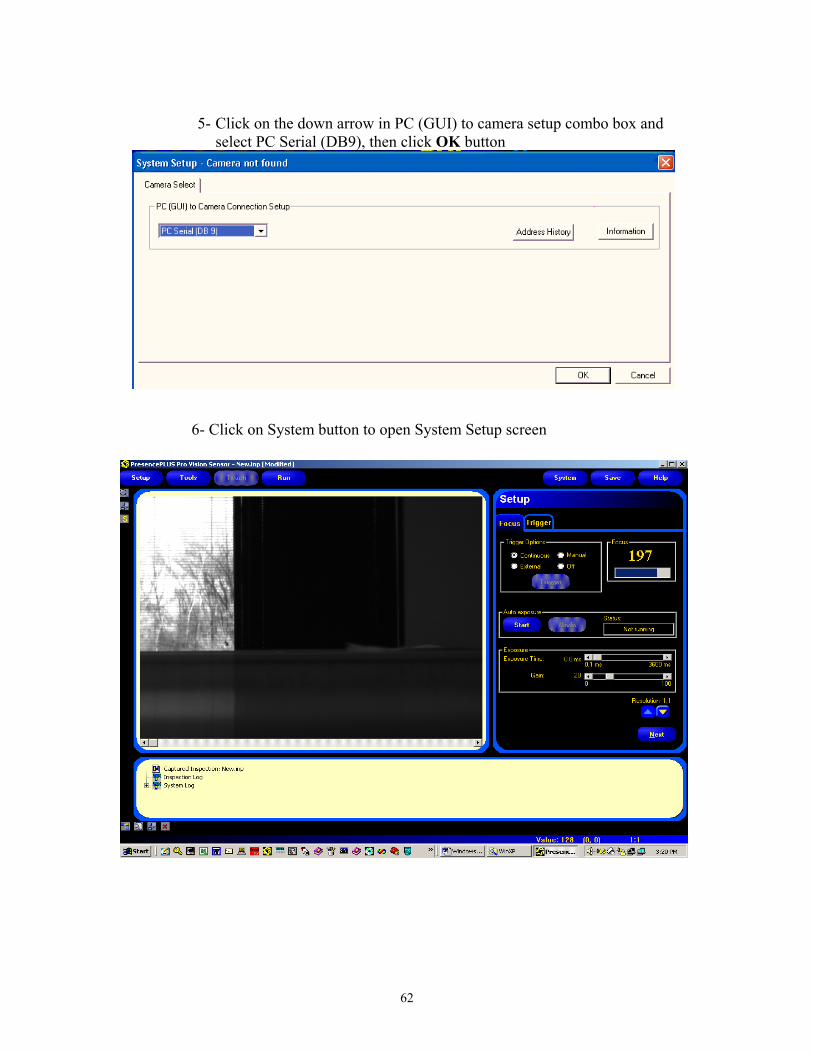
5- Click on the down arrow in PC (GUI) to camera setup combo box and
select PC Serial (DB9), then click OK button
6- Click on System button to open System Setup screen
62
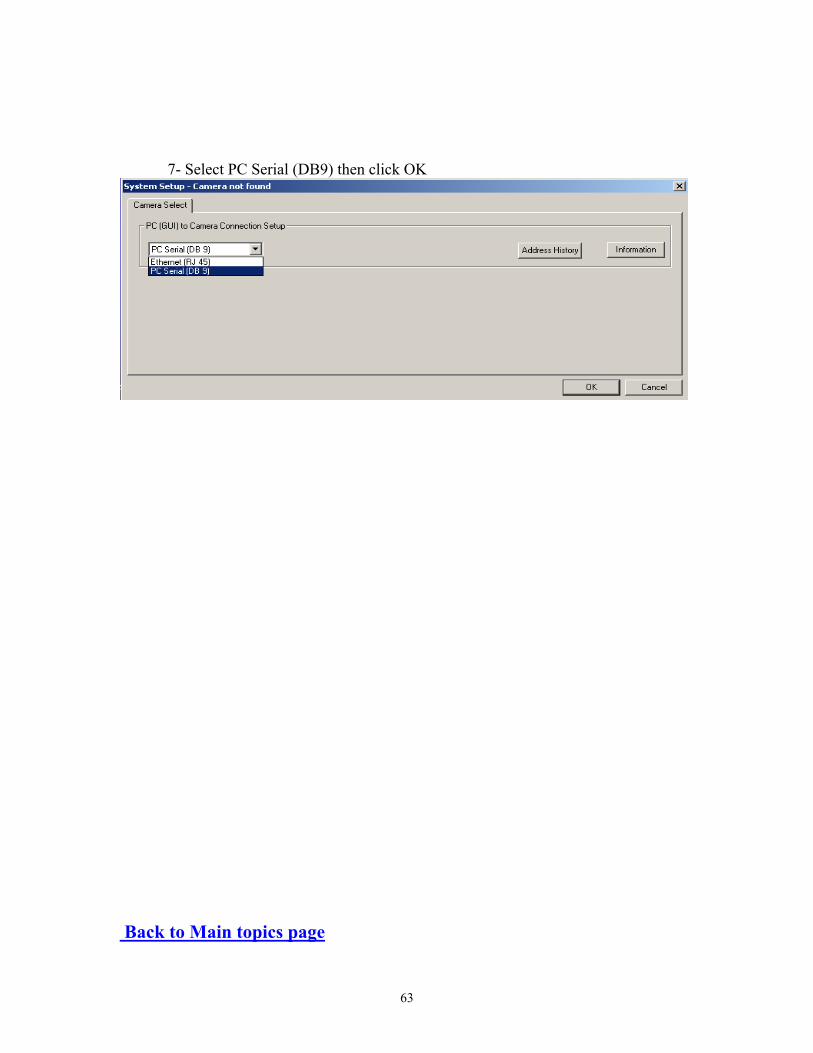
7- Select PC Serial (DB9) then click OK
Back to Main topics page
63

64

65