F E A T U R FFEEAATTUURRIIINNNGGG TT HHHEE I HHIISSSTTOOORRRIIICCC … · 2002-02-08 · F E A T U...
49
A A T T E E A A C C H H I I N N G G U U N NI I T T O O N N E E L L E E C C T T R R I I C C I I T T Y Y F F E E A A T T U U R R I I N N G G T T H H E E H H I I S S T T O O R R I I C C F F O O L L S S O O M M P P O O W WE E R R H H O O U U S S E E C C C A A A L L L I I I F F F O O O R R R N N N I I I A A A S S S C C C I I I E E E N N N C C C E E E S S S T T T A A A N N N D D D A A A R R R D D D S S S C C C O O O M M M P P P A A A T T T I I I B B B L L L E E E F F F O O O R R R G G G R R R A A A D D D E E E 4 4 4 written by Steve Gregorich in cooperation with California State Parks and The Gold Fields State Park District This instructional package is composed of two files: this electricity unit and a teachers guide. Teachers who plan to use the unit should download both files.
Transcript of F E A T U R FFEEAATTUURRIIINNNGGG TT HHHEE I HHIISSSTTOOORRRIIICCC … · 2002-02-08 · F E A T U...

AAA TTTEEEAAACCCHHHIIINNNGGG UUUNNNIIITTT OOONNN
EEELLLEEECCCTTTRRRIIICCCIIITTTYYY FFFEEEAAATTTUUURRRIIINNNGGGTTTHHHEEE HHHIIISSSTTTOOORRRIIICCC FFFOOOLLLSSSOOOMMM PPPOOOWWWEEERRR HHHOOOUUUSSSEEE CCCAAALLLIIIFFFOOORRRNNNIIIAAA SSSCCCIIIEEENNNCCCEEE SSSTTTAAANNNDDDAAARRRDDDSSS CCCOOOMMMPPPAAATTTIIIBBBLLLEEE FFFOOORRR GGGRRRAAADDDEEE 444
written bySteve Gregorich
in cooperation withCalifornia State Parks and
The Gold Fields State Park District
This instructional package is composed of two files: this electricity unit and a teacher�sguide. Teachers who plan to use the unit should download both files.

Electricity Unit: Featuring the Historic Folsom Powerhouse ii
CreditsSupport from the following persons in the development of these materials has been deeply appreciated:
California State Parks Consultation and OversightJacqueline Ball, District Supervisor, Gold Fields DistrictShana Avalos, District Interpretive Specialist, American River DistrictRodi Lee, State Park Interpreter I, American River District
Public School Teaching ConsultantFrances Ogata, Curriculum Lead Teacher for Mathematics and Science, Folsom Unified School District
Docents for the Folsom PowerhouseDonna ThomasStan Armstrong
Sacramento Utility District ConsultantJay Jensen, Docent for Historic Folsom Powerhouse
Electrical Engineering ConsultantsDon Richmond, Aehr Test SystemsMichelle Gregorich, Aspect Communications
Home FrontJanice Gregorich, Extraordinary Teacher and Master Materials Consultant
© 2002 by Steve Gregorich.All rights reserved with the following exception: the Gold Field District of the California State Parks maycopy, distribute, revise, or sell this document as part of their official interpretive activities.
Electricity Unit: Featuring the Historic Folsom Powerhouse iii
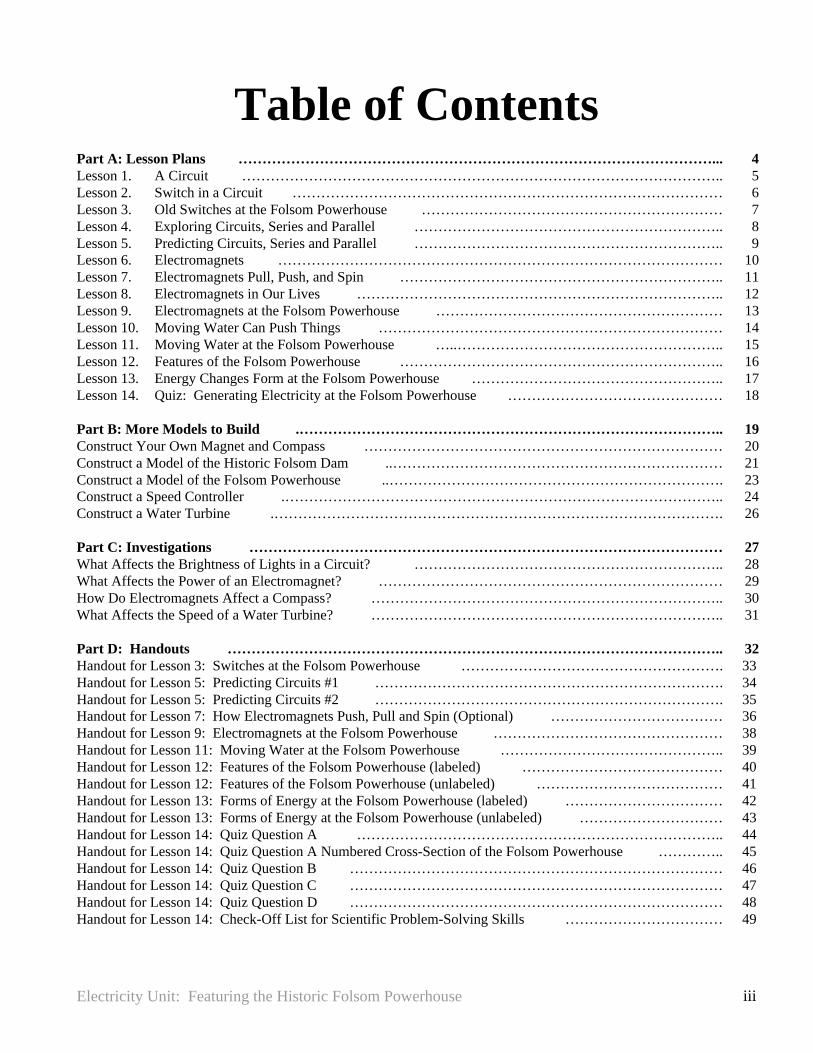
Table of ContentsPart A: Lesson Plans ………………………………………………………………………………………... 4Lesson 1. A Circuit ……………………………………………………………………………………….. 5Lesson 2. Switch in a Circuit ……………………………………………………………………………… 6Lesson 3. Old Switches at the Folsom Powerhouse ……………………………………………………… 7Lesson 4. Exploring Circuits, Series and Parallel ……………………………………………………….. 8Lesson 5. Predicting Circuits, Series and Parallel ……………………………………………………….. 9Lesson 6. Electromagnets ………………………………………………………………………………… 10Lesson 7. Electromagnets Pull, Push, and Spin ………………………………………………………….. 11Lesson 8. Electromagnets in Our Lives ………………………………………………………………….. 12Lesson 9. Electromagnets at the Folsom Powerhouse …………………………………………………… 13Lesson 10. Moving Water Can Push Things ……………………………………………………………… 14Lesson 11. Moving Water at the Folsom Powerhouse …..……………………………………………….. 15Lesson 12. Features of the Folsom Powerhouse ………………………………………………………….. 16Lesson 13. Energy Changes Form at the Folsom Powerhouse …………………………………………….. 17Lesson 14. Quiz: Generating Electricity at the Folsom Powerhouse ……………………………………… 18
Part B: More Models to Build .…………………………………………………………………………….. 19Construct Your Own Magnet and Compass ………………………………………………………………… 20Construct a Model of the Historic Folsom Dam ..…………………………………………………………… 21Construct a Model of the Folsom Powerhouse ..……………………………………………………………. 23Construct a Speed Controller .……………………………………………………………………………….. 24Construct a Water Turbine .…………………………………………………………………………………. 26
Part C: Investigations ……………………………………………………………………………………… 27What Affects the Brightness of Lights in a Circuit? ……………………………………………………….. 28What Affects the Power of an Electromagnet? ……………………………………………………………… 29How Do Electromagnets Affect a Compass? ……………………………………………………………….. 30What Affects the Speed of a Water Turbine? ……………………………………………………………….. 31
Part D: Handouts ………………………………………………………………………………………….. 32Handout for Lesson 3: Switches at the Folsom Powerhouse ………………………………………………. 33Handout for Lesson 5: Predicting Circuits #1 ………………………………………………………………. 34Handout for Lesson 5: Predicting Circuits #2 ………………………………………………………………. 35Handout for Lesson 7: How Electromagnets Push, Pull and Spin (Optional) ……………………………… 36Handout for Lesson 9: Electromagnets at the Folsom Powerhouse ………………………………………… 38Handout for Lesson 11: Moving Water at the Folsom Powerhouse ……………………………………….. 39Handout for Lesson 12: Features of the Folsom Powerhouse (labeled) …………………………………… 40Handout for Lesson 12: Features of the Folsom Powerhouse (unlabeled) ………………………………… 41Handout for Lesson 13: Forms of Energy at the Folsom Powerhouse (labeled) …………………………… 42Handout for Lesson 13: Forms of Energy at the Folsom Powerhouse (unlabeled) ………………………… 43Handout for Lesson 14: Quiz Question A ………………………………………………………………….. 44Handout for Lesson 14: Quiz Question A Numbered Cross-Section of the Folsom Powerhouse ………….. 45Handout for Lesson 14: Quiz Question B …………………………………………………………………… 46Handout for Lesson 14: Quiz Question C …………………………………………………………………… 47Handout for Lesson 14: Quiz Question D …………………………………………………………………… 48Handout for Lesson 14: Check-Off List for Scientific Problem-Solving Skills …………………………… 49
Electricity Unit: Featuring the Historic Folsom Powerhouse 4
Part A: Lesson Plans
Electricity Unit: Featuring the Historic Folsom Powerhouse 5
Lesson 1. A Circuit.
Materials. Each group will need:
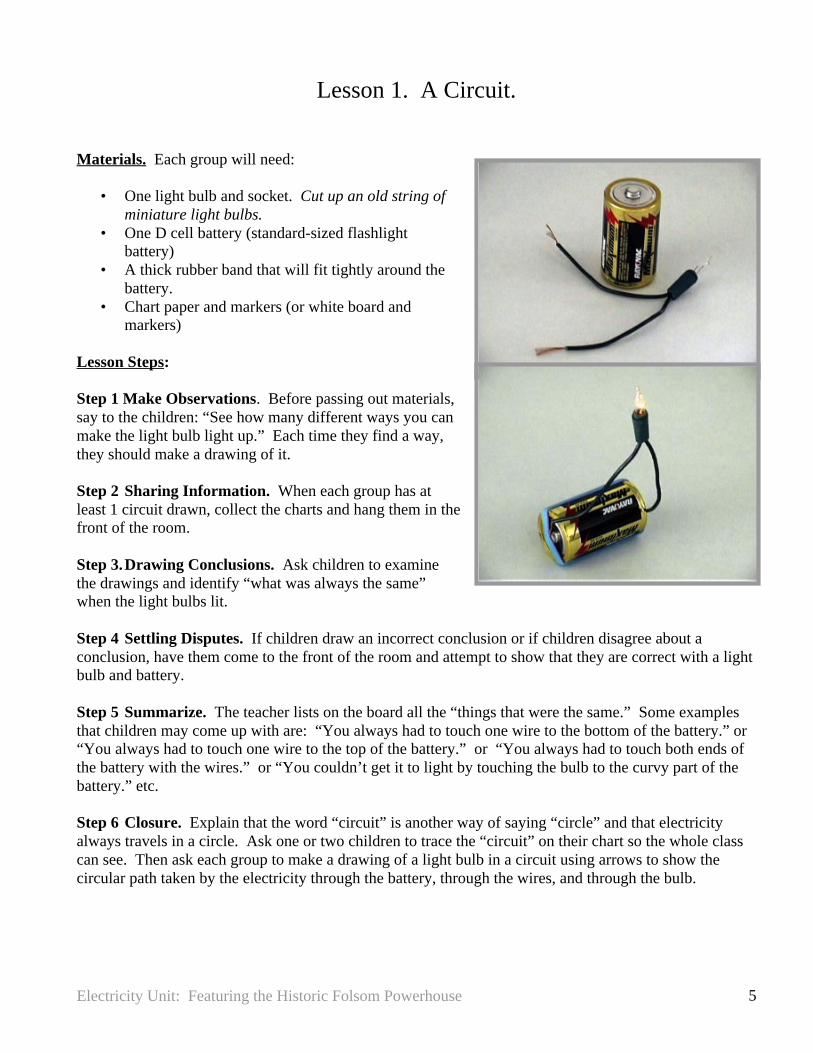
• One light bulb and socket. Cut up an old string ofminiature light bulbs.
• One D cell battery (standard-sized flashlightbattery)
• A thick rubber band that will fit tightly around thebattery.
• Chart paper and markers (or white board andmarkers)
Lesson Steps:
Step 1 Make Observations. Before passing out materials,say to the children: “See how many different ways you canmake the light bulb light up.” Each time they find a way,they should make a drawing of it.
Step 2 Sharing Information. When each group has atleast 1 circuit drawn, collect the charts and hang them in thefront of the room.
Step 3.Drawing Conclusions. Ask children to examinethe drawings and identify “what was always the same”when the light bulbs lit.
Step 4 Settling Disputes. If children draw an incorrect conclusion or if children disagree about aconclusion, have them come to the front of the room and attempt to show that they are correct with a lightbulb and battery.
Step 5 Summarize. The teacher lists on the board all the “things that were the same.” Some examplesthat children may come up with are: “You always had to touch one wire to the bottom of the battery.” or“You always had to touch one wire to the top of the battery.” or “You always had to touch both ends ofthe battery with the wires.” or “You couldn’t get it to light by touching the bulb to the curvy part of thebattery.” etc.
Step 6 Closure. Explain that the word “circuit” is another way of saying “circle” and that electricityalways travels in a circle. Ask one or two children to trace the “circuit” on their chart so the whole classcan see. Then ask each group to make a drawing of a light bulb in a circuit using arrows to show thecircular path taken by the electricity through the battery, through the wires, and through the bulb.

Electricity Unit: Featuring the Historic Folsom Powerhouse 6
Lesson 2: Switch in a Circuit.
Materials. Each group will need:
• a light bulb and socket• a thick rubber band• a D cell battery• a piece of wire about 6” long
Lesson Steps:
Step 1 Review. Review the term “circuit.” Give asmany children a chance to explain what it takes tomake a circuit and how electrons flow in a circuit.Have some children trace the circular path through acircuit in front of the class.
Step 2 Observations. Distribute thematerials and have the children make a“switch” by twisting the bare wire endstogether. Ask the children, “How wereyou able to make the light turn on andoff?” and “What happened to theelectrons coming from the battery whenyou disconnected the wires?”
Step 3 Solving Disputes. When a child gives an incorrect answer or when children disagree about ananswer, have them attempt to get a circuit to switch on and off using their idea. In other words, wheneverpossible, have the children test their own answers.
Step 4 Summarize. Introduce the word “switch.” Explain that a “switch” is anything that breaks orcompletes a circuit.
Step 5 Communicating. Pass out chart paper (or white boards) and markers so that each group can maketwo drawings of their circuit: one showing the switch open and one showing the switch closed. Explainthat they should label all the parts and use arrows to show how electrons moves through the circuit andswitch.

Electricity Unit: Featuring the Historic Folsom Powerhouse 7
Lesson 3: Old Switches at the Folsom Powerhouse
Materials. Each group will need:
• handout “Switches at the Folsom Powerhouse”• circuit and switch materials from previous lesson• 2 large paper clips
Lesson Steps
Step 1 Review. Review the important ideas learned in theprevious lessons. Ask “Can you explain how to make a lightbulb light up in a circuit?” “Can you explain how a switchworks in a circuit?” Let as many children give their ideas as possible so that important concepts arerepeated and many get to talk.
Step 2 Application. If you have not already done so, explainto the children that they will soon be taking a field trip to theFolsom Powerhouse and that this unit on electricity ispreparing them for that visit. Explain that you are going togive them a picture of switches that were used at the FolsomPowerhouse. This type of switch is called a “knife” switch.Their task is to construct a switch for their circuits that worksthe same way. Give out the handouts.
Step 3 Modeling. When the children think they haveconstructed a good model, they should draw a picture of it,label its parts, and list any “good” or “bad” features of thistype of switch. Pass out several extra paper clips per group, their original circuit materials, and thehandout.
Step 4 Communicating. Ask eachgroup to present their drawings to theclass and what they identified as“good” or “bad” features of the knifeswitch. There is a lot of contact areain a knife switch. A lot of electricalcurrent can flow through it. That iswhy knife switches were used inplaces like the Folsom Powerhouse.
Step 5 Setting Goals. Ask the children if they think they will be able to locate the knife switches whenthey visit the Folsom Powerhouse. Ask if they think they will be able to explain why knife switches wereused to the parents that go along on the field trip? After a few responses are shared, the lesson is over.
Electricity Unit: Featuring the Historic Folsom Powerhouse 8
Lesson 4: Exploring Circuits: Series and Parallel
Materials. Each group will need:
• at least 2 sets of circuit and switch materials from the previouslesson
Lesson Steps
Step 1 Review. Ask children to explain the parts of a circuit, what isnecessary for a light bulb to light up in a circuit, and how a switchworks.
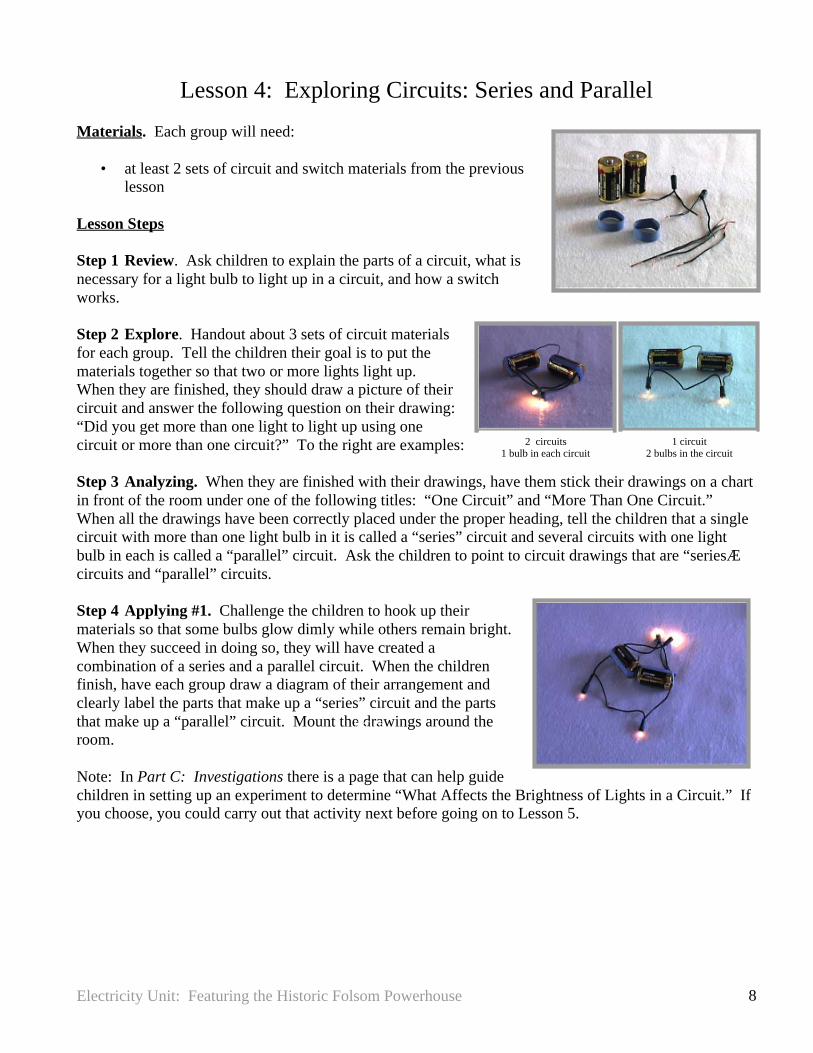
Step 2 Explore. Handout about 3 sets of circuit materialsfor each group. Tell the children their goal is to put thematerials together so that two or more lights light up.When they are finished, they should draw a picture of theircircuit and answer the following question on their drawing:“Did you get more than one light to light up using onecircuit or more than one circuit?” To the right are examples:
Step 3 Analyzing. When they are finished with their drawings, have them stick their drawings on a chartin front of the room under one of the following titles: “One Circuit” and “More Than One Circuit.”When all the drawings have been correctly placed under the proper heading, tell the children that a singlecircuit with more than one light bulb in it is called a “series” circuit and several circuits with one lightbulb in each is called a “parallel” circuit. Ask the children to point to circuit drawings that are “seriesÆcircuits and “parallel” circuits.
Step 4 Applying #1. Challenge the children to hook up theirmaterials so that some bulbs glow dimly while others remain bright.When they succeed in doing so, they will have created acombination of a series and a parallel circuit. When the childrenfinish, have each group draw a diagram of their arrangement andclearly label the parts that make up a “series” circuit and the partsthat make up a “parallel” circuit. Mount the drawings around theroom.
Note: In Part C: Investigations there is a page that can help guidechildren in setting up an experiment to determine “What Affects the Brightness of Lights in a Circuit.” Ifyou choose, you could carry out that activity next before going on to Lesson 5.
2 circuits1 bulb in each circuit
1 circuit2 bulbs in the circuit
parallel
series
Electricity Unit: Featuring the Historic Folsom Powerhouse 9
Lesson 5: Predicting Circuits: Series and Parallel
Materials. Each group will need:
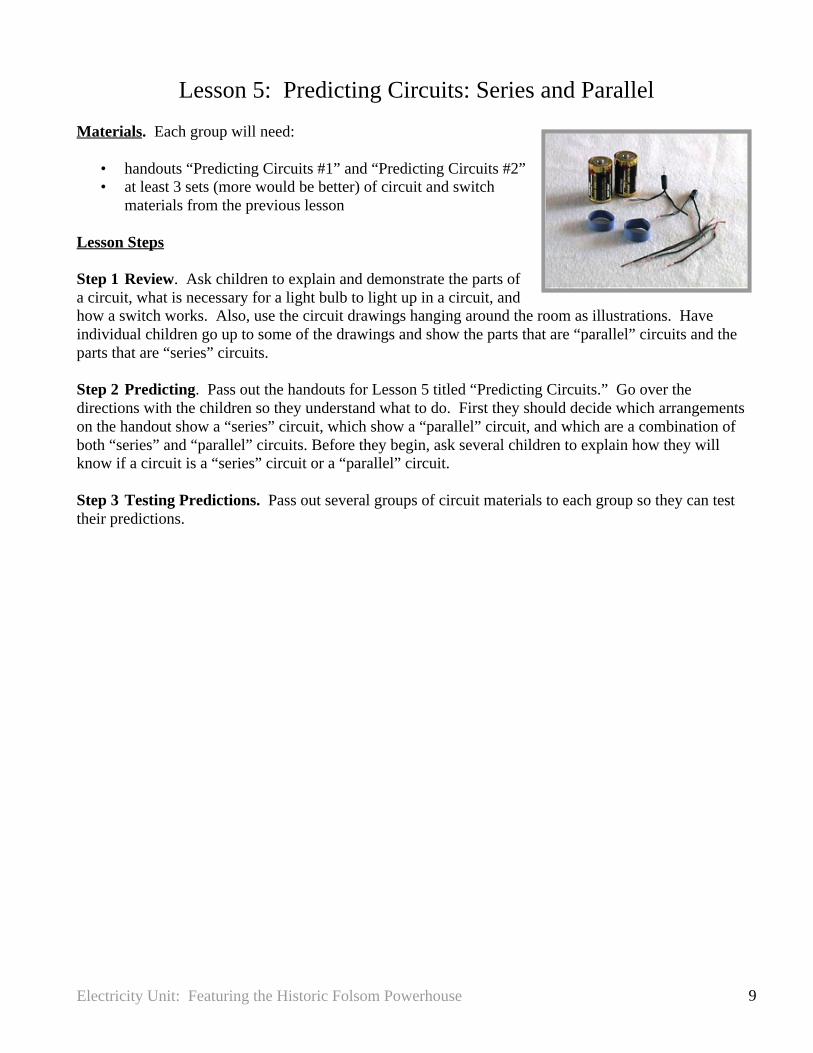
• handouts “Predicting Circuits #1” and “Predicting Circuits #2”• at least 3 sets (more would be better) of circuit and switch
materials from the previous lesson
Lesson Steps
Step 1 Review. Ask children to explain and demonstrate the parts ofa circuit, what is necessary for a light bulb to light up in a circuit, andhow a switch works. Also, use the circuit drawings hanging around the room as illustrations. Haveindividual children go up to some of the drawings and show the parts that are “parallel” circuits and theparts that are “series” circuits.
Step 2 Predicting. Pass out the handouts for Lesson 5 titled “Predicting Circuits.” Go over thedirections with the children so they understand what to do. First they should decide which arrangementson the handout show a “series” circuit, which show a “parallel” circuit, and which are a combination ofboth “series” and “parallel” circuits. Before they begin, ask several children to explain how they willknow if a circuit is a “series” circuit or a “parallel” circuit.
Step 3 Testing Predictions. Pass out several groups of circuit materials to each group so they can testtheir predictions.
Electricity Unit: Featuring the Historic Folsom Powerhouse 10
Lesson 6: Electromagnets
Materials. Each group will need:
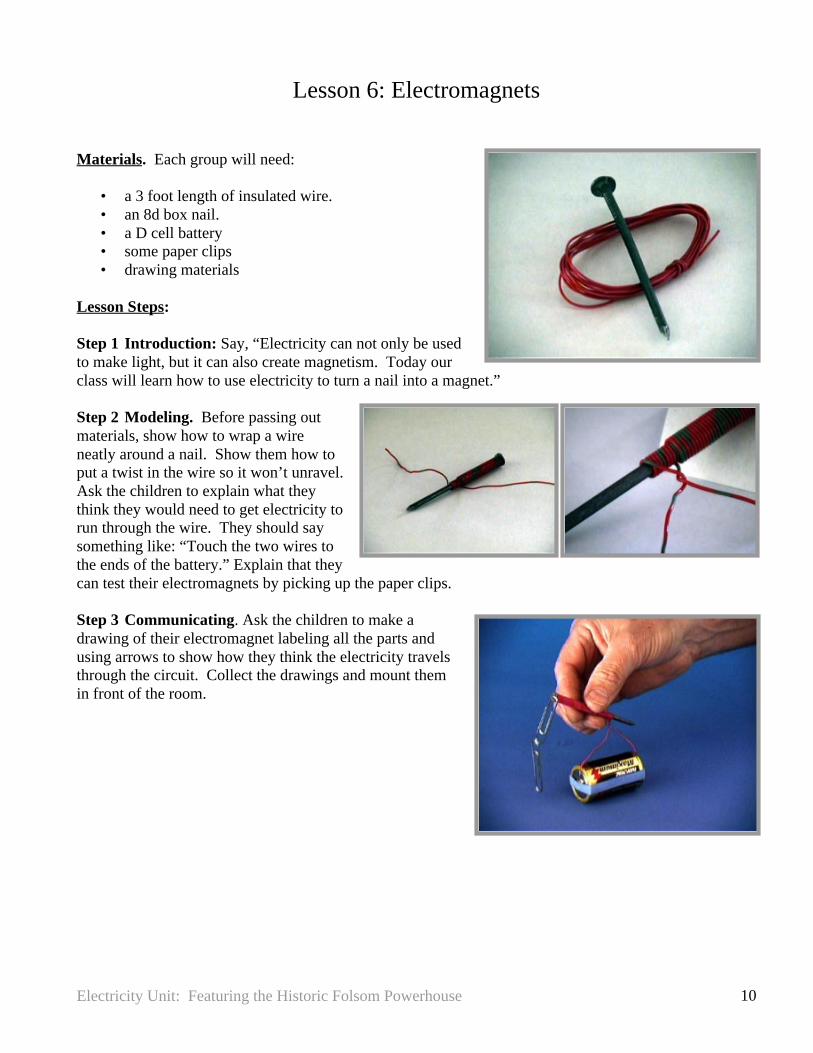
• a 3 foot length of insulated wire.• an 8d box nail.• a D cell battery• some paper clips• drawing materials
Lesson Steps:
Step 1 Introduction: Say, “Electricity can not only be usedto make light, but it can also create magnetism. Today ourclass will learn how to use electricity to turn a nail into a magnet.”
Step 2 Modeling. Before passing outmaterials, show how to wrap a wireneatly around a nail. Show them how toput a twist in the wire so it won’t unravel.Ask the children to explain what theythink they would need to get electricity torun through the wire. They should saysomething like: “Touch the two wires tothe ends of the battery.” Explain that theycan test their electromagnets by picking up the paper clips.
Step 3 Communicating. Ask the children to make adrawing of their electromagnet labeling all the parts andusing arrows to show how they think the electricity travelsthrough the circuit. Collect the drawings and mount themin front of the room.

Electricity Unit: Featuring the Historic Folsom Powerhouse 11
Lesson 7: Electromagnets Pull, Push, and Spin.
Materials. Each group will need:
• electromagnets from previous lesson• a D Cell battery• a small permanent magnet (round or square magnets can be
purchased at local hardware or electrical supply stores.• charting materials• OPTIONAL handout “How Electromagnets Do Work”
Lesson Steps:
Step 1 Review. Review the important ideas from the previous lessons. Ask children to explain what ismeant by a circuit, how electricity travels in a circuit, what is a switch in a circuit, what happens whenelectricity travels through a wire around a nail, what is a series circuit, what is a parallel circuit?
Step 2 Introduction. Explain that electromagnets can be used to do work. In today’s lesson, the classwill find out how electromagnets can be used to move things.
Step 3 Modeling. Before passing out materials, explain that each group should use the materials to findout how an electromagnet can be used to pull, push or spin something. They should draw 3 pictures, onelabeled “pulling,” one labeled “pushing,” and the last labeled “spinning.” When they get theelectromagnet to pull, push, or spin the little magnet, they should draw a picture of what happened.
OPTIONAL Step 3 Modeling. If your children need more direction, pass out the handout for Lesson 3:“How Electromagnets Do Work.” Tell the children to hold their electromagnets and the small, roundmagnet the same way as in the pictures. Then direct them to draw pictures labeled “pulling,” “pushing,”and “spinning.”
Step 4 Connecting to Life Experiences. When the groups are finished, collect and display the charts atthe front of the room. Then ask the class: “Can you think of an electric machine that pulls, pushes, orspins something?” As the children give ideas, list them on the board. You are likely to get most ideasabout electric machines that “spin” something. However, most children and adults are not aware of howmuch electromagnets are used all around us. We’ll take care of that problem in the next lesson.
Step 5 Extending. Give the children an overnight assignment. Tell them to find 5 electric machines athome that pull, push, or spin something. They should draw the machine they find and label the part of themachine where they think the electromagnet is that does the pulling, pushing, or spinning.
Electricity Unit: Featuring the Historic Folsom Powerhouse 12
Lesson 8: Electromagnets in Our Lives
Materials:
none
Lesson Steps:
Step 1 Review. Review the important ideas of the previous lessons. Ask what the word “circuit” means.Ask someone to explain how to put a “switch” in a circuit. Ask the children to explain how to make anelectromagnet. Ask children to explain a series and parallel circuit.
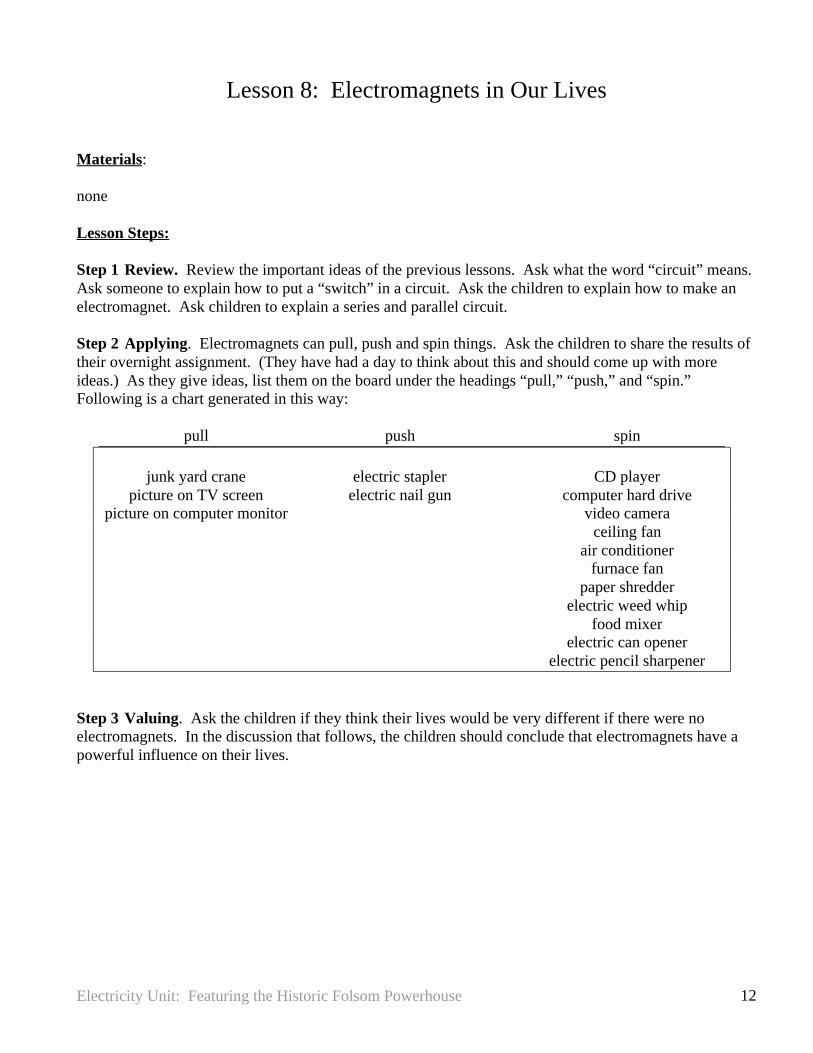
Step 2 Applying. Electromagnets can pull, push and spin things. Ask the children to share the results oftheir overnight assignment. (They have had a day to think about this and should come up with moreideas.) As they give ideas, list them on the board under the headings “pull,” “push,” and “spin.”Following is a chart generated in this way:
pull push spin
junk yard crane electric stapler CD playerpicture on TV screen electric nail gun computer hard drive
picture on computer monitor video cameraceiling fan
air conditionerfurnace fan
paper shredderelectric weed whip
food mixerelectric can opener
electric pencil sharpener
Step 3 Valuing. Ask the children if they think their lives would be very different if there were noelectromagnets. In the discussion that follows, the children should conclude that electromagnets have apowerful influence on their lives.
Electricity Unit: Featuring the Historic Folsom Powerhouse 13
Lesson 9: Electromagnets at the Folsom Powerhouse
Materials. Each group will need:
• handout “Electromagnets at theFolsom Powerhouse”
Lesson Steps:
Step 1 Review. Review the terms circuitand switch. Ask the children to explain howto make an electromagnet. Ask them toname some things that containelectromagnets. Ask them to explain seriesand parallel circuits. Ask them to tell youwhat types of things electromagnets can do.(pull, push and spin things)
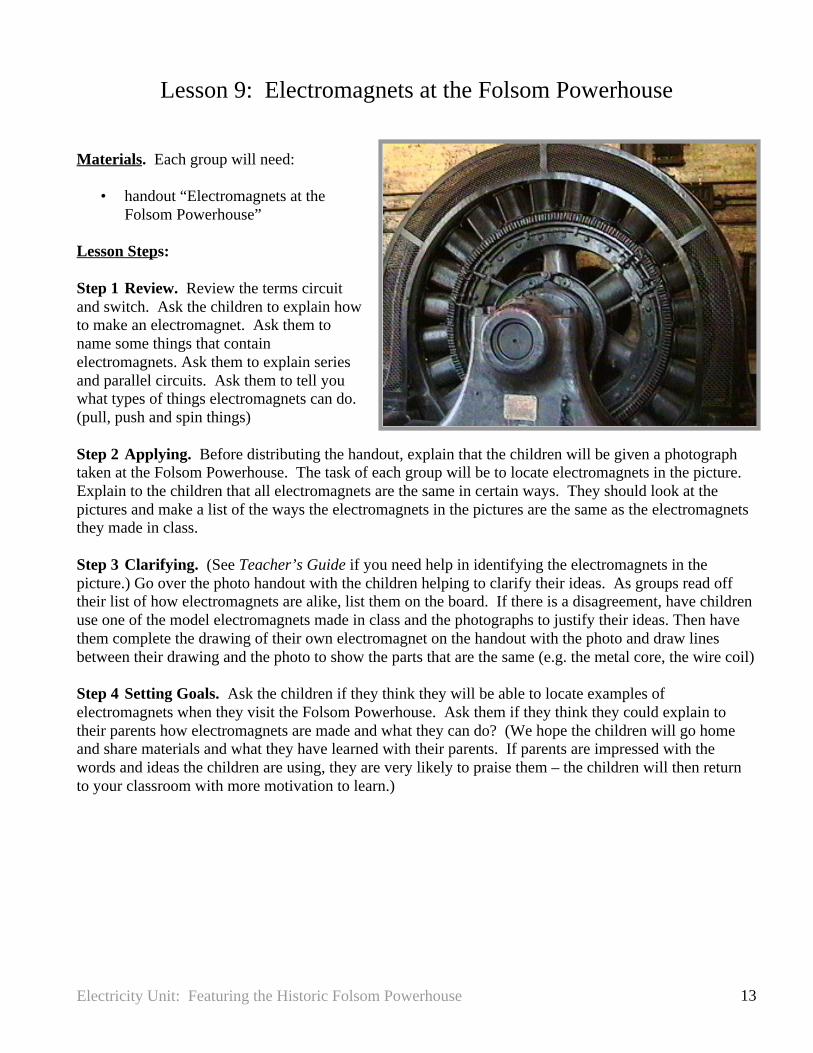
Step 2 Applying. Before distributing the handout, explain that the children will be given a photographtaken at the Folsom Powerhouse. The task of each group will be to locate electromagnets in the picture.Explain to the children that all electromagnets are the same in certain ways. They should look at thepictures and make a list of the ways the electromagnets in the pictures are the same as the electromagnetsthey made in class.
Step 3 Clarifying. (See Teacher’s Guide if you need help in identifying the electromagnets in thepicture.) Go over the photo handout with the children helping to clarify their ideas. As groups read offtheir list of how electromagnets are alike, list them on the board. If there is a disagreement, have childrenuse one of the model electromagnets made in class and the photographs to justify their ideas. Then havethem complete the drawing of their own electromagnet on the handout with the photo and draw linesbetween their drawing and the photo to show the parts that are the same (e.g. the metal core, the wire coil)
Step 4 Setting Goals. Ask the children if they think they will be able to locate examples ofelectromagnets when they visit the Folsom Powerhouse. Ask them if they think they could explain totheir parents how electromagnets are made and what they can do? (We hope the children will go homeand share materials and what they have learned with their parents. If parents are impressed with thewords and ideas the children are using, they are very likely to praise them – the children will then returnto your classroom with more motivation to learn.)

Electricity Unit: Featuring the Historic Folsom Powerhouse 14
Lesson 10: Moving Water Can Push Things
Materials. Each group will need:
• an empty, half-gallon milk carton (have extras available)• a plastic soda straw• access to water
Lesson Steps:
Step 1 Review. Ask the children to explain the kind of thingselectromagnets can do. (Pull, push andspin.) Ask them if they think they coulduse water to pull, push and spin things?Let several give some ideas.
Step 2 Directions. Before passing outmaterials, explain that each group willpoke a hole in the milk carton with a pencilso that the soda straw will fit into it snugly.Demonstrate (see Teacher’s Guide). Then,demonstrate how to hold the soda strawclosed while filling the carton with water.Explain that the class will go outsidetogether and each group will use the jet ofwater to see what things they can movewith it.
Step 3 Do the Activity.
Step 4 Discussion. Ask the children what kind of motion they were able to get with the stream of water.All will have been able to push things, some will have found a way to make things spin.
Step 5 Summary. It is not likely that any will find a way to make water pull things, though it can bedone. However, if children conclude that the water can be used to push and spin things, that is sufficientfor this lesson.

Electricity Unit: Featuring the Historic Folsom Powerhouse 15
Lesson 11: Moving Water at the Folsom Powerhouse
Materials: Each child will need:
• a handout “Moving Water at theFolsom Powerhouse” A miniature ofthe handout is on the right.
• colored pencils, markers or crayons(brown, blue, red, gray and yellow)
Lesson Steps:
Step 1.Review. Ask children to recall howthe jets of water were able to move things inthe last lesson. Have several childrenidentify things that were pushed or spun bythe water.
Step 2.Directions. Hold up one of the handouts “Moving Water at the Folsom Powerhouse.” Tell themthat they should study the five steps on the handout that describe how water moves through the FolsomPowerhouse. Allow the children to discuss with one another how the water moves to clarify theirunderstanding of the drawing. When they think they understand the drawing clearly, they are to color itwith colored pencils, markers or crayons using the following scheme:
1. dirt = brown2. water = blue3. bricks = red4. stones and cement = gray5. metal = yellow
Have several children hold up their colored drawings at the front of the room so their color scheme can beseen and discussed. Some children will be able to observe and distinguish things in greater detail thanothers. Through this activity, children are assisted in identifying the parts of the powerhouse.
Step 3.Setting Goals. Ask the children if they think they will be able to locate the 5 areas on the handoutwhen they visit the powerhouse. You could ask them some questions that will help them to focus theirobservations, such as:
“How will you be able to tell the penstock pipes from other pipes at the powerhouse?”“What would you find at the bottom of the penstock pipes?” “If you cannot see theunderground tunnel, what evidence of the tunnel might you look for?” (possible answer:the tunnel openings beneath the building) “Would the forebay be up high or down low?”etc.
Electricity Unit: Featuring the Historic Folsom Powerhouse 16
Lesson 12: Features of the Folsom Powerhouse
Materials. Each group will need:
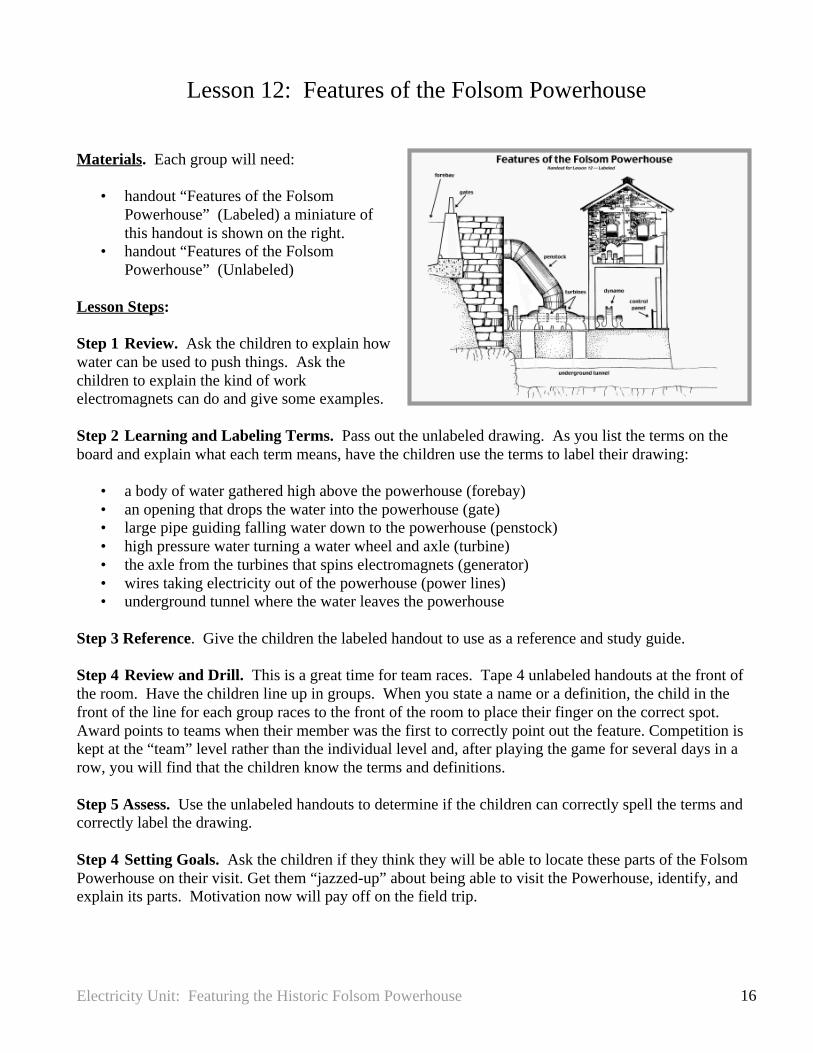
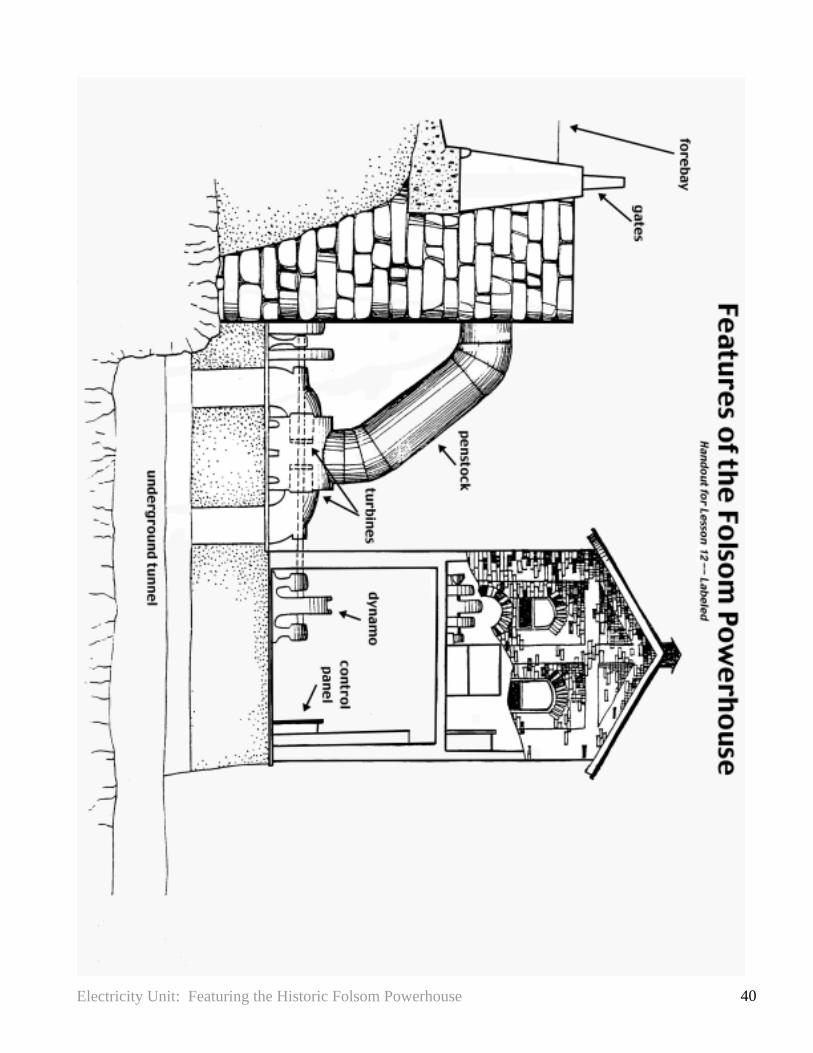
• handout “Features of the FolsomPowerhouse” (Labeled) a miniature ofthis handout is shown on the right.
• handout “Features of the FolsomPowerhouse” (Unlabeled)
Lesson Steps:
Step 1 Review. Ask the children to explain howwater can be used to push things. Ask thechildren to explain the kind of workelectromagnets can do and give some examples.
Step 2 Learning and Labeling Terms. Pass out the unlabeled drawing. As you list the terms on theboard and explain what each term means, have the children use the terms to label their drawing:
• a body of water gathered high above the powerhouse (forebay)• an opening that drops the water into the powerhouse (gate)• large pipe guiding falling water down to the powerhouse (penstock)• high pressure water turning a water wheel and axle (turbine)• the axle from the turbines that spins electromagnets (generator)• wires taking electricity out of the powerhouse (power lines)• underground tunnel where the water leaves the powerhouse
Step 3 Reference. Give the children the labeled handout to use as a reference and study guide.
Step 4 Review and Drill. This is a great time for team races. Tape 4 unlabeled handouts at the front ofthe room. Have the children line up in groups. When you state a name or a definition, the child in thefront of the line for each group races to the front of the room to place their finger on the correct spot.Award points to teams when their member was the first to correctly point out the feature. Competition iskept at the “team” level rather than the individual level and, after playing the game for several days in arow, you will find that the children know the terms and definitions.
Step 5 Assess. Use the unlabeled handouts to determine if the children can correctly spell the terms andcorrectly label the drawing.
Step 4 Setting Goals. Ask the children if they think they will be able to locate these parts of the FolsomPowerhouse on their visit. Get them “jazzed-up” about being able to visit the Powerhouse, identify, andexplain its parts. Motivation now will pay off on the field trip.

Electricity Unit: Featuring the Historic Folsom Powerhouse 17
Lesson 13: Energy Changes Form at the Folsom Powerhouse
Materials. Each group will need:
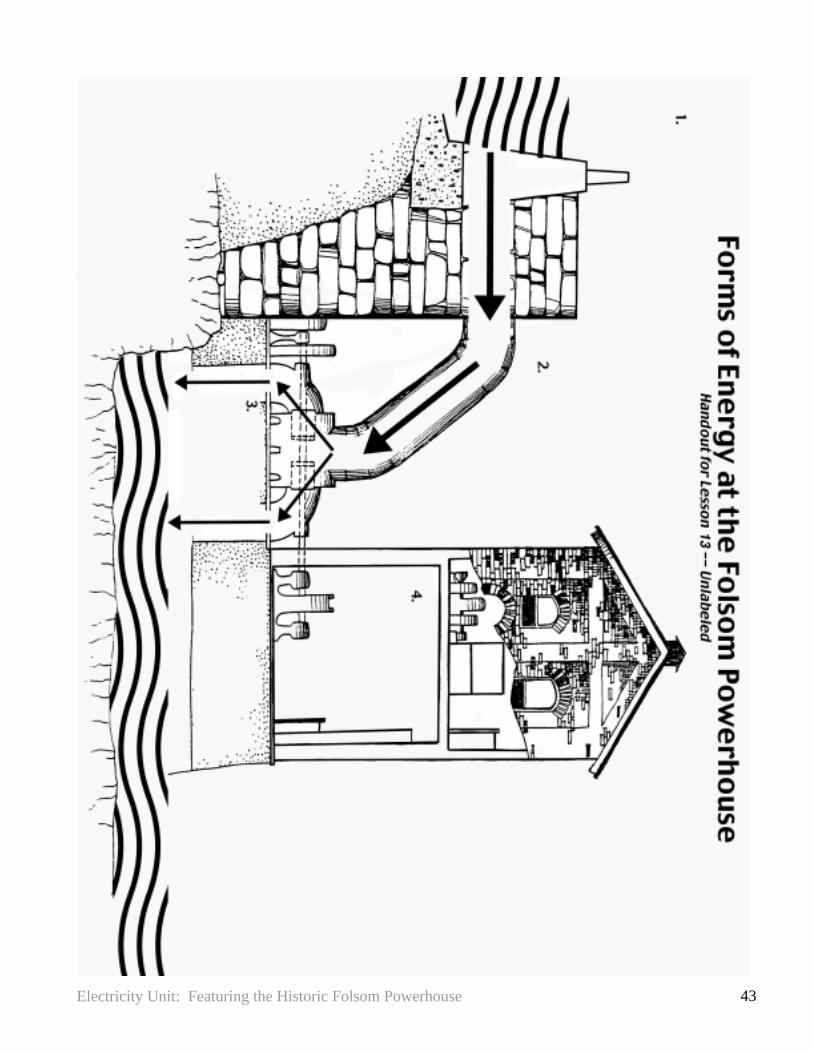
• handout “Forms of Energy at the FolsomPowerhouse” (Labeled) A miniature ofthis handout is shown on the right.
• handout “Forms of Energy at the FolsomPowerhouse” (Unlabeled)
Lesson Steps:
Step 1 Review. Ask the children to locate andexplain each of the major features of the FolsomPowerhouse: forebay, penstocks, turbine,generator, and high power lines.Ask the children to explain how the energy of falling water eventually becomes electricity.
Step 2 Formalizing Understanding. Using pictures or a drawing on the blackboard, introduce childrento the following terms: potential energy, energy of motion, mechanical energy and electrical energy.Explain that when water has been raised up, it has the potential of producing work as it falls back to theground. As water flows downward, it has energy of motion. When water sets a wheel in motion, we saythat the wheel has mechanical energy, and when mechanical energy produces electricity, we call itelectrical energy.
Step 3 Modeling. Tell them that they will be given a drawing of the Folsom Power Plant. They are tolabel the parts of the picture that illustrate each of those types of energy.
Step 4 Setting Goals. Ask the children how they might explain how energy changes form to visitors atthe Folsom Power Plant.

Electricity Unit: Featuring the Historic Folsom Powerhouse 18
Lesson 14: Quiz – Generating Electricity at the Folsom Powerhouse
Materials. Each child will need:
• handouts – Several pages of quiz questions are provided in the handouts section. You shouldchoose the particular pages you want to use.
Lesson Steps:
Step 1 Giving Directions. Hold up a copy of the two handouts and explain how they are to be used.
Step 2 Taking the Quiz. Pass out the handouts of quiz items you have selected.
This is the last lesson in the series. Ideally, you have scheduled the field trip to the Folsom Powerhouseso that it will occur within a reasonable time after finishing these lessons. See Parts B and C for moremodels you may choose to have children build and ideas for independent investigations children maycarry out on their own.

Electricity Unit: Featuring the Historic Folsom Powerhouse 19
Part B: Models
The models described in this section may be constructed as a full class, small group, or individual project.If a picture is worth a thousand words, a model must be worth at least a million!
Electricity Unit: Featuring the Historic Folsom Powerhouse 20
Construct Your Own Magnet and Compass
Materials:
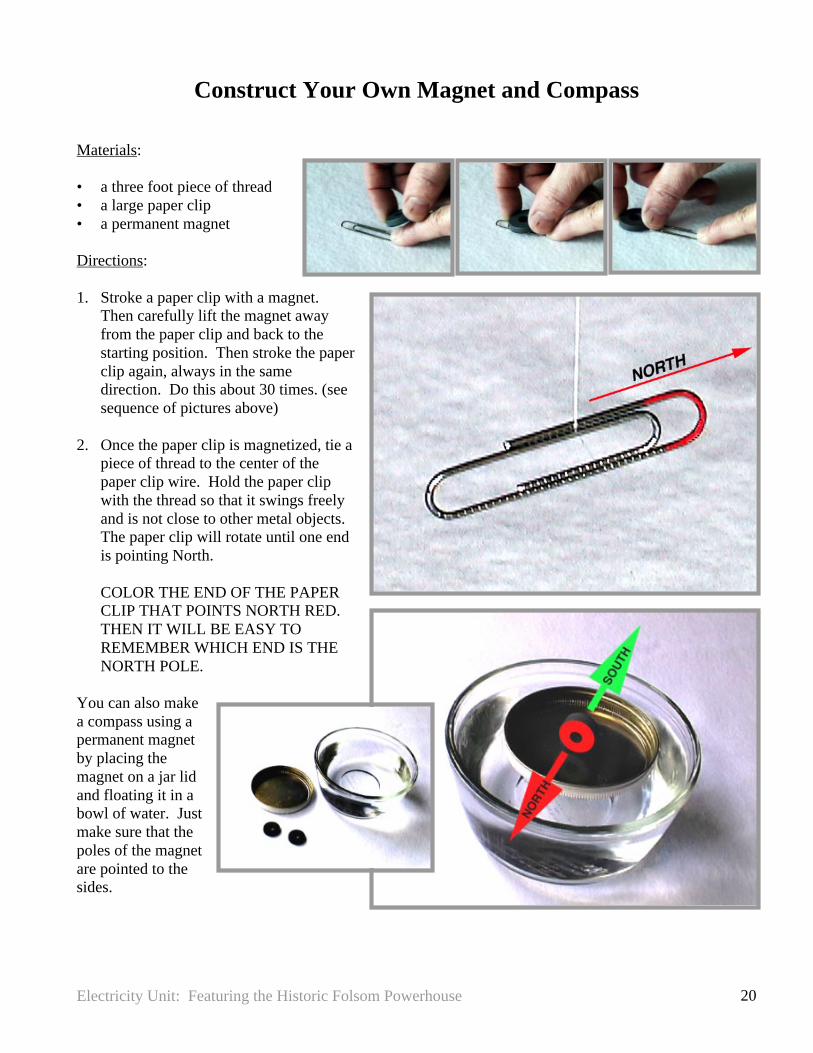
• a three foot piece of thread• a large paper clip• a permanent magnet
Directions:
1. Stroke a paper clip with a magnet.Then carefully lift the magnet awayfrom the paper clip and back to thestarting position. Then stroke the paperclip again, always in the samedirection. Do this about 30 times. (seesequence of pictures above)
2. Once the paper clip is magnetized, tie apiece of thread to the center of thepaper clip wire. Hold the paper clipwith the thread so that it swings freelyand is not close to other metal objects.The paper clip will rotate until one endis pointing North.
COLOR THE END OF THE PAPERCLIP THAT POINTS NORTH RED.THEN IT WILL BE EASY TOREMEMBER WHICH END IS THENORTH POLE.
You can also makea compass using apermanent magnetby placing themagnet on a jar lidand floating it in abowl of water. Justmake sure that thepoles of the magnetare pointed to thesides.

Electricity Unit: Featuring the Historic Folsom Powerhouse 21
Construct a Model of the Historic Folsom Dam
Refer to the photo above to construct a model of the original Folsom Dam and its canal that sent waterdownstream to the Folsom Powerhouse. With a little planning, you can briefly fill the model with waterand operate the gates.
Materials:
• about 4 pounds or more of ceramic clay ormodeling clay
• A large baking pan or some other waterproofcontainer to hold the model
• A waterproof, flat material for the gates.
See the next page for engineer drawings of theHistoric Folsom Dam.

Electricity Unit: Featuring the Historic Folsom Powerhouse 22
If you want to make your model dam more realistic, these historical engineering drawings will help.

Electricity Unit: Featuring the Historic Folsom Powerhouse 23
Construct a Model of theFolsom Powerhouse
Use these engineering drawings of theFolsom Powerhouse to construct a model ofit. If you draw your pictures of thePowerhouse walls on cardboard, you can gluethe walls together and then add cardboardsections for the roof. You might use tissuepaper tubes or the cardboard tubes from a boxof plastic wrap for the penstocks.
You could use many different materials tocreate your model. For instance, you couldbuild the walls out of sugar cubes, clay, oreven mud. Many different materials willwork – use your creativity!

Electricity Unit: Featuring the Historic Folsom Powerhouse 24
Construct a Speed Controller
An important problem in operating the FolsomPowerhouse was controlling the speed of the turbine anddynamo so that they produced a steady supply ofelectricity without speed-ups or slow-downs. To do that,a special speed controller kept the turbine spinning at asteady rate. On the right is a picture of one of the speedcontrollers at the Folsom Powerhouse.
You can construct a speed controller that is not exactly thesame as the one used at the Folsom Powerhouse, but theidea is the same. Your speed controller uses fan bladesand wind resistance to control the speed of a descendingweight.
Materials:
• the foam winding spool from a spool of thread• 4 pieces of thin cardboard or plastic about 1/2 inch square
(In the picture on the right, plastic was cut from the side ofa milk jug for this purpose.)
• 3 feet of thread• a large paper clip (or some other weight)• a nail or stick that will fit easily into the hole in the spool.
(The nails used to make electromagnets will work just finehere.)
Directions:
1. With adult supervision, make 4 shallow cuts in the foam spool.
2. Slide one of the plastic squares into each cut in the spool.3. Use white glue to glue the squares to the foam. Let dry.

Electricity Unit: Featuring the Historic Folsom Powerhouse 25
4. Glue one end of the string onto the spool. Let dry.
5. Tie the weight to the other end of the string.
6. Wind the string around one end of the spool.7. Insert a nail or stick into the hole of the spool.
8. Hold the speed controller by the end of the nail and let theweight drop.

Electricity Unit: Featuring the Historic Folsom Powerhouse 26
Construct a Water Turbine
On the right is a drawing of one of the water turbines in the FolsomPowerhouse. The turbine turns an axle that spins the generator to createelectricity. You can construct a water turbine too.
Materials:
• a wind fan made from a thread spool (see “Constructa Speed Controller.”
• some waterproof glue• a 1 gallon plastic milk jug• a soda straw
Directions:1. Construct a wind fan as shown in “Construct a SpeedController.” (You can use the wind fan from that lesson.)
2. Glue the vanes of the wind fan to the thread spoolwith waterproof glue or simply putwaterproof glue over the original whiteglue.
3. Poke a hole in a plastic milk jugwith a pencil and insert a soda straw intothe hole snuggly. (You can use the samematerials from lesson 8.)
4. Direct a jet of water from the jugand soda straw onto the blades to makethem spin.
This model demonstrates how movingwater turns the blades of a water turbine.The water turbine in turn spins the electricgenerator to produce electricity.
Electricity Unit: Featuring the Historic Folsom Powerhouse 27
Part C: InvestigationsThe following four investigations are based on previous lessons and models constructed in the unit:
Investigations Lessons Construction Models
What Affects the Brightness of Lights in a Circuit? Lessons 1-5 Magnet & CompassWhat Affects the Power of an Electromagnet? Lessons 6-9 (in the lesson plan)How Do Electromagnets Affect a Compass? Lessons 6-9 Magnet & CompassWhat Affects the Speed of a Water Turbine? Lessons 10-13 Speed Controller
The description for each investigation is written as if it were speaking directly to the student to helphim/her get started on an investigation. The pages may be copied and distributed to your class.

Electricity Unit: Featuring the Historic Folsom Powerhouse 28
What Affects the Brightness of Lights in a Circuit?
The Question. What things could you change in your circuit to see if it makes the lights glow brighter ordimmer? What if you put 2 light bulbs in the circuit – would they glow dimmer, remain just as bright, orwould they glow brighter? What if you used more wire? What if you added another battery? Can youhook up the light bulbs in different ways that might change their brightness?
Investigating. You can investigate this question 2 ways:
1. You could find the answers by looking them up in books or on the Internet. If you find someanswers, you could try them out with your circuit to see if you can get them to work.
2. You could decide to perform experiments to get your own answers. You could make a list of allthe things that you think might affect the brightness of light bulbs and try them out one at a time.
Be sure to keep careful notes. When you are ready to report your results you can present yourexperiments, observations, and conclusions accurately.
Observing. How will you observe what happens? Can you think of a way to measure the brightness of abulb? How will you keep things the same so you don’t make mistakes in your observations? Forinstance, what if the battery grows weaker as you carry out your experiments, what will you do to makesure you don’t mistake the affects of a weak battery for something else?
Reporting your Results. When you are ready to make your presentation to the class, think how youcould show your question, what you did, and what resulted in a simple and clear way. Here is a list ofthings that are usually included in the presentation of research:
• A statement of the question you investigated. It should be simple and clearly stated.• An explanation of the procedure you followed to find answers. For instance, you may have set upsome experiments and took notes of the results of each one. You should describe how you counted ormeasured things.• A display of your observations is very helpful. If you can chart or graph the observations youmade, it will make your results much easier to understand. Photos or drawings showing what happenedare also very helpful.• You should state the conclusions you reached. You should honestly admit if you were not able toreach a definite conclusion and explain any problems that got in your way or mistakes you made indrawing conclusions.

Electricity Unit: Featuring the Historic Folsom Powerhouse 29
What Affects the Power of an Electromagnet?
The Question. What things could you change in your circuit to see if it makes the electromagnet more orless powerful? What if you put 2 electromagnets in the circuit – would they each be able to pick up moreor fewer paperclips? What if you used a longer wire and wound more turns around the nail? What if youadded another battery? Can you hook up the electromagnets in different ways that might change theirstrength?
Investigating. You can investigate this question 2 ways:
1. You could attempt to find the answer to these questions by looking them up in books or on theInternet. If you find some answers, you could try them out with your electromagnet to see if you can getthem to work.
2. You could decide to perform experiments to get your own answers. You could make a list of allthe things that you think might affect the strength of an electromagnet and try them out one at a time.
Be sure to keep careful notes. When you are ready to report your results to the class, you can present yourexperiments, observations and conclusions accurately.
Observing. How will you observe what happens? Can you think of a way to measure the strength of anelectromagnet? How will you keep things the same so you don’t make mistakes in your observations?For instance, what if the battery grows weaker as you carry out your experiments, what will you do tomake sure you don’t mistake the affects of a weak battery for something else?
Reporting your Results. When you are ready to make your presentation to the class, think about howyou could show your question, what you did, and what resulted in a simple and clear way. Here is a listof things that are usually included in the presentation of research:
• A statement of the question you investigated. It should be simple and clearly stated.• An explanation of the procedure you followed to find answers. For instance, you may have set upsome experiments and took notes of the results of each one. You should describe how you counted ormeasured things.• A display of your observations is very helpful. If you can chart or graph the observations youmade, it will make your results much easier to understand. Photos or drawings showing what happenedare also very helpful.• You should state the conclusions you reached. You should honestly admit if you were not able toreach a definite conclusion and explain any problems that got in your way or mistakes you made indrawing conclusions.

Electricity Unit: Featuring the Historic Folsom Powerhouse 30
How Do Electromagnets Affect a Compass?
The Question. Can an electromagnet affect the way a compass points? Which way does a compass pointwhen you hold it near the head of the nail of your electromagnet? Which way does it point if you hold itnear the point of the nail? What if you switch the wires on the battery so the electric current flows theother way – does that affect the way the compass points?
Investigating. You can investigate this question 2 ways:
1. You could attempt to find the answers by looking them up in books or on the Internet. If you findsome answers, you could try them out with your electromagnet and compass to see if you can get them towork.
2. You could decide to perform experiments to get your own answers. You could make a list of allthe ways you could test the magnetic field of your electromagnet with a compass.
Be sure to keep careful notes. When you are ready to report your results to the class, you can present yourexperiments, observations and conclusions accurately.
Observing. How will you observe what happens? How will you keep things the same so you don’t makemistakes in your observations? How will you take notes so you don’t get mixed up? For instance, what ifthe battery grows weaker as you carry out your experiments, what will you do to make sure you don’tmistake the affects of a weak battery for something else?
Reporting your Results. When you are ready to make your presentation to the class, think about howyou could show your question, what you did, and what resulted in a simple and clear way. Here is a listof things that are usually included in the presentation of research:
• A statement of the question you investigated. It should be simple and clearly stated.• An explanation of the procedure you followed to find answers. For instance, you may have set upsome experiments and took notes of the results of each one. You should describe how you counted ormeasured things.• A display of your observations is very helpful. If you can chart or graph the observations youmade, it will make your results much easier to understand. Photos or drawings showing what happenedare also very helpful.• You should state the conclusions you reached. You should honestly admit if you were not able toreach a definite conclusion and explain any problems that got in your way or mistakes you made indrawing conclusions.
Electricity Unit: Featuring the Historic Folsom Powerhouse 31
What Affects the Speed of a Water Turbine?
The Question. What makes a water turbine go faster or slower? Does the amount of water in the milkjug make the turbine turn faster? Does the height the water drops affect the speed of the turbine? Whatabout the size of the turbine blades? What else might affect the speed of a water turbine?
Investigating. You can investigate this question 2 ways:
1. You could attempt to find the answers by looking them up in books or on the Internet. If you findsome answers, you could try them out with the water turbine you made in class.
2. You could decide to perform experiments to get your own answers. You could make a list of allthe things you could change, one at a time, to see if they affect the speed of the turbine.
Be sure to keep careful notes. When you are ready to report your results to the class, you can present yourexperiments, observations and conclusions accurately.
Observing. How will you observe what happens? Can you find some way to measure the speed of theturbine? How will you keep things the same so you don’t make mistakes in your observations? How willyou take notes so you don’t get mixed up? For instance, what if you hold the turbine at a slightlydifferent angle without noticing it, what will you do to make sure you don’t mistake the affects of holdingthe turbine differently for something else?
Reporting your Results. When you are ready to make your presentation to the class,5, think about howyou could show your question, what you did, and what resulted in a simple and clear way. Here is a listof things that are usually included in the presentation of research:
• A statement of the question you investigated. It should be simple and clearly stated.• An explanation of the procedure you followed to find answers. For instance, you may have set upsome experiments and took notes of the results of each one. You should describe how you counted ormeasured things.• A display of your observations is very helpful. If you can chart or graph the observations youmade, it will make your results much easier to understand. Photos or drawings showing what happenedare also very helpful.• You should state the conclusions you reached. You should honestly admit if you were not able toreach a definite conclusion and explain any problems that got in your way or mistakes you made indrawing conclusions.

Electricity Unit: Featuring the Historic Folsom Powerhouse 32
Part D: Handouts
Electricity Unit: Featuring the Historic Folsom Powerhouse 33
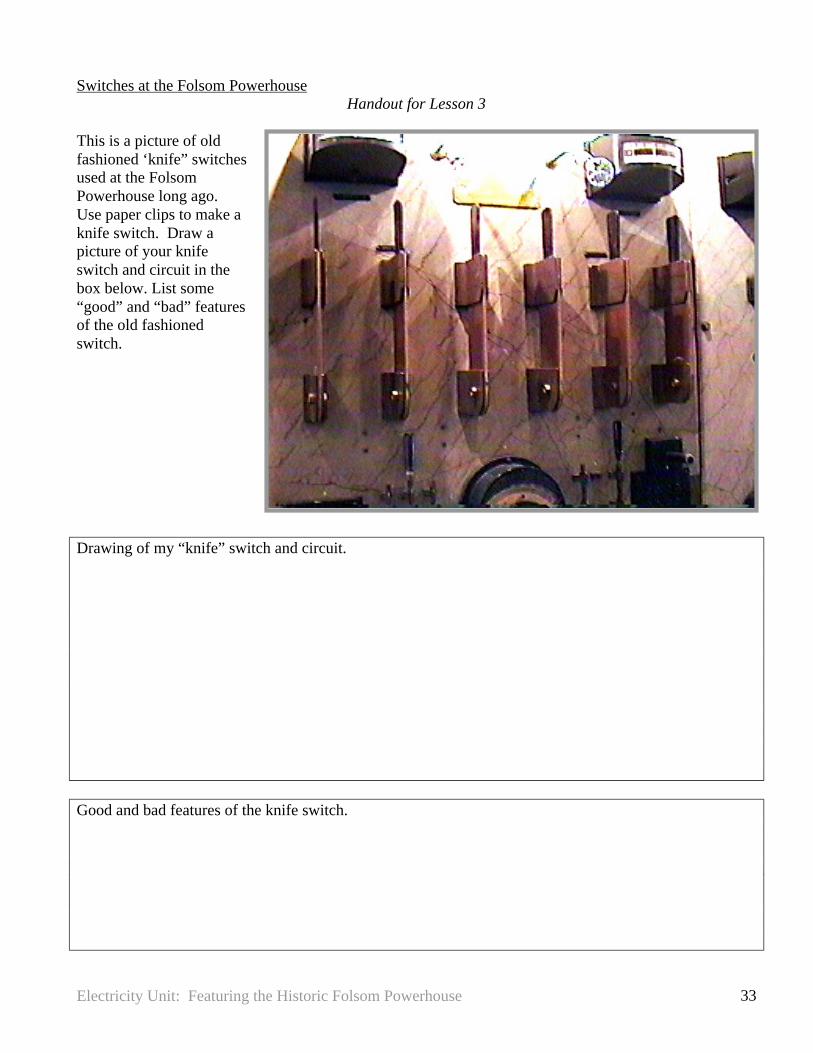
Switches at the Folsom PowerhouseHandout for Lesson 3
This is a picture of oldfashioned ‘knife” switchesused at the FolsomPowerhouse long ago.Use paper clips to make aknife switch. Draw apicture of your knifeswitch and circuit in thebox below. List some“good” and “bad” featuresof the old fashionedswitch.
Drawing of my “knife” switch and circuit.
Good and bad features of the knife switch.

Electricity Unit: Featuring the Historic Folsom Powerhouse 34
Predicting Circuits #1Handout for Lesson 5
Predict what will happen when the last wire is connected to the battery. Circle your answer. Also, circle“series” or “parallel” to tell what kind of circuit you see in the picture.
PICTURE 1.
All bulbs will be bright.Some will be bright and some dim.
All bulbs will be dim.
This is a (series) (parallel) circuit.
PICTURE 2.
All bulbs will be bright.Some will be bright and some dim.
All bulbs will be dim.
This is a (series) (parallel) circuit.
PICTURE 3.
All bulbs will be bright.Some will be bright and some dim.
All bulbs will be dim.
This is a (series) (parallel) circuit.
PICTURE 4.
All bulbs will be bright.Some will be bright and some dim.
All bulbs will be dim.
This is a (series) (parallel) circuit.
Electricity Unit: Featuring the Historic Folsom Powerhouse 35
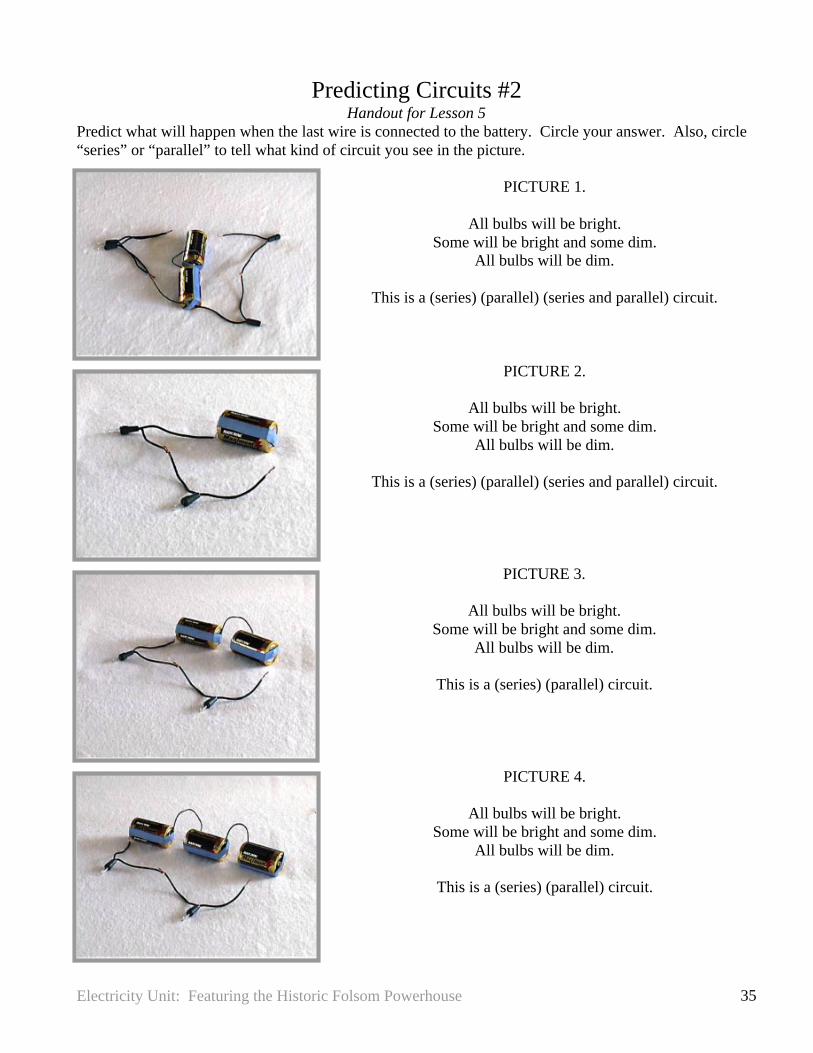
Predicting Circuits #2Handout for Lesson 5
Predict what will happen when the last wire is connected to the battery. Circle your answer. Also, circle“series” or “parallel” to tell what kind of circuit you see in the picture.
PICTURE 1.
All bulbs will be bright.Some will be bright and some dim.
All bulbs will be dim.
This is a (series) (parallel) (series and parallel) circuit.
PICTURE 2.
All bulbs will be bright.Some will be bright and some dim.
All bulbs will be dim.
This is a (series) (parallel) (series and parallel) circuit.
PICTURE 3.
All bulbs will be bright.Some will be bright and some dim.
All bulbs will be dim.
This is a (series) (parallel) circuit.
PICTURE 4.
All bulbs will be bright.Some will be bright and some dim.
All bulbs will be dim.
This is a (series) (parallel) circuit.

Electricity Unit: Featuring the Historic Folsom Powerhouse 36
How Electromagnets Push, Pull, and SpinOptional Handout for Lesson 7
PULLING AND PUSHING: Electromagnets can pull or push things. The picture below shows how tohold an electromagnet close to one side of a small magnet. Be sure that a flat side of the magnet is facingthe top of the nail. Then let go. The small magnet will be pulled toward, or pushed away from, theelectromagnet, depending on which side of the small magnet faces the electromagnet.
The pictures below show what happens when the small magnet is pulled toward or pushed away from theelectromagnet.
The electromagnet attracts one side of the smallmagnet, and . . .
repels the other side.

Electricity Unit: Featuring the Historic Folsom Powerhouse 37
The sequence of pictures below shows the small magnet first being pushed away, then spinning around,and then pulled back to the electromagnet. This shows how an electromagnet can “spin” something.
1.
2.
3.
4.
5.
Electricity Unit: Featuring the Historic Folsom Powerhouse 38
Electromagnets at the Folsom PowerhouseHandout for Lesson 9
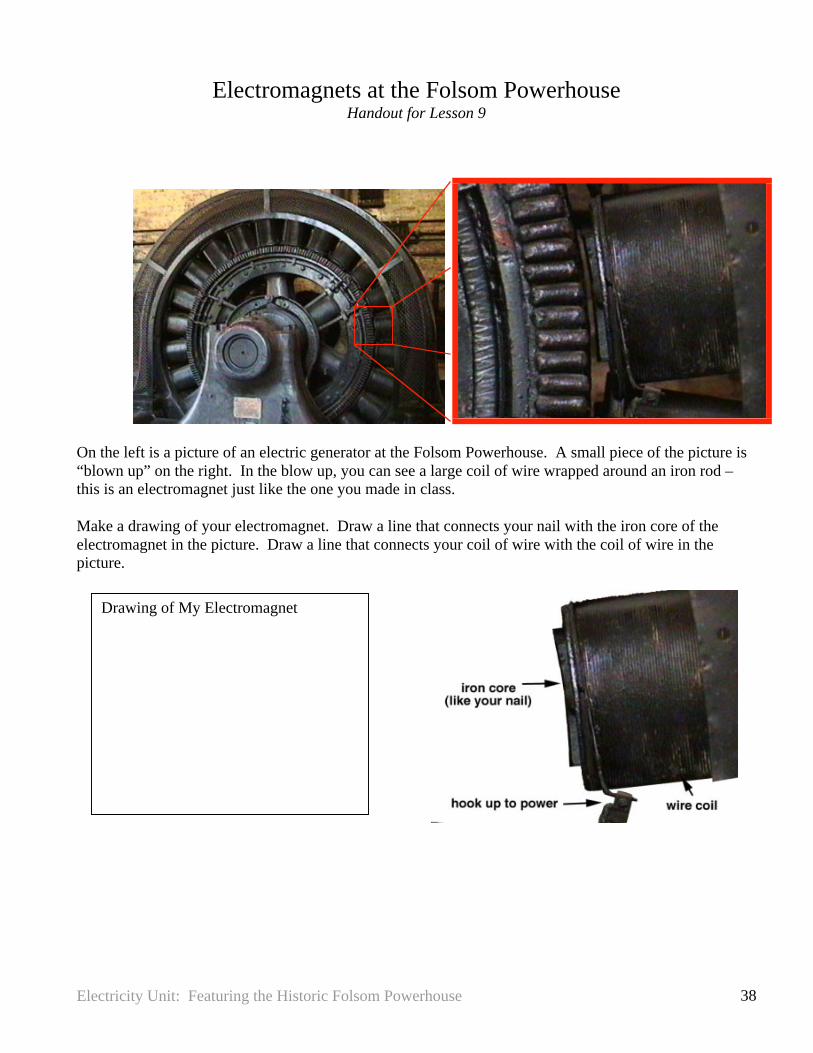
On the left is a picture of an electric generator at the Folsom Powerhouse. A small piece of the picture is“blown up” on the right. In the blow up, you can see a large coil of wire wrapped around an iron rod –this is an electromagnet just like the one you made in class.
Make a drawing of your electromagnet. Draw a line that connects your nail with the iron core of theelectromagnet in the picture. Draw a line that connects your coil of wire with the coil of wire in thepicture.
Drawing of My Electromagnet

Electricity Unit: Featuring the Historic Folsom Powerhouse 39
Electricity Unit: Featuring the Historic Folsom Powerhouse 40

Electricity Unit: Featuring the Historic Folsom Powerhouse 41

Electricity Unit: Featuring the Historic Folsom Powerhouse 42
Electricity Unit: Featuring the Historic Folsom Powerhouse 43
Electricity Unit: Featuring the Historic Folsom Powerhouse 44
Quiz Question AHandout for Lesson 14
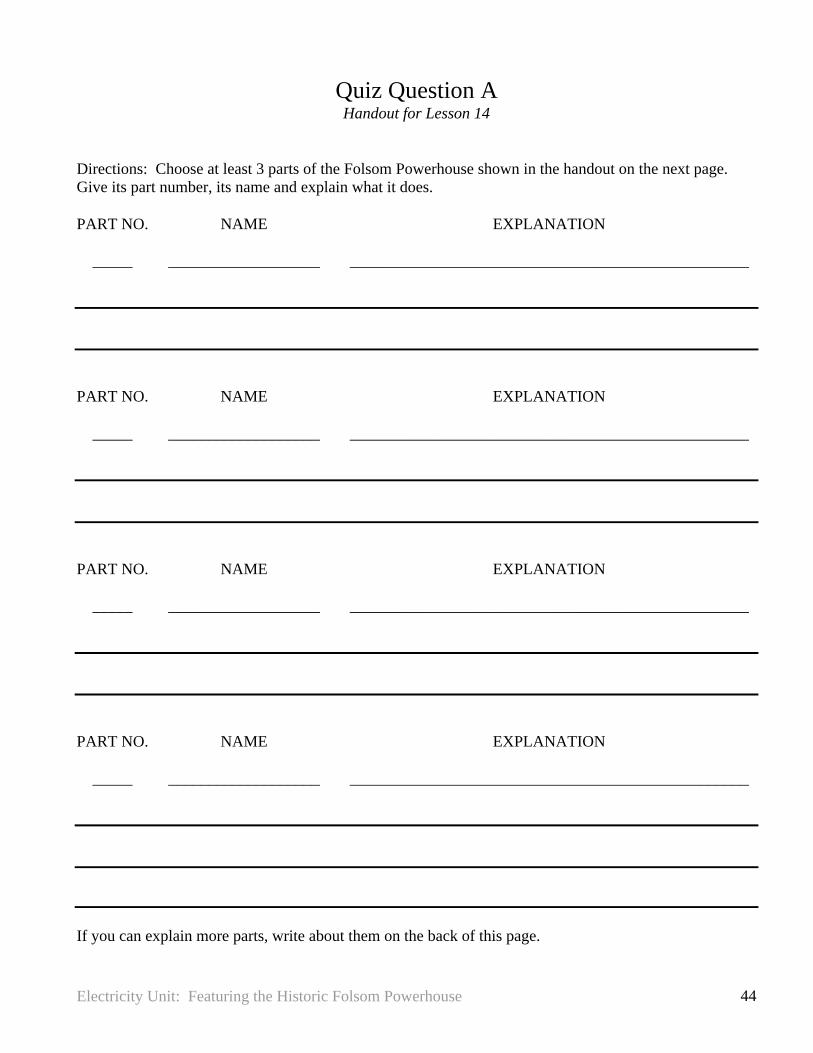
Directions: Choose at least 3 parts of the Folsom Powerhouse shown in the handout on the next page.Give its part number, its name and explain what it does.
PART NO. NAME EXPLANATION
_____ ___________________ __________________________________________________
PART NO. NAME EXPLANATION
_____ ___________________ __________________________________________________
PART NO. NAME EXPLANATION
_____ ___________________ __________________________________________________
PART NO. NAME EXPLANATION
_____ ___________________ __________________________________________________
If you can explain more parts, write about them on the back of this page.

Electricity Unit: Featuring the Historic Folsom Powerhouse 45
Drawing to go with Quiz Question A

Electricity Unit: Featuring the Historic Folsom Powerhouse 46
Quiz Question BHandout for Lesson 14
In the Drawing below, explain how water moves through the Folsom Powerhouse. Number 1 iscompleted as an example.

Electricity Unit: Featuring the Historic Folsom Powerhouse 47
Quiz Question CHandout for Lesson 14
In the drawing below, identify each part tell what form energy takes in that part. Part 1 is completed as anexample.

Electricity Unit: Featuring the Historic Folsom Powerhouse 48
Quiz Question DHandout for Lesson 14
Make a drawing of a light bulb in a circuit with a battery and a switch. Use arrows to show the path ofelectricity traveling through the circuit. Label these parts: battery, bulb, switch.
Make a drawing of an electromagnet in a circuit with a battery and a switch. Use arrows to show the pathof electricity traveling through the circuit. Label these parts: battery, electromagnet, switch.
Electricity Unit: Featuring the Historic Folsom Powerhouse 49
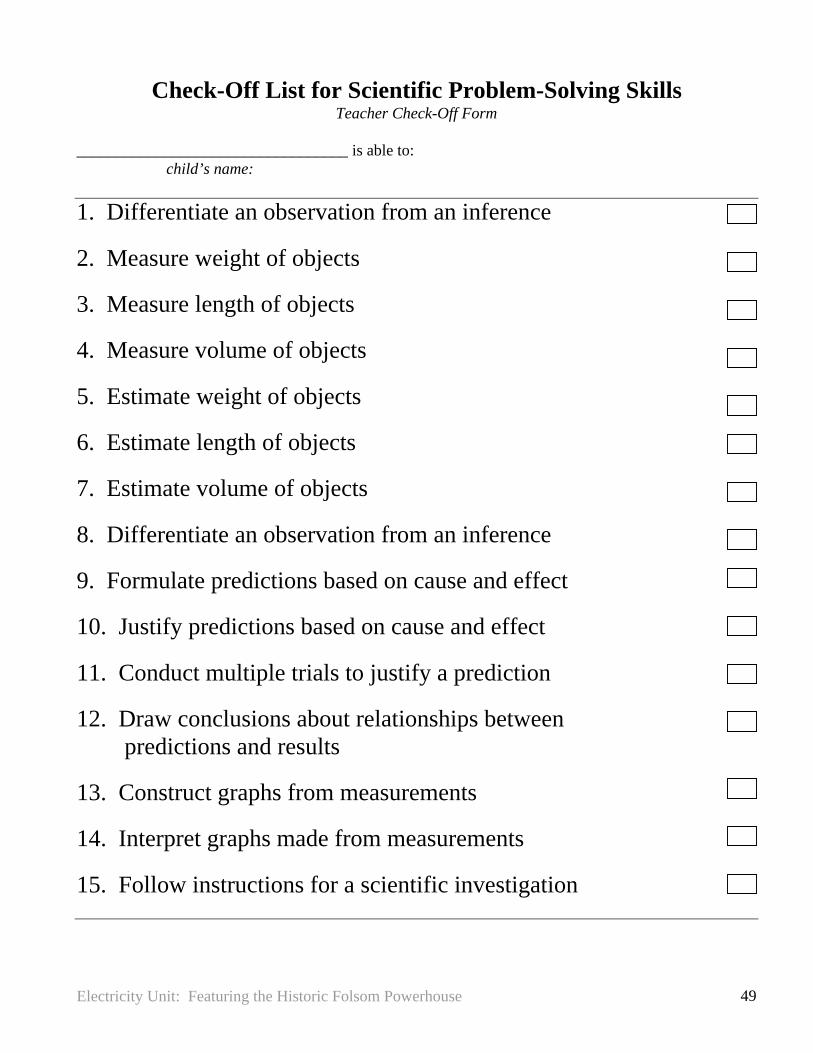
Check-Off List for Scientific Problem-Solving SkillsTeacher Check-Off Form
__________________________________ is able to:child’s name:
1. Differentiate an observation from an inference
2. Measure weight of objects
3. Measure length of objects
4. Measure volume of objects
5. Estimate weight of objects
6. Estimate length of objects
7. Estimate volume of objects
8. Differentiate an observation from an inference
9. Formulate predictions based on cause and effect
10. Justify predictions based on cause and effect
11. Conduct multiple trials to justify a prediction
12. Draw conclusions about relationships betweenpredictions and results
13. Construct graphs from measurements
14. Interpret graphs made from measurements
15. Follow instructions for a scientific investigation


![F]QD 1U OLSFD U€¦ · %lxohw\q%udq*rz\85( (qhujldhohnwu\f]qd 1u olsfd u %lxohw\q%udq*rz\85( (qhujldhohnwu\f]qd](https://static.fdocuments.pl/doc/165x107/5f62da7be3160b39904535ab/fqd-1u-olsfd-u-lxohwqudqrz85-qhujldhohnwufqd-1u-olsfd-u-lxohwqudqrz85.jpg)

![;;EIf I :; ig;; rr:sE= I= - cdn4.libris.ro · o F,!d llj o 'tI. F!.i U g.]:.1 F I". c/ - .'.'tt + E U * E,= ij * * U'3 i i ?. =,*'=. i'!';. E * g d - J -= ri rE - -r - e = ; .=' /..:](https://static.fdocuments.pl/doc/165x107/606ca6dbf5763f61dc21aa7e/eif-i-ig-rrse-i-cdn4-o-fd-llj-o-ti-fi-u-g1-f-i-c.jpg)