


Języki
Strony
Prawny

8/10/2019 Bki 2010d Eng
http://slidepdf.com/reader/full/bki-2010d-eng 1/1BKI-2010
English J´zek polskiJ´zek polskiJ´zek polskiJ´zek polskiJ´zek polski
z Usuƒ nalepk´ z wierzchniej cz´Êci kartrid˝a. Nast´pniprzy¬ó˝ do¬àczona w zestawie nalepk´, ustawiajàc etykiekartrid˝a w odpowiednim kierunku, jak pokazano nschemacie.
◆ Ostrze˝enie: Bàdê ostro˝ny przyk¬adajàc nalepk´ odpowiednim po¬o˝eniu i kierunku.
x W¬ó˝ do do¬àczonego klipa kartrid˝ stronà z dyszami,wciÊnij górna cz´Êç kartrid˝a, a˝ us¬yszysz klikniecie.
c Przy¬ó˝ za¬àczony Êwiderek do punktu wtryskiwanatramentu wskazanym na schemacie i obróç wi´cej jak razy zgodnie z ruchem wskazówek zegara, aby powi kszyma¬à dziurk´ na wierzchniej cz´Êci kartrid˝a, tak jak tpokazano na centralnym schemacie.
b Po w¬o˝eniu ig¬y wprowadê zalecanà iloÊç atramentu zale˝noÊci od modelu kartrid˝a, naciskajàc t¬ok przez oko30 sekund. Nast´pnie wyciàgnij zbiornik z atramentem.
✼ Zalecana iloÊç atramentu ✼Typ A : PG-210, 510, 810 – 8mlTyp B : PG-210XL, 512, 810XL – 10ml
◆ Ostrze˝enie: Podana iloÊç atramentu dotyczy ca¬kowicpustego kartrid˝a.
◆ Ostrze˝enie: Je˝eli wstrzykniesz zbyt du˝o atramentu luzbyt szybko, mo˝e to spowodowaç jego przelanie luwyciek.
n Przy¬ó˝ do¬àczonà strzykawk´ do uszczelki na dole klipapowoli odessij 1 ml atramentu. Nast´pnie od¬àcz strzykawk
◆ Ostrze˝enie: Dla powy˝szego kroku, uzyj strzykawki beig¬y i szczególnie uwa˝aj ˝eby odciagniety atrament nwp¬ynଠponownie do kartrid˝a.
❈ Uwaga: Procedur´ t´ wykonuje si´ w celu oczyszczen
dysz kartrid˝a, aby udoskonaliç jakoÊç wydruku.
m Wyjmij kartrid˝ z klipa i wyczyÊç nadmiar atramentu wokdysz przyk¬adajàc kartrid˝ dyszami do mi´kkiego materia¬A nast´pnie zainstaluj kartrid˝ w drukarce.
❈ Uwaga: Je˝eli atrament cieknie z z dysz kartrid˝a pnape¬nieniu, albo jakoÊç nie jest doÊç dobra, przeczytco zrobiç, gdy wystàpià problemy po nape¬nieniznajdujàcym na koƒcu instrukcji obs¬ugi i poczyƒ odpowiednkroki.
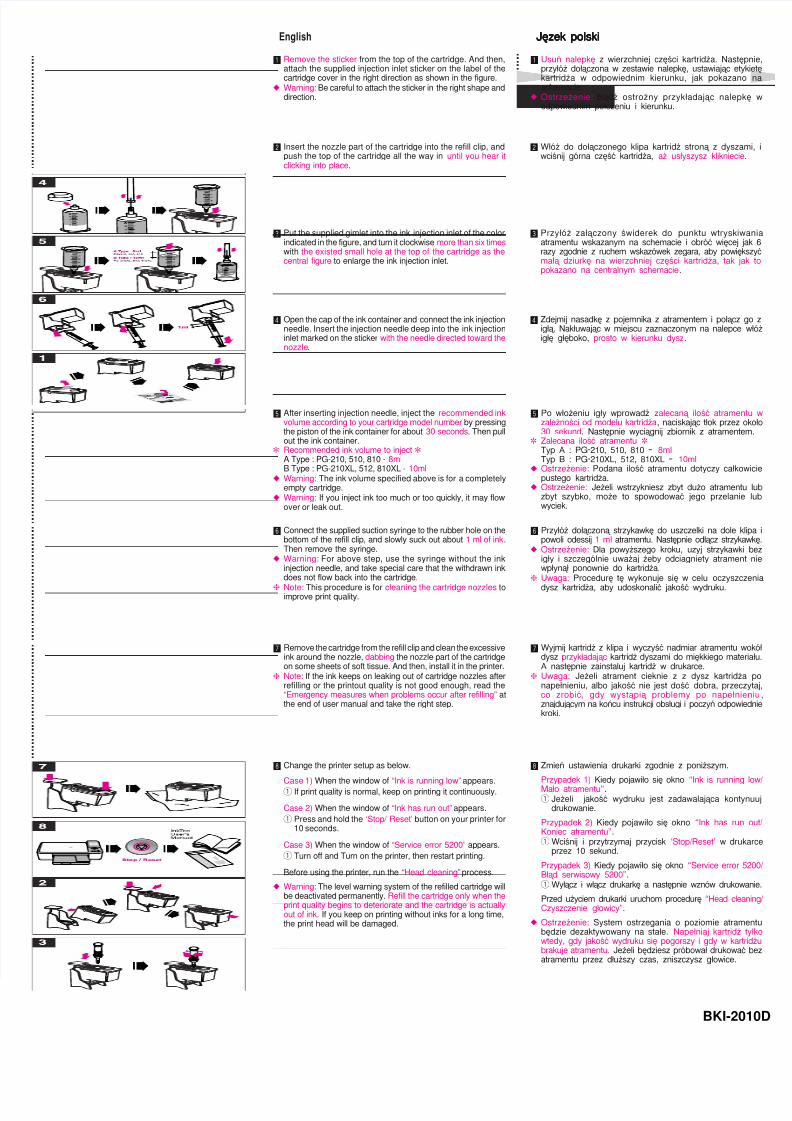
z Remove the sticker from the top of the cartridge. And then,attach the supplied injection inlet sticker on the label of thecartridge cover in the right direction as shown in the figure.
◆ Warning: Be careful to attach the sticker in the right shape anddirection.
x Insert the nozzle part of the cartridge into the refill clip, andpush the top of the cartridge all the way in until you hear itclicking into place.
c Put the supplied gimlet into the ink injection inlet of the colorindicated in the figure, and turn it clockwise more than six timeswith the existed small hole at the top of the cartridge as thecentral figure to enlarge the ink injection inlet.
v Open the cap of the ink container and connect the ink injectionneedle. Insert the injection needle deep into the ink injectioninlet marked on the sticker with the needle directed toward thenozzle.
n Connect the supplied suction syringe to the rubber hole on thebottom of the refill clip, and slowly suck out about 1 ml of ink.Then remove the syringe.
◆ Warning: For above step, use the syringe without the inkinjection needle, and take special care that the withdrawn inkdoes not flow back into the cartridge.
❈Note: This procedure is for cleaning the cartridge nozzles toimprove print quality.
m Remove the cartridge from the refill clip and clean the excessiveink around the nozzle, dabbing the nozzle part of the cartridgeon some sheets of soft tissue. And then, install it in the printer.
❈ Note: If the ink keeps on leaking out of cartridge nozzles afterrefilling or the printout quality is not good enough, read the“Emergency measures when problems occur after refilling” atthe end of user manual and take the right step.
, Change the printer setup as below.
Case 1) When the window of “Ink is running low” appears.
q If print quality is normal, keep on printing it continuously.
Case 2) When the window of “Ink has run out” appears.
q Press and hold the ‘Stop/ Reset’ button on your printer for10 seconds.
Case 3) When the window of “Service error 5200” appears.
q Turn off and Turn on the printer, then restart printing.
Before using the printer, run the “Head cleaning” process.
◆ Warning: The level warning system of the refilled cartridge willbe deactivated permanently. Refill the cartridge only when theprint quality begins to deteriorate and the cartridge is actuallyout of ink. If you keep on printing without inks for a long time,the print head will be damaged.
, Zmieƒ ustawienia drukarki zgodnie z poni˝szym.
Przypadek 1) Kiedy pojawi¬o si´ okno “Ink is running low
Ma¬o atramentu”.q Je˝eli jakoÊç wydruku jest zadawalajàca kontynu
drukowanie.
Przypadek 2) Kiedy pojawi¬o si´ okno “Ink has run ouKoniec atramentu”.qWciÊnij i przytrzymaj przycisk ‘Stop/Reset’ w drukarc
przez 10 sekund.
Przypadek 3) Kiedy pojawi¬o si´ okno “Service error 520B¬àd serwisowy 5200”.qWy¬àcz i w¬àcz drukark´ a nast´pnie wznów drukowani
Przed u˝yciem drukarki uruchom procedur´ “Head cleaninCzyszczenie g¬owicy”.
◆ Ostrze˝enie: System ostrzegania o poziomie atramenb´dzie dezaktywowany na sta¬e. Nape¬niaj kartrid˝ tylkwtedy, gdy jakoÊç wydruku si´ pogorszy i gdy w kartrid˝brakuje atramentu. Je˝eli b´dziesz próbowa¬ drukowaç beatramentu przez d¬u˝szy czas, zniszczysz g¬owice.
b After inserting injection needle, inject the recommended inkvolume according to your cartridge model number by pressingthe piston of the ink container for about 30 seconds. Then pullout the ink container.
✼ Recommended ink volume to inject ✼A Type : PG-210, 510, 810 - 8mlB Type : PG-210XL, 512, 810XL - 10ml
◆ Warning: The ink volume specified above is for a completelyempty cartridge.
◆ Warning: If you inject ink too much or too quickly, it may flowover or leak out.
v Zdejmij nasadk´ z pojemnika z atramentem i po¬àcz go ig¬à. Nak¬uwajàc w miejscu zaznaczonym na nalepce w¬óig¬´ g¬´boko, prosto w kierunku dysz.
Top Related