Szablon prezentacji beamer zgodny z księgą logotypu ... · składające się na slajd. ......
47
Szablon prezentacji beamer zgodny z księgą logotypu Politechniki Wroclawskiej: krótka dokumentacja Wersja: z drobnymi modykacjami! Wojciech Myszka Katedra Mechaniki i Inżynierii Materialowej -- :: + kompilowane: listopada
Transcript of Szablon prezentacji beamer zgodny z księgą logotypu ... · składające się na slajd. ......

Szablon prezentacji beamer zgodny z księgąlogotypu Politechniki Wrocławskiej: krótkadokumentacjaWersja: 50 z drobnymi modyfikacjami!
Wojciech MyszkaKatedra Mechaniki i Inżynierii Materiałowej
2018-11-27 07:36:18 +0100kompilowane: 27 listopada 2018

TerminologiaI strona (page) — plik PDF składa się z wielu stron i widzimy tylko jedną znich na ekranie;I slajd (frame) — podstawowa jednostka logiczna informacji wyświetlanejna ekranie; składać się na niąmoże kilka nakładek,I nakładka (overlay) — z punktu widzenia pliku PDF będzie to jedna
strona zawierająca, najczęściej, przyrostowo dodawane informacjeskładające się na slajd.Występuje tez pojęcie „folia” (transparency).Pojęcie hangout tłumaczę jako „materiały informacyjne”.

Szablon „rektorski”SPRAWOZDANIE REKTORA
Z DZIAŁALNOŚCI ZA 2012 ROK
Posiedzenie Senatulipiec 2013
1
Rysunek: Wygląd prezentacji z „rektorską” wersją szablonu

Logo HR Excellence in Research

Tła nowego szablonu w wersji polskiej i angielskiejtytułowa, horizontal, polski

Tła nowego szablonu w wersji polskiej i angielskiejtytułowa, vertical, polski

Tła nowego szablonu w wersji polskiej i angielskiejtytułowa, horizontal, angielski
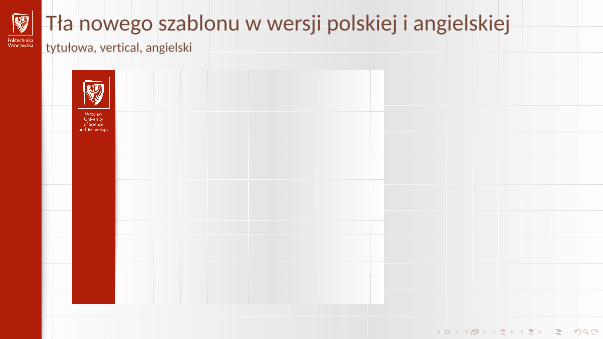
Tła nowego szablonu w wersji polskiej i angielskiejtytułowa, vertical, angielski

Tła nowego szablonu w wersji polskiej i angielskiejnormalna, horizontal, polski

Tła nowego szablonu w wersji polskiej i angielskiejnormalna, vertical, polski

Tła nowego szablonu w wersji polskiej i angielskiejnormalna, horizontal, angielski

Tła nowego szablonu w wersji polskiej i angielskiejnormalna,vertical, angielski
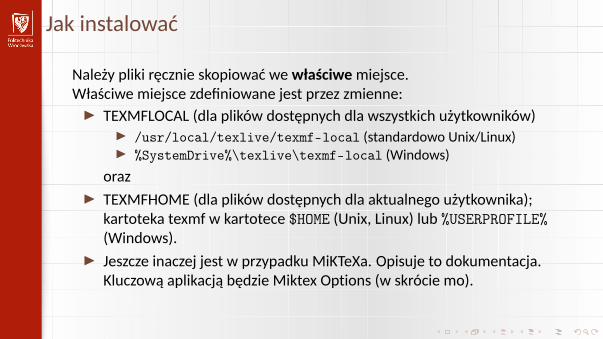
Jak instalowaćNależy pliki ręcznie skopiować we właściwemiejsce.Właściwe miejsce zdefiniowane jest przez zmienne:I TEXMFLOCAL (dla plików dostępnych dla wszystkich użytkowników)
I /usr/local/texlive/texmf-local (standardowo Unix/Linux)I %SystemDrive%\texlive\texmf-local (Windows)
orazI TEXMFHOME (dla plików dostępnych dla aktualnego użytkownika);kartoteka texmf w kartotece $HOME (Unix, Linux) lub %USERPROFILE%(Windows).I Jeszcze inaczej jest w przypadku MiKTeXa. Opisuje to dokumentacja.Kluczową aplikacją będzie Miktex Options (w skrócie mo).
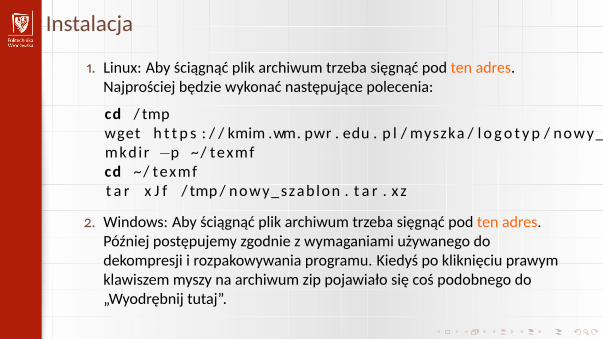
Instalacja1. Linux: Aby ściągnąć plik archiwum trzeba sięgnąć pod ten adres.Najprościej będzie wykonać następujące polecenia:
cd / tmpwget h t t p s : / / kmim .wm. pwr . edu . p l / myszka / l o go t yp / nowy_szab lon . t a r . x zmkdir −p ~/ texmfcd ~/ texmft a r x J f / tmp / nowy_szab lon . t a r . x z
2. Windows: Aby ściągnąć plik archiwum trzeba sięgnąć pod ten adres.Później postępujemy zgodnie z wymaganiami używanego dodekompresji i rozpakowywania programu. Kiedyś po kliknięciu prawymklawiszem myszy na archiwum zip pojawiało się coś podobnego do„Wyodrębnij tutaj”.
Dodatkowe pakiety
Oprócz pakietów standardowych (niezbędnych do pracy z beamerem) nie sąpotrzebne żadne pakiety dodatkowe.W przypadku gdy zechcemy użyć innych niż standardowe fontów potrzebnemogą być pakiety je instalujące, na przykład:I carlito — gdy chcemy naśladować standardowy font PowerPointa:Calibri.
Jak używać?pdfLATEX
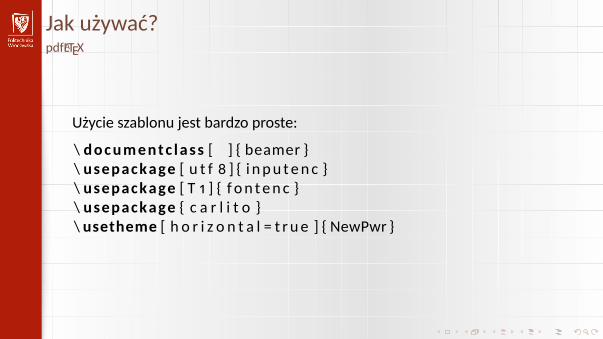
Użycie szablonu jest bardzo proste:\ documentc lass [ ] { beamer }\ usepackage [ u t f 8 ] { i npu tenc }\ usepackage [ T 1 ] { f on tenc }\ usepackage { c a r l i t o }\ usetheme [ h o r i z o n t a l = t r ue ] { NewPwr }
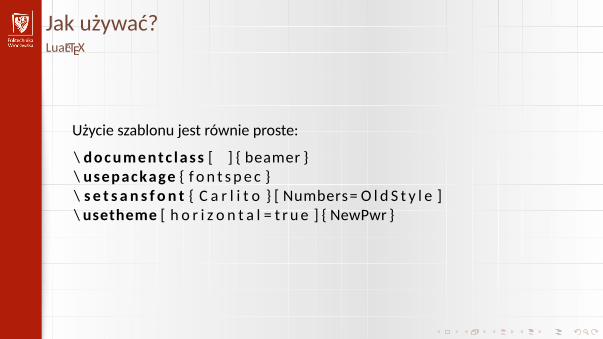
Jak używać?LuaLATEX
Użycie szablonu jest równie proste:\ documentc lass [ ] { beamer }\ usepackage { f on t s pe c }\ s e t s a n s f on t { C a r l i t o } [ Numbers= O l d S t y l e ]\ usetheme [ h o r i z o n t a l = t r ue ] { NewPwr }

Jak używać IOpcje szablonu PwrNew
W poleceniu \usetheme[ ]{NewPwr}, w nawiasach kwadratowych podajemyopcje szablonu. Można wybrać język i tło.1. Język wybieramy podając opcję lang=en lub lang=pl, gdy jej nie podamy— wybrany będzie język polski.2. Rodzaj tła (pasek poziomy lub pasek pionowy) podajemy deklarująchorizontal =true albo vertical =true; można skrócić do samegohorizontal , vertical . Gdy nie podamy — będzie vertical .3. Ponieważ gdzieniegdzie funkcjonuje jeszcze wersja „rektorska”szablonu, można użyć (niezalecanej) opcji rektor=true lub, po prosturektor . Szablon występuje wyłącznie w wersji polskojęzycznej i dlaekranów o aspectratio =43.

Jak używać IIOpcje szablonu PwrNew
4. Uważam, że nie zawsze musi być prezentowane logo HR Excellence inResearch. Władze uczelni są innego zdania i w związku z tym domyślnielogo jest umieszczane. Można je wyłączyć używając opcji hr= false .5. Opcja pagenumbers=true lub pagenumbers włącza numerowanie stron.(Standardowo wyłączone!) Strona tytułowa prezentacji nie jestnumerowana!6. Od „zawsze”, standardowo, na dole każdego slajdu beamer umieszczałsymbole nawigacji. Ponieważ, mało kto z tego korzysta — są onewyłączone. Można je włączyć umieszczając wśród opcji szablonunavigation lub navigation =true.
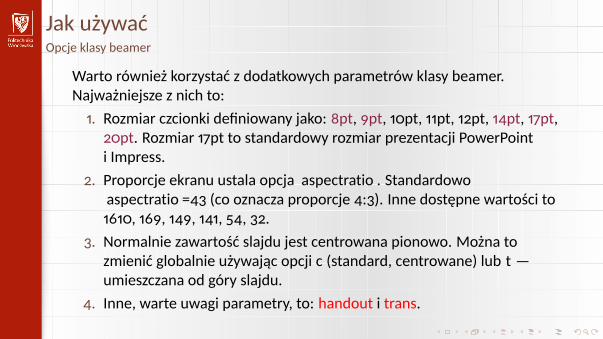
Jak używaćOpcje klasy beamer
Warto również korzystać z dodatkowych parametrów klasy beamer.Najważniejsze z nich to:1. Rozmiar czcionki definiowany jako: 8pt, 9pt, 10pt, 11pt, 12pt, 14pt, 17pt,20pt. Rozmiar 17pt to standardowy rozmiar prezentacji PowerPointi Impress.2. Proporcje ekranu ustala opcja aspectratio . Standardowoaspectratio =43 (co oznacza proporcje 4:3). Inne dostępne wartości to1610, 169, 149, 141, 54, 32.3. Normalnie zawartość slajdu jest centrowana pionowo. Można tozmienić globalnie używając opcji c (standard, centrowane) lub t —umieszczana od góry slajdu.4. Inne, warte uwagi parametry, to: handout i trans.
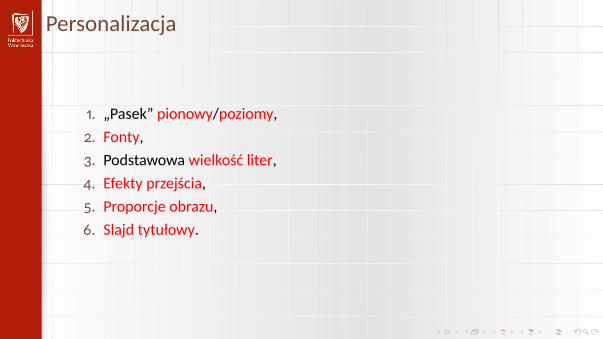
Personalizacja
1. „Pasek” pionowy/poziomy,2. Fonty,3. Podstawowa wielkość liter,4. Efekty przejścia,5. Proporcje obrazu,6. Slajd tytułowy.
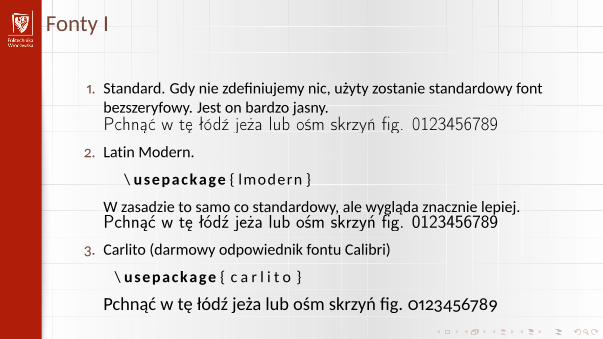
Fonty I1. Standard. Gdy nie zdefiniujemy nic, użyty zostanie standardowy fontbezszeryfowy. Jest on bardzo jasny.Pchnąć w tę łódź jeża lub ośm skrzyń fig. 0123456789
2. Latin Modern.\ usepackage { lmodern }
W zasadzie to samo co standardowy, ale wygląda znacznie lepiej.Pchnąć w tę łódź jeża lub ośm skrzyń fig. 0123456789
3. Carlito (darmowy odpowiednik fontu Calibri)\ usepackage { c a r l i t o }
Pchnąć w tę łódź jeża lub ośm skrzyń fig. 0123456789
Fonty II
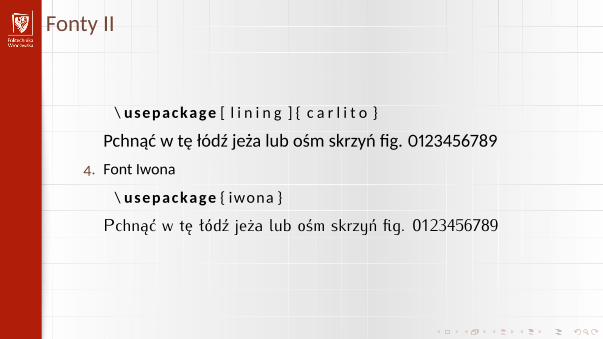
\ usepackage [ l i n i n g ] { c a r l i t o }Pchnąć w tę łódź jeża lub ośm skrzyń fig. 0123456789
4. Font Iwona\ usepackage { iwona }
Pchnąć w tę łódź jeża lub ośm skrzyń fig. 0123456789
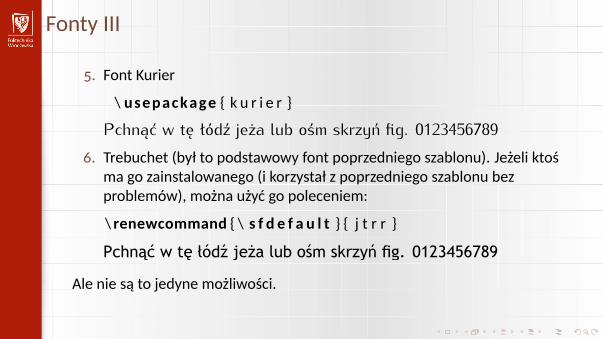
Fonty III5. Font Kurier
\ usepackage { k u r i e r }Pchnąć w tę łódź jeża lub ośm skrzyń fig. 0123456789
6. Trebuchet (był to podstawowy font poprzedniego szablonu). Jeżeli ktośma go zainstalowanego (i korzystał z poprzedniego szablonu bezproblemów), można użyć go poleceniem:\ renewcommand { \ s f d e f a u l t } { j t r r }Pchnąć w tę łódź jeża lub ośm skrzyń fig. 0123456789
Ale nie są to jedyne możliwości.
Efekty „przejścia”Transition effects
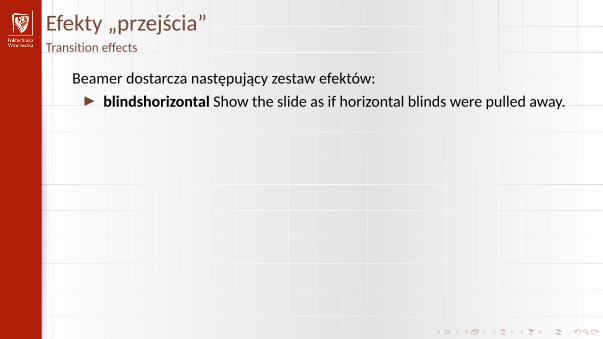
Beamer dostarcza następujący zestaw efektów:
I blindshorizontal Show the slide as if horizontal blinds were pulled away.I blindsvertical Show the slide as if vertical blinds were pulled away.I boxin Show the slide by moving to the center from all four sides.I boxout Show the slide by showing more and more of a rectangular areathat is centered on the slide center.I cover Show the slide by covering the content that was shown before.I dissolve Show the slide by slowly dissolving what was shown before.I fade Show the slide by slowly fading what was shown before.I glitter Show the slide with a glitter effect that sweeps in the specifieddirection.
Efekty „przejścia”Transition effects
Beamer dostarcza następujący zestaw efektów:I blindshorizontal Show the slide as if horizontal blinds were pulled away.
I blindsvertical Show the slide as if vertical blinds were pulled away.I boxin Show the slide by moving to the center from all four sides.I boxout Show the slide by showing more and more of a rectangular areathat is centered on the slide center.I cover Show the slide by covering the content that was shown before.I dissolve Show the slide by slowly dissolving what was shown before.I fade Show the slide by slowly fading what was shown before.I glitter Show the slide with a glitter effect that sweeps in the specifieddirection.
Efekty „przejścia”Transition effects
Beamer dostarcza następujący zestaw efektów:
I blindshorizontal Show the slide as if horizontal blinds were pulled away.
I blindsvertical Show the slide as if vertical blinds were pulled away.
I boxin Show the slide by moving to the center from all four sides.I boxout Show the slide by showing more and more of a rectangular areathat is centered on the slide center.I cover Show the slide by covering the content that was shown before.I dissolve Show the slide by slowly dissolving what was shown before.I fade Show the slide by slowly fading what was shown before.I glitter Show the slide with a glitter effect that sweeps in the specifieddirection.
Efekty „przejścia”Transition effects
Beamer dostarcza następujący zestaw efektów:
I blindshorizontal Show the slide as if horizontal blinds were pulled away.I blindsvertical Show the slide as if vertical blinds were pulled away.
I boxin Show the slide by moving to the center from all four sides.
I boxout Show the slide by showing more and more of a rectangular areathat is centered on the slide center.I cover Show the slide by covering the content that was shown before.I dissolve Show the slide by slowly dissolving what was shown before.I fade Show the slide by slowly fading what was shown before.I glitter Show the slide with a glitter effect that sweeps in the specifieddirection.
Efekty „przejścia”Transition effects
Beamer dostarcza następujący zestaw efektów:
I blindshorizontal Show the slide as if horizontal blinds were pulled away.I blindsvertical Show the slide as if vertical blinds were pulled away.I boxin Show the slide by moving to the center from all four sides.
I boxout Show the slide by showing more and more of a rectangular areathat is centered on the slide center.
I cover Show the slide by covering the content that was shown before.I dissolve Show the slide by slowly dissolving what was shown before.I fade Show the slide by slowly fading what was shown before.I glitter Show the slide with a glitter effect that sweeps in the specifieddirection.
Efekty „przejścia”Transition effects
Beamer dostarcza następujący zestaw efektów:
I blindshorizontal Show the slide as if horizontal blinds were pulled away.I blindsvertical Show the slide as if vertical blinds were pulled away.I boxin Show the slide by moving to the center from all four sides.I boxout Show the slide by showing more and more of a rectangular areathat is centered on the slide center.
I cover Show the slide by covering the content that was shown before.
I dissolve Show the slide by slowly dissolving what was shown before.I fade Show the slide by slowly fading what was shown before.I glitter Show the slide with a glitter effect that sweeps in the specifieddirection.
Efekty „przejścia”Transition effects
Beamer dostarcza następujący zestaw efektów:
I blindshorizontal Show the slide as if horizontal blinds were pulled away.I blindsvertical Show the slide as if vertical blinds were pulled away.I boxin Show the slide by moving to the center from all four sides.I boxout Show the slide by showing more and more of a rectangular areathat is centered on the slide center.I cover Show the slide by covering the content that was shown before.
I dissolve Show the slide by slowly dissolving what was shown before.
I fade Show the slide by slowly fading what was shown before.I glitter Show the slide with a glitter effect that sweeps in the specifieddirection.
Efekty „przejścia”Transition effects
Beamer dostarcza następujący zestaw efektów:
I blindshorizontal Show the slide as if horizontal blinds were pulled away.I blindsvertical Show the slide as if vertical blinds were pulled away.I boxin Show the slide by moving to the center from all four sides.I boxout Show the slide by showing more and more of a rectangular areathat is centered on the slide center.I cover Show the slide by covering the content that was shown before.I dissolve Show the slide by slowly dissolving what was shown before.
I fade Show the slide by slowly fading what was shown before.
I glitter Show the slide with a glitter effect that sweeps in the specifieddirection.
Efekty „przejścia”Transition effects
Beamer dostarcza następujący zestaw efektów:
I blindshorizontal Show the slide as if horizontal blinds were pulled away.I blindsvertical Show the slide as if vertical blinds were pulled away.I boxin Show the slide by moving to the center from all four sides.I boxout Show the slide by showing more and more of a rectangular areathat is centered on the slide center.I cover Show the slide by covering the content that was shown before.I dissolve Show the slide by slowly dissolving what was shown before.I fade Show the slide by slowly fading what was shown before.
I glitter Show the slide with a glitter effect that sweeps in the specifieddirection.
Efekty „przejścia” cdI push Show the slide by pushing what was shown before off the screenusing the new content.
I replace Replace the previous slide directly (default behaviour).I splitverticalin Show the slide by sweeping two vertical lines from thesides inward.I splitverticalout Show the slide by sweeping two vertical lines from thecenter outward.I splithorizontalin Show the slide by sweeping two horizontal lines fromthe sides inward.I splithorizontalout Show the slide by sweeping two horizontal lines fromthe center outward.I wipe Show the slide by sweeping a single line in the specified direction,thereby “wiping out” the previous contents.
Efekty „przejścia” cd
I push Show the slide by pushing what was shown before off the screenusing the new content.
I replace Replace the previous slide directly (default behaviour).
I splitverticalin Show the slide by sweeping two vertical lines from thesides inward.I splitverticalout Show the slide by sweeping two vertical lines from thecenter outward.I splithorizontalin Show the slide by sweeping two horizontal lines fromthe sides inward.I splithorizontalout Show the slide by sweeping two horizontal lines fromthe center outward.I wipe Show the slide by sweeping a single line in the specified direction,thereby “wiping out” the previous contents.
Efekty „przejścia” cd
I push Show the slide by pushing what was shown before off the screenusing the new content.I replace Replace the previous slide directly (default behaviour).
I splitverticalin Show the slide by sweeping two vertical lines from thesides inward.
I splitverticalout Show the slide by sweeping two vertical lines from thecenter outward.I splithorizontalin Show the slide by sweeping two horizontal lines fromthe sides inward.I splithorizontalout Show the slide by sweeping two horizontal lines fromthe center outward.I wipe Show the slide by sweeping a single line in the specified direction,thereby “wiping out” the previous contents.
Efekty „przejścia” cd
I push Show the slide by pushing what was shown before off the screenusing the new content.I replace Replace the previous slide directly (default behaviour).I splitverticalin Show the slide by sweeping two vertical lines from thesides inward.
I splitverticalout Show the slide by sweeping two vertical lines from thecenter outward.
I splithorizontalin Show the slide by sweeping two horizontal lines fromthe sides inward.I splithorizontalout Show the slide by sweeping two horizontal lines fromthe center outward.I wipe Show the slide by sweeping a single line in the specified direction,thereby “wiping out” the previous contents.
Efekty „przejścia” cd
I push Show the slide by pushing what was shown before off the screenusing the new content.I replace Replace the previous slide directly (default behaviour).I splitverticalin Show the slide by sweeping two vertical lines from thesides inward.I splitverticalout Show the slide by sweeping two vertical lines from thecenter outward.
I splithorizontalin Show the slide by sweeping two horizontal lines fromthe sides inward.
I splithorizontalout Show the slide by sweeping two horizontal lines fromthe center outward.I wipe Show the slide by sweeping a single line in the specified direction,thereby “wiping out” the previous contents.
Efekty „przejścia” cd
I push Show the slide by pushing what was shown before off the screenusing the new content.I replace Replace the previous slide directly (default behaviour).I splitverticalin Show the slide by sweeping two vertical lines from thesides inward.I splitverticalout Show the slide by sweeping two vertical lines from thecenter outward.I splithorizontalin Show the slide by sweeping two horizontal lines fromthe sides inward.
I splithorizontalout Show the slide by sweeping two horizontal lines fromthe center outward.
I wipe Show the slide by sweeping a single line in the specified direction,thereby “wiping out” the previous contents.
Efekty „przejścia” cd
I push Show the slide by pushing what was shown before off the screenusing the new content.I replace Replace the previous slide directly (default behaviour).I splitverticalin Show the slide by sweeping two vertical lines from thesides inward.I splitverticalout Show the slide by sweeping two vertical lines from thecenter outward.I splithorizontalin Show the slide by sweeping two horizontal lines fromthe sides inward.I splithorizontalout Show the slide by sweeping two horizontal lines fromthe center outward.
I wipe Show the slide by sweeping a single line in the specified direction,thereby “wiping out” the previous contents.

Efekty przejściaUwagi
I Pamiętać natomiast trzeba, że nie każdy program używany dowyświetlania plików PDF wszystkie efekty realizuje. Można miećpewność chyba tylko w przypadku oryginalnego Adobe AcrobatReadera.I Efekt przejścia został zaimplementowany w taki sposób, że można gowskazać dla wybranych nakłądek. Polecenia włączające efekt przejściadokładnie opisane są w dokumentacji pakietu beamer. Tworzy się jeprzez dodanie do nazwy efektu przedrostka: \trans. Całe polecenie mapostać:\transefekt<specyfikacja slajdów>[dodatkowe parametry].I dodatkowe parametry to, na przykład czas trwanie efektu: duration=1
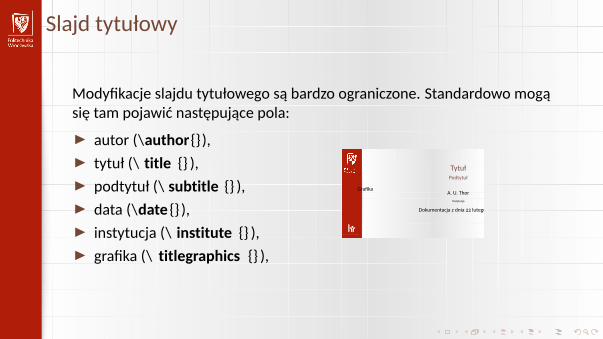
Slajd tytułowyModyfikacje slajdu tytułowego są bardzo ograniczone. Standardowo mogąsię tam pojawić następujące pola:I autor (\author{}),I tytuł (\ title {} ),I podtytuł (\ subtitle {} ),I data (\date {} ),I instytucja (\ institute {} ),I grafika (\ titlegraphics {} ),
Grafika
TytułPodtytułA. U. Thor
InstytucjaDokumentacja z dnia 22 lutego 2018
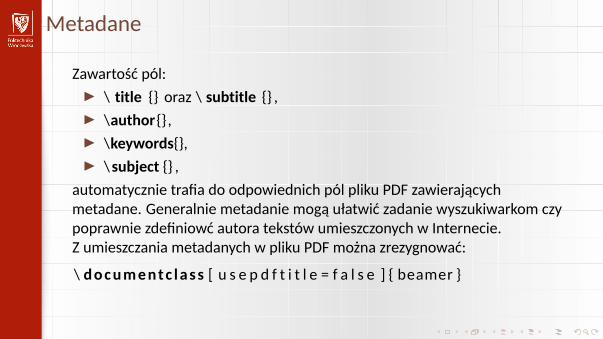
MetadaneZawartość pól:I \ title {} oraz \ subtitle {} ,I \author{},I \keywords{},I \subject {} ,
automatycznie trafia do odpowiednich pól pliku PDF zawierającychmetadane. Generalnie metadanie mogą ułatwić zadanie wyszukiwarkom czypoprawnie zdefiniowć autora tekstów umieszczonych w Internecie.Z umieszczania metadanych w pliku PDF można zrezygnować:\ documentc lass [ u s e p d f t i t l e = f a l s e ] { beamer }

DokumentacjaNa dokumentację składa się:I plik nowy_szablon_doc_article.pdf;I plik nowy_szablon_doc_beamer.pdf będący wersją „prezentacyjną” tejdokumentacji (czyli właśnie to);I pliki źródłowe dokumentacji;I przykładowa, prosta prezentacja NewPwr-example.pdf wraz zeźródłami;I dodatkowym bonusem jest plik oficyna_url . bst czyli szablon „prawiezgodny” z wymaganiami Oficyny Wydawniczej PWr.
Dokumentacja znajduje się w podkatalogu doc/pwr.
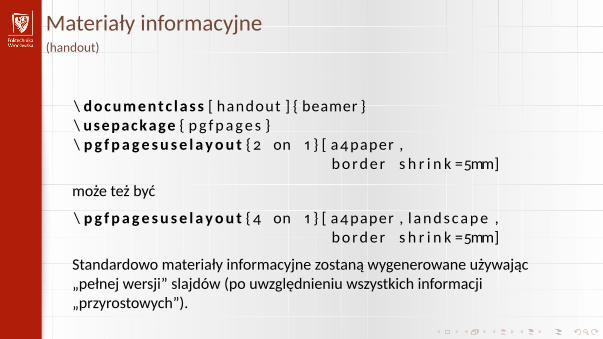
Materiały informacyjne(handout)
\ documentc lass [ handout ] { beamer }\ usepackage { pg fpages }\ pg fpagesuse l ayou t { 2 on 1 } [ a4paper ,border s h r i n k =5mm]może też być\ pg fpagesuse l ayou t {4 on 1 } [ a4paper , l andscape ,border s h r i n k =5mm]Standardowo materiały informacyjne zostaną wygenerowane używając„pełnej wersji” slajdów (po uwzględnieniu wszystkich informacji„przyrostowych”).
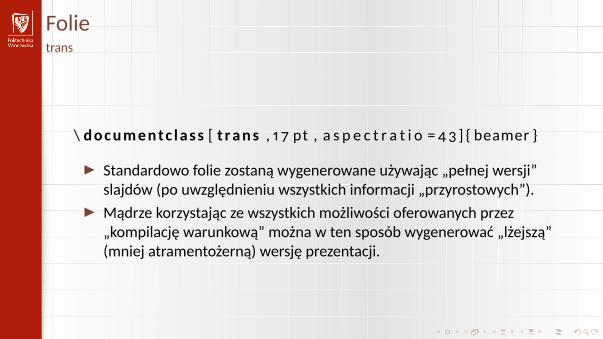
Folietrans
\ documentc lass [ t rans , 1 7 pt , a s p e c t r a t i o =43 ] { beamer }I Standardowo folie zostaną wygenerowane używając „pełnej wersji”slajdów (po uwzględnieniu wszystkich informacji „przyrostowych”).I Mądrze korzystając ze wszystkich możliwości oferowanych przez„kompilację warunkową” można w ten sposób wygenerować „lżejszą”(mniej atramentożerną) wersję prezentacji.
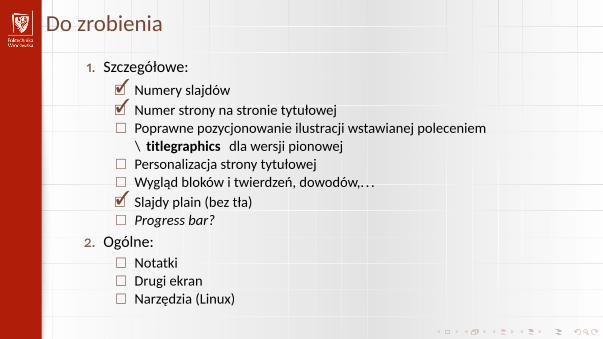
Do zrobienia1. Szczegółowe:�3 Numery slajdów�3 Numer strony na stronie tytułowej� Poprawne pozycjonowanie ilustracji wstawianej poleceniem\ titlegraphics dla wersji pionowej� Personalizacja strony tytułowej� Wygląd bloków i twierdzeń, dowodów,. . .�3 Slajdy plain (bez tła)� Progress bar?
2. Ogólne:� Notatki� Drugi ekran� Narzędzia (Linux)