LXF106vpn Access.tut Adv
5
92 Linux Format June 2008 Tutorial Secure VPN Gateway. VPN: Remote Looking for a remote access system that will give you total control over who gets access to what? David Gempton walks you through his Secure VPN Gateway . Secure VPN Gateway Set up a remote networking client the easy way W orking remotely must be the Nirvana of the computer age. The ability to travel the world and plug into the office from wherever you are as if you’d never left your desk would be fantastic (if you’re reading this standing up on packed commuter train, you’ll agree – and you have our sympathies). That said, the reality often leaves a lot to be desired. One of my biggest concerns is the actual level of security (or lack of security) that people achieve when making a remote network connection. A few years ago the difficulties of achieving a secure remote connection was giving one of my clients so much hassle that they came to me for a solution to solve their problems. The resulting software is Secure VPN Gateway . It’s this solution that we are going to install and configure in this tutorial. Before we start the install, lets look at some of the issues that surround the creation of a secure network connection. Username/password security Traditional password security is easily broken. You need a solution that’s difficult to crack. Complexity Remote access solutions are often tricky for the end user to configure. You need a solution that is simple to use, with nothing to configure, nothing to learn, and that’s pretty to look at. Only this sort of solution can be rolled out to the entire spectrum of computer users. Network Tolerance Some secure network protocols are fussy about packet manipulation. The answer is simply to use a solution with a more tolerant robust protocol. Monitoring Not all remote access solutions make it easy to access the logs. A solution that includes monitoring should highlight potential risks. Administration VPN solutions that make you configure user accounts then define firewall rules to restrict their access are making you do unnecessary work. The solution needs to be a one- stop shop, with VPN account maintenance and firewall network port restriction tightly coupled together. Too many entry points With too many users, port forwarding quickly becomes a curse to administer. The solution must provide turn-style network access with all connections coming in through the same access point. Secure VPN Gateway is one solution that overcomes all of these issues. It also has client software for Linux, Windows, and Mac OS X, so you can run whatever desktop you want. Installing Secure VPN Gateway The Linux install kit can be freely downloaded from www.ttc4it. com/gallery1.htm. This free kit will give you a fully functioning system, though it’s limited to only two separate user accounts. Additional user accounts can be enabled by purchasing the appropriate user licence. [Alternatively, you could use any number of free VPN solutions for Linux that are not only free as in beer but also as in speech.] Copy the SVG_install01.tar.gz tarball into a directory called /tmp/install/. Use cd to move into this directory, and run: Project requirements What you will need for this project: Copy of Secure VPN Gateway available from www.ttc4it.com/gallery1.htm A Linux box with an Apache web server up and running. An internet connection. USB memory stick with at least 10MB free. Two different clients open at once with a variety of applications running, all encrypted, all secure. David Gempton has spent 22 years as a professional Unix/Linux consultant. He’s also the founder and managing director of Technology Training Consulting Limited, the company that sells the software featured in this tutorial. Our expert LXF106.tut adv 92 17/4/08 13:12:58
-
Upload
richard-high -
Category
Documents
-
view
213 -
download
0
Transcript of LXF106vpn Access.tut Adv

8/8/2019 LXF106vpn Access.tut Adv
http://slidepdf.com/reader/full/lxf106vpn-accesstut-adv 1/4
92 Linux Format June 2008
Tutorial Secure VPN Gateway.
VPN: RemoteLooking for a remote access system that will give you total control over who getsaccess to what? David Gempton walks you through his Secure VPN Gateway .
Secure VPN Gateway Set up a remotenetworking client the easy way
Working remotely must be the Nirvana of the computerage. The ability to travel the world and plug into the
office from wherever you are as if you’d never left your
desk would be fantastic (if you’re reading this standing up on
packed commuter train, you’ll agree – and you have our
sympathies). That said, the reality often leaves a lot to be desired.
One of my biggest concerns is the actual level of security (or lack
of security) that people achieve when making a remote network
connection.
A few years ago the difficulties of achieving a secure remote
connection was giving one of my clients so much hassle that they
came to me for a solution to solve their problems. The resulting
software is Secure VPN Gateway . It’s this solution that we are
going to install and configure in this tutorial. Before we start the
install, lets look at some of the issues that surround the creation of
a secure network connection.
Username/password security Traditional password security iseasily broken. You need a solution that’s difficult to crack.
Complexity Remote access solutions are often tricky for the
end user to configure. You need a solution that is simple to use,
with nothing to configure, nothing to learn, and that’s pretty to look
at. Only this sort of solution can be rolled out to the entire
spectrum of computer users.
Network Tolerance Some secure network protocols are fussy
about packet manipulation. The answer is simply to use a solution
with a more tolerant robust protocol.
Monitoring Not all remote access solutions make it easy toaccess the logs. A solution that includes monitoring should
highlight potential risks.
Administration VPN solutions that make you configure user
accounts then define firewall rules to restrict their access are
making you do unnecessary work. The solution needs to be a one-
stop shop, with VPN account maintenance and firewall network
port restriction tightly coupled together.
Too many entry points With too many users, port forwarding
quickly becomes a curse to administer. The solution must provide
turn-style network access with all connections coming in through
the same access point.
Secure VPN Gateway is one solution that overcomes all of
these issues. It also has client software for Linux, Windows, and
Mac OS X, so you can run whatever desktop you want.
Installing Secure VPN GatewayThe Linux install kit can be freely downloaded from www.ttc4it.
com/gallery1.htm. This free kit will give you a fully functioning
system, though it’s limited to only two separate user accounts.
Additional user accounts can be enabled by purchasing the
appropriate user licence. [Alternatively, you could use any number
of free VPN solutions for Linux that are not only free as in beer but
also as in speech.]
Copy the SVG_install01.tar.gztarball into a directory called
/tmp/install/. Use cd to move into this directory, and run:
Project requirementsWhat you will need for this project:
Copy of Secure VPN Gateway available from
www.ttc4it.com/gallery1.htm
A Linux box with an Apache web server up and running.
An internet connection.
USB memory stick with at least 10MB free. Two different clients open at once with a variety of
applications running, all encrypted, all secure.
DavidGemptonhas spent 22 yearsas a professionalUnix/Linuxconsultant. He’salso the founderand managingdirector ofTechnologyTraining ConsultingLimited, thecompany that sells
the softwarefeatured in thistutorial.
Ourexpert
LXF106.tut_adv 92 17/4/08 13:12:58

8/8/2019 LXF106vpn Access.tut Adv
http://slidepdf.com/reader/full/lxf106vpn-accesstut-adv 2/4
June 2008 Linux Format 93
Secure VPN Gateway Tutorial
networking
If you missed last issue Call 0870 837 4773 or +44 1858 438795.
tar xvzf ./SVG_install01.tar.gz
to unpack the tarball, then enter
./vpn_install
to install Secure VPN Gateway
on to your system. A number of
directories will be created under
/opt. Software will be installed in
these directories and into your Apache cgi-bin directory.
You will be asked a series of questions regarding the installationand your current network settings. These questions are explained
here in detail. It might seem a bit simplistic to advanced users, but
the setup process has been detailed to show just how easy it is to
administer.
Enter the VPN network name (vpn1) Enter a simple string that
helps to identify this particular VPN server (no spaces).
Enter the port number for the VPN link This is the network port
number that the VPN server will listen on. The default is 2227.
Enter the external IP address for the VPN server -Red
interface This is the network IP address of the Linux system that
is exposed to the internet. If the Linux system is connected to a
firewall, this will be the IP address on the Linux system that the
firewall will forward internet traffic to. It is normally know as the
‘red’ interface.
Is this interface behind a Firewall (y/n) If there is a firewall
between your Linux system and the internet answer‚‘y’. (Make surethat the firewall is configured to forward all internet traffic on port
2227 through to your Linux system’s Red interface.)
Enter the internet IP address that the firewall will forward to
the VPN server If you answered ‚‘y’ to the previous question you
must now enter the IP address of your external (internet-exposed)
firewall network connection. This is the address that you would
access from the internet in order to reach your firewall.
Enter the IP address for the VPN server -Green interface This
is the network IP address of the Linux system that is connected to
your local network. If your Linux system has only one network
interface, this IP address will be the same as the Red interface.
You will now be presented with a summary of the questions
and answers. After you’ve pressed ‘y’ to verify that all of the
answers are correct, the install will proceed. If you want to change
your answers, enter ‘n’ and the questions will be asked again. Enter
‘x’ and the install will exit.
Daemon startupThe install will soon ask questions regarding the starting of the
Secure VPN Gateway daemons.
Checking for sshd on interface ###.###.###.### : 2227.
The VPN sshd daemon is not running, would you like to startit now (y/n) Enter ‘y’ to start the daemon now.
Would you like sshd to be started on this port automatically
on system start? (y/n) Enter ‘y’ to this question.
Would you like to start the VPN Port Server now (y/n)? Enter
‘y’ to start the port server now.
Would you like to start the VPN Port Server automatically on
system start (y/n)? Enter ‘y’ to this question.
After you’ve answered these
questions, the initial installation
will be complete. The next thing
to do is point your web browser
at the URL displayed at the
bottom of your ‘Install
completed’ message, and you
Find out more at www.ttc4it.com.
When you’ve completed the initial configuration steps, you should get a webmin
interface that looks something like this.
“You need a solution withnothing to configure andnothing to learn.”
Secur e V PN Gatew ay Client applications f or Linux and W indow s
LXF106.tut_adv 93 17/4/08 13:13:04
8/8/2019 LXF106vpn Access.tut Adv
http://slidepdf.com/reader/full/lxf106vpn-accesstut-adv 3/4
94 Linux Format June 2008
Tutorial Secure VPN Gateway.
menu of link rules that have been associated to the account. The
remote user is presented with a menu of available link rules and
can turn on the rules they need to use.
Configure VPN Manager
After you’ve installed the software, you must access the VPNManager and click on ‘Manage Admin Users’ This will allow you to
define user accounts that can run the Secure VPN Gateway web
manager. Once you’ve added a user, the page security will be
activated, so be sure to write down the account details before
leaving the page.
To add a user, enter their username in the ‘Add New User’ text
box and their password into “New User’s Passwd’ field. Click on
the Save button to add the user. You will be asked to confirm your
actions. Click on OK to continue or Cancel to cancel to action.
For existing users’ accounts, you can change their passwords
by entering the new password into the ‘New Passwd’ text box and
clicking on the padlock (on Internet Explorer , click on the User ID
button beside the new password).
You can delete users by clicking on the skull and cross bones
(on IE , click in the User ID button in the Delete User column). Note
that the admin user can not be deleted.
Add a VPN link ruleA VPN link rule is a description of
a network port on a server that
the remote PC will need to
access in order to run an
application. Only the network
ports described in the rules will
be accessible by remote users. These VPN link rules are what
makes Secure VPN Gateway more secure than other host-to-
network VPN systems.
To add a new VPN link rule, access the VPN Manager and click
on ‘Add New VPN Link’. You will be presented with a form in the
bottom frame of the screen.
Once you have entered the required details, click on the Save
New Rule button and the rule is saved.Before a remote user can access any systems behind the
Secure VPN Gateway they will require a client install kit containing
valid digital keys. Client install kits are generated automatically
when a new VPN account is created and when the ‘Refresh’ keys
are clicked. Once the kit has been created it can be downloaded at
any time by clicking on the download button for the account. The
date and time displayed below the download button shows when
the client kit was last generated. Be aware that as soon as you
regenerate a client kit, all previous copies of that account’s client
kit will become invalid and will not be able to connect again.
To create a new VPN account, click on ‘Add New Account’ in the
menu panel. This will display a form in the bottom frame of the
screen. Enter a name that will help you to identify who is using the
VPN account. Select ‘Enable Roaming’. Click on ‘Create Account’ to
create the user.
When an account is first created its state is disabled. This issymbolised by the red oval in the state column, which means that
the account can’t be used. To enable the account. click on the red
oval and it will turn green. A green icon means that the account is
enabled.
Associate VPN links to VPN accountsFor a remote user to access VPN link rules, the administrator must
associate some links with the remote user’s VPN account. This is
done by clicking on the tool box in the VPN account row.
This displays a form with a pull-down list in the bottom frame.
The list contains all rules that the account does not already have.
Select the desired link and click on ‘Submit Query’ to add the link.
can proceed to configuring the VPN manager. The Secure VPN
Gateway manager is a dynamic web tool that runs on the Linux
system and is accessed with a standard web browser. For best
results use Firefox , Mozilla , Konqueror , orNetscape . (Faults that
exist within Internet Explorer prevent it from displaying some of
the graphical buttons.)
VPN Manager ConceptsThe VPN Manager follows a
simple concept, which we have
to understand if we’re to get the
best out of it. The VPN
administrator creates VPN
accounts. These accounts
contain digital keys. Each
account is unique, and the associated client kit can only be used to
access that account. A client installation kit will be generated for
that account, and can be sent out to the remote user. This client
kit contains a self-installing application that will set everything up
so that the remote user can talk to your VPN server. The client kit
can also be installed on to a CD-ROM or USB memory stick.
The VPN administrator creates VPN link rules that define
network ports on individual servers that the remote user will needto access in order to access specific network services. VPN link
rules are individually associated to the VPN accounts.
Once the login details and digital keys have been authenticated,
the remote client software talks to the VPN server and is given a
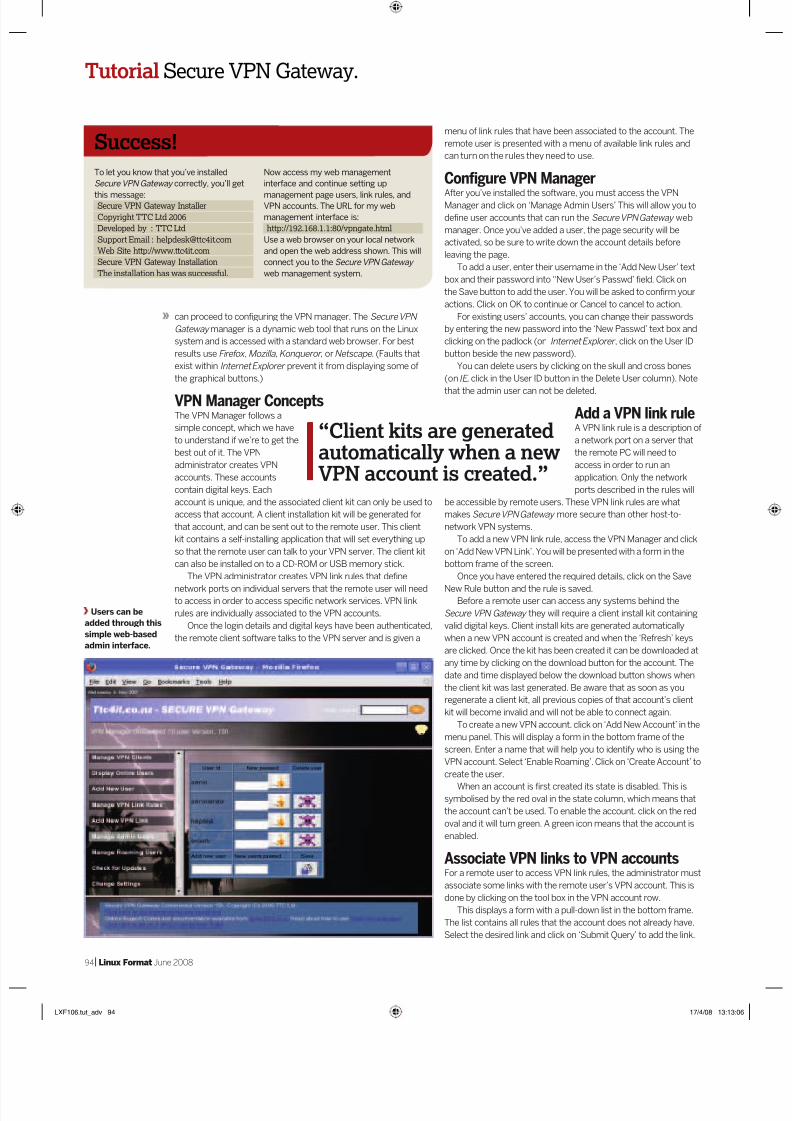
Success!
To let you know that you’ve installed
Secure VPN Gateway correctly, you’ll get
this message:Secure VPN Gateway Installer
Copyright TTC Ltd 2006
Developed by : TTC Ltd
Support Email : [email protected]
Web Site http://www.ttc4it.com
Secure VPN Gateway Installation
The installation has was successful.
Now access my web management
interface and continue setting up
management page users, link rules, andVPN accounts. The URL for my web
management interface is:
http://192.168.1.1:80/vpngate.html
Use a web browser on your local network
and open the web address shown. This will
connect you to the Secure VPN Gateway
web management system.
Users can be
added through this
simple web-based
admin interface.
“Client kits are generatedautomatically when a newVPN account is created.”
LXF106.tut_adv 94 17/4/08 13:13:06

8/8/2019 LXF106vpn Access.tut Adv
http://slidepdf.com/reader/full/lxf106vpn-accesstut-adv 4/4
June 2008 Linux Format 95
Secure VPN Gateway Tutorial
When a VPN link is first added to an account its state is disabled.
This is symbolised by the red oval in the state column. This means
that the VPN link can’t be used. To enable the VPN link, click on the
red oval and it will turn green. A green icon means that the link rule
is enabled.
Remote loginsOnce you have at least one roaming VPN account, you can create
a remote login account. Click on the ‘Manage Roaming Accounts’
area of the menu panel. This will display the current roaming
accounts and let you change their passwords, delete them, and
create new accounts. When you create a new account you must
select a roaming VPN account from the pull-down list. (this list
shows only roaming VPN accounts).
The usernames and passwords that you enter will be case
sensitive. The usernames will work only for the roaming VPN
account client kit to which they are associated. You can have more
than one username associated to a single roaming VPN account.
You can change the password of an existing user by entering
the new password into the ‘New Passwd’ text box and clicking on
the padlock (administrators persisting with Internet Explorer
should click on the User ID button beside the new passwordinstead). You can delete users by clicking on the skull and cross
bones (on IE it is the ‘User ID’ button in the Delete User column).
Deliver the client kitFor remote users to run
applications via your Secure
VPN Gateway server they will
need a client install kit. These
kits are generated automatically
for each VPN account. You can
download the kit to your PC by
clicking on the download button in the VPN account row and
selecting to save it.
Once you have downloaded the kit you can email it to the
remote user or burn it to a CD-ROM and mail or courier it to them.
The kit is useless without the associated roaming username andpassword.
By default, the VPN clients are Windows applications, though
client kits are also available for Linux and Mac OS X. Your flavour of
client kit operating system can be changed by copying the client
application to /opt/ssh-config/etc/SshVpn/ on your Linux
Secure VPN Gateway server.
Linux and Windows client applications have been included
on the LXFDVD.
Using the secure VPN client kitThe secure VPN client kit generated by Secure VPN Gateway
is in the form of a Windows executable zip file. This can be either
executed on a Windows PC, in which case it will install into
C:\SshVpn & C:\.ssh. Or you can open the executable with an
unzipping tool such as arc on Linux (zip format), or WinZip on
Windows.Once you’ve opened it, extract the file’s contents to a USB
memory stick. The software can be completely run from the USB
memory stick. Simply double-click on the file called vpnclient.exe.
This will automatically initiate a connection back to your Secure
VPN Gateway server. What I find handy is to expand the client kit
to a USB memory stick and then copy the clients for Linux
( vpnclientlinux) and Mac OS X ( vpnclientmacosx) to the
memory stick. This way I have Linux, Mac OS X and Windows
all covered.
Once contact has been established with Secure VPN Gateway
you will be prompted to log in. This is where you enter the roaming
user’s username and password that was linked to this VPN
account. After you have logged in you will be presented with a
menu of available Secure links that have been associated with
your VPN account.A single click on a tubular button starts the connection
process. The connection is complete when the red power symbol
stops flashing and locks on green. Connections are closed by
another single click on the
button. Progress messages and
errors are displayed at the foot
of the screen.
Link rules that start
applications automatically after
opening the secure link will also
close the application
automatically when you click on the button to close the secure
link. Have fun with it. I am keen to hear how you have put this
software to use.
Keeping your network secure is important. Please take the
time to read ‘How to Secure Your Network’ on the TechnologyTraining Consulting website at www.ttc4it.com. LXF
Select a roaming
VPN account from
the drop-down list
in the bottom-right
field.
Client kits are available for Linux, Mac OS X
and Windows operating systems.
“The client kit is uselesswithout the associatedusername and password.”
The client kit presents logged-in users with
a list of available networks.
LXF106 tut adv 95 17/4/08 13:13:07