KLIMATYZATOR KANAŁOWY LIGHT - hkk.info.pl · Odpowiednie dla zapewnienia komfortu zasilanie,...
36
-1- R410A SET TEMPERATURE(˚C) TEMP MODE SWING VENT CANCEL TIMER ON/OFF RESET LOCK ECONOMIC RUNNING FAN SPEED FAN HIGH MED LOW AUTO COOL DRY HEAT HUCU 200 XA HUCU 260 XA HUCU 350 XAL HUCU 530 XAL HUCU 710 XAL HUCI 1080 XA HUCI 1400 XA HUCI 1600 XA BEFORE USING YOUR NEW AIR CONDITIONER, PLEASE READ THIS MANUAL AND KEEP IT FOR KLIMATYZATOR KANAŁOWY INSTRUKCJA OBSŁUGI Dziękujemy za zakup klimatyzatora Hokkaido. Prosimy o zapoznanie się z instrukcją obsługi przed włączeniem urządzenia. www.hkk.info.pl
Transcript of KLIMATYZATOR KANAŁOWY LIGHT - hkk.info.pl · Odpowiednie dla zapewnienia komfortu zasilanie,...
-1-
DUCTED TYPE AIR CONDITIONERS (MONO-MULTISPLIT INVERTER, AIR-TO-AIR, HEAT PUMP TYPE)
USER MANUAL
R410A
SET TEMPERATURE(˚C)
TEMPMODE
SWINGVENT
CANCEL
TIMER
ON/OFF
RESET LOCK
ECONOMICRUNNING
FAN SPEED
FANHIGHMEDLOW
AUTOCOOLDRYHEAT
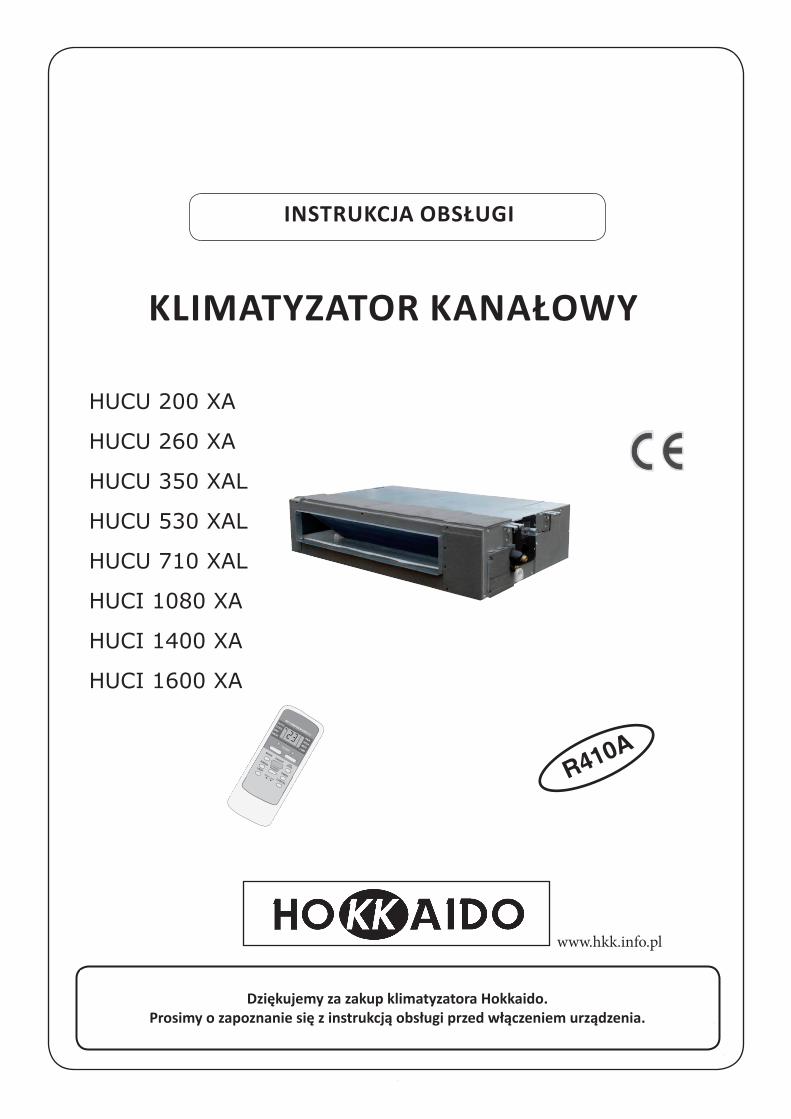
HUCU 200 XA
HUCU 260 XA
HUCU 350 XAL
HUCU 530 XAL
HUCU 710 XAL
HUCI 1080 XA
HUCI 1400 XA
HUCI 1600 XA
"LIGHT Commercial DC Inverter" Models
2015
WARNING!THANK YOU FOR PURCHASING OUR PRODUCT.
BEFORE USING YOUR NEW AIR CONDITIONER, PLEASE READ THIS MANUAL AND KEEP IT FOR FUTURE REFERENCE.
KLIMATYZATOR KANAŁOWY
INSTRUKCJA OBSŁUGI
Dziękujemy za zakup klimatyzatora Hokkaido.Prosimy o zapoznanie się z instrukcją obsługi przed włączeniem urządzenia.
www.hkk.info.pl

-2-
Table of Contents
GENERAL INFORMATION ...................................................................................................... 3
SAFETY PRECAUTIONS ........................................................................................................ 5
INDOOR AND OUTDOOR’S UNITS OUTLINE ..................................................................... 10
INDOOR UNIT DISPLAY PANEL ............................................................................................11
RECOMMENDED OPERATING CONDITIONS ..................................................................... 12
INFRARED REMOTE CONTROLLER ................................................................................... 13
HEAT, COOL, FAN OPERATION ........................................................................................... 16
DRY OPERATION .................................................................................................................. 17
AUTO OPERATION ............................................................................................................... 18
TIMER FUNCTION ................................................................................................................. 19
“ECO" (ENERGY SAVING) FUNCTION ................................................................................ 22
EMERGENCY OPERATION & TEST SWITCH ..................................................................... 23
CLEANING AND MAINTENANCE OF THE AIR CONDITIONER ......................................... 24
HINTS FOR ECONOMICAL OPERATION ............................................................................ 29
TROUBLESHOOTING ........................................................................................................... 30
AUTOMATIC RESTART AFTER A POWER FAILURE ......................................................... 34
SPIS TREŚCI
INFORMACJE OGÓLNE 3
ŚRODKI BEZPIECZEŃSTWA 6
OPIS JEDNOSTKI WEWNĘTRZNEJ I ZEWNĘTRZNEJ 10
WYŚWIETLACZ LCD JEDNOSTKI WEWNĘTRZNEJ 11
ZALECANE WARUNKI PRACY 12
STEROWNIK BEZPRZEWODOWY 13
TRYBY PRACY (OGRZEWANIE, CHŁODZENIE, NAWIEW) 16
TRYB OSUSZANIA 17
TRYB AUTO 18
PROGRAMATOR CZASOWY 19
TRYB „ECO” 22
TRYB AWARYJNY I TESTOWY 23
CZYSZCZENIE I KONSERWACJA 24
WSKAZÓWKI DO PRAWIDŁOWEGO UŻYTKOWANIA 29
ROZWIAZYWANIE PROBLEMÓW 30
AUTOMATYCZNE WŁĄCZANIE PO ZANIKU ZASILANIA 34
- 3 -
GENERAL INFORMATION
Outline of specific features
ECO-FRIENDLY REFRIGERANT R410AAs R410A refrigerant contains no chlorine, it does not damage ozone.
POWER CONTROL THROUGH "DC INVERTER"Power is suppplied according to real needs of comfort, thus permitting a sure energy saving.
INFRARED REMOTE CONTROLLERAll available functions of the air conditioner can be set by using the infrared remote controller, whose LCD panel immediately shows the operating parameters.
ON TIMER / OFF TIMERON Timer, allows to program the air conditioner's start within 24 hours. If the set time does not exceed 10 hours, the TIMER ON is set by 0.5 hours' steps. If the set time exceeds 10 hours, the TIMER ON is set by 1 hour's steps.OFF Timer, allows to program the air conditioner's stop within 24 hours. If the set time does not exceed 10 hours, the TIMER OFF is set by 0.5 hours' steps. If the set time exceeds 10 hours, the TIMER OFF is set by 1 hour's steps.The air conditioner's start and/or stop may also be programmed in sequence, within 24 hours.
DRY FUNCTIONWhen "DRY" function is selected, the air conditioner strongly reduces humidity inside the room, and also keeps the room temperature at a constant value.
ADVANCED CONTROL FOR INDOOR UNIT'S FANThermostatic stops. In Heating mode, when set temperature has been reached inside the room, the compressor stops and the indoor fan speed is lowered to avoid cold drafts.Hot Keep. At the beginning of operation in Heating mode, the indoor fan will start only 5 minutes later, i.e. when the temperature of indoor heat exchanger is adequate.
MICROCOMPUTER CONTROLLED DEFROSTING FUNCTION (HEATING MODE)The microcomputer on printed circuit board can monitor all decreases in heating power of the air conditioner caused by frosting on outdoor heat exchanger, and inputs the signal for automatic defrosting; a LED lights up when this function is activated.
INFORMACJE OGÓLNE
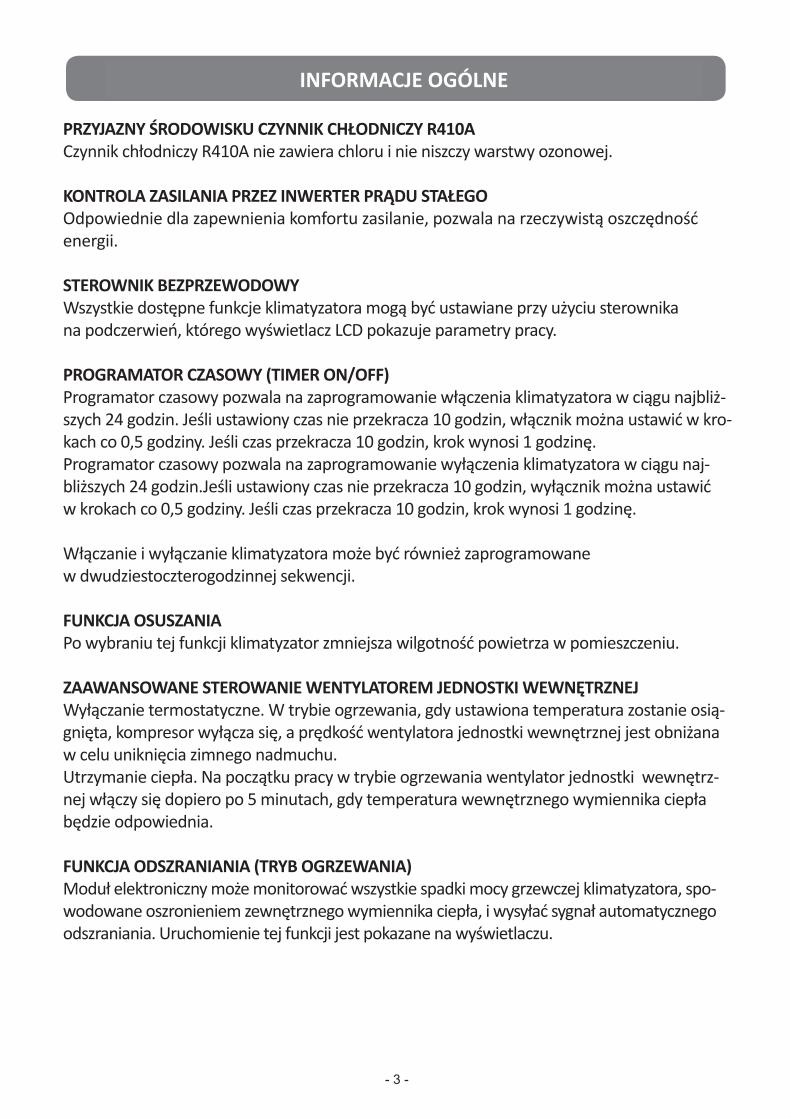
PRZYJAZNY ŚRODOWISKU CZYNNIK CHŁODNICZY R410ACzynnik chłodniczy R410A nie zawiera chloru i nie niszczy warstwy ozonowej.
KONTROLA ZASILANIA PRZEZ INWERTER PRĄDU STAŁEGOOdpowiednie dla zapewnienia komfortu zasilanie, pozwala na rzeczywistą oszczędność energii.
STEROWNIK BEZPRZEWODOWYWszystkie dostępne funkcje klimatyzatora mogą być ustawiane przy użyciu sterownikana podczerwień, którego wyświetlacz LCD pokazuje parametry pracy.
PROGRAMATOR CZASOWY (TIMER ON/OFF)Programator czasowy pozwala na zaprogramowanie włączenia klimatyzatora w ciągu najbliż-szych 24 godzin. Jeśli ustawiony czas nie przekracza 10 godzin, włącznik można ustawić w kro-kach co 0,5 godziny. Jeśli czas przekracza 10 godzin, krok wynosi 1 godzinę.Programator czasowy pozwala na zaprogramowanie wyłączenia klimatyzatora w ciągu naj-bliższych 24 godzin.Jeśli ustawiony czas nie przekracza 10 godzin, wyłącznik można ustawić w krokach co 0,5 godziny. Jeśli czas przekracza 10 godzin, krok wynosi 1 godzinę.
Włączanie i wyłączanie klimatyzatora może być również zaprogramowane w dwudziestoczterogodzinnej sekwencji.
FUNKCJA OSUSZANIAPo wybraniu tej funkcji klimatyzator zmniejsza wilgotność powietrza w pomieszczeniu.
ZAAWANSOWANE STEROWANIE WENTYLATOREM JEDNOSTKI WEWNĘTRZNEJWyłączanie termostatyczne. W trybie ogrzewania, gdy ustawiona temperatura zostanie osią-gnięta, kompresor wyłącza się, a prędkość wentylatora jednostki wewnętrznej jest obniżana w celu uniknięcia zimnego nadmuchu.Utrzymanie ciepła. Na początku pracy w trybie ogrzewania wentylator jednostki wewnętrz-nej włączy się dopiero po 5 minutach, gdy temperatura wewnętrznego wymiennika ciepła będzie odpowiednia.
FUNKCJA ODSZRANIANIA (TRYB OGRZEWANIA)Moduł elektroniczny może monitorować wszystkie spadki mocy grzewczej klimatyzatora, spo-wodowane oszronieniem zewnętrznego wymiennika ciepła, i wysyłać sygnał automatycznego odszraniania. Uruchomienie tej funkcji jest pokazane na wyświetlaczu.

- 4 -
GENERAL INFORMATION
THERMOSTAT UNDER MICROCOMPUTER CONTROLThe thermostat being controlled by microcomputer allows remarkable energy saving and provides more comfort, as the room temperature is checked with the greatest precision.
INDOOR FAN AUTOMATIC SPEED CONTROLThe airflow from the Indoor Unit can be controlled step by step, on the basis of the difference between the room temperature and the set temperature. This allows to reduce the lapse of time needed to reach the desired temperature both in Cooling and Heating mode, by treating the appropriate air volumes.
MOTORIZED LOUVERS FOR AIRFLOW DIRECTIONThe flaps can be controlled directly by the remote controller so as to reach your desired position.• By pressing "AIR DIRECTION" button, you can select your desired angle for vertical airflowlouver. Once the angle has been selected, the position is memorized by the inner electronics for next start of the air conditioner. • If you press "SWING" button, the flaps move up and down continuously, thus increasing air circulation inside the room.
AUTORESTART AFTER A POWER FAILURE• When a power failure occurs during operation, the air conditioner immediately stops.• When power is restored, "OPERATION" lamp starts blinking. In particular, the air conditionerwill automatically restart after 3 minutes have elapsed since power is restored. This means that it is not required to press "ON/OFF" button on the remote controller. The settings will be the same as before the blackout.
DIAGNOSTIC & PROTECTIVE FUNCTIONSShown by codifed flashing of LED indicators on the Indoor Unit, they allow to diagnose in a quite procise way the main malfunctions which may concern the air conditioner.3-minutes' delay protection: there is a protective control of the Outdoor Unit, to prevent compressor's damages after stops. This control is effective in case of malfunction, power failure, turning off the system, etc. and it does not allow Outdoor Unit to restart before 3 minutes have elapsed since the Unit stopped. During this time, Indoor Unit cannot run.
INFORMACJE OGÓLNE
TERMOSTAT KONTROLOWANY PRZEZ MIKROKOMPUTERSterowanie termostatem pozwala na znaczną oszczędność energii, a także zapewnia wyższy komfort, ponieważ temperatura w pomieszczeniu jest ustalana z najwyższą do-kładnością.
AUTOMATYCZNE STEROWANIE PRĘDKOŚCIĄ WENTYLATORANawiew z jednostki wewnętrznej jest stopniowo regulowany na podstawie różnicy mię-dzy temperaturą pomieszczenia a temperaturą zadaną. Pozwala to na sprawne uzyskanie wymaganej temperatury w obu trybach pracy: Chłodzenia i Ogrzewania w odpowiednim czasie.
FUNKCJA „ECO”Tryb oszczędności energii
AUTOMATYCZNE WŁĄCZANIE PO ZANIKU ZASILANIAW przypadku zaniku zasilania następuje natychmiastowe zatrzymanie klimatyzatora.Po przywróceniu zasilania urządzenie automatycznie wznawia pracę. Lampka„OPERATION” zaczyna migać i po trzech minutach klimatyzator załącza się ponownie bez konieczności naciskania przycisku „ON/OFF”. Ustawienia powracają do zatwierdzonych przed zanikiem zasilania.
FUNKCJE DIAGNOSTYCZNE I ZABEZPIECZAJĄCEKody sygnalizowane poprzez mrugnięcia diod jednostki wewnętrznej pozwalają na precy-zyjną diagnostykę głównych problemów mogących pojawiać się w klimatyzatorze.Zabezpieczenie 3-minutowe: funkcja zabezpieczająca jednostki zewnętrznej, zapobiegająca uszkodzeniu kompresora po zatrzymaniu. Działa ona w przypadku awarii, zaniku zasilania, wyłączenia systemu itp., i nie pozwala na ponowne włączenie jednostki zewnętrznej przed upływem 3 minut od jej wyłączenia. W tym czasie jednostka wewnętrzna nie działa.
-5-
SAFETY PRECAUTIONS
Disposal of an old air conditionerBefore disposing an old air conditioner, please make sure it is inoperative and carry out the disposal by adopting all safety precautions. Unplug it from the power line in order to avoid risks of electric shock.Please remember that an air conditioner contains refrigerant fluid, requiring specialized waste disposal. The valuable materials contained in the air conditioner can be recycled. Contact your local Waste Disposal Center for adequate disposal or contact your Dealer for any question.Please make sure that piping of your air conditioner does not get damaged before being picked up by the relevant Waste Disposal Center. You can contribute to the protection of the environment by adopting an appropriate anti-pollution method of disposal.
Disposal of the packaging of your new air conditionerAll the packaging materials used in the package of your new air conditioner can be disposed without any danger for the environment.The cardboard may be broken or cut into small pieces and given to a Waste Paper Disposal Service. The wrapping bag made of polyethylene and the polyethylene goam pads contain no fluorochloric hydrocarbon.All these valuable materials may be taken to a Waste Collecting Center and used again after adequate recycling.Consult your local Authorities for the name and address of the Waste Materials Collecting Centers and Waste Paper Disposal Services nearest to your house.
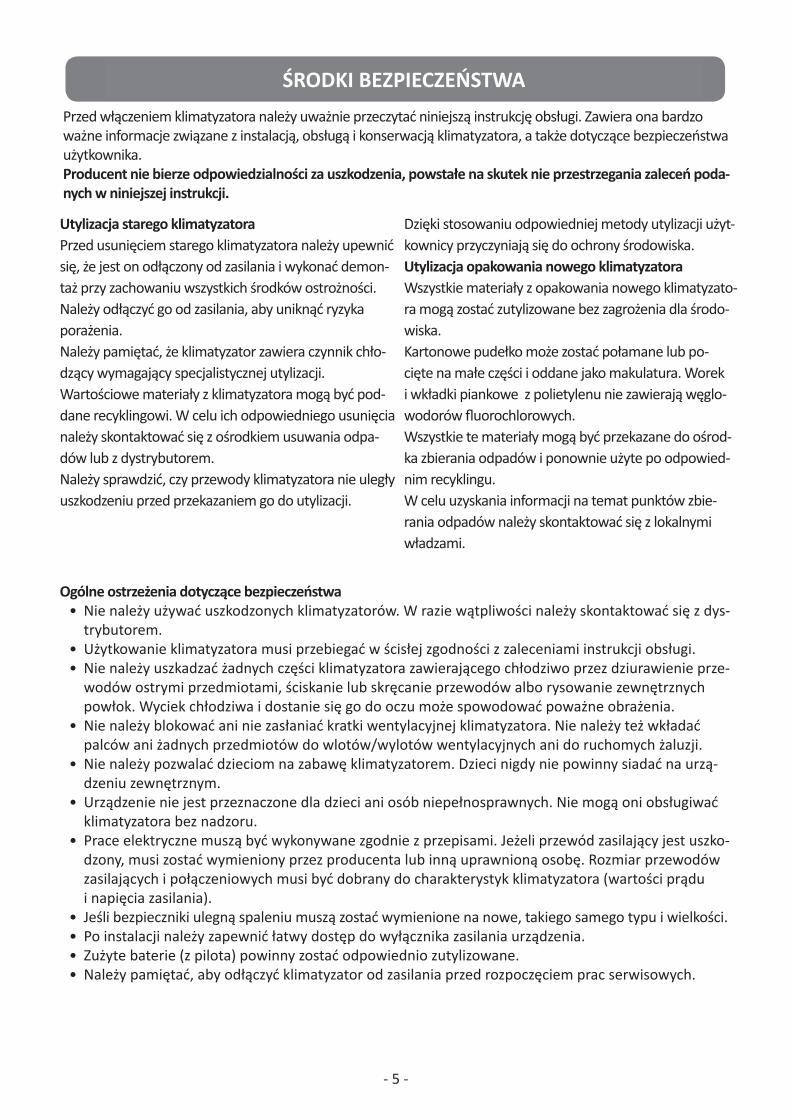
General warnings for safety• Do not operate damaged air conditioners. In case of doubt, contact your Dealer.• Use of air conditioner must be carried out in strict compliance with the instructions listed futher on.• Do not damage any parts of the air conditioner that carry refrigerant by piercing or perforating the piping with sharp or pointed objects, by crushing or twisting the tubes or scraping off the surfaces' coatings. If the refrigerant spurts out and gets into eyes, this may result in serious injuries.• Do not obstruct or cover the ventilation grille of the air conditioner. Do not put fingers nor insert objects into the inlet/outlet vent or into the motorized louver.• Do not allow children to play with the air conditioner. Children should be never allowed to sit on the Oudoor Unit.• The appliance is not intended for children and disabled people. They must not operate the air conditioner without supervision.• Electrical works must be carried out according to the local laws. If the power cable is damaged, it must be replaced by the Manufacturer or by qualified Personnel. Size of power cables and connecting wires must be adequate to the characteristics of the air conditioner (current values and power input values).• If fuses on the PCB are blown, they must be replaced with new fuses of the same type and size.• After installation, power plug should be properly disposed.• Exhausted batteries (infrared remote controller) should be properly disposed.• Always remember to unplug the air conditioner before opening the inlet grille. Never try to unplug the air conditioner by pulling off the power cable. Always grip the power plug firmly and pull it straight out of the power socket.
Before starting the air conditioner, please read carefully the information in this "USER'S MANUAL". The User's Manual contains very important suggestions relatied to installation, operation and maintenance of the air conditioner and concerning your personal safety.The Manufacturer accept no responsibility for the damages that may arise due to non-observance of the instructions listed in this "USER'S MANUAL".
ŚRODKI BEZPIECZEŃSTWAPrzed włączeniem klimatyzatora należy uważnie przeczytać niniejszą instrukcję obsługi. Zawiera ona bardzo ważne informacje związane z instalacją, obsługą i konserwacją klimatyzatora, a także dotyczące bezpieczeństwa użytkownika.Producent nie bierze odpowiedzialności za uszkodzenia, powstałe na skutek nie przestrzegania zaleceń poda-nych w niniejszej instrukcji.
Ogólne ostrzeżenia dotyczące bezpieczeństwa• Nie należy używać uszkodzonych klimatyzatorów. W razie wątpliwości należy skontaktować się z dys-
trybutorem.• Użytkowanie klimatyzatora musi przebiegać w ścisłej zgodności z zaleceniami instrukcji obsługi.• Nie należy uszkadzać żadnych części klimatyzatora zawierającego chłodziwo przez dziurawienie prze-
wodów ostrymi przedmiotami, ściskanie lub skręcanie przewodów albo rysowanie zewnętrznych powłok. Wyciek chłodziwa i dostanie się go do oczu może spowodować poważne obrażenia.
• Nie należy blokować ani nie zasłaniać kratki wentylacyjnej klimatyzatora. Nie należy też wkładać palców ani żadnych przedmiotów do wlotów/wylotów wentylacyjnych ani do ruchomych żaluzji.
• Nie należy pozwalać dzieciom na zabawę klimatyzatorem. Dzieci nigdy nie powinny siadać na urzą-dzeniu zewnętrznym.
• Urządzenie nie jest przeznaczone dla dzieci ani osób niepełnosprawnych. Nie mogą oni obsługiwać klimatyzatora bez nadzoru.
• Prace elektryczne muszą być wykonywane zgodnie z przepisami. Jeżeli przewód zasilający jest uszko-dzony, musi zostać wymieniony przez producenta lub inną uprawnioną osobę. Rozmiar przewodów zasilających i połączeniowych musi być dobrany do charakterystyk klimatyzatora (wartości prądu i napięcia zasilania).
• Jeśli bezpieczniki ulegną spaleniu muszą zostać wymienione na nowe, takiego samego typu i wielkości.• Po instalacji należy zapewnić łatwy dostęp do wyłącznika zasilania urządzenia.• Zużyte baterie (z pilota) powinny zostać odpowiednio zutylizowane.• Należy pamiętać, aby odłączyć klimatyzator od zasilania przed rozpoczęciem prac serwisowych.
Utylizacja starego klimatyzatoraPrzed usunięciem starego klimatyzatora należy upewnić się, że jest on odłączony od zasilania i wykonać demon-taż przy zachowaniu wszystkich środków ostrożności. Należy odłączyć go od zasilania, aby uniknąć ryzyka porażenia.Należy pamiętać, że klimatyzator zawiera czynnik chło-dzący wymagający specjalistycznej utylizacji.Wartościowe materiały z klimatyzatora mogą być pod-dane recyklingowi. W celu ich odpowiedniego usunięcia należy skontaktować się z ośrodkiem usuwania odpa-dów lub z dystrybutorem.Należy sprawdzić, czy przewody klimatyzatora nie uległy uszkodzeniu przed przekazaniem go do utylizacji.
Dzięki stosowaniu odpowiedniej metody utylizacji użyt-kownicy przyczyniają się do ochrony środowiska.Utylizacja opakowania nowego klimatyzatoraWszystkie materiały z opakowania nowego klimatyzato-ra mogą zostać zutylizowane bez zagrożenia dla środo-wiska.Kartonowe pudełko może zostać połamane lub po-cięte na małe części i oddane jako makulatura. Worek i wkładki piankowe z polietylenu nie zawierają węglo-wodorów fluorochlorowych.Wszystkie te materiały mogą być przekazane do ośrod-ka zbierania odpadów i ponownie użyte po odpowied-nim recyklingu.W celu uzyskania informacji na temat punktów zbie-rania odpadów należy skontaktować się z lokalnymi władzami.
-6-- 5 -

-6-
SAFETY PRECAUTIONS
SAFETY INSTRUCTIONS
• Please read carefully the following Safety Instructions before operating the air conditioner.
• A strict observance of the instructions indicated in this "USER'S MANUAL" will prevent personal hurt and incidents to the User. Moreover, correct operation and long life of the system will be ensured.
• Depending on the seriousness of potential risks and damages, the reported Instructions are classified in two types: "WARNING" and "CAUTION". A strict observance of the Instructions is required to guarantee your personal safety and the safety of the environments where the Units are installed.
• The following Instructions are related to the air conditioner's installation. They have been reported in this "USER'S MANUAL" just to allow the User to check that installation has been properly carried out. If an improper installation - not corresponding to the Instructions - is verified, please contact the Dealer or the Authorized Technical Service.
The User must never attempt to repair, install or perform special maintenance by himself.
Key to symbols
WARNING This symbol points out the risk of serious injury or death.
This symbol points out the risk of injury or damage to the property.
Prohibition. Action or procedure not allowed, with serious effects on objects and people.
CAUTION
Obligation. Compulsory action or procedure. The missed observance could bring serious effects on objects and people.
!
!
!
• Strictly observe the instructions provided in this Manual.
• The air conditioning system contains inside its refrigerant circuit the R410A gasunder pressure. Never disconnect refrigerant pipes or connection joints.
• Never perform any handling on Outdoor Unit service valves or on Indoor Unit’sunions.
• Keep this Manual in a safe place easy to reach at any time for convenientreference.
• In case the air conditioner is transferred and reinstalled, this User’s Manualshould always be attached to the appliance.
ŚRODKI BEZPIECZEŃSTWA
• Należy dokładnie przestrzegać zaleceń niniejszej instrukcji.• System klimatyzacyjny zawiera w układzie chłodniczym czynnik R410A pod ci-
śnieniem. Nie należy odłączać przewodów chłodziwa ani połączeniowych.• Nie należy wykonywać żadnych czynności przy zaworach urządzenia zewnętrz-
nego ani przy złączach urządzenia wewnętrznego.• Niniejszą instrukcję należy przechowywać w dostępnym miejscu, aby można
było z niej łatwo skorzystać.• W przypadku demontażu i ponownej instalacji instrukcja musi być przekazana
razem z klimatyzatorem.
INSTRUKCJE BEZPIECZEŃSTWA
• Przed użyciem klimatyzatora należy uważnie przeczytać instrukcje bezpieczeństwa.• Ścisłe przestrzeganie instrukcji pozwoli zapobiec obrażeniom i wypadkom użytkownika. Poza
tym zapewni właściwą obsługę i długą żywotność układu.• Zależnie od stopnia potencjalnego ryzyka i uszkodzeń, poniższe instrukcje są podzielone na
dwa rodzaje: „UWAGA” i „OSTRZEŻENIE”. Dokładne przestrzeganie instrukcji jest wymagane do zapewnienia bezpieczeństwa osobistego i otoczenia, w którym urządzenia są zainstalowa-ne.
• Poniższe instrukcje są związane z instalacją klimatyzatora. Zostały one zamieszczone w ni-niejszej instrukcji obsługi, aby użytkownik mógł sprawdzić poprawność wykonania instalacji. W przypadku stwierdzenia nieprawidłowego montażu – niezgodnego z instrukcją – należy skontaktować się z dystrybutorem lub autoryzowanym serwisem.
• Użytkownik nie może podejmować samodzielnych prób naprawy, instalacji, ani wykonywać samodzielnie specjalistycznej konserwacji urządzenia.
Opis symboli
UWAGA Symbol ten wskazuje ryzyko poważnych obrażeń lub śmierci.
Symbol wskazuje ryzyko obrażeń lub uszkodzenia mienia.
Niedozwolona czynność lub procedura z poważnymi skutkami dla ludzi lub przedmiotów.
Obowiązkowa czynność lub procedura. Nie przestrzeganie niesie poważne skutki dla ludzi i przedmiotów.
OSTRZEŻENIE
-7-- 6 -

-7-
SAFETY PRECAUTIONS
Installation
Never try to install this Unit by yourself, i.e. without the support of Technical Personnel. Never try to reapir the Unit by yourself. The Unit's components can be reached only by opening or removing the covering panels, and this involves exposure to high voltage. Even by disconnecting power supply, it is not always possible to avoid the risk of electric shocks.
• Please always contact the Dealer or the Authorized Service Center for installation.Never attempt to install the air conditioner by yourself, because improper installation could cause electric shock, injuries, water leakage or fire.
• Please always contact the Dealer or the Authorized Service Center for any servicing operation or special maintenance.Never try to repair or carry out special maintenance by yourself. Improper repair or maintenance could cause electric shock, injuries, water leakage or fire.
Please confirm that installation has been carried out according to the following prescriptions:
WARNING!
!
!
CAUTION!
!
!
!
• Ensure that drain hose and drain pipe installation has been carried out correctly. Incorrect installation or maintenance will cause water leakage.
CAUTION!
!
!• Ensure that Indoor and Outdoor Units have been properly grounded. Defective grounding could cause electric shock.
!• This kind of appliance needs a specific circuit breaker with proper protective devices against overcurrents and short circuits (fuses or automatic switches).
Circuitbreaker
(specific)
• When installing, all possible countermeasures must be taken to avoid refrigerant leaks. If there is a high concentration of refrigerant gas in the room, oxygen lack may occur.
• Do not install the air conditioner near burners, heat sources or flammable gas. This is to avoid the risk of malfunctioning, fire or explosion.
• Ensure that a circuit breaker has been installed on the power supply line of the air conditioner, to avoid the risk of electric shocks.
• When installing in a small room, countermeasures should be taken in case of a refrigerant leak exceeds the proper range. Otherwise, it will cause asphyxia.
ŚRODKI BEZPIECZEŃSTWA
MontażNie należy instalować urządzenia samodzielnie, tzn. bez pomocy personelu technicznego. Nie należy po-dejmować prób samodzielnej naprawy. Podzespoły urządzenia są dostępne tylko po otwarciu lub zdjęciu osłon, co stwarza ryzyko porażenia wysokim napięciem. Nawet po odłączeniu zasilania nie zawsze moż-na uniknąć ryzyka porażenia.
Wyłącznik
Należy upewnić się, że instalacja została wykonana zgodnie z poniższymi zaleceniami:
UWAGA
OSTRZEŻENIE
OSTRZEŻENIE
W celu przeprowadzenia montażu należy skontaktować się z dystrybutorem lub autoryzowa-nym centrum serwisowym. Nie należy instalować klimatyzatora samodzielnie, gdyż niepra-widłowe wykonanie może spowodować porażenie elektryczne, obrażenia, wyciek wody lub pożar
W celu wykonania serwisowania lub przeprowadzenia specjalnej konserwacji należy skontaktować się dystrybutorem lub autoryzowanym centrum serwisowym.Nie należy podejmować prób samodzielnych napraw i specjalnej konserwacji .Niewłaściwa naprawa lub konserwacja może spowodować porażenie elektryczne, obrażenia, wyciek wody lub pożar.
Podczas instalacji należy podjąć wszelkie możliwe środki dla uniknięcia wycieku chłodziwa. Wysokie stężenie gazu w pomieszczeniu może prowadzić do niedotlenienia.
Nie należy instalować klimatyzatora w pobliżu palników, źródeł ciepła lub palnego gazu. Pozwoli to uniknąć ryzyka awarii, pożaru lub eksplozji.
Należy upewnić się, czy na linii zasilania przed klimatyzatorem zainstalowany został wyłącznik, po-zwalający uniknąć ryzyka porażenia.
Przy instalacji w małym pomieszczeniu należy podjąć działania przeciw nadmiernemu wyciekowi chłodziwa. W przeciwnym razie może dojść do uduszenia.
Należy sprawdzić czy instalacja przewodu odpływowego została prawidłowo wykonana. Niewłaści-wa instalacja lub konserwacja spowoduje wyciek wody.
Należy sprawdzić, czy urządzenia wewnętrzne i zewnętrzne zostały odpowiednio uziemione. Niewłaściwe uziemienie może spowodować porażenie.
Ten rodzaj urządzenia wymaga specjalnego wyłącznika obwoduz odpowiednimi zabezpieczeniami przeciw zwarciom (bezpieczniki lub wyłączniki automatyczne).
-8-- 7 -
-8-
SAFETY PRECAUTIONS
Always observe the operating precautions listed in the following tables. In this way, correct operation and safeguard of people, animals and objects inside the air-conditioned room will be ensured.
WARNING!Use the correct voltage and frequency for power supply.
Do not insert the air conditioner's plug into multiple sockets or into sockets to which other appliances are connected. Do not use plug adapters.
!
!
!
Fully insert the plug into the power socket and make sure the connection is secure and without play. Otherwise, sparks and fire may occur.
Do not put heavy objects on the power supply cord. Take care not to damage it. Do not use supply cords which are faulty or damaged.
Do not pull the plug out of the power socket by drawing the power cord. Damaging to the power cord, to the plug or to the socket may occur, and this could result in electric shock or fire generation.
Never turn off the air conditioner by pulling the power supply plug out of the socket. This could cause electric shock or fire.Always press the "ON/OFF" button on remote controller.
Do not use extension cords. Do not use rolled power supply cords.
Never touch switches, sockets or power supply plugs with wet hands. This could cause electric shock.
If you smell something burning, immediately turn off the air conditioner, switch the circuit breaker to "OFF" or "0", and contact the Authorized Technical Service.
Do not insert any objects into the air inlet or outlet of Indoor and Outdoor Units. Even if fans are stopped, they could automatically start all at once.
You should avoid to expose your body directly to cool air for a long time. This may you cause health problems to you.
Do not direct the airflows towards infants, aged or disabled people.
220~230V, 50Hz
SLEEP
TIMER
MODE
FAN
SWING
ON/OFF
SLEEP TIMER ON TIMER OFF
FEELCOOLDRYFANHEAT
AUTOHIGHMEDLOWSWING
ŚRODKI BEZPIECZEŃSTWA
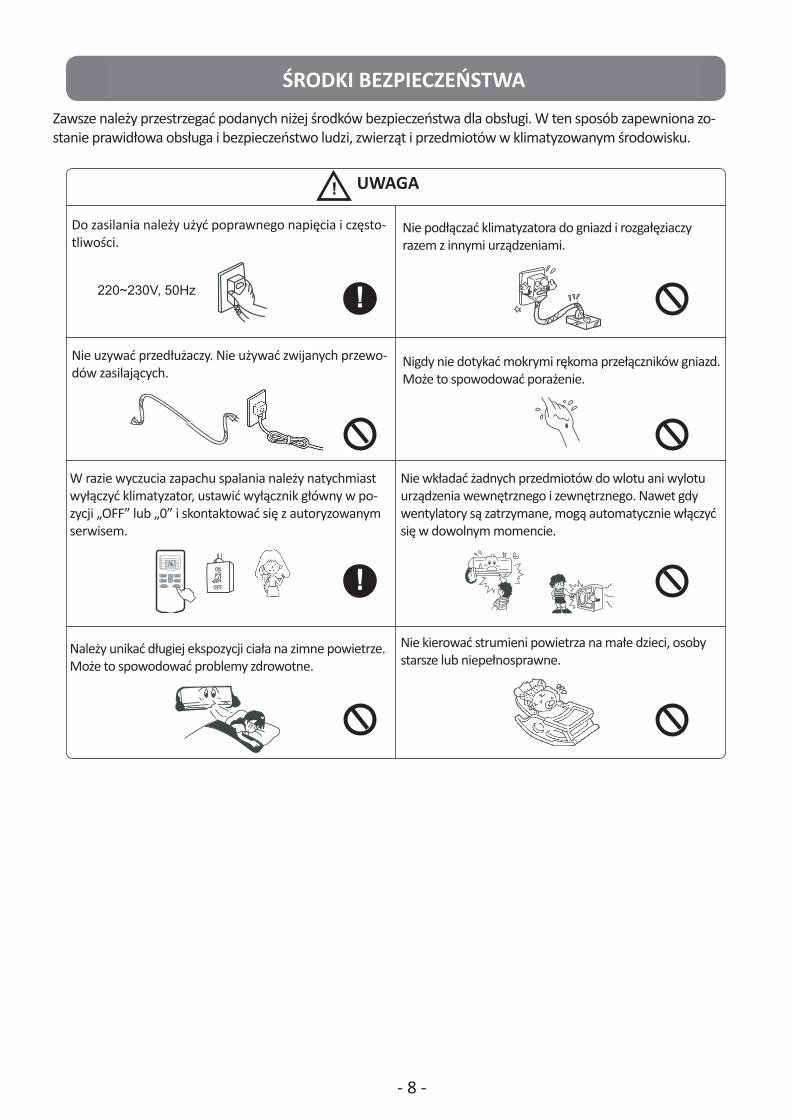
Zawsze należy przestrzegać podanych niżej środków bezpieczeństwa dla obsługi. W ten sposób zapewniona zo-stanie prawidłowa obsługa i bezpieczeństwo ludzi, zwierząt i przedmiotów w klimatyzowanym środowisku.
UWAGA
Do zasilania należy użyć poprawnego napięcia i często-tliwości.
Należy unikać długiej ekspozycji ciała na zimne powietrze. Może to spowodować problemy zdrowotne.
W razie wyczucia zapachu spalania należy natychmiast wyłączyć klimatyzator, ustawić wyłącznik główny w po-zycji „OFF” lub „0” i skontaktować się z autoryzowanym serwisem.
Nie uzywać przedłużaczy. Nie używać zwijanych przewo-dów zasilających.
Nie podłączać klimatyzatora do gniazd i rozgałęziaczy razem z innymi urządzeniami.
Nie kierować strumieni powietrza na małe dzieci, osoby starsze lub niepełnosprawne.
Nie wkładać żadnych przedmiotów do wlotu ani wylotu urządzenia wewnętrznego i zewnętrznego. Nawet gdy wentylatory są zatrzymane, mogą automatycznie włączyć się w dowolnym momencie.
Nigdy nie dotykać mokrymi rękoma przełączników gniazd. Może to spowodować porażenie.
- 8 -

-9-
SAFETY PRECAUTIONS
CAUTION!
!
!
!
Do not use sprayers near the air conditioner and do not spray anything towards the appliance.
Do not expose plants or animals to the direct airflow of the air conditioner.
Ventilate the room regularly while the air conditioner is operating. Fail to follow this advice could result in lack of oxygen inside the room.
Do not place anything in front of the air conditioner nor obstruct the air outlet.
!
Ventilation should be operated when using at the same time the air conditioner and gas burners.Insufficient ventilation may cause lack of oxygen.
Do not place burners near the airflow of air conditioner.
To avoid the risk of electric shock, do not sprinkle water nor other liquid on Indoor Unit. Do not clean the air conditioner by water spurts.
Do not expose food, plants, animals, precision devices or works of art to the direct airflow of the air conditioner.
When necessary, replace fuses with new ones of the same type and size. Never use a piece of iron or copper instead of the proper fuse, as it could result in a malfunction or in a fire accident.
Do not put any object on the air conditioner. On the appliance's upper part there is an air grille that must not be obstructed. Besides, a heavy object may cause the air conditioner's fall.
Do not touch the heat exchangers' metal flaps on Indoor and Outdoor Units. This could cause hurts due to the sharp shape of the flaps. Take care of this especially when removing the front panel and the air filters.
For proper performance, operate the air conditioner under the recommended temperature and humidity range (see page 12). If the Unit operates beyond these conditions, malfunctions may occur or dew may drip out of the Indoor Unit.
ŚRODKI BEZPIECZEŃSTWA
UWAGA
Wentylacja powinna być używana przy jednoczesnym użytkowaniu klimatyzatora i palników gazowych. Nie-właściwa wentylacja może spowodować brak tlenu.
Nie umieszczać palników w pobliżu strumienia powie-trza z klimatyzatora.
Aby uniknąć ryzyka porażenia, nie spryskiwać urzą-dzenia wewnętrznego wodą ani innymi płynami. Nie czyścić klimatyzatora strumieniem wody.
Nie narażać jedzenia, roślin, zwierząt ani precyzyjnych urządzeń na bezpośredni nadmuch z klimatyzatora.
W razie konieczności należy wymienić bezpieczniki na bezpieczniki tego samego rodzaju i rozmiaru. Nie uży-wać kawałków stali lub miedzi zamiast bezpieczników, gdyż może to spowodować awarię i pożar.
Nie umieszczać niczego na klimatyzatorze. W górnej części urządzenia znajdu-je się kratka. Nie wolno jej zasłaniać. Dodatkowo umieszczenie na klimatyza-torze ciężkich obiektów może spowodować jego zerwanie ze ściany.
Nie używać spryskiwaczy w pobliżu klimatyzatora, ani nie natryskiwać niczego na urządzenie.
Nie narażać roślin ani zwierząt na bezpośredni nadmuch z klimatyzatora.
Podczas użycia klimatyzatora należy regularnie wietrzyć pomieszczenie. Nie wykonanie tego może spowodować brak tlenu.
W celu uzyskania odpowiedniej wydajności klimatyza-tor powinien pracować w podanych zakresach tem-peratury i wilgotności. Jeśli urządzenie pracuje w wa-runkach innych niż podane, może dojść do awarii lub osadzania rosy na jednostce wewnętrznej.
Nie umieszczać roślin ani zwierząt na drodze powietrza wychodzącego z klimatyzatora.
Nie należy dotykać metalowych klapek wymienników ciepła w jednostkach wewnętrznych i zewnętrznych. Może dojść do zranienia ich ostrymi krawędziami. Należy zwracać na to uwagę zwłaszcza podczas demontażu panelu wlotu powietrza i filtra powietrza.
-10-- 9 -
-10-
INDOOR AND OUTDOOR’S UNITS OUTLINE
INDOOR UNIT OUTDOOR UNIT
IR Remote controller
Air filter Air inlet (side and rear)
Air outlet
1
2
3
4
5
6
7
89
10
89
010
Electric control cabinet
123456
78910
Connecting pipeAir inlet
Drain pipe
Air outlet
Air inlet
INDOOR UNIT OUTDOOR UNIT
NOTE
All the pictures in this manual are for explanation purpose only. They may be slightly different from the air conditioner you purchased (depend on model).The actual shape shall prevail.
SET TEMPERATURE(˚C)
TEMP
MODE
SWING
VENT CANCEL
TIMER
ON/OFF
RESET LOCK
ECONOMICRUNNING
FAN SPEED
FANHIGHMEDLOW
AUTOCOOLDRYHEAT
OPIS JEDNOSTKI WEWNĘRZNEJ I ZEWNĘTRZNEJOPIS JEDNOSTKI WEWNĘTRZNEJ I ZEWNĘTRZNEJ
Jednostka zewnętrznaJednostka wewnętrzna
Jednostka wewnętrzna
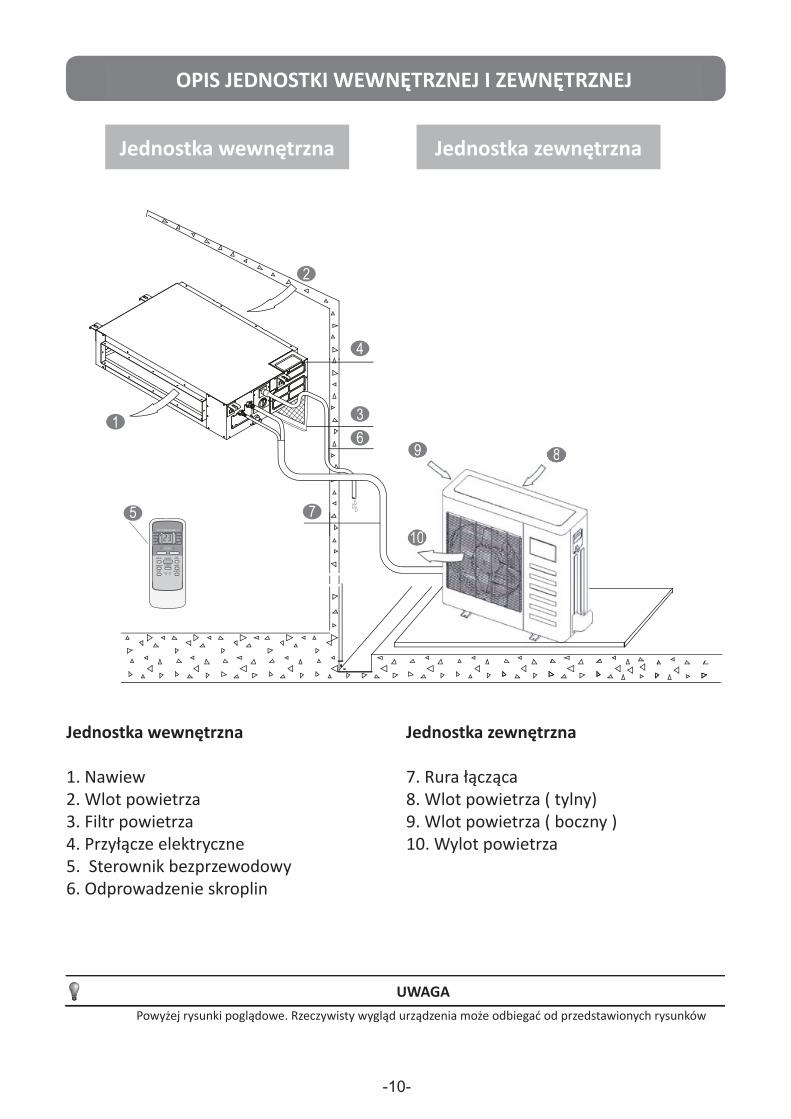
1. Nawiew2. Wlot powietrza 3. Filtr powietrza4. Przyłącze elektryczne5. Sterownik bezprzewodowy6. Odprowadzenie skroplin
Jednostka zewnętrzna
7. Rura łącząca8. Wlot powietrza ( tylny)9. Wlot powietrza ( boczny )10. Wylot powietrza
UWAGAPowyżej rysunki poglądowe. Rzeczywisty wygląd urządzenia może odbiegać od przedstawionych rysunków

-11-
INDOOR UNIT DISPLAY PANEL
LCD DISPLAY WINDOW
MANUAL buttonThis button is used to start Unit if remote controller is not available or its batteriesare exhausted.This button is also used for testing the air conditioner in Cooling mode (see furtheron, page 23).
TIMER LEDLights up during Timer operation.
ALARM LEDThe LED lights up alone, or together with other lamps, to indicate a malfunctionon the system. This malfunction causes the system’s stop.
DIGITAL DISPLAY TUBEDisplays Error Codes when there is a malfunction on the system.
DEF./FAN (DEFROST/PREHEATING) LED• In Heating mode, if a layer of frost forms on the outdoor heat exchanger, defrostingautomatically starts and the LED lights up.• The LED also lights up when indoor heat exchanger’s Preheating function isactivated. This occurs in Heating mode, in order to avoid the emission of air atlow temperature (prevention function anti-cold drafts).
OPERATION LEDThis lamp illuminates when the air conditioner is in operation.
MANUAL OPERATION TIMER DEF./FAN ALARM
1
1
2
3
4
5
INFRARED SIGNAL RECEIVERIt permits to receive signals from remote controller.
6
7
4
2 3 5
6
7
WYŚWIETLACZ LCD JEDNOSTKI WEWNĘTRZNEJ
Układ elektroniczny klimatyzatora jest w stanie zdiagnozować usterki i przedstawić przy pomocy 4 wskaźników LED umieszczonych na panelu jednostki wewnętrznej. Na podsta-wie tych wskazań autoryzowany serwis techniczny może określić rodzaj usterki.
1. Przycisk sterowania ręcznegoUżywany w przypadku zagubienia sterownika bezprzewodowego lub wyczerpania jego baterii. Przycisk jest również używany do testowania klimatyzatora w trybie chłodzenia (patrz str 23).
2. Dioda operacyjna Świeci po włączeniu klimatyzatora.
3. Dioda programatora czasowegoŚwieci kiedy funkcja TIMER jest aktywna (programowanie czasu włączenia / wyłączenia klimatyza-tora). 4. Dioda odszraniania/podgrzewania
• W trybie ogrzewania kiedy utworzy się warstwa szronu na zewnętrznym wymienniku ciepła, proces odszraniania rozpocznie się automatycznie i dioda się zaświeci.
• Dioda również się zaświeci w trybie ogrzewania kiedy zostanie aktywowana funkcja wstępnego podgrzania wymiennika ciepła jednostki wewnętrznej.
5. Dioda alarmuŚwieci pojedynczo lub z innymi diodami wskazując na nieprawidłowości działania systemu powo-dującymi jego zatrzymanie.
6. Odbiornik sygnału podczerwieniPozwala na odbiór sygnałów ze sterownika bezprzewodowego przez jednostkę wewnętrzną.
7. Wyświetlacz Wyświetla kody błędów w przypadku wystąpienia usterek.

-12-
To obtain the best performances from the Unit, it is recommended its use under the following conditions:
NOTE: If the Unit operates in rooms which are satured with oil vapors or volatile matters, harmful substances could coat and clog the indoor unit heat exchanger. Besides, scalings of saltness could form on the Outdoor Units installed in sea-surroundings; if not removed, they will damage the Units in a very short time. In both cases, please contact the Authorized Technical Service to require frequent maintenance.
Use of the air conditioner out of the above mentioned temperature ranges could cause the intervention of built-in protective functions consequently stopping the system operation.
RECOMMENDED OPERATING CONDITIONS
17° to 32°C
-15° to 50°C
17° to 27°C
-15° to 24°C
17° to 32°C
0° to 50°C
Outdoor temperature:
Room temperature:COOLING
OPERATIONCAUTION:Room relative humidity should be less than 80%. If the air conditioner operates beyondthis limit, the surface of the heat exchanger could get covered with frost.
Outdoor temperature:HEATING
OPERATION
DRYINGOPERATION
Room temperature:
Outdoor temperature:
Room temperature:
W celu uzyskania najlepszej wydajności klimatyzatora zaleca się użytkowanie w następują-cych zakresach temperatur:
CHŁODZENIE • Temperatura zewnętrzna: od -15°C do 50°C• Temperatura pomieszczenia: od 17°C do 32°C
UWAGA Wilgotność względna w pomieszczeniu powinna być poniżej 80%. Jeżeli klimatyzator pracuje powyżej tej granicy, powierzchnia wymiennika ciepła jednostki wewnętrznej może pokryć się szronem.
OGRZEWANIE• Temperatura zewnętrzna: od -15°C do 24°C• Temperatura pomieszczenia: od 17°C do 27°C
OSUSZANIE• Temperatura zewnętrzna: od 0°C do 50°C• Temperatura pomieszczenia: od 17°C do 32°C
Użycie klimatyzatora poza powyższymi zakresami temperatur może spowodować zadziała-nie wbudowanych funkcji zabezpieczających, stopniowo zatrzymujących działanie systemu.
UWAGA Jeżeli urządzenie pracuje w pomieszczeniach nasyconych parami olejów lub substancjami lotnymi może dojść do zablokowania działania wymiennika ciepła jednostki wewnętrznej. W regionach nadmorskich na jednostkach zewnętrznych mogą pojawić się osady solne, jeśli nie będą usuwane spowodują uszkodzenie klimatyzatora. W celu uzyskania pomocy w kon-serwacji tak eksploatowanych urządzeń prosimy o kontakt z serwisem technicznym.
ZALECANE WARUNKI PRACY

-13-
INFRARED REMOTE CONTROLLER
Buttons' outline
SET TEMPERATURE(˚C)
TEMP
MODE
SWING
VENT CANCEL
TIMER
ON/OFF
RESET LOCK
ECONOMICRUNNING
FAN SPEED
FANHIGHMEDLOW
AUTOCOOLDRYHEAT
MODE
SWING
ON/OFF FAN SPEED
RESET
LOCK
TIMER
CANCEL
TEMPTo increase set temperatureor Timer’s setting.Temperature increases bysteps of 1°C.
To select fan speed accordingto the following sequence:AUTO-LOW-MED-HIGH.
To select Timer function:TIMER ON for programmedstart and TIMER OFF forprogrammed stop.
To cancel Timer’s settings.
Internal switch. Push it witha pointed article to lock allcurrent settings. Press itaga in to cance l LOCKfunction.
Internal switch. When thisbutton is pressed, all currentsettings are cancelled anddefau l t cond i t ions arerestored.
VENT
ECONOMIC RUNNING
TEMPTo decrease set temperatureor Timer’s setting. Temperature decreases bysteps of 1°C.
To start/stop the airconditioner.
At each press of the button, operation mode changes as follows:
To start/stop the automaticswinging of the motorizedlouver.In this way, it is also possibleto stop the louver at thedesired position.This function is not availableon these Models.
To set ventilating mode.At each press of the button,ventilating mode changes asfollows:
This function is not availableon these Models.
AUTO COOL DRY HEAT FAN
AUTO OFFCONTINUOUS
To activate Energy-savingoperation mode.
1. Indoor setting temperature range: 17˚C ÷ 30˚C. 2. Operative temperature range: -5˚C ÷ 60˚C. 3. Rated voltage: STANDARD --> 3.0 V LOWEST --> 2.0 V 4. Maximum allowed distance between the remote controller and the Indoor Unit: 11m with new batteries; 8m standard. 5. Timer setting function: 24h.
Caution:After replacing batteries in the remote controller,the display will show the following items:
3 - Temperature: 23˚C; 4 - Fan speed: AUTO.
1 - Mode: AUTO; 2 - Timer: NO;
IR Remote Controller’s Technical Data
STEROWNIK BEZPRZEWODOWY
Opis przycisków
Obniżenie ustawionej temperatury ( krok 1°C) lub ustawienia programatora czasowego
Włączenie/ wyłączenie klimatyzatora
Każde naciśnięcie przyci-sku zmienia tryb pracy w sekwencji
Funkcja niedostępna w tych modelach
Funkcja niedostępna w tych modelach
Uruchomienie funkcji oszczędzania energii
Podnoszenie ustawionej temperatury ( krok 1°C) lub ustawienia programatora czasowego
Wybranie prędkości kli-matyzatora w sekwencji AUTO-LOW-MED.-HIGH
Programowanie czasu włą-czenia i wyłączenia klimaty-zatora
Anulowanie ustawień pro-gramatora czasowego
Zablokowanie ustawień. W celu odblokowania należy wcisnąć ponownie
Wciśnięcie anuluje wszyst-kie bieżące ustawienia i przywraca ustawienia domyślne
Uwaga :Po wymianie baterii wyświetlacz sterownika bezprze-wodowego pokaże następujące pozycje:1. Tryb: AUTO 3. Temperatura: 23°C2. Progr. czas: NO 4. Prędkość wentylatora: AUTO
Dane techniczne sterownika bezprzewodowego
1. Zakres temperatur w pomieszczeniu : 17°C ̴ 30°C2. Zakres temperatur sterownika: -5°C ̴ 60°C3. Napięcie: STANDARDOWE > 3,0 V / MINIMALNE > 2,0 V4. Maksymalna odległość pomiędzy sterownikiem bezprzewodowym, a jednostką wewnętrzną: 11 m z nowymi bateriami 8 m.5. Ustawienia programatora czasowego 24h

-14-
INFRARED REMOTE CONTROLLER
1) Make sure the 2 batteries (“AAA” type, 1.5V) are fully charged and correctly fitted in the special slot on the remote controller, by respecting the polarity marked on the remote controller itself. The batteries' average life is of about 6 months ~ 1 year.2) Use the remote controller by turning it towards the Indoor Unit at no more than 8 metres from the Unit itself.3) The remote controller will not work properly if curtains, doors or other objects placed between the remote controller and the infrared receiver on the Indoor Unit do not allow the signal transmission.4) If the remote controller is placed sideways as regards to the signal receiver, it will operate within a max. angle of 30° on the right or on the left from the receiver. If the remote controller is fixed on its wall bearing, it will work within a side distance of 0.5 metres on the right or on the left from the receiver.5) If the infrared receiver on Indoor Unit is exposed to direct sunlight, the remote controller (and consequently the air conditioner) probably will not work properly.6) In order to avoid interferences, keep the remote controller at least 1 metre away from Hi-Fi, TV, radio and in general from appliances generating electromagnetic fields.7) If the remote controller stops to operate correctly, press “RESET” button on the remote controller to cancel current settings and restore factory defaults' settings. Check if correct operation of remote controller has been restored.8) Do not wet the remote controller and prevent any liquid from falling into it.9) Handle the remote controller with care and pay attention not to drop it nor place heavy objects on it. Keep it far away from heat sources such as heaters, cooking stoves, electric blankets, etc.10) Never use solvents nor strong detergents for cleaning the remote controller. Only use a soft, clean and dry cloth.
Installation & correct use of remote controller
Max. allowed distance: 8 metres
SET TEMPERATURE(˚C)
TEMPMODE
SWINGVENT
CANCEL
TIMER
ON/OFF
RESET LOCK
ECONOMICRUNNING
FAN SPEED
FANHIGHMEDLOW
AUTOCOOLDRYHEAT
Signal receiver &LED Display
Air outlet
MANUAL OPERATION TIMER DEF./FAN ALARM
Signal receiver
LED Display
STEROWNIK BEZPRZEWODOWY
WŁASCIWE UŻYTKOWANIE STEROWNIKA
1. Upewnij się, że 2 baterie (typ AAA, 1,5V) są w pełni naładowane i prawidłowo wło-żone w specjalnym miejscu, z uwzględnieniem polaryzacji zaznaczonej na sterowni-ku. Przeciętna żywotność baterii w tym urządzeniu wynosi od około 6 miesięcy do roku.
2. Sterownik należy używać, kierując go w stronę urządzenia z odległości nie większej niż 8 m.
3. Sterownik nie będzie działał prawidłowo jeżeli pomiędzy nim, a odbiornikiem pod-czerwieni w jednostce wewnętrznej znajdują się przeszkody (kurtyny, drzwi i itp.).
4. Jeżeli sterownik jest umieszczony z boku jednostki wewnętrznej, będzie działać w za-kresie 30o na lewo i prawo. Jeżeli sterownik jest umieszczony jest w uchwycie ścien-nym, będzie działać w odległości 0,5 metra w lewo i prawo.
5. Jeżeli odbiornik podczerwieni urządzenia jest wystawiony na bezpośrednie nasłonecz-nienie, sterownik nie będzie działał prawidłowo (w konsekwencji również klimatyzator).
6. W celu uniknięcia zakłóceń należy umieścić sterownik, co najmniej 1 metr od telewi-zora, sprzętu audio, itp.
7. Jeśli sterownik przestaje działać prawidłowo, należy wcisnąć przycisk „RESET” aby anulować aktualne ustawienia i przywrócić ustawienia fabryczne. Ustawić ponownie aktualny czas i sprawdzić, czy sterownik działa prawidłowo.
8. Nie moczyć sterownika i zapobiegać rozlaniu na niego płynów.9. Ostrożnie posługiwać się sterownikiem oraz uważać, aby go nie upuszczać i nie kłaść
na nim ciężkich przedmiotów. Trzymać go z dala od źródeł ciepła, takich jak grzejniki, kuchenki do gotowania, koce elektryczne itd.
10. Nigdy nie należy używać rozpuszczalników ani silnych detergentów do czyszczenia sterownika. Należy używać jedynie miękkiej, czystej i suchej szmatki.
Odbiornik sygnału i wyświetlacz LED
Odbiornik sygnału
Wylot powietrza
Max. odległość działania sterownika: 8 metrów
Wyświetlacz LED
-15-
INFRARED REMOTE CONTROLLER
Batteries' replacement
If after the transmission of a signal by remote controller the confirmation sound emitted by the Indoor Unit's buzzer is no more heard, or the indicator on remote controller's display does not light up, batteries must be replaced.To open the battery case, see the Figure below.
CAUTION!
If after replacing batteries the remote controler does not work, remove batteries and reinsert them after a few minutes, or press the inner button "RESET" on remote controller.
• Always insert two new batteries of AAA type (1.5V) type of the same brand (never insert one new battery and one old battery, as this may cause a malfunction).
• Please observe the batteries' polarity ("+" / "-") marked on the battery case and on the batteries themselves.
• Before closing the battery case's cover, check if the remote controller displays "0:00" with flashing colon.
• Remove batteries from remote controller if you foresee not to use it for several weeks. A leakage of acid may damage the remote controller.
• Normal average life of a battery set is of about 6 months ~ 1 year.
Batteries’ replacement
Slide the cover and remove it.
Insert batteries.
Reinstall the cover of the battery case.
1
2
3
Pay attentionto the polarities
+ and - .
Push the coverin the arrow’sdirection.
STEROWNIK BEZPRZEWODOWY
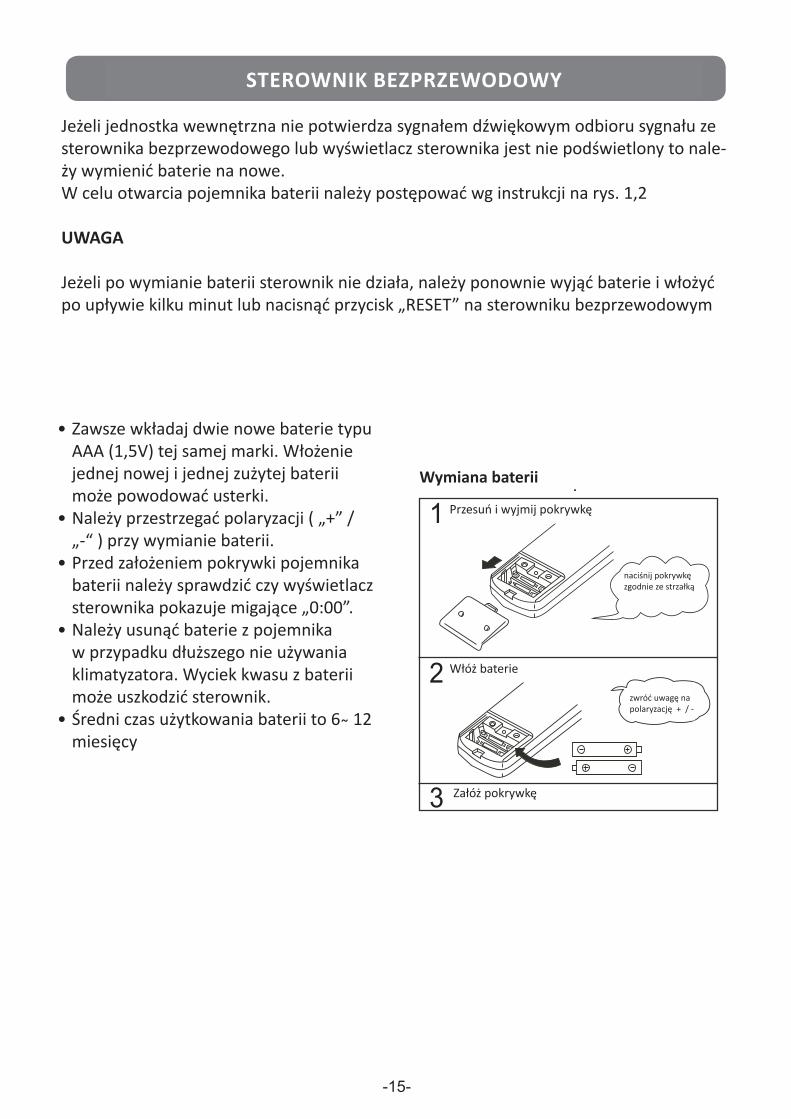
• Zawsze wkładaj dwie nowe baterie typu AAA (1,5V) tej samej marki. Włożenie jednej nowej i jednej zużytej baterii może powodować usterki.
• Należy przestrzegać polaryzacji ( „+” / „-“ ) przy wymianie baterii.
• Przed założeniem pokrywki pojemnika baterii należy sprawdzić czy wyświetlacz sterownika pokazuje migające „0:00”.
• Należy usunąć baterie z pojemnika w przypadku dłuższego nie używania klimatyzatora. Wyciek kwasu z baterii może uszkodzić sterownik.
• Średni czas użytkowania baterii to 6 ̴ 12 miesięcy
Jeżeli jednostka wewnętrzna nie potwierdza sygnałem dźwiękowym odbioru sygnału ze sterownika bezprzewodowego lub wyświetlacz sterownika jest nie podświetlony to nale-ży wymienić baterie na nowe.W celu otwarcia pojemnika baterii należy postępować wg instrukcji na rys. 1,2
UWAGA
Jeżeli po wymianie baterii sterownik nie działa, należy ponownie wyjąć baterie i włożyć po upływie kilku minut lub nacisnąć przycisk „RESET” na sterowniku bezprzewodowym
Wymiana baterii
Przesuń i wyjmij pokrywkę
Włóż baterie
Załóż pokrywkę
naciśnij pokrywkę zgodnie ze strzałką
zwróć uwagę na polaryzację + / -

-16-
HEAT, COOL, FAN OPERATION
COOL, HEAT. FAN Modes
Connecting/operating the air conditioner
1.
2.
3.
Stop
Connect the air conditioner to the power source:operation LED on Indoor Unit’s panel will start flashing.
Press ON/OFF button to start the air conditioner:OPERATION LED on Indoor Unit’s panel willstop flashing and will light up.
Press ON/OFF button on remote controller to stopthe air conditioner’s operation.
1.
2.
3.
SET TEMPERATURE(˚C)
TEMP
MODE
SWING
VENT CANCEL
TIMER
ON/OFF
RESET LOCK
ECONOMICRUNNING
FAN SPEED
FANHIGHMEDLOW
AUTOCOOLDRYHEAT
1
2
2
3
Select your desired operation mode by pressingMODE button:- COOL- HEAT- FAN Select your desired temperature by pressingTEMP buttons.
Select your desired fan speed by pressingFAN SPEED button:
- AUTO- LOW- MED- HIGH
4.
4
NOTES:
In FAN mode, it is not possible to select your desired room temperature, therefore move directlyfrom above item No.1 to item No.3.
Operation mode in COOL, HEAT and FAN modes is memorized by the microcomputer, so if youwould like to keep it for next operation of the air conditioner, you only need to press ON/OFF buttonon remote controller. Set temperature and fan speed settings will be memorized too, so they will bethe same at next restart of the air conditioner. It is possible to change operation mode while the air conditioner is operating. However, theUnit will not immediately start operating according to the new mode, but a little delay is neededfor carrying out a test and choosing new operating parameters.
Aby rozpocząć operację:
Podłącz jednostkę do źródła zasilania – dioda „Ope-ration” na wyświetlaczu jednostki wewnętrznej powinna zacząć migać.1. Wybierz preferowany tryb za pomocą przycisku MODE• COOL – chłodzenie• HEAT – ogrzewanie• FAN – nawiew
2. Ustal pożądaną temperaturę za pomocą przycisku TEMP ˅˄
3. Ustaw pożądaną prędkość wentylatora przyci-skiem FAN SPEED• AUTO – automatycznie• LOW – niska• MED. – średnia• HIGH – wysoka
4. Naciśnij przycisk ON/OFF w celu włączenia klima-tyzatora. Dioda „Operation” powinna zacząć świecić stałym światłem.
Aby zatrzymać operację:Naciśnij przycisk ON/OFF na sterowniku w celu za-trzymania pracy klimatyzatora.
TRYBY PRACY (OGRZEWANIE, CHŁODZENIE, NAWIEW)
UWAGI
1. W trybie FAN nie jest możliwe ustawianie wybranej temperatury , przejdź z pkt-u 1 instrukcji do pkt-u 3.
2. Ustawienia w trybach chłodzenia, ogrzewania i nawiewu są zapamiętywane przez mikrokomputer i wystarczy nacisnąć przycisk ON/OFF aby odtworzyć ustawienia przy kolejnym włączeniu klimatyzatora.
3. Jest możliwa zmiana ustawień w trakcie pracy klimatyzatora, jednak z powodu testo-wania i wyboru nowych parametrów odbywa się to z pewnym opóźnieniem.
-17-
DRY OPERATION
DRY Mode
Connecting/operating the air conditioner
1. Select DRY mode by pressing MODE button.
2. Select your desired temperature by pressingTEMP button.
3.
Stop
DRY mode is a Cooling mode with low fan speed, inwhich the refrigerant flow through indoor heat exchangeris compatible with low fan speed, so as to permitthe condensation of humidity without changing airtemperature.Operation in DRY mode dries the air.
Connect the air conditioner to the power source:OPERATION LED on Indoor Unit’s panel will startflashing.
Press ON/OFF button to start the air conditioner:OPERATION LED on Indoor Unit’s panel willstop flashing and will light up.
Press ON/OFF button on remote controller to stopthe air conditioner’s operation.
NOTES:
In DRY mode, it is not possible to select your desired fan speed, as it will be automatically controlledby the microcomputer (the display shows “LOW” indication).
The User can select his desired room temperature. However, if batteries are replaced or RESETbutton is pressed, operation mode changes to AUTO and temperature is automatically set to23°C.
DRY mode, as well as all other operation modes, is memorized by the microcomputer, so if youwould like to keep it at next restart of the air conditioner, you only need to press ON/OFF button onremote controller.In DRY mode, if the User selects a temperature other than 23°C, set temperature will be kept inmemory for next restart of the air conditioner. It is possible to change operation mode while the air conditioner is operating in DRY mode. However,the Unit will not immediately start operating according to the new mode, but a little delay is neededfor carrying out a test and choosing new operating parameters.
1.
2.
3.
SET TEMPERATURE(˚C)
TEMP
MODE
SWING
VENT CANCEL
TIMER
ON/OFF
RESET LOCK
ECONOMICRUNNING
FAN SPEED
FANHIGHMEDLOW
AUTOCOOLDRYHEAT
1
2
2
3
4.
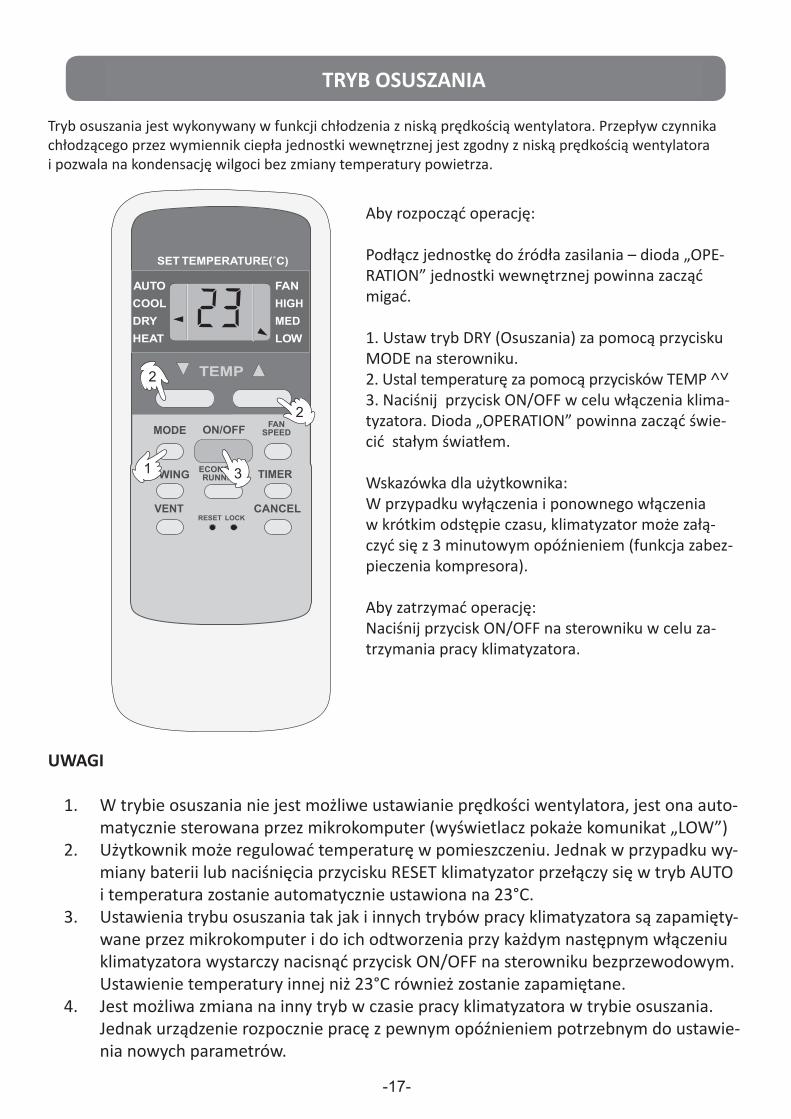
Aby rozpocząć operację:
Podłącz jednostkę do źródła zasilania – dioda „OPE-RATION” jednostki wewnętrznej powinna zacząć migać.
1. Ustaw tryb DRY (Osuszania) za pomocą przycisku MODE na sterowniku.2. Ustal temperaturę za pomocą przycisków TEMP ˄˅3. Naciśnij przycisk ON/OFF w celu włączenia klima-tyzatora. Dioda „OPERATION” powinna zacząć świe-cić stałym światłem.
Wskazówka dla użytkownika:W przypadku wyłączenia i ponownego włączenia w krótkim odstępie czasu, klimatyzator może załą-czyć się z 3 minutowym opóźnieniem (funkcja zabez-pieczenia kompresora).
Aby zatrzymać operację:Naciśnij przycisk ON/OFF na sterowniku w celu za-trzymania pracy klimatyzatora.
TRYB OSUSZANIA
UWAGI
1. W trybie osuszania nie jest możliwe ustawianie prędkości wentylatora, jest ona auto-matycznie sterowana przez mikrokomputer (wyświetlacz pokaże komunikat „LOW”)
2. Użytkownik może regulować temperaturę w pomieszczeniu. Jednak w przypadku wy-miany baterii lub naciśnięcia przycisku RESET klimatyzator przełączy się w tryb AUTO i temperatura zostanie automatycznie ustawiona na 23°C.
3. Ustawienia trybu osuszania tak jak i innych trybów pracy klimatyzatora są zapamięty-wane przez mikrokomputer i do ich odtworzenia przy każdym następnym włączeniu klimatyzatora wystarczy nacisnąć przycisk ON/OFF na sterowniku bezprzewodowym. Ustawienie temperatury innej niż 23°C również zostanie zapamiętane.
4. Jest możliwa zmiana na inny tryb w czasie pracy klimatyzatora w trybie osuszania. Jednak urządzenie rozpocznie pracę z pewnym opóźnieniem potrzebnym do ustawie-nia nowych parametrów.
Tryb osuszania jest wykonywany w funkcji chłodzenia z niską prędkością wentylatora. Przepływ czynnika chłodzącego przez wymiennik ciepła jednostki wewnętrznej jest zgodny z niską prędkością wentylatora i pozwala na kondensację wilgoci bez zmiany temperatury powietrza.

-18-
AUTO OPERATION
AUTO Mode
When AUTO mode is selected, the air conditionerautomatically chooses the suitable operation settingsaccording to room temperature and eventually to thetemperature set to the User. The four possible optionsare among COOL, DRY, HEAT, FAN.
SET TEMPERATURE(˚C)
TEMP
MODE
SWING
VENT CANCEL
TIMER
ON/OFF
RESET LOCK
ECONOMICRUNNING
FAN SPEED
FANHIGHMEDLOW
AUTOCOOLDRYHEAT
1
2
2
3
Connecting/operating the air conditioner
1. Select AUTO mode by pressing MODE button.
2. Select your desired temperature by pressingTEMP button.
3.
Stop
Connect the air conditioner to the power source:OPERATION LED on Indoor Unit’s panel will startflashing.
Press ON/OFF button to start the air conditioner:OPERATION LED on Indoor Unit’s panel willstop flashing and will light up.
Press ON/OFF button on remote controller to stopthe air conditioner’s operation.
NOTES:
In AUTO mode, it is not possible to select your desired fan speed, as it will be automatically controlledby the microcomputer (the display shows “LOW” indication).
The User can select his desired room temperature. However, if batteries are replaced or RESETbutton is pressed, operation mode changes to AUTO and temperature is automatically set to23°C.
AUTO mode, as well as all other operation modes, is memorized by the microcomputer, so if youwould like to keep it at next restart of the air conditioner, you only need to press ON/OFF button onremote controller.In AUTO mode, if the User selects a temperature other than 23°C, set temperature will be kept inmemory for next restart of the air conditioner. It is possible to change operation mode while the air conditioner is operating in AUTO mode. However,the Unit will not immediately start operating according to the new mode, but a little delay is neededfor carrying out a test and choosing new operating parameters.
1.
2.
3.
4.
Urządzenie w trybie „AUTO” rozpoczyna pracę w optymalnym ustawieniu z uwzględnieniem tem-peratury powietrza w pomieszczeniu i preferencji użytkownika.
Aby rozpocząć operację:
Podłącz urządzenie do źródła zasilania - Dioda „OPE-RATION” jednostki wewnętrznej powinna zacząć migać.1. Wybierz „AUTO” za pomocą przycisku MODE na sterowniku.2. Wybierz temperaturę za pomocą przycisków TEMP ˅˄
3. Aby włączyć klimatyzator, naciśnij przycisk ON/OFF. Dioda „OPERATION” powinna zacząć świecić stałym światłem.
Aby zatrzymać operację:Naciśnij przycisk ON/OFF na sterowniku w celu za-trzymania pracy klimatyzatora.
TRYB AUTOMATYCZNY
UWAGI :
1. W trybie AUTO nie jest możliwe ustawianie prędkości wentylatora, jest ona automatycznie sterowana przez mikrokomputer (wyświetlacz pokaże komunikat „LOW”).
2. Użytkownik może regulować temperaturę w pomieszczeniu. Jednak w przypadku wymiany baterii lub naciśnięcia przycisku RESET klimatyzator przełączy się w tryb AUTO i temperatura zostanie automatycznie ustawiona na 23°C.
3. Ustawienia trybu AUTO tak jak i innych trybów pracy klimatyzatora są zapamiętywane przez mikrokomputer i do ich odtworzenia przy każdym następnym włączeniu klimatyzatora wystar-czy nacisnąć przycisk ON/OFF na sterowniku bezprzewodowym. Ustawienie temperatury innej niż 23°C również zostanie zapamiętane.
4. Jest możliwa zmiana na inny tryb w czasie pracy klimatyzatora w trybie AUTO. Jednak urządze-nie rozpocznie pracę z pewnym opóźnieniem potrzebnym do ustawienia nowych parametrów.

-19-
TIMER FUNCTION
TIMER ON (Programmed Start)
Connecting the air conditioner
1.
2.
Stop
TIMER function allows to program the start and/or thestop of the air conditioner according to your needs.
Connect the air conditioner to the power source:OPERATION LED on Indoor Unit’s panel will start flashing.
After 0.5 seconds since the time for programmedstart was set, the remote controller will send settingsto Indoor Unit. OPERATION LED will go out andTIMER LED will light up. After 2 seconds, the displaywill show set temperature and the symbol referredto operation mode. At set time, the air conditionerwill start operating and OPERATION LED will lightup, while TIMER LED will go out.
3.
Press ON/OFF button on remote controller to stopthe air conditioner’s operation.
NOTES:
Time increases and decreases are 30-minutes’ steps till 10 subsequent hours and 60-minutes’s steps from10 to 24 hours. The remote controller’s Timer is not a clock, so it is necessary to set the time period - not theexact time - for programmed start.
Unlike operation modes, TIMER settings are not kept in memory by the microcomputer, therefore if a powerfailure occurs, TIMER settings will be cancelled and need to be set again.
Before selecting TIMER settings, it is possible to choose the desired operation mode.
TIMER max. range is 24 hours, i.e. it is not possible to operate weekly settings.
To modify settings, press CANCEL button and repeat the above described procedure for TIMER ON.
1.
2.
3.
SET TEMPERATURE(˚C)
TEMP
MODE
SWING
VENT CANCEL
TIMER
ON/OFF
RESET LOCK
ECONOMICRUNNING
FAN SPEED
FANHIGHMEDLOW
AUTOCOOLDRYHEAT
3
1
22
4.
Programmed start - TIMER ON
Press TIMER button: the display will show“h” and the digits for programming the setting.The remote controller is ready to receive settingfor “TIMER ON”.
Press TEMP buttons ( or ) for selecting thetime for programmed start of the air conditioner.
Press CANCEL button on remote controller tostop the air conditioner’s operation.
h
5.
When TIMER function is selected, the remote controller automatically sends signals for programmed start/stop to theIndoor Unit. If you would like to be sure that these signals are received by Indoor Unit, it is necessary to address theremote controller towards the Indoor Unit’s signal receiver, and check there are no obstacles that may affect theimpulses’ transmission.
CAUTION !
PROGRAMOWANIE WŁĄCZENIA KLIMATYZATORA (TIMER ON)Funkcja TIMER pozwala na zaprogramowanie włączenia i/lub wyłączenia klimatyzatora w zależności od potrzeb.
Podłączenie klimatyzatora Podłącz klimatyzator do sieci elektrycznej. Dioda „OPERA-TION” na jednostce wewnętrznej powinna zacząć migać.Naciśnij przycisk ON/OFF. Dioda „OPERATION” zacznie świecić stałym światłem
Programowanie włączenia klimatyzatora - TIMER ON1. Nacisnąć przycisk TIMER: wyświetlacz pokaże „h” i ustawie-nia cyfrowe do zaprogramowania. Sterownik bezprzewodowy jest gotowy do przyjęcia ustawień dla „TIMER ON”.2. Naciśnij przycisk TEMP ( ˄ lub ˅ ) w celu zaprogramowania czasu włączenia klimatyzatora.
Po 0,5 sekundy od zaprogramowania sterownik wysyła sygnał z ustawieniami do jednostki wewnętrznej. Dioda „OPERA-TION” gaśnie a dioda TIMER zaczyna świecić. Po 2 sekundach wyświetlacz pokaże ustawioną temperaturę i wybrany tryb pracy. W ustawionym czasie klimatyzator rozpocznie pracę i zaświeci się dioda OPERATION a dioda TIMER zgaśnie.3. Naciśnij przycisk CANCEL w celu anulowania funkcji.
Wyłączenie klimatyzatoraNaciśnij przycisk ON/OFF na sterowniku bezprzewodowym.
OSTRZEŻENIE !
Przy wyborze funkcji TIMER należy zapewnić prawidłowy od-biór sygnału ze sterownika bezprzewodowego przez jednostkę wewnętrzną. Żadne przeszkody nie powinny znajdować się między urządzeniami.
PROGRAMATOR CZASOWY
UWAGI
1. Zmany czasów ustawień odbywają się 30-minutowych krokach w przedziale do 10 godzin w 60-minutowych krokach w przedziale od 10 do 24 godzin
2. W odróżnieniu od trybów pracy, ustawienia funkcji TIMER nie są zapamiętywane w pamięci mikrokomputera i w przypadku zaniku zasilania istnieje konieczność dokonania ponownych ustawień.
3. Przed włączeniem funkcji TIMER jest możliwe ustawienie wybranego trybu pracy.4. Ustawienie funkcji TIMER jest możliwe w przedziale 24-godzinnym. Funkcja nie działa jako
programator tygodniowy.5. Zmiana ustawień przy pomocy przycisku CANCEL i ponownego zaprogramowania wg. instruk-
cji TIMER ON

-20-
TIMER FUNCTION
TIMER OFF (Programmed Stop)
5.
1.
2.
TIMER OFF function allows to set programmed stoptime for the air conditioner. In this way, the appliancewill automatically stop at the desired time.
After 0.5 seconds since the time for programmed stopwas set, the remote controller will send settings toIndoor Unit. TIMER LED will light up.After 2 seconds, the display wil show set temperature.At set time, the air conditioner will stop operation andOPERATION LED and TIMER LED will go out.
NOTES:See “TIMER ON” function on the previous page.
SET TEMPERATURE(˚C)
TEMP
MODE
SWING
VENT CANCEL
TIMER
ON/OFF
RESET LOCK
ECONOMICRUNNING
FAN SPEED
FANHIGHMEDLOW
AUTOCOOLDRYHEAT
5
1-3
2-42-4
Durante l'impostazione del TIMER premere il pulsante CANCEL per annullare l'impostazione.
Programmed stop - TIMER OFF
Press TIMER button: the display will show “h”and eventually the digits of last setting for“TIMER ON”.
Press TEMP buttons ( or ) to cancel “TIMERON” settings. The display will show “00”.
h
CAUTION !
Press TIMER button again: the display will show“h” and eventually the digits of the last setting for“TIMER OFF”.
Press TEMP button ( or ) to set the programmedstop time for the air conditioner.
3.
4.
Connecting/operating the air conditionerConnect the air conditioner to the power source:OPERATION LED on Indoor Unit’s panel will start flashing.Press “ON/OFF” button on remote controller to start theair conditioner: OPERATION LED on Indoor Unit willlight up.
When TIMER function is selected, the remote controller automatically sends signals for programmed start/stop to theIndoor Unit. If you would like to be sure that these signals are received by Indoor Unit, it is necessary to address theremote controller towards the Indoor Unit’s signal receiver, and check there are no obstacles that may affect theimpulses’ transmission.
OSTRZEŻENIE!
Przy wyborze funkcji TIMER należy zapewnić prawidłowy odbiór sygnału ze sterownika bez-przewodowego przez jednostkę wewnętrzną. Żadne przeszkody nie powinny znajdować się między urządzeniami.
UWAGIPatrz funkcje „TIMER ON” z poprzedniej strony
PROGRAMOWANIE WYŁĄCZENIA KLIMATYZATORA (TIMER OFF)Funkcja TIMER OFF pozwala na zaprogramowanie wyłączenia klimatyzatora w ustawionym czasie.
Podłączenie klimatyzatora Podłącz klimatyzator do sieci elektrycznej. Dioda „OPERA-TION” na jednostce wewnętrznej powinna zacząć migać.Naciśnij przycisk ON/OFF. Dioda „OPERATION” zacznie świecić stałym światłem. Programowanie wyłączenia klimatyzatora - TIMER OFF.
1. Nacisnąć przycisk TIMER: wyświetlacz pokaże „h” i ostatnio zaprogramowane ustawienia cyfrowe dla TIMER ON.
2. Naciśnij przycisk TEMP ( ˄ lub ˅ ) w celu anulowania usta-wień TIMER ON. Wyswietlacz pokaże „00”.
3. Naciśnij przycisk TIMER ponownie: wyświetlacz pokaże „h” i ostatnio zaprogramowane ustawienia cyfrowe dla TIMER OFF.
4. Naciśnij przycisk TEMP ( ˄ lub ˅ ) w celu zaprogramowania czasu wyłączenia klimatyzatora. Po 0,5 sekundy od zaprogra-mowania sterownik wysyła sygnał z ustawieniami do jednostki wewnętrznej. Dioda OPERATION gaśnie a dioda TIMER zaczyna świecić. Po 2 sekundach wyświetlacz pokaże ustawioną tem-peraturę i wybrany tryb pracy. W ustawionym czasie klimaty-zator rozpocznie pracę i zaświeci się dioda OPERATION a dioda TIMER zgaśnie.
5. Naciśnij przycisk CANCEL w celu anulowania funkcji.
Wyłączenie klimatyzatoraNaciśnij przycisk ON/OFF na sterowniku bezprzewodowym.
PROGRAMATOR CZASOWY

-21-
TIMER FUNCTION
TIMER ON/OFF (Programmed Start/Stop)
5.
1.
2.
TIMER ON/OFF (or TIMER OFF/ON) function allowsyou to set the automatic start/stop or stop/start of theair conditioner at your desired time.
After 0.5 seconds since the time for programmedstart/stop was set, the remote controller will send settingsto Indoor Unit. TIMER LED will light up. After 2 seconds,the display will show set temperature. At set time, theair conditioner will start/stop operation and OPERATIONLED and TIMER LED will light up or go out accordingto the selected combination.
:
SET TEMPERATURE(˚C)
TEMP
MODE
SWING
VENT CANCEL
TIMER
ON/OFF
RESET LOCK
ECONOMICRUNNING
FAN SPEED
FANHIGHMEDLOW
AUTOCOOLDRYHEAT
5
1-3
2-42-4
Press CANCEL button to cancel TIMER settings.
Programmed Start/StopTIMER ON/OFF (TIMER OFF/ON)
Press TIMER button: the display will show “h”and eventually the digits of last setting for “TIMERON”.
Press TEMP buttons ( or ) to set new timefor “TIMER ON”.
h
CAUTION !
Press TIMER button again: the display will show“h” and eventually the digits of the last setting for“TIMER OFF”.
Press TEMP button ( or ) to set the programmedstop time for “TIMER OFF”.
3.
4.
Connecting/operating the air conditioner
Connect the air conditioner to the power source:OPERATION LED on Indoor Unit’s panel will start flashing.
NOTES:See “TIMER ON” function on page 19.
When TIMER function is selected, the remote controller automatically sends signals for programmed start/stop to theIndoor Unit. If you would like to be sure that these signals are received by Indoor Unit, it is necessary to address theremote controller towards the Indoor Unit’s signal receiver, and check there are no obstacles that may affect theimpulses’ transmission.
OSTRZEŻENIE
Przy wyborze funkcji TIMER należy zapewnić prawidłowy odbiór sygnału ze sterownika bez-przewodowego przez jednostkę wewnętrzną. Żadne przeszkody nie powinny znajdować się między urządzeniami.
UWAGIPatrz funkcje „TIMER ON” ze strony 19.
Funkcja TIMER ON/OFF (lub TIMER OFF/ON) pozwala na zaprogramowanie włączenia/ wyłączenia lub wyłączenia/włą-czenia klimatyzatora w ustawionym czasie.
Podłączenie klimatyzatora Podłącz klimatyzator do sieci elektrycznej. Dioda „OPERA-TION” na jednostce wewnętrznej powinna zacząć migać.Naciśnij przycisk ON/OFF. Dioda „OPERATION” zacznie świecić stałym światłem Programowanie włączenia/ wyłączenia klimatyzatora - TIMER ON/OFF (TIMER OFF/ON)
1. Nacisnąć przycisk TIMER: wyświetlacz pokaże „h” i ostatnio zaprogramowane ustawienia cyfrowe dla TIMER ON.
2. Naciśnij przycisk TEMP ( ˄ lub ˅ ) w celu wprowadzenia nowych ustawień TIMER ON.
3. Naciśnij przycisk TIMER ponownie: wyświetlacz pokaże „h” i ostatnio zaprogramowane ustawienia cyfrowe dla TIMER OFF.
4. Naciśnij przycisk TEMP ( ˄ lub ˅ ) w celu zaprogramowania czasu wyłączenia klimatyzatora „TIMER OFF”. Po 0,5 sekundy od zaprogramowania sterownik wysyła sygnał z ustawieniami do jednostki wewnętrznej. Dioda OPERATION gaśnie a dioda TIMER zaczyna świecić. Po 2 sekundach wyświetlacz pokaże ustawioną temperaturę i wybrany tryb pracy. W ustawionym czasie klimatyzator rozpocznie pracę i zaświeci się dioda OPE-RATION a dioda TIMER zgaśnie.
5. Naciśnij przycisk CANCEL w celu anulowania funkcji.
Wyłączenie klimatyzatoraNaciśnij przycisk ON/OFF na sterowniku bezprzewodowym
PROGRAMATOR CZASOWY
PROGRAMOWANIE WŁĄCZENIA/ WYŁĄCZENIA KLIMATYZATORA (TIMER ON/OFF)

-22-
“ECO" (ENERGY SAVING) FUNCTION
ECONOMIC RUNNING mode
Connecting/operating the air conditioner
1.
2.
Stop
Connect the air conditioner to the power source:“OPERATION” LED on Indoor Unit’s panel will startflashing.
Press "ON/OFF" button to start the air conditioner: "OPERATION" LED on Indoor Unit’s panel will stop flashing and will light up.
Press "ON/OFF" button on remote controller to stopthe air conditioner’s operation.
SET TEMPERATURE(˚C)
TEMP
MODE
SWING
VENT CANCEL
TIMER
ON/OFF
RESET LOCK
ECONOMICRUNNING
FAN SPEED
FANHIGHMEDLOW
AUTOCOOLDRYHEAT
1
2
2
3
Select your desired operation mode by pressing MODE button:
• COOL• AUTO
• HEAT• FAN
Select your desired temperature by pressing “TEMP” buttons.
4. Press “ECONOMIC RUNNING” button.
3.4
By setting “ECO” mode, the fan will work “LOW” speed.
Fan speed is automatically selected by the inner electronics, therefore it cannot be changed
by the User.
To cancel the Energy Saving mode:Press again “ECONOMIC RUNNING” button.
Podłączenie klimatyzatora.
Podłącz klimatyzator do sieci elektrycznej. Dioda „OPERATION” na jednostce wewnętrznej powinna zacząć migać.
1. Ustaw tryb pracy naciskając przycisk MODE:• AUTO• COOL• DRY• HEAT
2. Ustaw wymaganą temperaturę naciskając przycisk „TEMP”3. Naciśnij przycisk ON/OFF w celu włączenia klima-tyzatora. „Dioda OPERATION” zacznie świecić cią-głym światłem.4. Naciśnij przycisk „ECONIMIC RUNNING”.
Anulowanie funkcji „ECO”:Nacisnąć ponownie przycisk „ECONOMIC RUNNING”
Wyłączenie klimatyzatora:Nacisnąć przycisk „ON/OFF” na sterowniku bezprze-wodowym.
TRYB „ECO”
W funkcji „ECO” wentylator jednostki wewnętrznej będzie pracował z prędko-ścią „LOW” (niską).Prędkość wentylatora jest regulowana automatycznie i nie ma możliwości ręcz-nego ustawiania.

-23-
EMERGENCY OPERATION & TEST SWITCH
NOTE: Do not use the Emergency/Test function as the normal operating mode of the air conditioner.
MANUAL button:
Operation in Emergency mode:
Testing the air conditioner:
End of operation in Emergency mode or Test mode:
AUTO
•
•
•
TEMPORARY button forEmergency/Test mode
This button is used to operate the Unit temporarily in case you misplace the remotecontroller or its batteries are exhausted.
Two modes including AUTO and FORCED COOL can be selected through theTEMPORARY BUTTON on the air-in grill control box of the Indoor Unit.Once you push this button, the air conditioner will run in such order: AUTO, FORCEDCOOL, OFF, and back to AUTO.
Press MANUAL button once: OPERATION lamp on Indoor Unit will light up, andthe air conditioner will run under AUTO mode.The remote controller operation is enabled to operate according to the receivedsignal.
FORCED COOLPress MANUAL button twice: OPERATION lamp flashes, the air conditioner is enforcedto COOL mode wth a wind speed of HIGH for 30 minutes, then it is turned to AUTOmode.The remote controller operation is disabled.
OFFPress MANUAL button while the air conditioner is operating in Emergency mode or inTest mode: operation will be immediately stopped.The OPERATION lamp goes off. The air conditioner is OFF while the remote controlleroperation is enabled.
MANUAL OPERATION TIMER DEF./FAN ALARM
Przycisk ręcznego sterowania :
Jeżeli zgubiłeś pilot zdalnego sterowania lub baterie w nim zużyły się, klimatyzator może być uruchomiony przez naciśnięcie przycisku ręcznego sterowania na przednim panelu jednostki we-wnętrznej. Dwa tryby pracy AUTO i FORCED COOL mogą zostać wybrane przy użyciu przycisku ręcznego stero-wania, w sekwencji: AUTO, FORCED COOL, OFF i znowu AUTO.
Praca w trybie awaryjnym:• AUTOJednokrotnie naciśnij przycisk ręcznego sterowania: dioda OPERATION zapali się ciągłym światłem i klimatyzator rozpocznie pracę w trybie AUTO.Sterownik może wysyłać sygnały.
Testowanie klimatyzatora:• FORCED COOLNaciśnij przycisk ręcznego sterowania dwukrotnie. Dioda „OPERATION” zacznie migać. Klimatyzator rozpocznie pracę w trybie chłodzenia z wysoką prędkością wentylatora przez 30 minut. Następnie tryb przełączy się na „AUTO”.W czasie testu sygnały ze sterownika bezprzewodowego nie będą odbierane przez jednostkę we-wnętrzną.
Zakończenie pracy jednostki w trybie awaryjnym lub testowym:• OFFNacisnąć przycisk ręcznego sterowania na panelu przednim w czasie trybu awaryjnego lub w czasie trybu testowego : nastąpi wyłączenie klimatyzatora. Dioda OPERATION zgaśnie.Przejście do normalnej pracy przy użyciu sterownika bezprzewodowego.
UWAGA: nie używać tryby awaryjnego i testowego w czasie normalnej pracy klimatyzatora.
REGULACJA KIERUNKU PRZEPŁYWU POWIETRZA
Przycisk ręcznego sterowania

- 25 -
ORDINARY MAINTENANCE AND ADVICE FOR USE
Before starting any kind of ordinary maintenance:1 - Stop the appliance by pressing "ON/OFF" button on remote controller;2 - Move the circuit breaker to "OFF" or "0" position;3 - Pull the plug out of the power socket;4 - To reach the Unit, please use a stepladder or other appropriate bearing strong enough to ensure your safety.
Cleaning the remote controller Cleaning the Indoor Unit
Do not use water, but a dry cloth. Do not use products for glass cleaning, nor soaked in detergents.
Use a dry and soft cloth. In case of need, dampen the cloth in water and neutral detergent, then wring well.
Never use any of the following products for cleaning
Benzine, paint solvents, polishing products, by-products of oil in general, etc. may damage the outside surfaces of Unit and cause deformations and scratches on the appliance and on the remote controller.
The use of very hot water (over 40°C) may discolour and/or deform the plastic parts.
Indoor Unit's cleaning
NOTES:• If the appliance or the inlet grille are very dirty, clean them with a cloth soaked in tepid water and neutraldetergent. Rinse in clean watrer and dry well. The presency of humidity on the inlet grille may cause electric shocks.• Never use any abrasive sponge for cleaning, to avoid scratching the Unit's surfaces.• If the grille is open or has been removed, do not touch the metallic flaps of the heat exchanger, as theflaps are sharp and may hurt you.• Do not expose the grille or the Unit to direct sunlight, to avoid discolouring or deforming them.
WARNING!
Outdoor Unit's cleaning• Check regularly that the air inlet and outlet are not obstructed by dust or dirt in general.• For any other cleaning or maintenance of Outdoor Unit, always contact the Authorized TechnicalService.
CZYSZCZENIE I KONSERWACJA
Czyszczenie jednostki wewnętrznej
UWAGA
Przed rozpoczęciem jakiejkolwiek zwyczajnej czynności konserwacyjnej:1. Należy zatrzymać urządzenie, naciskając przycisk „ON/OFF” na pilocie zdalnego sterowania.2. Ustawić wyłącznik automatyczny w pozycji „OFF” (WYŁĄCZENIA) lub „0”.3. Wyjąć wtyczkę z gniazdka zasilania.4. W celu dosięgnięcia do urządzenia należy używać drabiny lub innej odpowiednio wytrzyma-
łej podpory zapewniającej bezpieczeństwo.
Czyszczenie pilota
Nigdy nie wolno używać do czyszczenia żadnych następujących środków
Nie wolno używać wody, a jedynie suchej szmatki. Nie wolno używać środków do czyszczenia szkła ani żadnych innych zanurzonych w detergentach.
Benzyny, rozpuszczalników do farb, środków nabłyszcza-jących, wszelkich produktów ubocznych z przerobu oleju itp., które mogą uszkodzić powierzchnie zewnętrzne urządzenia oraz spowodować odkształcenia i zadrapania na urządzeniu i na pilocie zdalnego sterowania.
Używać suchej i miękkiej szmatki. W razie po-trzeby zamoczyć szmatkę w wodzie i detergencie o neutralnym pH.
Użycie bardzo gorącej wody (o temperaturze ponad 40°C) może spowodować odbarwienie i/lub odkształcenia plastikowych części.
Czyszczenie jednostki wewnętrznej
UWAGI• Jeśli urządzenie lub kratka wlotowa są bardzo zabrudzone, należy oczyścić je szmatką zamoczoną w letniej wodzie i detergencie o neu-
tralnym pH. Następnie należy spłukać je w czystej wodzie i dobrze wysuszyć. Obecność wilgoci w kratce wlotowej może spowodować porażenie elektryczne.
• Nigdy nie wolno używać do czyszczenia gąbki ściernej, aby uniknąć zadrapania powierzchni urządzenia.• Jeśli kratka wentylacyjna jest otwarta lub została zdjęta, nie wolno dotykać metalowych krawędzi wymiennika ciepła, ponieważ są one
ostre i mogą powodować zranienia.• Nie wolno wystawiać kratki wentylacyjnej lub urządzenia na bezpośrednie działanie promieni słonecznych, aby uniknąć ich wyblaknięcia
lub odkształcenia.
Czyszczenie jednostki zewnętrznej• Regularnie sprawdzać czy wlot i wylot powietrza nie są zatkane w całości przez kurz i zanieczyszczenia.• W celu przeprowadzenia innych czynności związanych z czyszczeniem i konserwacją jednostki zewnętrznej należy zawsze kontaktować się
z autoryzowanym serwisem technicznym
- 24 -

-25-
CLEANING AND MAINTENANCE OF THE AIR CONDITIONER
Removing and cleaning the Air Filter
If your purchasing Unit is a rear ventilated one, please remove the filter fixed screws (2 screws) and take down the filter away from the Unit.
Fig.1
1
On Ducted Models, the filter’s cleaning must be carried out by the Personnel of the Authorized Technical Service, as the filter’s removing involves reaching some installation parts which normally are not accessible by the User.Moreover, the filter’s cleaning involves the disassembly of some parts of the Unit.
After removing the filter, do not touch the metallic fins of indoor heat exchanger, as they are sharp and may hurt you.
Do not operate the Unit without the air filter.
CLEAN THE AIR FILTERS AT EVERY SEASON’S CHANGE
CAUTION!
NOTES:
• The filter must always be clean: if it is clogged with dust or other solid particles in general, the cooling and heating capacity of the air conditioner will be reduced. Moreover, the appliance will be noisier and consume more electricity.• Normally, it is not necessary to replace the filter: you only have to clean it at regular intervals. Replace the filter when the accumulated dirt is too hard to be removed.• In case the air filter is damaged and needs to be replaced, it is necessary to order it as a spare part: please contact your Retailer or the Authorized Technical Service.• IMPORTANT: Never reinstall the filter on Indoor Unit in case it is damaged.Normally, the cleaning must be carried out at every season's change.However, if the air conditioner is used for many hours a day in a dusty environment, it must be cleaned more often than other air conditioners used in less heavy conditions.
UWAGI
• Filtry muszą być zawsze czyste w przeciwnym razie wydajność chłodzenia i ogrzewania będzie mniejsza. Ponadto klimatyzator będzie pracował głośniej i zużywał więcej energii.
• Zasadniczo wymiana filtrów nie jest konieczna. Wystarczy czyszczenie w regularnych od-stępach czasu. Należy wymienić filtr jeżeli usunięcie nagromadzonych zanieczyszczeń jest niemożliwe.
• Uszkodzone filtry należy wymienić na nowe, zamawiając je jako części zapasowe w auto-ryzowanym serwisie technicznym.
• WAŻNE: Nigdy nie używaj uszkodzonych filtrów.
Zasadniczo czyszczenie powinno się odbywać przed każdym sezonem, jednak używanie kli-matyzatora w trudniejszych warunkach (wiele godzin dziennie, zapylone środowisko) wyma-ga częstszego czyszczenia.
Wyjęcie i czyszczenie filtra powietrza
W jednostkach kanałowych czyszczenie fitra powinno być przeprowadzone przez autoryzo-wany serwis techniczny.Wyjęcie filtra wymaga odłączenia niektórych części instalacyjnych niedostępnych dla użyt-kownika.
CZYSZCZENIE I KONSERWACJA
UWAGA
Po wyjęciu filtra nie należy dotykać ostrych, metalowych brzegów wymiennika ciepła jednostki wewnętrznej co grozi skaleczeniem
Nie używać klimatyzatora bez założonego filtra powietrza.
CZYŚCIĆ FILTRY PO KAŻDYM SEZONIE
Jeżeli zainstalowana jednostka posiada wlot po-wietrza z tyłu należy odkręcić dwie śruby mocu-jące i wyjąć filtr z jednostki
Rys. 1
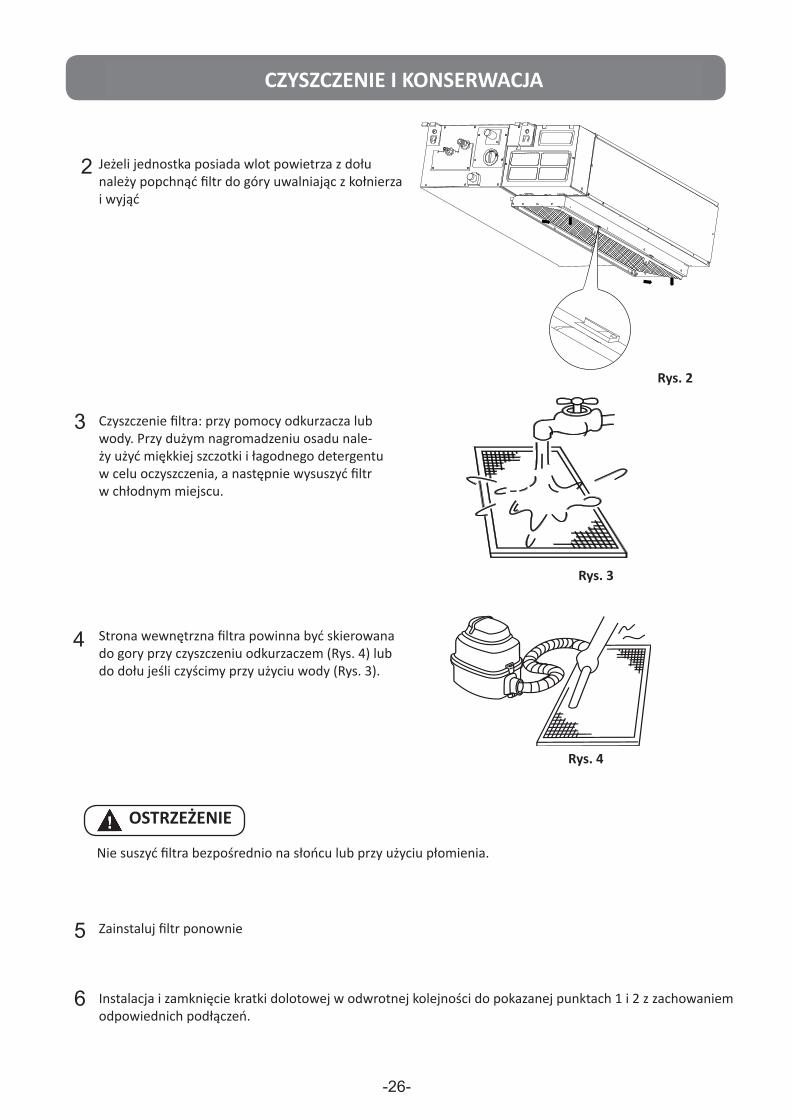
-26-
CLEANING AND MAINTENANCE OF THE AIR CONDITIONER
Clean the air filter: vacuum cleaner or pure water may be used to clean the air filter. If the dust accumulation is too heavy, please use soft brush and mild detergent to clean it and dry out in cool place.
The air-in side should face up when using vacuum cleaner (refer to Fig.4).The air-in side should face down when using water (refer to Fig.3).
Fig.3
Fig.4
CAUTION
Do not dry out the air filter under direct sunshine or with fire.
Re-install the air filter.
3
4
5
Install and close the air-in grill in the reverse order of step 1 and 2 and connect the control box cables to the corresponding terminals of the main body.
6
If your purchasing Unit is a descensional ventilated one, please push the filter up slightly to let the position retainer escape away from the flange fixed holes, and take off the filter.
Fig.2
2 Jeżeli jednostka posiada wlot powietrza z dołu należy popchnąć filtr do góry uwalniając z kołnierza i wyjąć
Czyszczenie filtra: przy pomocy odkurzacza lub wody. Przy dużym nagromadzeniu osadu nale-ży użyć miękkiej szczotki i łagodnego detergentu w celu oczyszczenia, a następnie wysuszyć filtr w chłodnym miejscu.
Strona wewnętrzna filtra powinna być skierowana do gory przy czyszczeniu odkurzaczem (Rys. 4) lub do dołu jeśli czyścimy przy użyciu wody (Rys. 3).
Nie suszyć filtra bezpośrednio na słońcu lub przy użyciu płomienia.
Zainstaluj filtr ponownie
Instalacja i zamknięcie kratki dolotowej w odwrotnej kolejności do pokazanej punktach 1 i 2 z zachowaniem odpowiednich podłączeń.
OSTRZEŻENIE
Rys. 4
Rys. 3
Rys. 2
CZYSZCZENIE I KONSERWACJA

- 27 -
ORDINARY MAINTENANCE AND ADVICE FOR USE
At the beginning of season
When restarting the air conditioner after a long time, or at the beginning of the season, please carry out the following procedure:
Do not obstruct the air inlet and outletCheck if any objects obstruct the airflow at the air inlet and outlet on Indoor and Outdoor Units.
Check the Unit's fixingCheck the condition of fixing devices on Indoor and Outdoor Units, especially those mande of iron on Outdoor Units which are more subject to corrosion, so as to avoid their possible collapse.
Earth cableCheck if there are no false electric contacts and especially if the earth cable is not interrupted and well connected.
An incorrect or inexistent earth connection may cause the danger of electric shocks.
CAUTION
Air filterCheck if there is the filter on the Indoor Unit. The filter must be clean. In case there is no filter or the filter is dirty, reinsert or clean it.
Remote controller's batteriesInsert batteries in the remote controller's battery case.
Unit's startThe Outdoor Unit must be connected to the power line 12 hours before its start. Insert the plug into the power socket and move the circuit breaker to "ON": "OPERATION" LED on Indoor Unit will start flashing once per second.Start the Indoor Unit by pressing "ON/OFF" button on remote controller only 12 hours after the Outdoor Unit has been powered.
1
2
3
4
5
6
!
1 2 3
CZYSZCZENIE I KONSERWACJA
1. Sprawdź drożność jednostki wewnętrznej i zewnętrznej
2. Sprawdź zamocowanie jednostekSzczególnie jednostki zewnętrznej zamontowanej na metalowych uchwytach po-datnych na korozję
3. Przewód uziemiającySprawdź czy połączenia nie są przerwane.
4. Filtry powietrzaSprawdź czystość filtrów jednostki wewnętrznej. Oczyść lub wymień w razie konieczności.
5. Baterie sterownika bezprzewodowegoWłóż baterie.
6. Włączenie klimatyzatoraJednostka zewnętrzna musi być podłączona do sieci elek-trycznej na 12 godzin przed uruchomieniem urządzenia.Włóż wtyczkę do gniazdka i przełącznik na „ON”. Dioda „OPERATION” zacznie migać.Uruchom jednostkę wewnętrzną naciskająć przycisk „ON/OFF” na sterowniku bezprzewodowym ale dopiero po 12 godzinach od podłączenia do sieci elektrycznej jednostki zewnętrznej.
Przed sezonem
Po dłuższym czasie nieużywania lub przed rozpoczęciem sezonu proszę zapoznać się z następu-jąca instrukcją:
Nieprawidłowe lub nieistniejące uziemienie może grozić porażeniem prądem elektrycznym
UWAGA

- 28 -
ORDINARY MAINTENANCE AND ADVICE FOR USE
At the end of season
At the end of the season or in case you foresee not to use the air conditioner for a long time, please carry out the following procedure:
Dry the UnitOperate the air conditioner in "COOL" mode for about half a day by setting a temperature of 30°C, or operate the appliance in "FAN" mode for half a day by setting a "HIGH" fan speed.This is for drying the Unit and preventing the forming of moulds and/or bad smells.
Disconnect the appliance from the power supplyStop the air conditioner by pressing "ON/OFF" button on remote controller, move the circuit breaker to "OFF" or "0" and pull the plug out of the power socket.This is necessary as the appliance consumes a little quantity of electricity even if it is stopped.
Clean and reinstall the air filter
Clean the body or the panel of the Unit
Remove batteries from the remote controller
1
2
3
4
5
~ 6 hours
Cool operation / 30°C
Fan operation /HIGH (fan speed)
!
1 2 3
CZYSZCZENIE I KONSERWACJA
Na koniec sezonu
Na koniec sezonu lub w przypadku planowanego dłuższego nieużywania klimatyzatora proszę o zapoznanie się z poniższą instrukcją:
1. Osusz klimatyzator
Włącz klimatyzator w trybie chłodzenia na kilka godzin usta-wiając temperaturę na 30°C lub w trybie nawiewu z prędkością wentylatora „HIGH”. Osuszenie klimatyzatora zapobiegnie po-wstawaniu pleśni i nieprzyjemnych zapachów.
2. Odłącz urządzenie od sieci elektrycznej
Wyłącz klimatyzator przyciskiem „ON/OFF” na sterowniku bez-przewodowym, wyłącznik sieci elektrycznej na „OFF” lub „0” i wyjmij wtyczkę z gniazdka. Jest to konieczne ponieważ urządzenie pobiera niewielką ilość energii elektrycznej nawet gdy jest wyłączone
3. Oczyść lub wymień filtry powietrza.
4. Oczyść obudowę i panel klimatyzatora.
5. Usuń baterie ze sterownika bezprzewodowego.
6 godzin
Tryb chłodzenia / o30
Tryb nawiewu / Prędkość wentylatora „HIGH”
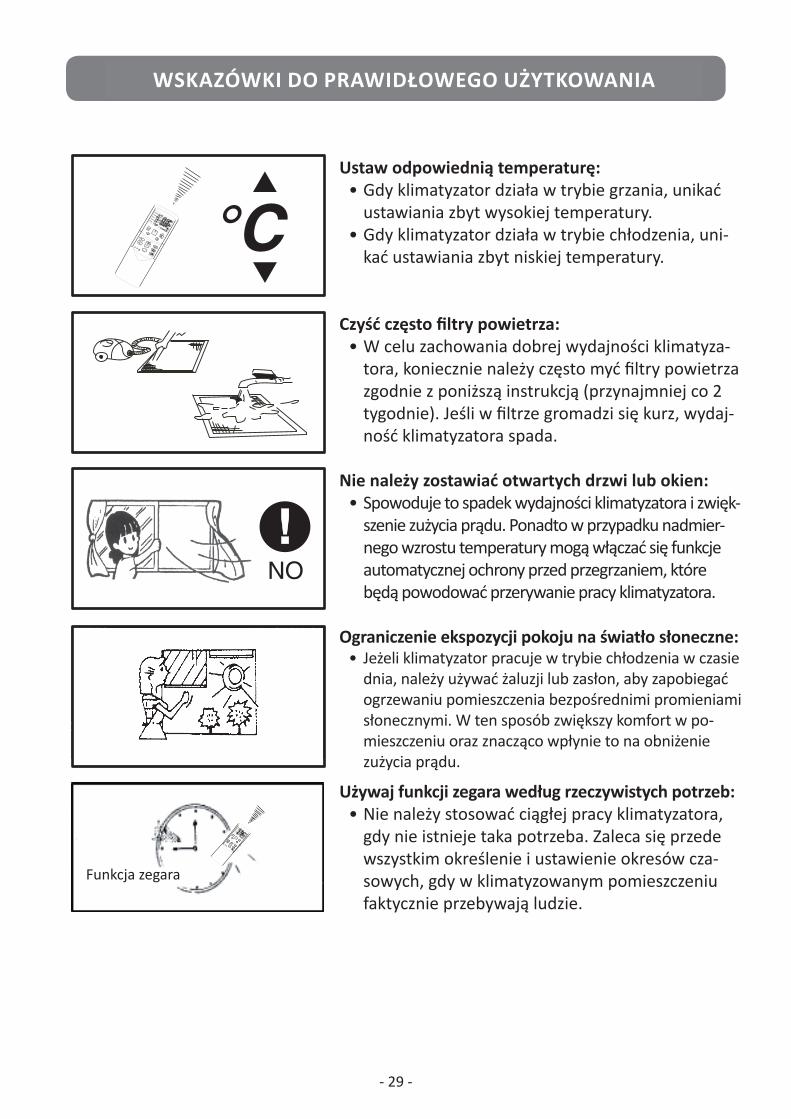
- 29 -
ORDINARY MAINTENANCE AND ADVICE FOR USE
Suggestions for economical use
Select a suitable temperature value• In Heating mode, avoid to set too high temperature
value.
• In Cooling mode, avoid to set too low temperature
values.
Often clean the air filters
• To obtain the air conditioner's best performance, it is
necessary to clean the filters on Indoor Unit at least every
2 weeks, as already described. If dust accumulates on the
filter, the air conditioner's performance decreases.
Do not keep doors or windows open
• This decreases the air conditioner's performance and causes
an increase in electricity consumption. Moreover, in case of
thermal overload, the automatic protective functions may
intervene, and the air conditioner will stop operation.
Reduce the exposure to sunlight
• In Cool mode, protect the window panes by curtains or
shutters. In this way, you can obtain more comfort and a
reduction in electricity consumption.
Use TIMER function moderately
• Do not select operating intervals higher than real comfort
needs, and consider above all the real stay of people inside
the air-conditioned room.
Adjust the airflow correctly
• With a little experience, it is possible to estimate by yourself
the increase in comfort which arises from a correct adjusting
of the airflow coming out of the Unit. Energy consumptions
being equal, comfort remarkably increases.
°C
NO
!
WSKAZÓWKI DO PRAWIDŁOWEGO UŻYTKOWANIA
Ustaw odpowiednią temperaturę:• Gdy klimatyzator działa w trybie grzania, unikać
ustawiania zbyt wysokiej temperatury.• Gdy klimatyzator działa w trybie chłodzenia, uni-
kać ustawiania zbyt niskiej temperatury.
Czyść często filtry powietrza:• W celu zachowania dobrej wydajności klimatyza-
tora, koniecznie należy często myć filtry powietrza zgodnie z poniższą instrukcją (przynajmniej co 2 tygodnie). Jeśli w filtrze gromadzi się kurz, wydaj-ność klimatyzatora spada.
Nie należy zostawiać otwartych drzwi lub okien:• Spowoduje to spadek wydajności klimatyzatora i zwięk-
szenie zużycia prądu. Ponadto w przypadku nadmier-nego wzrostu temperatury mogą włączać się funkcje automatycznej ochrony przed przegrzaniem, które będą powodować przerywanie pracy klimatyzatora.
Ograniczenie ekspozycji pokoju na światło słoneczne:• Jeżeli klimatyzator pracuje w trybie chłodzenia w czasie
dnia, należy używać żaluzji lub zasłon, aby zapobiegać ogrzewaniu pomieszczenia bezpośrednimi promieniami słonecznymi. W ten sposób zwiększy komfort w po-mieszczeniu oraz znacząco wpłynie to na obniżenie zużycia prądu.
Używaj funkcji zegara według rzeczywistych potrzeb:• Nie należy stosować ciągłej pracy klimatyzatora,
gdy nie istnieje taka potrzeba. Zaleca się przede wszystkim określenie i ustawienie okresów cza-sowych, gdy w klimatyzowanym pomieszczeniu faktycznie przebywają ludzie.
- 29 -
Funkcja zegara
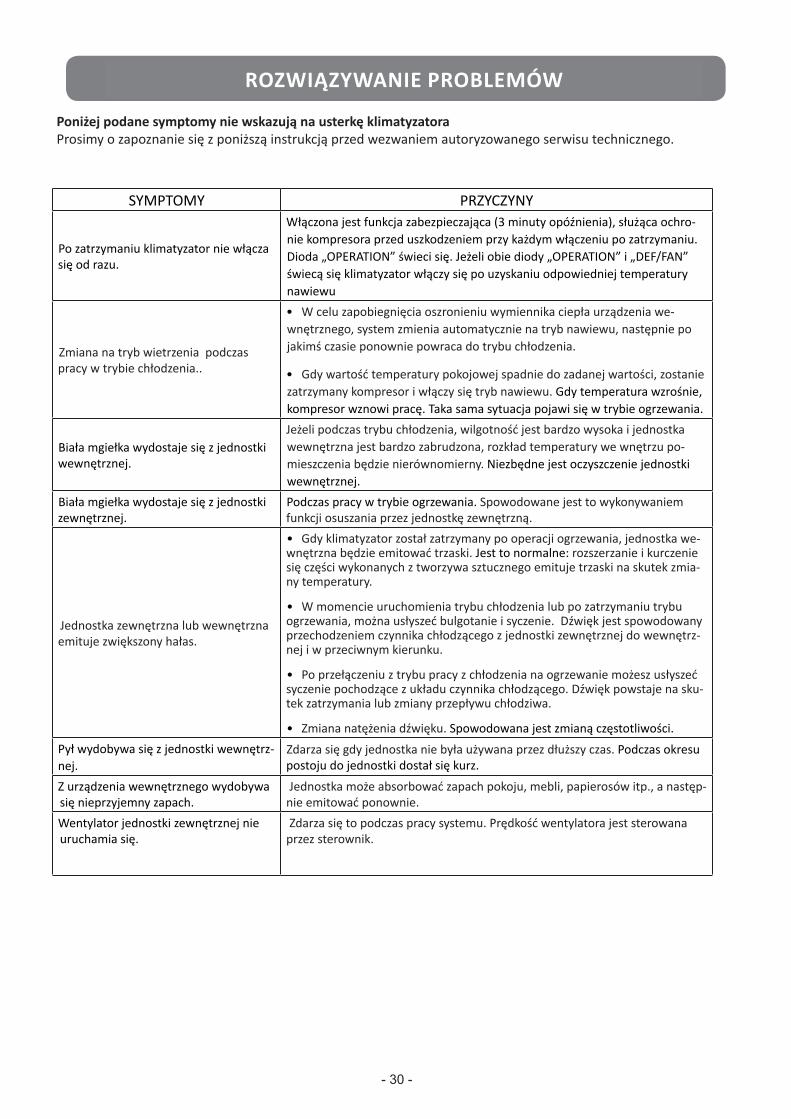
- 30 -
TROUBLESHOOTING
The following table shows a series of seeming malfunctions.Please check the following items before calling the Authorized Technical Service.
WHAT HAPPENS REASON
After a stop, the air conditioner does not restarts immediately.
• If "OPERATION" LED on Indoor Unit lights up, it is normal that thesystem does not immediately restart. A protective function (3-minutes' delay) is active for preventing damages to the compressor every time the operation restarts after a stop.• If both "OPERATION" and "PRE/DEF" lamps light up, this is not amalfunction: the compressor does not immediately restarts because of the intervention of the anti-cold drafts protection.
Noise from the Indoor Unit or from the Outdoor Unit
• In "COOL" mode or during a thermostatic stop, you may hear the noiseemitted by the operation of the drain pump on Indoor Unit.• When the system stops after heating operation, the Indoor Unit emitsa creaking sound. This is normal: expansion and contraction of plastic parts caused by temperature changes make this noise.• During the start in "COOL" mode or after the stop of "HEAT" operation,you may hear a gurgling sound or a hissing sound. This is the sound of refrigerant gas flowing through both Indoor and Outdoor Units.• When operation mode is switched from "COOL" to "HEAT", you mayhear a hissing sound coming from the refrigerant circuit. This is the noise of refrigerant caused by flow stop or flow change.• The tone of operating noise changes. This noise is caused by thechange of frequency.
• The Unit can absorb the smell of rooms, furniture, cigarettes, etc.,and then emits it again.
Dust comes out of the Indoor Unit.
The Indoor Unit gives off bad smells.
• During operation in "HEAT" mode. This is because the Outdoot Unitis carrying out the automatic defrosting.
Change into the "FAN" mode during "COOL" mode.
• In order to prevent the frosting of indoor heat exchanger, the systemchenges into "FAN" mode automatically, and restores to the "COOL" mode after soon.• When the room temperature value drops to the set temperature value,compressor stops and the Indoor Unit changes to "FAN" mode. When temperature rises up, the compressor starts again. It is the same in "HEAT" mode.
White mist comes out of the Indoor Unit.
• If during operation in "COOL" mode, humidity is high and the IndoorUnit's inside is very dirty, temperature distribution inside the room becomes uneven. It is necessary to clean the Indoor Unit: please call the Authorized Technical Service.
White mist comes out of the Outdoor Unit.
• This happens if the Unit is used again after a long time. During thistime, dust has got inside the Unit.
The Outdoor Unit's fan does not spin.
• This happens during the system's operation. The speed of the fanis controlled in order to optimize product operation.
Following symptoms are not air conditioner's troubles
ROZWIĄZYWANIE PROBLEMÓW
Poniżej podane symptomy nie wskazują na usterkę klimatyzatoraProsimy o zapoznanie się z poniższą instrukcją przed wezwaniem autoryzowanego serwisu technicznego.
SYMPTOMY PRZYCZYNY
Po zatrzymaniu klimatyzator nie włącza się od razu.
Włączona jest funkcja zabezpieczająca (3 minuty opóźnienia), służąca ochro-nie kompresora przed uszkodzeniem przy każdym włączeniu po zatrzymaniu. Dioda „OPERATION” świeci się. Jeżeli obie diody „OPERATION” i „DEF/FAN” świecą się klimatyzator włączy się po uzyskaniu odpowiedniej temperatury nawiewu
Zmiana na tryb wietrzenia podczas pracy w trybie chłodzenia..
• W celu zapobiegnięcia oszronieniu wymiennika ciepła urządzenia we-wnętrznego, system zmienia automatycznie na tryb nawiewu, następnie po jakimś czasie ponownie powraca do trybu chłodzenia.
• Gdy wartość temperatury pokojowej spadnie do zadanej wartości, zostanie zatrzymany kompresor i włączy się tryb nawiewu. Gdy temperatura wzrośnie, kompresor wznowi pracę. Taka sama sytuacja pojawi się w trybie ogrzewania.
Biała mgiełka wydostaje się z jednostki wewnętrznej.
Jeżeli podczas trybu chłodzenia, wilgotność jest bardzo wysoka i jednostka wewnętrzna jest bardzo zabrudzona, rozkład temperatury we wnętrzu po-mieszczenia będzie nierównomierny. Niezbędne jest oczyszczenie jednostki wewnętrznej.
Biała mgiełka wydostaje się z jednostki zewnętrznej.
Podczas pracy w trybie ogrzewania. Spowodowane jest to wykonywaniem funkcji osuszania przez jednostkę zewnętrzną.
Jednostka zewnętrzna lub wewnętrzna emituje zwiększony hałas.
• Gdy klimatyzator został zatrzymany po operacji ogrzewania, jednostka we-wnętrzna będzie emitować trzaski. Jest to normalne: rozszerzanie i kurczenie się części wykonanych z tworzywa sztucznego emituje trzaski na skutek zmia-ny temperatury.
• W momencie uruchomienia trybu chłodzenia lub po zatrzymaniu trybu ogrzewania, można usłyszeć bulgotanie i syczenie. Dźwięk jest spowodowany przechodzeniem czynnika chłodzącego z jednostki zewnętrznej do wewnętrz-nej i w przeciwnym kierunku.
• Po przełączeniu z trybu pracy z chłodzenia na ogrzewanie możesz usłyszeć syczenie pochodzące z układu czynnika chłodzącego. Dźwięk powstaje na sku-tek zatrzymania lub zmiany przepływu chłodziwa.
• Zmiana natężenia dźwięku. Spowodowana jest zmianą częstotliwości.Pył wydobywa się z jednostki wewnętrz-nej.
Zdarza się gdy jednostka nie była używana przez dłuższy czas. Podczas okresu postoju do jednostki dostał się kurz.
Z urządzenia wewnętrznego wydobywa się nieprzyjemny zapach.
Jednostka może absorbować zapach pokoju, mebli, papierosów itp., a następ-nie emitować ponownie.
Wentylator jednostki zewnętrznej nie uruchamia się.
Zdarza się to podczas pracy systemu. Prędkość wentylatora jest sterowana przez sterownik.

-31-
TROUBLESHOOTING
Before starting troubleshooting, please perform the following checks:
Problems deriving from the remote controller
WHAT HAPPENS CHECK POSSIBLE REASON
Check if "AUTO" mode is displayed on remote controller. The User cannot change the
indoor fan speed.
When operating in "AUTO" mode, the indoor fan speed is automatically set by the electronics.
Check if "DRY" mode is displayed on remote controller.
It is not possible to change the settings while the air conditioner is operating
WHAT HAPPENS CHECK POSSIBLE REASONSignals from the remote controller are transmitted only when "ON/OFF" button is pressed.
The transmission indicator on the remote controller does not light up
Check if TIMER function is active.
Signals from remote controller cannot be transmitted because the appliance is stopped.
WHAT HAPPENS CHECK POSSIBLE REASON
Set point temperature is not displayed on remote controller.
Set point temperature is not displayed on remote controller
Check if "FAN" or “DRY” mode has been selected.
Set temperature cannot be set when operating mode is "FAN" or “DRY”.
WHAT HAPPENS CHECK POSSIBLE REASON
Check if TIMER OFF function has been set.
After a lapse of time, "TIMER OFF" indication disappears from the display.
The air conditioner automatically stops at set time, and TIMER indication on remote controller goes off.
"TIMER" indications displayed on remote controller go off
WHAT HAPPENS CHECK POSSIBLE REASON
Check if remote controller is actually turned to the receiver on the Indoor Unit, and that no obstacles are placed between them.
When pressing "ON/OFF" button on remote controller, no receiving tone is heard from Indoor Unit.
Turn the remote controller to the receiver on the Indoor Unit, then push "ON/OFF" button.
The signal receiving tone from Indoor Unit is no more heard
NOTE: Sometimes, the remote controller may stop operating correctly because of interferences or electromagnetic noise. In this case, it is necessary to remove batteries from the remote controller, possibly eliminate the noise's reason, wait a few minutes and reinsert the batteries in their case. Now operation should be normal.
When operating in "DRY" mode, the indoor fan speed is automatically set by the electronics.
After a lapse of time, "TIMER ON" indication disappears from the display.
Check if TIMER ON function has been set.
As soon as set time for start has been reached, the air conditioner starts and the displayed time goes off.
Zmiana ustawień jest niemożliwa w czasie pracy klimatyzatora
OPIS USTERKI SPRAWDZIĆ MOŻLIWE PRZYCZYNYNie można zmienić prędkości wenty-latora jednostki wewnętrznej.
Sprawdzić czy na wyświetlaczu pilota nie świeci się wskaźnik trybu automa-tycznego „AUTO”.
Podczas pracy w trybie automatycznym „AUTO” prędkość wentylatora jednostki wewnętrznej jest ustawiana automatycz-nie przez układ elektroniczny.
Sprawdzić czy na wyświetlaczu pilota nie świeci się wskaźnik trybu osusza-nia „DRY”.
Podczas pracy w trybie osuszania „DRY” prędkość wentylatora jednostki we-wnętrznej jest ustawiana automatycznie przez układ elektroniczny.
Kontrolka transmisji sygnału na sterowniku nie zapala się
OPIS USTERKI SPRAWDZIĆ MOŻLIWE PRZYCZYNYSygnały z pilota są przesyłane tylko wtedy, gdy przycisk „ON/OFF” jest wciśnięty.
Sprawdzić czy funkcja PROGRAMATO-RA CZASOWEGO nie jest aktywna.
Sygnały z pilota nie mogą być wysyłane, gdy urządzenie jest wyłączone.
Zaprogramowana temperatura nie jest pokazywana na wyświetlaczu sterownika
OPIS USTERKI SPRAWDZIĆ MOŻLIWE PRZYCZYNYZaprogramowana temperatura nie jest pokazywana na wyświetlaczu pilota.
Sprawdzić czy wybrano tryb nawiewu „FAN”.
Nie można ustawić zaprogramowanej temperatury podczas pracy w trybie na-wiewu „FAN”.
Wyłączyły się wskaźniki funkcji „TIMER” na wyświetlaczu sterownika
OPIS USTERKI SPRAWDZIĆ MOŻLIWE PRZYCZYNYPo pewnym czasie wskaźnik „TIMER OFF” zniknął na wyświetlaczu.
Sprawdzić czy została ustawiona funkcja ZAPROGRAMOWANEGO WY-ŁĄCZANIA KLIMATYZATORA „TIMER OFF”.
Klimatyzator wyłącza się automatycznie po zaprogramowanym czasie, podczas gdy wskaźnik TIMER na pilocie przestaje świe-cić.
Po pewnym czasie wskaźnik „TIMER ON” zniknął na wyświetlaczu.
Sprawdzić czy została ustawiona funkcja ZAPROGRAMOWANEGO WŁĄCZANIA KLIMATYZATORA „TIMER ON”.
Klimatyzator włącza się natychmiast po osiągnięciu zaprogramowanego czasu uru-chomienia, a wyświetlany czas znika.
Po wysłaniu sygnału z pilota nie dobiega żaden sygnał dźwiękowy z jednostki wewnętrznej
OPIS USTERKI SPRAWDZIĆ MOŻLIWE PRZYCZYNYPo naciśnięciu przycisku „ON/OFF” na pilocie nie dobiega żaden dźwięk potwierdzenia z jednostki wewnętrz-nej.
Sprawdzić czy pilot jest skierowany aktualnie prosto w stronę odbiornika jednostki wewnętrznej i czy nie ma żadnych przeszkód między nimi.
Skierować pilot w stronę odbiornika jed-nostki wewnętrznej, a następnie nacisnąć przycisk „ON/OFF”.
ROZWIĄZYWANIE PROBLEMÓW
Problemy ze sterownikiem bezprzewodowymProśba o zapoznanie się z poniższą instrukcją przed przystąpieniem do badania przyczyn usterek
UWAGACzasami sterownik bezprzewodowy nie pracuje prawidłowo w związku z zakłóceniami elek-tromagnetycznymi. W takim przypadku należy wyjąć baterie i postarać się usunąć przyczynę zakłóceń. Po odczekaniu kilku minut włożyć ponownie baterie. Teraz sterownik powinien dzia-łać prawidłowo.
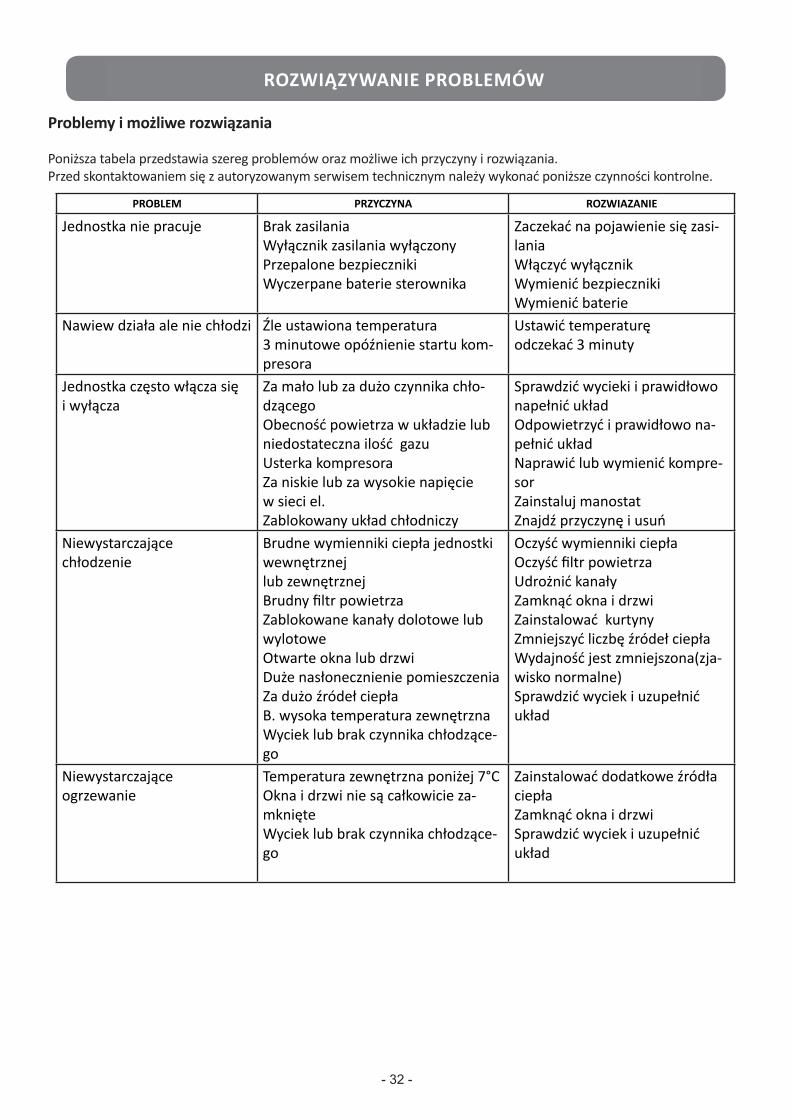
- 32 -
TROUBLESHOOTING
Problems and possible solutions
The following table shows a series of problems and their possible reasons and solutions.Compiere le verifiche descritte prima di richiedere l’intervento dell’Assistenza Tecnica.
PROBLEM REASONS SOLUTIONS
• Power failure.• Power switch is off.• Fuse of power switch may haveburned.• Batteries of remote controller exhaustedor other problem of controller.
Unit does not start.
• Wait for the comeback of power.• Switch on the power.• Replace the fuse.
• Replace the batteries or check thecontroller.
Air flowing normally, but completely cannot cooling.
• Temperature is not set correctly.• The 3-minutes' delay protection forcompressor is active.
• Set the temperature properly.• Wait 3 minutes, then the compressorwill restart and the Unit will restarts cooling.
Uni t s tar ts and stops frequently.
• Refrigerant is too little or too much.
• Presence of air or insufficient refrigerantgas in the refrigerating circuit.• Compressor's malfunction.• Voltage is too high or too low.• System circuit is blocked.
• Check leakage, and rightly rechargerefrigerant.• Vacuumize and rightly rechargerefrigerant.• Repair or replace compressor.• Install a manostat.• Find reasons and solution.
Low cooling effect.
• Heat exchanger on Indoor andOutdoor Units is dirty.• Air filter is dirty.• Air inlets and outlets on Indoor/Outdoor Units are obstructed.• Doors and/or windows are open.• Sunlight directly shines.
• There are too much heat sources.• Outdoor temperature is too high.
• Leakage or lack of refrigerant.
• Clean the heat exchanger.
• Clean the air filter.• Eliminate all dirties on the air inlets/outlets.• Close doors and/or windows.• Install curtains in order to shelter theUnit from sunshine.• Reduce heat sources.• AC cooling capacity is reduced (thisis normal).• Check leakage and rightly rechargerefrigerant.
Low heating effect.
• Outdoor temperature is lower than7°C.• Doors and/or windows are notcompletely closed.• Leakage or lack of refrigerant.
• Install further heating devices.
• Close the doors and/or the windows.
• Check leakage and rightly rechargerefrigerant.
ROZWIĄZYWANIE PROBLEMÓW
Problemy i możliwe rozwiązania
Poniższa tabela przedstawia szereg problemów oraz możliwe ich przyczyny i rozwiązania.Przed skontaktowaniem się z autoryzowanym serwisem technicznym należy wykonać poniższe czynności kontrolne.
PROBLEM PRZYCZYNA ROZWIĄZANIEPROBLEM PRZYCZYNA ROZWIAZANIE
Jednostka nie pracuje Brak zasilaniaWyłącznik zasilania wyłączonyPrzepalone bezpiecznikiWyczerpane baterie sterownika
Zaczekać na pojawienie się zasi-laniaWłączyć wyłącznikWymienić bezpiecznikiWymienić baterie
Nawiew działa ale nie chłodzi Źle ustawiona temperatura3 minutowe opóźnienie startu kom-presora
Ustawić temperaturęodczekać 3 minuty
Jednostka często włącza się i wyłącza
Za mało lub za dużo czynnika chło-dzącegoObecność powietrza w układzie lub niedostateczna ilość gazuUsterka kompresoraZa niskie lub za wysokie napięcie w sieci el.Zablokowany układ chłodniczy
Sprawdzić wycieki i prawidłowo napełnić układOdpowietrzyć i prawidłowo na-pełnić układNaprawić lub wymienić kompre-sorZainstaluj manostatZnajdź przyczynę i usuń
Niewystarczającechłodzenie
Brudne wymienniki ciepła jednostki wewnętrznej lub zewnętrznej Brudny filtr powietrza Zablokowane kanały dolotowe lub wylotowe Otwarte okna lub drzwi Duże nasłonecznienie pomieszczenia Za dużo źródeł ciepła B. wysoka temperatura zewnętrzna Wyciek lub brak czynnika chłodzące-go
Oczyść wymienniki ciepłaOczyść filtr powietrzaUdrożnić kanałyZamknąć okna i drzwiZainstalować kurtynyZmniejszyć liczbę źródeł ciepłaWydajność jest zmniejszona(zja-wisko normalne)Sprawdzić wyciek i uzupełnić układ
Niewystarczająceogrzewanie
Temperatura zewnętrzna poniżej 7°C Okna i drzwi nie są całkowicie za-mknięte Wyciek lub brak czynnika chłodzące-go
Zainstalować dodatkowe źródła ciepłaZamknąć okna i drzwiSprawdzić wyciek i uzupełnić układ
- 34 -
TROUBLESHOOTING
Error Codes on Indoor Unit
CAUTION:
if one of the following malfunctions occur, immediately stop operation, turn off the main switch and contact the Authorized Technical Service:
• You smell something burning.
• "OPERATION" LED on Indoor Unit is flashing rapidly (5Hz). This lamp is still flashing rapidly after turning off the power and turn on again.
• Remote controller is malfunctioning, or its buttons do not work well.
• A safety device such as a fuse or a breaker frequently actuates.
• Obstacles or water enter the Unit.
• Water leaks from Indoor Unit.
• Other malfunctions are observed.
Never try to repair the Air Conditioner by yourself
NO. Malfunction operation lamp timer lamp defrosting lamp alarm lamp
1
2
3
4
5
6
7
8
display (nixie tube)
EEPROM malfunction Quick-flash E7
Indoor fan unit malfunction Quick-flash E8 Quick-flash
Lifting panel malfunction Quick-flash F1
Quick-flash
Quick-flash
Lifting panel is not closed Quick-flash
Quick-flash
On F2
E2 Room temperature sensor checking channel is abnormal Quick-flash
E3 Pipe temperature sensor (T2) checking channel is abnormal
Quick-flash
E4 Pipe temperature sensor (T2B) checking channel is abnormal Quick-flash
EE Water-level alarm malfunction Quick-flash 9
In-outdoor unit communication checking channel is abnormal Quick-flash E1
10
11
12
13 Indoor master/slave unit communication checking channel is abnormal
F3 Quick-flash Quick-flash
Other malfunctions of master/ slave unit
F4 Quick-flash Quick-flash
Outdoor unit malfunction Ed Slow-flash
Quick-flash F0 Quick-flash Quick-flash Lifting panel communication checking channel is abnormal
Collision model malfunction E0 Quick-flash
14
ROZWIĄZYWANIE PROBLEMÓW
Kody błedów wyświetlane na jednostce wewnętrznej
Usterka dioda operacyjna d. Timer d. def. fan. d. alarmu wyświetlacz
brak sterowania prędkością went. j.w błysk błysk E8
EE
F3
F4
błysk
błysk
błysk
błysk
błysk
błysk błysk
błysk
dłuższe błyśnięcie
błysk
błysk
nieprawidłowa komunikacja j.w – j.z.nieprawidłowe działanie czujnika temp. wewn.
nieprawidłowe działanie czujnika (T2) temp. obiegu
nieprawidłowe działanie czujnika (T2B) temp. obiegu
usterka oprogramowania ( EEPROM )
uszkodzenie czujnika poziomu skroplin
uszkodzenie jednostki zewnętrznej
zakłócona komunikacja między jedn. wewnętrznymi
inne usterki jednostek ze-wnętrznych
- 33 -
OSTRZEŻENIE !
NIE NALEŻY PODEJMOWAĆ PRÓB SAMODZIELNEJ NAPRAWY
Jeżeli wydarzy się jedna z poniższych sytuacji należy natychmiast wyłączyć klimatyzator, wyłączyć głów-ny włącznik i skontaktować się z autoryzowanym serwisem technicznym.
• Przewód zasilający jest uszkodzony lub gorący• Czuć zapach spalenizny• Dioda „OPERATION” jednostki wewnętrznej szybko miga nawet po wyłączeniu i ponownym włą-
czeniu klimatyzatora.• Urządzenie głośno pracuje• Przepalają się bezpieczniki.• Woda dostała się do urządzenia lub z niego wycieka.• Sterownik bezprzewodowy działa nieprawidłowo.• Zaobserwowano inne nieprawidłowości
-34-
• When a power failure occurs during operation, the air conditioner stops immediately.
• When power is restored, the "OPERATION" lamp on the Indoor Unit starts blinking.
• In particular, the air conditioner will restart automatically after 3 minutes have elapsed
since power is restored. This means that it is not required to press the "ON/OFF" button
on the remote control.
The settings will be the same as before the blackout.
However, it is necessary to program TIMER again, as in case of a blackout, TIMER
settings for automatic start/stop of the air conditioner are cancelled.
AUTOMATIC RESTART AFTER A POWER FAILUREAUTOMATYCZNE WŁĄCZENIE PO ZANIKU ZASILANIA
Urządzenie wyłączy się po zaniku zasilania i automatycznie włączy z zachowaniem po-przednich ustawień w momencie ponownego pojawienia się zasilania – Dioda „OPERA-TION” jednostki wewnętrznej zacznie migotać i po trzech minutach klimatyzator włączy się automatycznie co oznacza że nie trzeba naciskać przycisku ON/OFF na sterowniku bezprzewodowym.
Wymagane jest jednak ponowne zaprogramowanie PROGRAMATORA CZASOWEGO (TIMER).
NOTES
www.hkk.info.pl
Autoryzacja tekstu: ELEKTRONIKA S.A. Importer, Autoryzowany Przedstawiciel Hokkaido w Polsce
WSZELKIE PRAWA ZASTRZEŻONE
![Czujnik / aktuator przełączający 1/1-kanałowy; 2/1 ... · Czujnik i aktuator są połączone w mechanizmie podtynkowym [1]. Kanały czujnika i kanały przełączające są w chwili](https://static.fdocuments.pl/doc/165x107/5cadbca488c99365598b50ac/czujnik-aktuator-przelaczajacy-11-kanalowy-21-czujnik-i-aktuator.jpg)