NOC K. Lee T.Takahashi html.bk Rev. F KOW N.Mizuno H...
302
1 Introduction About Your Network Interface The EpsonNet 802.11g Wireless Ext. Print Server is a wireless network interface that connects to the USB port of an Epson device (such as printer or all-in-one). With this network interface, you can create a wireless connection between the Epson device and a local area network using the IEEE 802.11b/g communication standard. A radio signal is transmitted over the wireless network when you send a job to the device. Then the device prints or scans the file when the network interface receives the radio signal directly from a computer or from an access point. This network interface is Wi-Fi certified for interoperability with other 802.11-compliant products. Because the network interface supports multiple protocols and automatically detects protocols on your network, you can print from Microsoft ® Windows ® , Apple ® Macintosh ® , UNIX ® , and IBM ® OS/2 applications. Use EpsonNet EasyInstall to easily configure the network interface for use on a TCP/IP network. If you are using an all-in-one, EpsonNet EasyInstall installs the drivers on your computer. You can use the device on the TCP/IP network at once. For protocols such as TCP/IP, NetWare, NetBEUI, AppleTalk ® , IPP, and SNMP, you can use EpsonNet Config, the configuration utility provided with your product, to quickly and easily configure the network interface to use these protocols.
Transcript of NOC K. Lee T.Takahashi html.bk Rev. F KOW N.Mizuno H...
R4CB860html.bk Rev. FINTRO.FM A5 size10/19/04
RProof Sign-off:KOW N.Mizuno H.TomizawaT.TakahashiNOC K. Lee
Introduction
About Your Network Interface
The EpsonNet 802.11g Wireless Ext. Print Server is a wireless network interface that connects to the USB port of an Epson device (such as printer or all-in-one). With this network interface, you can create a wireless connection between the Epson device and a local area network using the IEEE 802.11b/g communication standard.
A radio signal is transmitted over the wireless network when you send a job to the device. Then the device prints or scans the file when the network interface receives the radio signal directly from a computer or from an access point.
This network interface is Wi-Fi certified for interoperability with other 802.11-compliant products.
Because the network interface supports multiple protocols and automatically detects protocols on your network, you can print from Microsoft® Windows®, Apple® Macintosh®, UNIX®, and IBM® OS/2 applications.
Use EpsonNet EasyInstall to easily configure the network interface for use on a TCP/IP network. If you are using an all-in-one, EpsonNet EasyInstall installs the drivers on your computer. You can use the device on the TCP/IP network at once.
For protocols such as TCP/IP, NetWare, NetBEUI, AppleTalk®, IPP, and SNMP, you can use EpsonNet Config, the configuration utility provided with your product, to quickly and easily configure the network interface to use these protocols.
1
R4CB860html.bk Rev. FINTRO.FM A5 size10/19/04
L Proof Sign-off:KOW N.Mizuno H.TomizawaT.TakahashiNOC K. Lee
Note:The EpsonNet Config utility configures the network interface to work only with protocols that exist on your network. This does not imply that you can use all of the above-mentioned protocols on your network or operating system. The protocols that the network interface can use may vary depending on the operating system and the network configuration.
About This Guide
This Reference Guide contains information about using the network interface on a network. It includes how to set up the network interface, install the configuration software, and modify network settings of your device and computer.
For information about your device, see the manual shipped with the device.
Note:❏ To read the online guide, you must have Microsoft Internet Explorer
4.0 (or later) or Netscape Navigator 4.0 (or later) installed on your computer.
❏ This guide is written for network administrators, and many of the steps included here require detailed network knowledge and administrator rights.
❏ The term “network administrator” refers to the person responsible for maintaining the network. “Administrator” is synonymous with “Supervisor” in this guide.
❏ The term “network interface” refers to the EpsonNet 802.11g Wireless Ext. Print Server in this guide.
❏ The term “device” refers to the printer or all-in-one that is supported by the network interface.
2
R4CB860html.bk Rev. FINTRO.FM A5 size10/19/04
RProof Sign-off:KOW N.Mizuno H.TomizawaT.TakahashiNOC K. Lee
❏ Some screen shots in this guide may list a device name other than your device. This difference does not alter the instructions.
Instructions on Using the Network Interface
Notes on powering on and off
❏ Do not turn off the device and the network interface when changing the settings. This may damage the device and the network interface.
❏ Do not turn off the device and the network interface while printing is in progress. This may cause operational trouble to the computer sending the print data and suspend the printing process.
❏ Do not turn off the network interface during a firmware update. Otherwise, the update cannot be completed correctly and the network interface may not turn on (may not work) after the update.
Notes on USB connection
❏ Only supported devices can connect to a USB downstream connector of the network interface. Do not use a USB hub.
❏ Only IBM compatible computer or Macintosh equipped with USB can connect to a USB upstream connector of the network interface.
Notes on security
❏ WEP KeySet a WEP Key or WPA-PSK to prevent wireless interception by unauthorized persons. The wireless transmission speed is reduced when WEP or WPA-PSK is enabled because time is required for encryption and decryption.
3
R4CB860html.bk Rev. FINTRO.FM A5 size10/19/04
L Proof Sign-off:KOW N.Mizuno H.TomizawaT.TakahashiNOC K. Lee
❏ Security lockInsert a commercially available theft-prevention cable through the security lock, which is located on the back panel of the network interface, to secure the device to a table or pillar. This network interface is compatible with the Microsaver Security System manufactured by Kensington.
Notes on radio waves
❏ Radio wave interference may occur when there are devices that use radio waves within the 2.4 GHz ISM band near the network interface. Therefore, separate the network interface from these devices as much as possible to prevent radio wave interference.
❏ When using the network interface in the Ad Hoc mode, radio wave interference may occur if the channel of the network interface and the other devices are close to each other. Therefore, separate a few channels from the channel used near the network interface.
❏ Shorten the distance of the network interface and devices that communicate with the network interface.
Where to locate the network interface
❏ The location of the network interface must be considered to improve the wireless communication. The rotary stand can provide a good position. The condition of radio wave can be checked using EpsonNet Config, lights of the network interface, and the status sheet.
Package Contents
Your network interface package includes the following items.
4
R4CB860html.bk Rev. FINTRO.FM A5 size10/19/04
RProof Sign-off:KOW N.Mizuno H.TomizawaT.TakahashiNOC K. Lee
❏ Wireless network interface (The Web-based EpsonNet Config is pre-installed.)
❏ AC adapter and power cord
cCaution:Only use the AC adapter shipped with this package to supply power to the network interface.
❏ USB cable
❏ Software CD-ROM containing:
-- EpsonNet Config (for Windows)-- EpsonNet Config (for Macintosh)-- EpsonNet Print-- EpsonNet Internet Print-- EpsonNet WebManager-- EpsonNet SetupManager-- Reference Guide-- Drivers and utilities for the following Epson devices:
EPSON STYLUS PHOTO RX500EPSON STYLUS PHOTO RX600EPSON STYLUS CX4600EPSON STYLUS CX6400EPSON STYLUS CX6600
❏ Setup sheet
❏ AC Adapter sheet
Note:You need to supply items such as a computer with an 802.11b/g WLAN compliant network interface card installed, an Epson device with a USB port, a USB cable, and an access point (required for infrastructure mode only).
5
R4CB860html.bk Rev. FINTRO.FM A5 size10/19/04
L Proof Sign-off:KOW N.Mizuno H.TomizawaT.TakahashiNOC K. Lee
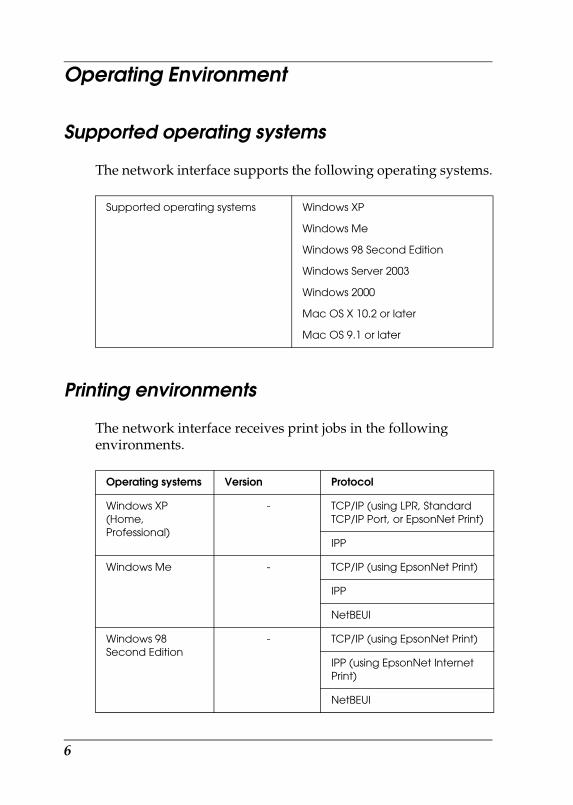
Operating Environment
Supported operating systems
The network interface supports the following operating systems.
Printing environments
The network interface receives print jobs in the following environments.
Supported operating systems Windows XP
Windows Me
Windows 98 Second Edition
Windows Server 2003
Windows 2000
Mac OS X 10.2 or later
Mac OS 9.1 or later
Operating systems Version Protocol
Windows XP (Home, Professional)
- TCP/IP (using LPR, Standard TCP/IP Port, or EpsonNet Print)
IPP
Windows Me - TCP/IP (using EpsonNet Print)
IPP
NetBEUI
Windows 98 Second Edition
- TCP/IP (using EpsonNet Print)
IPP (using EpsonNet Internet Print)
NetBEUI
6
R4CB860html.bk Rev. FINTRO.FM A5 size10/19/04
RProof Sign-off:KOW N.Mizuno H.TomizawaT.TakahashiNOC K. Lee
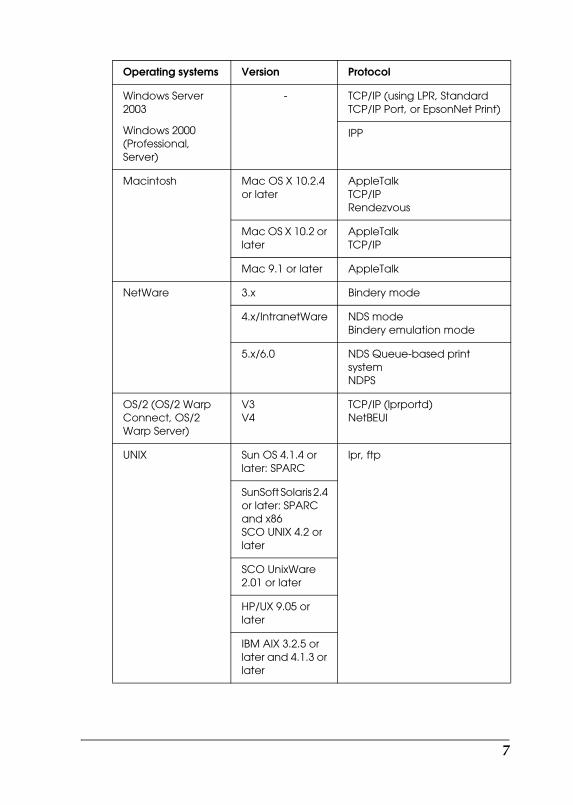
Windows Server 2003
Windows 2000 (Professional, Server)
- TCP/IP (using LPR, Standard TCP/IP Port, or EpsonNet Print)
IPP
Macintosh Mac OS X 10.2.4 or later
AppleTalkTCP/IPRendezvous
Mac OS X 10.2 or later
AppleTalkTCP/IP
Mac 9.1 or later AppleTalk
NetWare 3.x Bindery mode
4.x/IntranetWare NDS modeBindery emulation mode
5.x/6.0 NDS Queue-based print systemNDPS
OS/2 (OS/2 Warp Connect, OS/2 Warp Server)
V3V4
TCP/IP (lprportd)NetBEUI
UNIX Sun OS 4.1.4 or later: SPARC
lpr, ftp
SunSoft Solaris 2.4 or later: SPARC and x86 SCO UNIX 4.2 or later
SCO UnixWare 2.01 or later
HP/UX 9.05 or later
IBM AIX 3.2.5 or later and 4.1.3 or later
Operating systems Version Protocol
7
R4CB860html.bk Rev. FINTRO.FM A5 size10/19/04
L Proof Sign-off:KOW N.Mizuno H.TomizawaT.TakahashiNOC K. Lee
Note:❏ The multi-user environment of Mac OS 9 is not supported.
❏ If you use the device in a dial-up router environment, you must set an IP address for the device. Make sure the IP address is suitable for the segment; incorrect IP address may generate unexpected dial-up.
❏ See the manual shipped with your device for information on the supported operating system of the device.
Scanning environments
The network interface supports EPSON Scan via TCP/IP and allows network scanning when it is connected to the all-in-one. The supported operating systems are Windows XP/Me/98/2000 and Mac OS X/9.
Network Storage environments
The network interface supports sharing memory via SMB when it is connected to the all-in-one. The supported operating systems are Windows XP/2000.
Supported Epson Devices
The network interface can be installed for the following Epson devices (as of May, 2004).
❏ Ink Jet Printer: Stylus C64/C84Stylus Photo 1280/2200Stylus Photo R200/R300/R800
8
R4CB860html.bk Rev. FINTRO.FM A5 size10/19/04
RProof Sign-off:KOW N.Mizuno H.TomizawaT.TakahashiNOC K. Lee
❏ All-in-one:Stylus Photo RX500/RX600Stylus CX3600/CX4600/CX6400/CX6600
❏ Laser Printer:EPL-6200EPL-N2500/N3000/N7000AL-C1900/C4000/C4100
❏ Impact Dot Matrix Printer:FX-880+/890/1180+/2190DLQ-3500PLQ-20LQ-590/630/2090
Features of the Network Interface
❏ Meets the IEEE 802.11b/g (2.4 GHz) communication standard.
❏ Prints or scans via wireless network.
❏ Supports the network storage function.
❏ Supports both the Infrastructure mode and the Ad Hoc mode.
❏ Supports the roaming function.
❏ Supports 64-bit/128-bit WEP Key and WPA-PSK(TKIP).
❏ Communicates with up to 11 or 13 channels.
❏ Communicates with any Wi-Fi certified products.
❏ Uses communication speeds at 11/5.5/2/1 Mbps for 802.11b, 54/48/36/24/18/12/9/6 Mbps for 802.11g, or automatically changes the speed according to the radio waves.
9
R4CB860html.bk Rev. FINTRO.FM A5 size10/19/04
L Proof Sign-off:KOW N.Mizuno H.TomizawaT.TakahashiNOC K. Lee
❏ Supports multiple protocols, such as TCP/IP, NetWare, NetBEUI, AppleTalk, and IPP.
❏ Supports DHCP.
❏ Supports Automatic Private IP Addressing (APIPA) that assigns an IP address automatically to the network interface even if there is no DHCP server on your network.
❏ Supports the Dynamic DNS function.
❏ Supports Rendezvous on Mac OS X 2.4 or higher.
❏ Supports SNMP and MIB.
❏ Supports NTP (Network Time Protocol).
10
R4CB860html.bk Rev. FINTRO.FM A5 size10/19/04
RProof Sign-off:KOW N.Mizuno H.TomizawaT.TakahashiNOC K. Lee
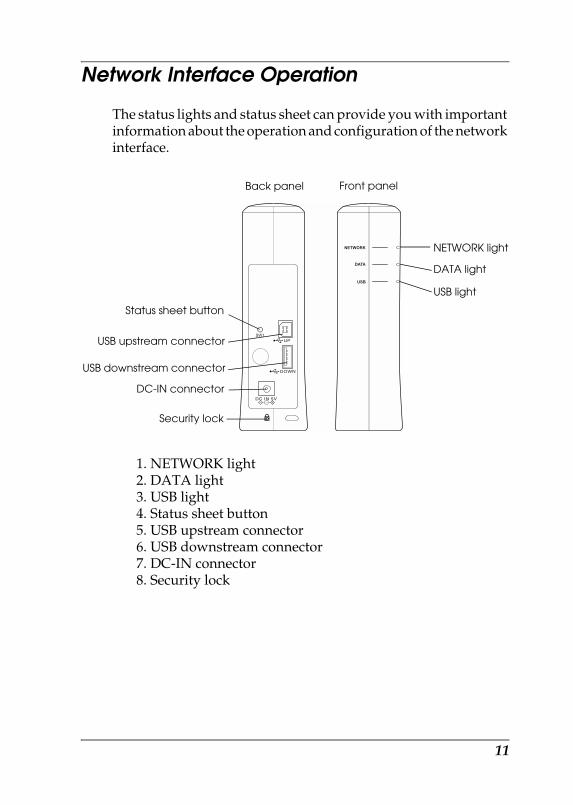
Network Interface Operation
The status lights and status sheet can provide you with important information about the operation and configuration of the network interface.
1. NETWORK light2. DATA light3. USB light4. Status sheet button5. USB upstream connector6. USB downstream connector7. DC-IN connector8. Security lock
NETWORK light
DATA light
USB upstream connector
Status sheet button
USB downstream connector
DC-IN connector
Security lock
Back panel Front panel
USB light
11
R4CB860html.bk Rev. FINTRO.FM A5 size10/19/04
L Proof Sign-off:KOW N.Mizuno H.TomizawaT.TakahashiNOC K. Lee
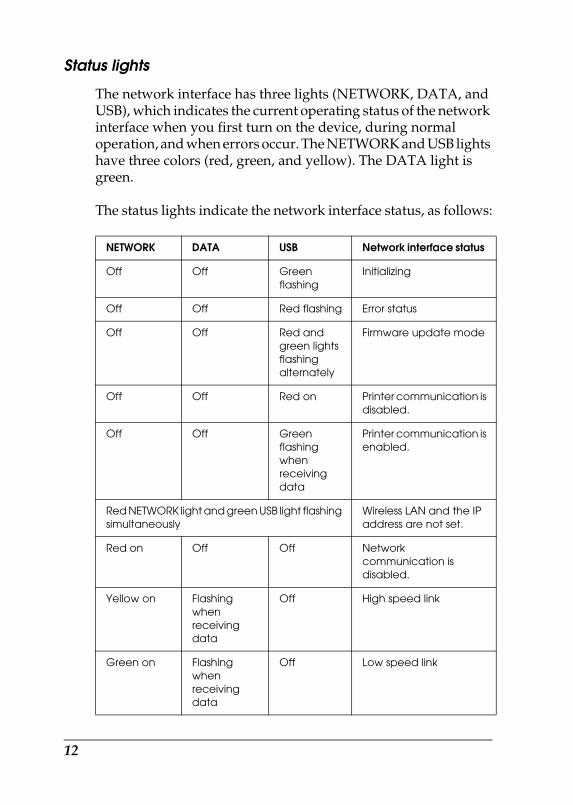
Status lights
The network interface has three lights (NETWORK, DATA, and USB), which indicates the current operating status of the network interface when you first turn on the device, during normal operation, and when errors occur. The NETWORK and USB lights have three colors (red, green, and yellow). The DATA light is green.
The status lights indicate the network interface status, as follows:
NETWORK DATA USB Network interface status
Off Off Green flashing
Initializing
Off Off Red flashing Error status
Off Off Red and green lights flashing alternately
Firmware update mode
Off Off Red on Printer communication is disabled.
Off Off Green flashing when receiving data
Printer communication is enabled.
Red NETWORK light and green USB light flashing simultaneously
Wireless LAN and the IP address are not set.
Red on Off Off Network communication is disabled.
Yellow on Flashing when receiving data
Off High speed link
Green on Flashing when receiving data
Off Low speed link
12
R4CB860html.bk Rev. FINTRO.FM A5 size10/19/04
RProof Sign-off:KOW N.Mizuno H.TomizawaT.TakahashiNOC K. Lee
Status sheet button
The first time you use the network interface after installing or reinstalling it, plug the power cord of the network interface into a wall outlet while holding down the status sheet button for about twenty seconds to initialize the network interface. The length of time necessary to hold down the status sheet button varies depending on the device model.
Before you start configuring the network interface, be sure to press and hold down the status sheet button on the network interface to print a status sheet. A status sheet provides important information about the network interface, such as MAC address, SSID, device settings, and device’s current status. Press the status sheet button once to print a simple status sheet, or twice to print a full status sheet. You cannot print a status sheet when the device has already started printing, or when it is offline or not ready to print.
Note: If the device does not print a status sheet, make sure the device is online and no print jobs are being processed, then wait a minute. If it still does not print a status sheet, turn the device off, wait until the DATA light goes out while the red USB light is on, and then turn it back on again. The status sheet can be printed one minute after the device finishes warming up.
cCaution:After turning off the device, wait until the DATA light goes out before turning it back on; otherwise the network interface may not work correctly.
USB upstream connector
This connector is used to connect a USB cable to a computer, so that the default network interface settings can be modified by using the configuration utility.
13
R4CB860html.bk Rev. FINTRO.FM A5 size10/19/04
L Proof Sign-off:KOW N.Mizuno H.TomizawaT.TakahashiNOC K. Lee
USB downstream connector
This connector is used to connect a USB cable to the device to enable communication with the device.
DC-IN connector
This is an external power supply connector for the AC adapter shipped with the network interface. Plug or unplug the power cord of the network interface from a wall outlet to turn the network interface on or off.
Security lock
You can pass a commercially available theft-prevention cable through the security lock hole to secure the network interface to a table or pillar. This network interface is compatible with the Microsaver Security System manufactured by Kensington.
Rotary stand
The rotary stand is located at the bottom of the network interface. Rotate the rotary stand counterclockwise by 90 degrees to provide an auxiliary stand for stability. The stand can be screwed to a location or on the wall for hanging.
The IEEE 802.11g Communication Standard
The network interface supports the IEEE 802.11b/g communication standard. It is compatible with other IEEE 802.11b/g compliant products.
14
R4CB860html.bk Rev. FINTRO.FM A5 size10/19/04
RProof Sign-off:KOW N.Mizuno H.TomizawaT.TakahashiNOC K. Lee
An IEEE 802.11b/g WLAN (wireless local area network) operates within the 2.4 GHz ISM band. It divides the 2.4 GHz into 11 or 13 channels using Direct-Sequence Spread Spectrum (DSSS), and uses Carrier Sense Multiple Access with Collision Avoidance (CSMA/CA) to avoid packet collision. Both CSMA/CA with ACK and CSMA/CA with RTS/CTS are supported.
Wi-Fi certification
This wireless network interface is Wi-Fi certified by the Wi-Fi Alliance (WFA). The WFA certification ensures full product interoperability with other Wi-Fi certified products. For more information on other Wi-Fi certified products, go to http://www.wi-fi.org.
Wireless Environment
Operating modes
You can configure the network interface for the Infrastructure mode or the Ad Hoc mode.
15
R4CB860html.bk Rev. FINTRO.FM A5 size10/19/04
L Proof Sign-off:KOW N.Mizuno H.TomizawaT.TakahashiNOC K. Lee
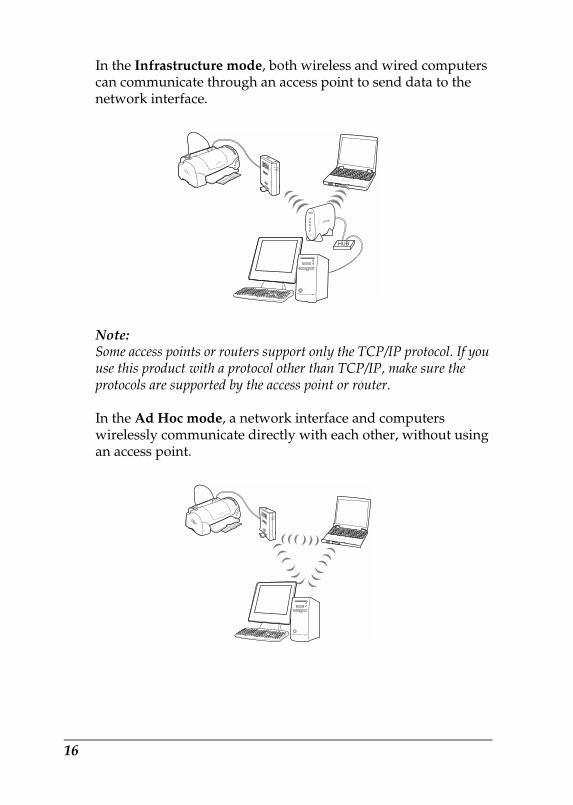
In the Infrastructure mode, both wireless and wired computers can communicate through an access point to send data to the network interface.
Note:Some access points or routers support only the TCP/IP protocol. If you use this product with a protocol other than TCP/IP, make sure the protocols are supported by the access point or router.
In the Ad Hoc mode, a network interface and computers wirelessly communicate directly with each other, without using an access point.
HUB
16
R4CB860html.bk Rev. FINTRO.FM A5 size10/19/04
RProof Sign-off:KOW N.Mizuno H.TomizawaT.TakahashiNOC K. Lee
Security
WEP (Wired Equivalent Privacy) is a security protocol for wireless network. Data is encrypted using the WEP Key providing the security of your wireless network. You must set the same WEP Key to the network interface and the access point.
The network interface supports a 64-bit or 128-bit encryption key, and you can use either hexadecimal or ASCII characters.
WPA-PSK(TKIP) is a Wi-Fi security with a strong encryption algorithm as well as user authentication. It provides a high security that user data remains protected and that only authorized users may access the network.
Note:The wireless transmission speed is reduced when WEP or WPA-PSK(TKIP) is enabled because time is required for encryption and decryption.
SSID is a unique identifier to specify a wireless LAN. All devices and access points connected to a specific wireless LAN must use the same SSID to communicate with devices on the wireless LAN.
Radio signal range
The data transfer rate of the network interface depends on the environment where the network interface is located.
Note:The wireless transmission speed decreases as the distance between the network interface and the computer or the access point increases.
17
R4CB860html.bk Rev. FINTRO.FM A5 size10/19/04
L Proof Sign-off:KOW N.Mizuno H.TomizawaT.TakahashiNOC K. Lee
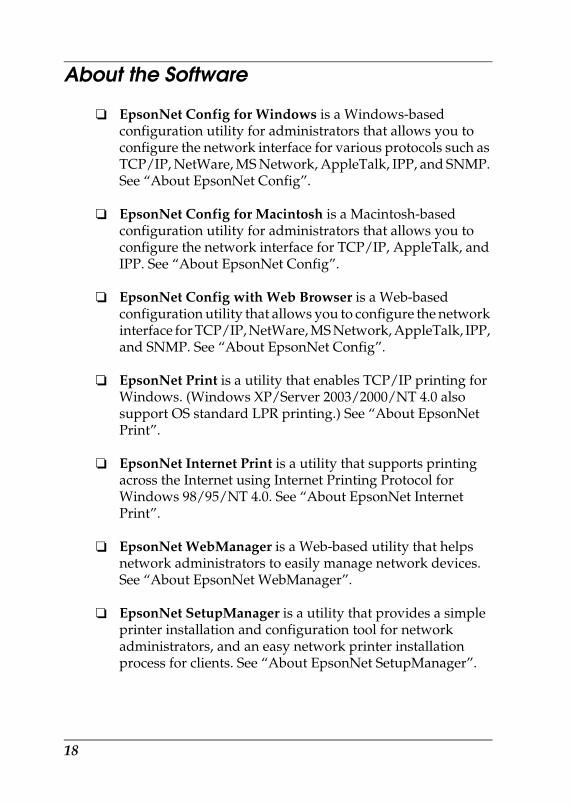
About the Software
❏ EpsonNet Config for Windows is a Windows-based configuration utility for administrators that allows you to configure the network interface for various protocols such as TCP/IP, NetWare, MS Network, AppleTalk, IPP, and SNMP. See “About EpsonNet Config”.
❏ EpsonNet Config for Macintosh is a Macintosh-based configuration utility for administrators that allows you to configure the network interface for TCP/IP, AppleTalk, and IPP. See “About EpsonNet Config”.
❏ EpsonNet Config with Web Browser is a Web-based configuration utility that allows you to configure the network interface for TCP/IP, NetWare, MS Network, AppleTalk, IPP, and SNMP. See “About EpsonNet Config”.
❏ EpsonNet Print is a utility that enables TCP/IP printing for Windows. (Windows XP/Server 2003/2000/NT 4.0 also support OS standard LPR printing.) See “About EpsonNet Print”.
❏ EpsonNet Internet Print is a utility that supports printing across the Internet using Internet Printing Protocol for Windows 98/95/NT 4.0. See “About EpsonNet Internet Print”.
❏ EpsonNet WebManager is a Web-based utility that helps network administrators to easily manage network devices. See “About EpsonNet WebManager”.
❏ EpsonNet SetupManager is a utility that provides a simple printer installation and configuration tool for network administrators, and an easy network printer installation process for clients. See “About EpsonNet SetupManager”.
18
R4CB860html.bk Rev. FINTRO.FM A5 size10/19/04
RProof Sign-off:KOW N.Mizuno H.TomizawaT.TakahashiNOC K. Lee
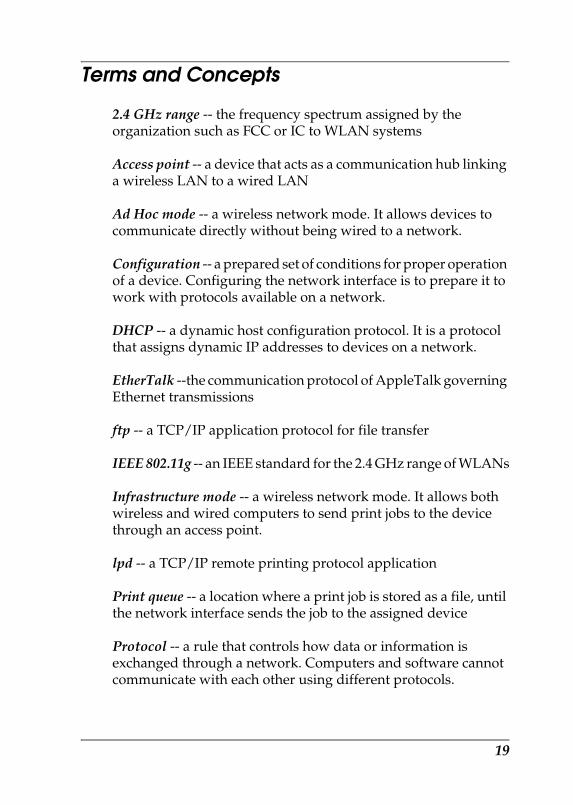
Terms and Concepts
2.4 GHz range -- the frequency spectrum assigned by the organization such as FCC or IC to WLAN systems
Access point -- a device that acts as a communication hub linking a wireless LAN to a wired LAN
Ad Hoc mode -- a wireless network mode. It allows devices to communicate directly without being wired to a network.
Configuration -- a prepared set of conditions for proper operation of a device. Configuring the network interface is to prepare it to work with protocols available on a network.
DHCP -- a dynamic host configuration protocol. It is a protocol that assigns dynamic IP addresses to devices on a network.
EtherTalk --the communication protocol of AppleTalk governing Ethernet transmissions
ftp -- a TCP/IP application protocol for file transfer
IEEE 802.11g -- an IEEE standard for the 2.4 GHz range of WLANs
Infrastructure mode -- a wireless network mode. It allows both wireless and wired computers to send print jobs to the device through an access point.
lpd -- a TCP/IP remote printing protocol application
Print queue -- a location where a print job is stored as a file, until the network interface sends the job to the assigned device
Protocol -- a rule that controls how data or information is exchanged through a network. Computers and software cannot communicate with each other using different protocols.
19
R4CB860html.bk Rev. FINTRO.FM A5 size10/19/04
L Proof Sign-off:KOW N.Mizuno H.TomizawaT.TakahashiNOC K. Lee
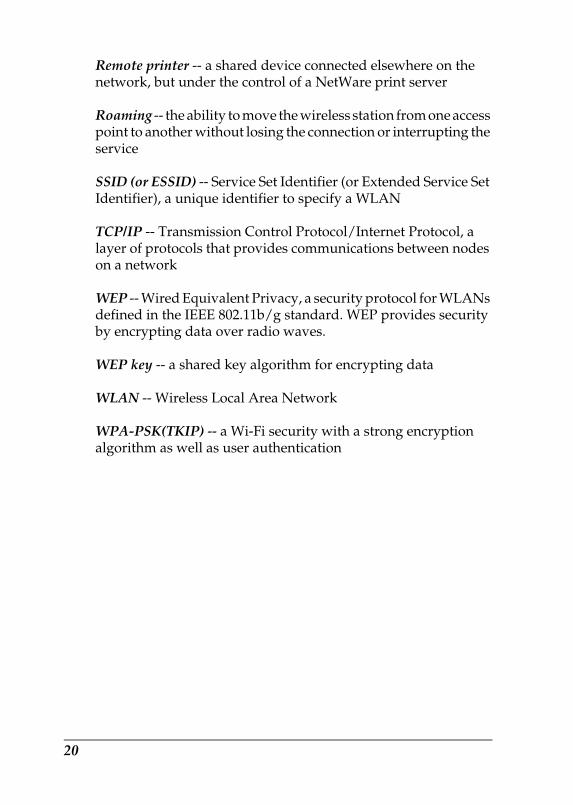
Remote printer -- a shared device connected elsewhere on the network, but under the control of a NetWare print server
Roaming -- the ability to move the wireless station from one access point to another without losing the connection or interrupting the service
SSID (or ESSID) -- Service Set Identifier (or Extended Service Set Identifier), a unique identifier to specify a WLAN
TCP/IP -- Transmission Control Protocol/Internet Protocol, a layer of protocols that provides communications between nodes on a network
WEP -- Wired Equivalent Privacy, a security protocol for WLANs defined in the IEEE 802.11b/g standard. WEP provides security by encrypting data over radio waves.
WEP key -- a shared key algorithm for encrypting data
WLAN -- Wireless Local Area Network
WPA-PSK(TKIP) -- a Wi-Fi security with a strong encryption algorithm as well as user authentication
20
R4CB860html.bk Rev. FHOWTO.FM A5 size10/19/04
RProof Sign-off:KOW N.Mizuno H.TomizawaT.TakahashiNOC K. Lee
How To
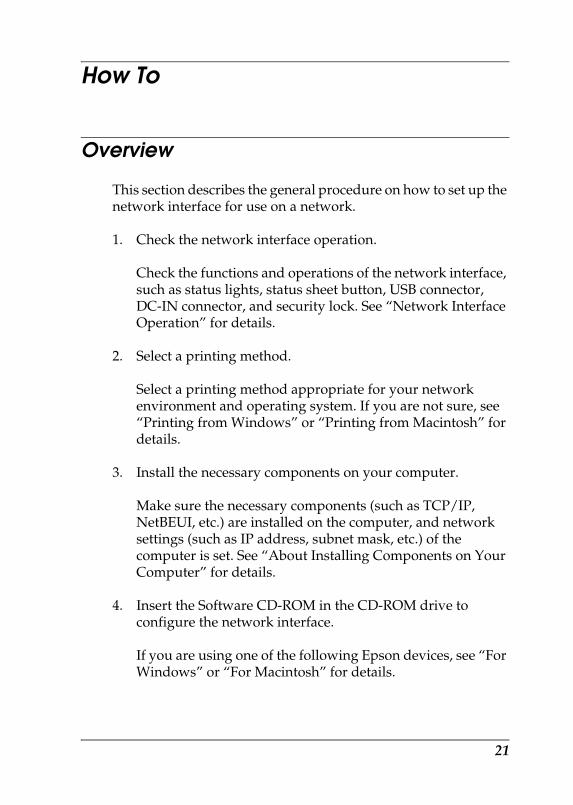
Overview
This section describes the general procedure on how to set up the network interface for use on a network.
1. Check the network interface operation.
Check the functions and operations of the network interface, such as status lights, status sheet button, USB connector, DC-IN connector, and security lock. See “Network Interface Operation” for details.
2. Select a printing method.
Select a printing method appropriate for your network environment and operating system. If you are not sure, see “Printing from Windows” or “Printing from Macintosh” for details.
3. Install the necessary components on your computer.
Make sure the necessary components (such as TCP/IP, NetBEUI, etc.) are installed on the computer, and network settings (such as IP address, subnet mask, etc.) of the computer is set. See “About Installing Components on Your Computer” for details.
4. Insert the Software CD-ROM in the CD-ROM drive to configure the network interface.
If you are using one of the following Epson devices, see “For Windows” or “For Macintosh” for details.
21

R4CB860html.bk Rev. FHOWTO.FM A5 size10/19/04
L Proof Sign-off:KOW N.Mizuno H.TomizawaT.TakahashiNOC K. Lee
- EPSON STYLUS PHOTO RX500- EPSON STYLUS PHOTO RX600- EPSON STYLUS CX4600- EPSON STYLUS CX6400- EPSON STYLUS CX6600
If your device is not listed above, see “For Windows” or “For Macintosh” for details.
5. If necessary, install the printer driver.
Install the printer driver from the CD-ROM that comes with the device. See “About Installing the Printer Driver” for details.
6. If necessary, configure the network settings of the network interface using EpsonNet Config.
Configure the network interface for TCP/IP, AppleTalk, MS Network, etc. using EpsonNet Config. For Windows users, see “About EpsonNet Config”. For Macintosh users, see “About EpsonNet Config”.
22
R4CB860html.bk Rev. FMTHOD.FM A5 size10/19/04
RProof Sign-off:KOW N.Mizuno H.TomizawaT.TakahashiNOC K. Lee
Selecting a Printing Method
Printing from Windows
Check if there is a Windows XP/Server 2003/2000 print server on your network, and then use the suggestions below.
Note:Only the recommended printing methods are introduced here. See “Features of the Printing Methods” for information on additional methods.
If no Windows XP/Server 2003/2000 print server exists
Use a printing method appropriate to your operating system:
❏ For Windows Me/98We recommend TCP/IP printing via EpsonNet Print. See “About EpsonNet Print”.
❏ For Windows XP/Server 2003/2000We recommend TCP/IP printing via LPR. See “Windows XP”, “Windows Server 2003”, or “Windows 2000”.
If a Windows XP/Server 2003/2000 print server exists
On the server, set the printer to connect with LPR and turn it into a shared printer. Your clients can then print to this shared printer.
23

R4CB860html.bk Rev. FMTHOD.FM A5 size10/19/04
L Proof Sign-off:KOW N.Mizuno H.TomizawaT.TakahashiNOC K. Lee
Printing from Macintosh
Mac OS X 10.2.4 or later
❏ Rendezvous
❏ EPSON TCP/IP
❏ EPSON AppleTalk
Mac OS X 10.2 or later
❏ EPSON TCP/IP
❏ EPSON AppleTalk
Mac OS 9
❏ AppleTalk
Features of the Printing Methods
This section describes features of the printing methods available for you to choose.
LPR (TCP/IP) printing
Advantages
❏ No computer as a network interface is required.
❏ No special utility for Windows XP/Server 2003/2000 is required.
24
R4CB860html.bk Rev. FMTHOD.FM A5 size10/19/04
RProof Sign-off:KOW N.Mizuno H.TomizawaT.TakahashiNOC K. Lee
❏ You can see the printer status using EPSON Status Monitor 2 or 3.
❏ For Windows XP/Server 2003/2000, you can create a print log using the event viewer.
❏ You can print via a router.
Disadvantages
❏ You need to set up TCP/IP.
❏ For Windows Me/98, EpsonNet Print must be installed on all computers to use for printing.
Internet printing
Advantages
❏ No proxy server (computer) is required.
❏ You can print to the printer over the Internet.
Disadvantages
❏ EPSON Status Monitor 2 or 3 cannot be used.
❏ TCP/IP and DNS settings are required.
❏ For Windows Me/98, EpsonNet Internet Print must be installed on all computers used for printing.
❏ For Windows XP/Server 2003/2000, you cannot share the Internet printer.
25
R4CB860html.bk Rev. FMTHOD.FM A5 size10/19/04
L Proof Sign-off:KOW N.Mizuno H.TomizawaT.TakahashiNOC K. Lee
Microsoft Network Shared printing
Advantages
❏ Easy to set up (IP address is not required if NetBEUI protocol is installed).
❏ No computer as a network interface is required.
❏ No special print utility is required.
Disadvantages
❏ EPSON Status Monitor 2 or 3 cannot be used.
❏ You cannot print via a router.
❏ It takes a longer time to start printing because more time is required to search for a network device.
26

R4CB860html.bk Rev. FCOMP.FM A5 size10/19/04
RProof Sign-off:KOW N.Mizuno H.TomizawaT.TakahashiNOC K. Lee
Installing Components on Your Computer
About Installing Components on Your Computer
Before configuring the network interface and printing from the computer, you need to install the necessary components (such as TCP/IP, NetBEUI, etc.) and assign an IP address and subnet mask for your computer, depending on the printing method you want to use. See the section appropriate for your operating system.
Note:You need to install the TCP/IP protocol on your computer to use EPSON Scan.
“Windows XP”
“Windows Me/98”
“Windows Server 2003”
“Windows 2000”
“Macintosh”
Windows XP
For Windows XP, use the following procedure to install the necessary components.
Note:❏ The Windows XP CD-ROM may be required during the
installation.
27

R4CB860html.bk Rev. FCOMP.FM A5 size10/19/04
L Proof Sign-off:KOW N.Mizuno H.TomizawaT.TakahashiNOC K. Lee
❏ When using TCP/IP or IPP for printing, you need to set the IP address, the subnet mask, and the default gateway of the computer.
1. Click Start, highlight Control Panel, and then click Network and Internet Connections. Select Network Connections.
2. Under LAN or High-Speed Internet, click the Local Area Connection icon.
3. Under Network Tasks, click Change settings of this connection.
4. Check if the following necessary components are in the list. If they are already installed, see “How to Set Up the Network Interface”.
28
R4CB860html.bk Rev. FCOMP.FM A5 size10/19/04
RProof Sign-off:KOW N.Mizuno H.TomizawaT.TakahashiNOC K. Lee
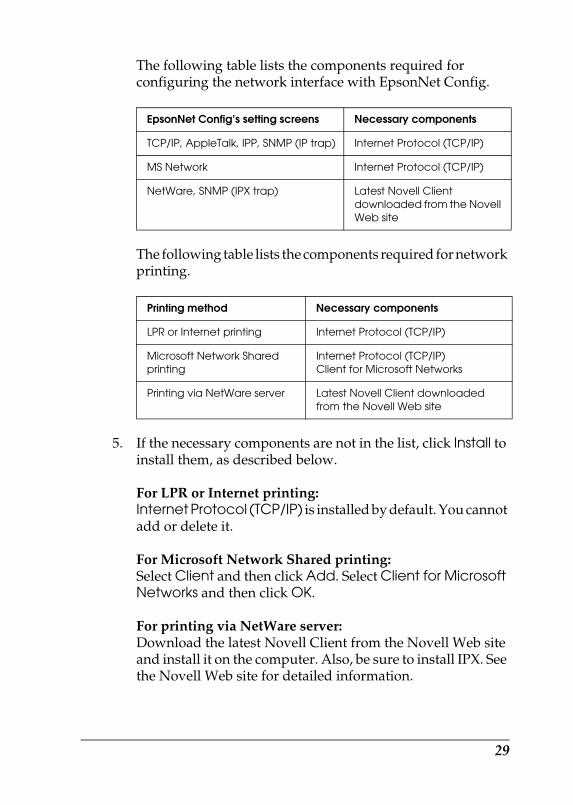
The following table lists the components required for configuring the network interface with EpsonNet Config.
The following table lists the components required for network printing.
5. If the necessary components are not in the list, click Install to install them, as described below.
For LPR or Internet printing:Internet Protocol (TCP/IP) is installed by default. You cannot add or delete it.
For Microsoft Network Shared printing:Select Client and then click Add. Select Client for Microsoft Networks and then click OK.
For printing via NetWare server:Download the latest Novell Client from the Novell Web site and install it on the computer. Also, be sure to install IPX. See the Novell Web site for detailed information.
EpsonNet Config’s setting screens Necessary components
TCP/IP, AppleTalk, IPP, SNMP (IP trap) Internet Protocol (TCP/IP)
MS Network Internet Protocol (TCP/IP)
NetWare, SNMP (IPX trap) Latest Novell Client downloaded from the Novell Web site
Printing method Necessary components
LPR or Internet printing Internet Protocol (TCP/IP)
Microsoft Network Shared printing
Internet Protocol (TCP/IP)Client for Microsoft Networks
Printing via NetWare server Latest Novell Client downloaded from the Novell Web site
29
R4CB860html.bk Rev. FCOMP.FM A5 size10/19/04
L Proof Sign-off:KOW N.Mizuno H.TomizawaT.TakahashiNOC K. Lee
6. For LPR, Internet, Microsoft Network Shared printing:Double-click Internet Protocol (TCP/IP) on the Local Area Connection Properties dialog box to open the Internet Protocols (TCP/IP) Properties dialog box. Set the IP address, the subnet mask, etc. and then click OK.
7. Restart the computer.
The necessary components are now installed.
Windows Me/98
For Windows Me/98, use the following procedure to install the necessary components.
Note:❏ The Windows Me/98 CD-ROM may be required during the
installation.
❏ When using TCP/IP or IPP for printing, you need to set the IP address, the subnet mask, and the default gateway of the computer.
1. Click Start, point to Settings, and then select Control Panel.
30
R4CB860html.bk Rev. FCOMP.FM A5 size10/19/04
RProof Sign-off:KOW N.Mizuno H.TomizawaT.TakahashiNOC K. Lee
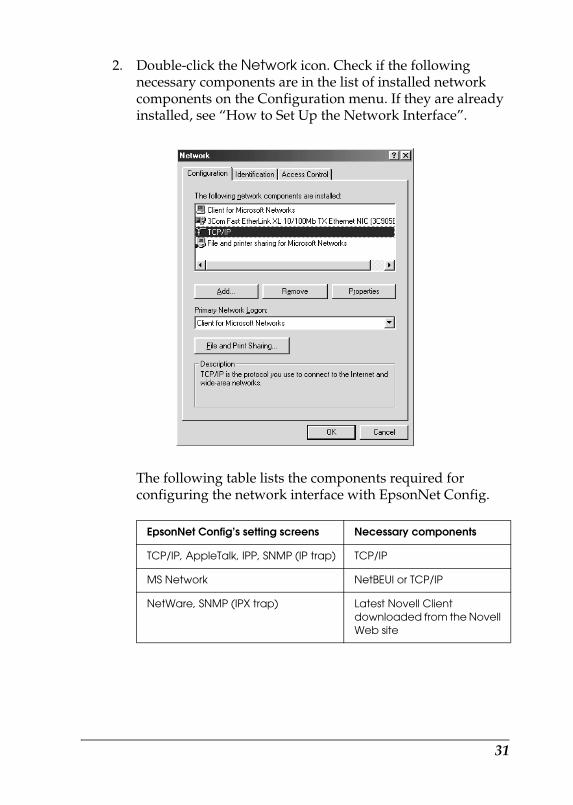
2. Double-click the Network icon. Check if the following necessary components are in the list of installed network components on the Configuration menu. If they are already installed, see “How to Set Up the Network Interface”.
The following table lists the components required for configuring the network interface with EpsonNet Config.
EpsonNet Config’s setting screens Necessary components
TCP/IP, AppleTalk, IPP, SNMP (IP trap) TCP/IP
MS Network NetBEUI or TCP/IP
NetWare, SNMP (IPX trap) Latest Novell Client downloaded from the Novell Web site
31
R4CB860html.bk Rev. FCOMP.FM A5 size10/19/04
L Proof Sign-off:KOW N.Mizuno H.TomizawaT.TakahashiNOC K. Lee
Note:Do not use Novell Client for Windows 95/98 version 3.00 and Novell Client for Windows NT version 4.50 when using the following modes: NetWare 3.x/4.x Bindery Print Server mode, NetWare 3.x Remote Printer mode, NetWare 4.x Bindery Remote Printer mode, and NetWare 4.x/5.x NDS Remote Printer mode.
The following table lists the components required for network printing.
3. If the necessary components are not in the list, click Add to install them, as described below.
For LPR or Internet printing:Select Protocol and then click Add. Select Microsoft from the Manufacturers list and TCP/IP from the Network Protocols list. Then click OK.
For Microsoft Network Shared printing:To use TCP/IP, see the description described earlier to install TCP/IP. To use NetBEUI, select Protocol and then click Add. Select Microsoft from the Manufacturers list and NetBEUI from the Network Protocols list. Then click OK.Select Client and then click Add. Select Microsoft from the Manufacturers list and Client for Microsoft Networks from the Network Clients list. Then click OK.
Printing method Necessary components
LPR or Internet printing TCP/IP
Microsoft Network Shared printing
TCP/IP or NetBEUIClient for Microsoft Networks
Printing via NetWare server Latest Novell Client downloaded from the Novell Web site
32

R4CB860html.bk Rev. FCOMP.FM A5 size10/19/04
RProof Sign-off:KOW N.Mizuno H.TomizawaT.TakahashiNOC K. Lee
For printing via NetWare server:Download the latest Novell Client from the Novell Web site and install it on the computer. Also, be sure to install IPX. See the Novell Web site for detailed information.
4. For LPR, Internet, Microsoft Network Shared printing:Double-click TCP/IP on the Configuration menu to open the TCP/IP Properties dialog box. Set the IP address, the subnet mask, etc. and then click OK.
5. Restart the computer.
The necessary components are now installed.
Windows Server 2003
For Windows Server 2003, use the following procedure to install the necessary components.
Note:❏ The Windows Server 2003 CD-ROM may be required during the
installation.
❏ When using TCP/IP or IPP for printing, you need to set the IP address, the subnet mask, and the default gateway of the computer.
1. Click Start, point to Control Panel, and then select Network Connections. Click Local Area Connections.
2. Click the Properties button.
33

R4CB860html.bk Rev. FCOMP.FM A5 size10/19/04
L Proof Sign-off:KOW N.Mizuno H.TomizawaT.TakahashiNOC K. Lee
3. Check if the following necessary components are in the list. If they are already installed, see “How to Set Up the Network Interface”.
The following table lists the components required for configuring the network interface with EpsonNet Config.
The following table lists the components required for network printing.
EpsonNet Config’s setting screens Necessary components
TCP/IP, AppleTalk, IPP, SNMP (IP trap) Internet Protocol (TCP/IP)
MS Network Internet Protocol (TCP/IP)
NetWare, SNMP (IPX trap) Latest Novell Client downloaded from the Novell Web site
Printing method Necessary components
34
R4CB860html.bk Rev. FCOMP.FM A5 size10/19/04
RProof Sign-off:KOW N.Mizuno H.TomizawaT.TakahashiNOC K. Lee
4. If the necessary components are not in the list, click Install to install them, as described below.
For LPR or Internet printing:Internet Protocol (TCP/IP) is installed by default. You cannot add or delete it.
For Microsoft Network Shared printing:Select Client and then click Add. Select Client for Microsoft Networks and then click OK.
For printing via NetWare server:Download the latest Novell Client from the Novell Web site and install it on the computer. Also, be sure to install IPX. See the Novell Web site for detailed information.
5. For LPR, Internet, or Microsoft Network Shared printing:Double-click Internet Protocol (TCP/IP) in the Local Area Connection Properties dialog box to open the Internet Protocols (TCP/IP) Properties dialog box. Set the IP address, the subnet mask, etc. and then click OK.
6. Restart the computer.
The necessary components are now installed.
Windows 2000
For Windows 2000, use the following procedure to install the necessary components.
LPR or Internet printing Internet Protocol (TCP/IP)
Microsoft Network Shared printing
Internet Protocol (TCP/IP)Client for Microsoft Networks
Printing via NetWare server Latest Novell Client downloaded from the Novell Web site
35
R4CB860html.bk Rev. FCOMP.FM A5 size10/19/04
L Proof Sign-off:KOW N.Mizuno H.TomizawaT.TakahashiNOC K. Lee
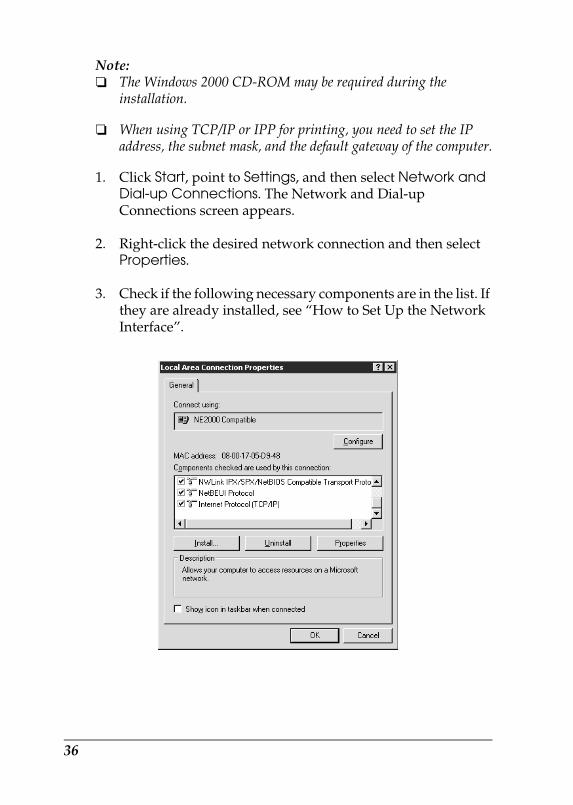
Note:❏ The Windows 2000 CD-ROM may be required during the
installation.
❏ When using TCP/IP or IPP for printing, you need to set the IP address, the subnet mask, and the default gateway of the computer.
1. Click Start, point to Settings, and then select Network and Dial-up Connections. The Network and Dial-up Connections screen appears.
2. Right-click the desired network connection and then select Properties.
3. Check if the following necessary components are in the list. If they are already installed, see “How to Set Up the Network Interface”.
36
R4CB860html.bk Rev. FCOMP.FM A5 size10/19/04
RProof Sign-off:KOW N.Mizuno H.TomizawaT.TakahashiNOC K. Lee
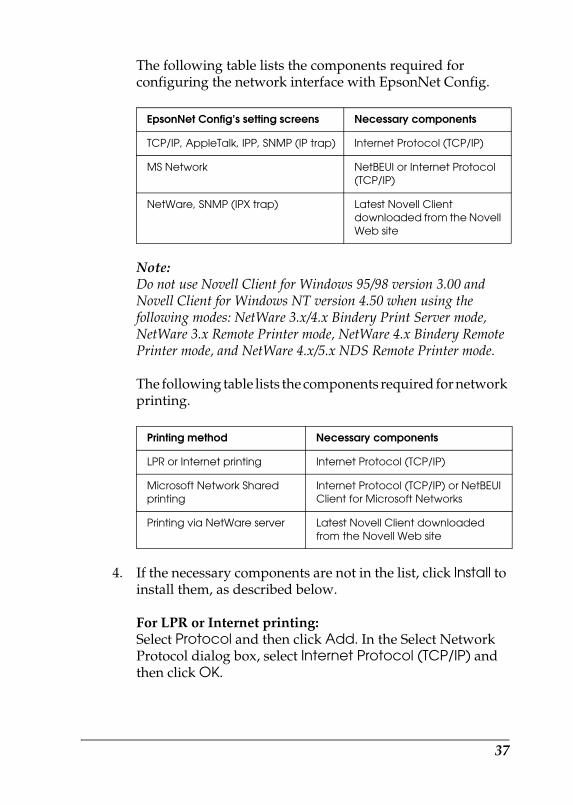
The following table lists the components required for configuring the network interface with EpsonNet Config.
Note:Do not use Novell Client for Windows 95/98 version 3.00 and Novell Client for Windows NT version 4.50 when using the following modes: NetWare 3.x/4.x Bindery Print Server mode, NetWare 3.x Remote Printer mode, NetWare 4.x Bindery Remote Printer mode, and NetWare 4.x/5.x NDS Remote Printer mode.
The following table lists the components required for network printing.
4. If the necessary components are not in the list, click Install to install them, as described below.
For LPR or Internet printing:Select Protocol and then click Add. In the Select Network Protocol dialog box, select Internet Protocol (TCP/IP) and then click OK.
EpsonNet Config’s setting screens Necessary components
TCP/IP, AppleTalk, IPP, SNMP (IP trap) Internet Protocol (TCP/IP)
MS Network NetBEUI or Internet Protocol (TCP/IP)
NetWare, SNMP (IPX trap) Latest Novell Client downloaded from the Novell Web site
Printing method Necessary components
LPR or Internet printing Internet Protocol (TCP/IP)
Microsoft Network Shared printing
Internet Protocol (TCP/IP) or NetBEUIClient for Microsoft Networks
Printing via NetWare server Latest Novell Client downloaded from the Novell Web site
37
R4CB860html.bk Rev. FCOMP.FM A5 size10/19/04
L Proof Sign-off:KOW N.Mizuno H.TomizawaT.TakahashiNOC K. Lee
For Microsoft Network Shared printing:To use Internet Protocol, see the description described earlier to install Internet Protocol (TCP/IP).To use NetBEUI, select Protocol and then click Add. Select NetBEUI Protocol and then click OK. Select Client and then click Add. Select Client for Microsoft Networks and then click OK.
For printing via NetWare server:Download the latest Novell Client from the Novell Web site and install it on the computer. Also, be sure to install IPX. See the Novell Web site for detailed information.
5. For LPR, Internet, Microsoft Network Shared printing: Double-click Internet Protocol (TCP/IP) on the Configuration menu to open the TCP/IP Properties dialog box. Set the IP address, the subnet mask, etc. and then click OK.
6. Restart the computer.
The necessary components are now installed.
Macintosh
To assign an IP address, subnet mask, etc. to your Macintosh, follow the steps below.
Note:To print using the AppleTalk protocol and configure the network interface with EpsonNet Config for Macintosh, select AirMac or Built-in Ethernet on the AppleTalk Control Panel or the AppleTalk tab. Then configure the network interface with EpsonNet Config for Macintosh.
38
R4CB860html.bk Rev. FCOMP.FM A5 size10/19/04
RProof Sign-off:KOW N.Mizuno H.TomizawaT.TakahashiNOC K. Lee
Mac OS X
1. From the Apple menu, select System Preferences.
2. Click the Network icon.
3. Select AirMac, and then click the Configure button.
4. Click the TCP/IP tab.
5. Assign an IP address and other settings if necessary.
6. Click the Apply Now button to save any changes.
Mac OS 9
1. From the Apple menu, select Control Panel, and then TCP/IP.
2. Set Connect via to AirMac.
3. Assign an IP address and other settings if necessary.
4. Close the dialog box to save any changes.
39

R4CB860html.bk Rev. FCOMP.FM A5 size10/19/04
L Proof Sign-off:KOW N.Mizuno H.TomizawaT.TakahashiNOC K. Lee
40
R4CB860html.bk Rev. FSTART.FM A5 size10/19/04
RProof Sign-off:KOW N.Mizuno H.TomizawaT.TakahashiNOC K. Lee
How to Set Up the Network Interface
For Windows
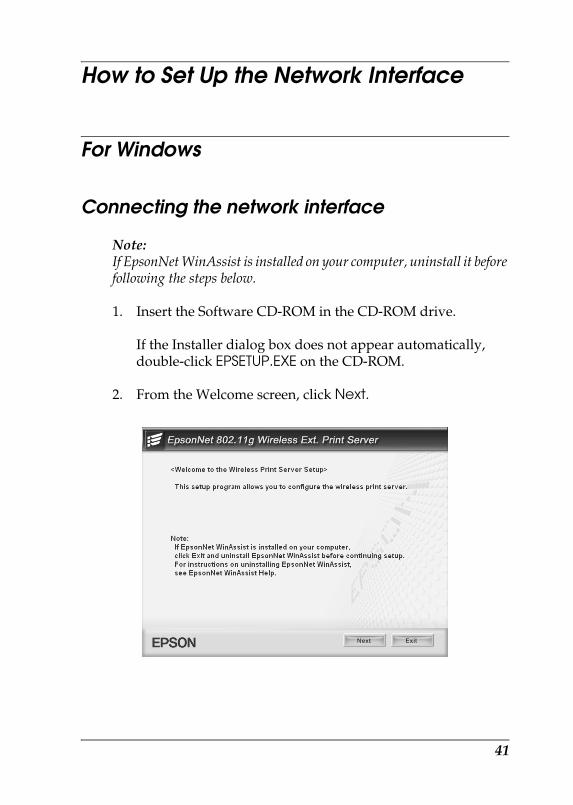
Connecting the network interface
Note:If EpsonNet WinAssist is installed on your computer, uninstall it before following the steps below.
1. Insert the Software CD-ROM in the CD-ROM drive.
If the Installer dialog box does not appear automatically, double-click EPSETUP.EXE on the CD-ROM.
2. From the Welcome screen, click Next.
41
R4CB860html.bk Rev. FSTART.FM A5 size10/19/04
L Proof Sign-off:KOW N.Mizuno H.TomizawaT.TakahashiNOC K. Lee
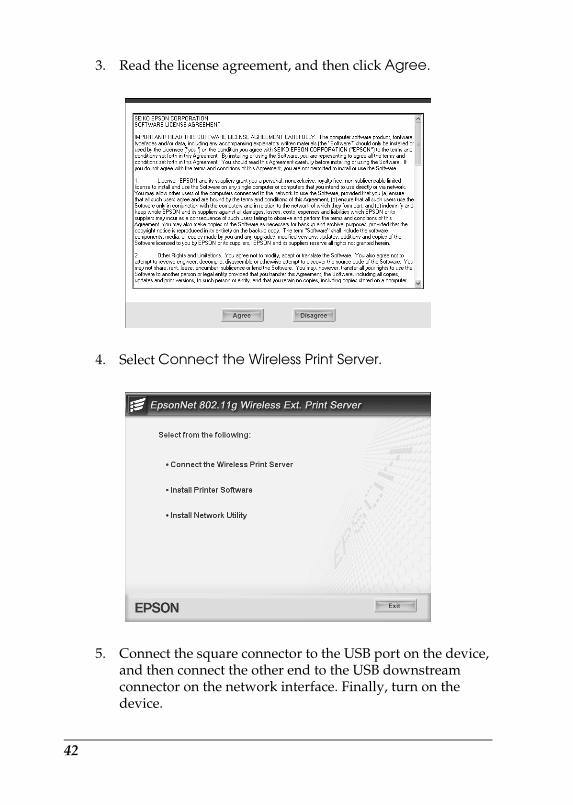
3. Read the license agreement, and then click Agree.
4. Select Connect the Wireless Print Server.
5. Connect the square connector to the USB port on the device, and then connect the other end to the USB downstream connector on the network interface. Finally, turn on the device.
42
R4CB860html.bk Rev. FSTART.FM A5 size10/19/04
RProof Sign-off:KOW N.Mizuno H.TomizawaT.TakahashiNOC K. Lee
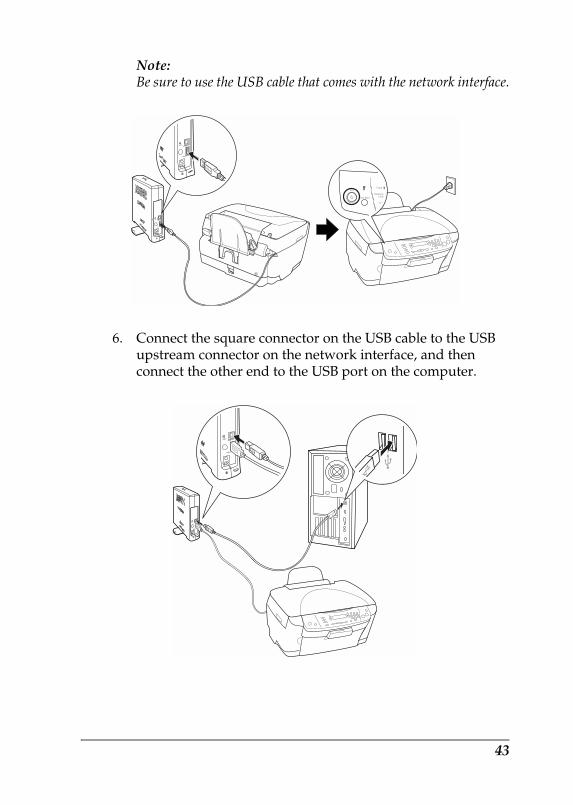
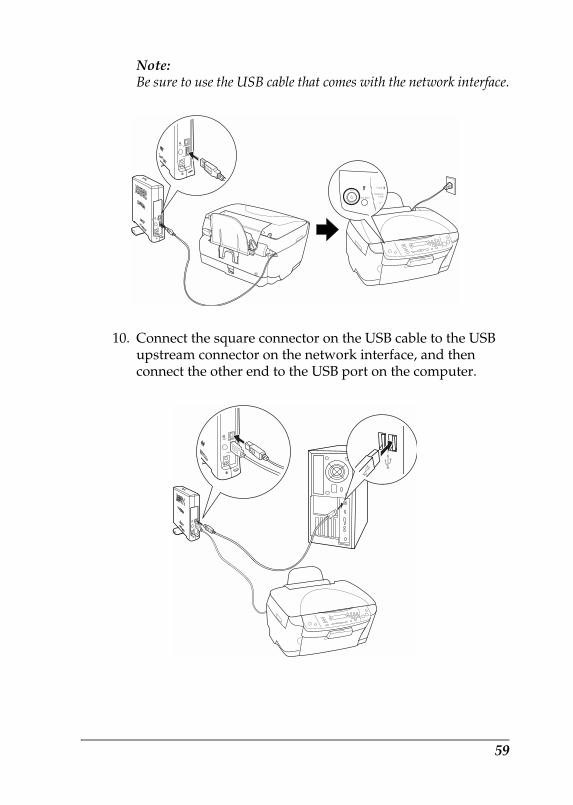
Note:Be sure to use the USB cable that comes with the network interface.
6. Connect the square connector on the USB cable to the USB upstream connector on the network interface, and then connect the other end to the USB port on the computer.
43

R4CB860html.bk Rev. FSTART.FM A5 size10/19/04
L Proof Sign-off:KOW N.Mizuno H.TomizawaT.TakahashiNOC K. Lee
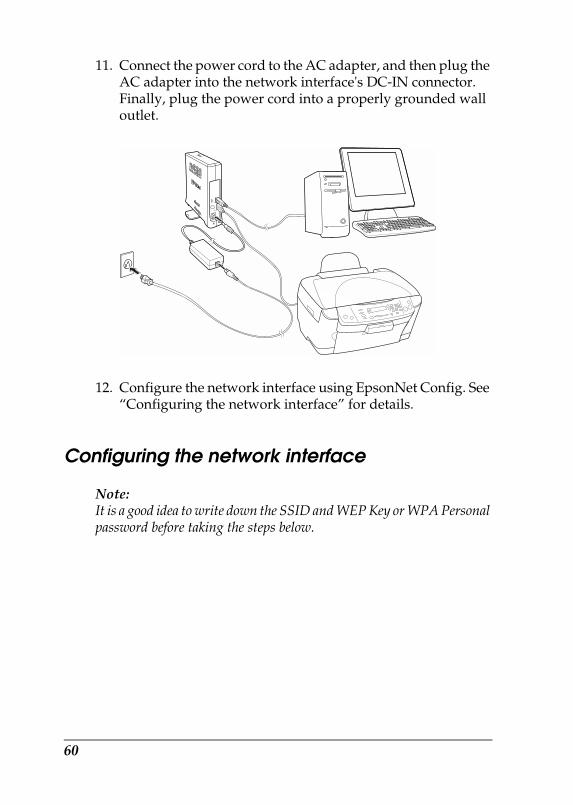
7. Connect the power cord to the AC adapter, and then plug the AC adapter into the network interface's DC-IN connector. Finally, plug the power cord into a properly grounded wall outlet.
8. The “Found New Hardware Wizard” appears to prompt you to install the USB driver. Select the Install from a list or specific location radio button and then click Next.
Note for Windows XP Service Pack 2 Users:If the following screen appears, select the No, not this time radio button, and then click Next.
44

R4CB860html.bk Rev. FSTART.FM A5 size10/19/04
RProof Sign-off:KOW N.Mizuno H.TomizawaT.TakahashiNOC K. Lee
Note:These screens may be different depending on the operating system.
9. Select the Search for the best driver in these locations radio button and select the Search removable media check box, and then click Next.
45
R4CB860html.bk Rev. FSTART.FM A5 size10/19/04
L Proof Sign-off:KOW N.Mizuno H.TomizawaT.TakahashiNOC K. Lee
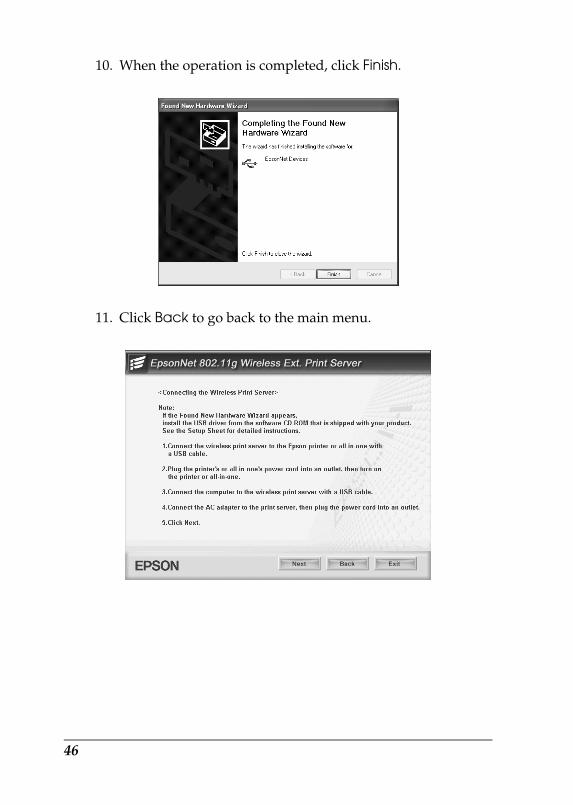
10. When the operation is completed, click Finish.
11. Click Back to go back to the main menu.
46
R4CB860html.bk Rev. FSTART.FM A5 size10/19/04
RProof Sign-off:KOW N.Mizuno H.TomizawaT.TakahashiNOC K. Lee
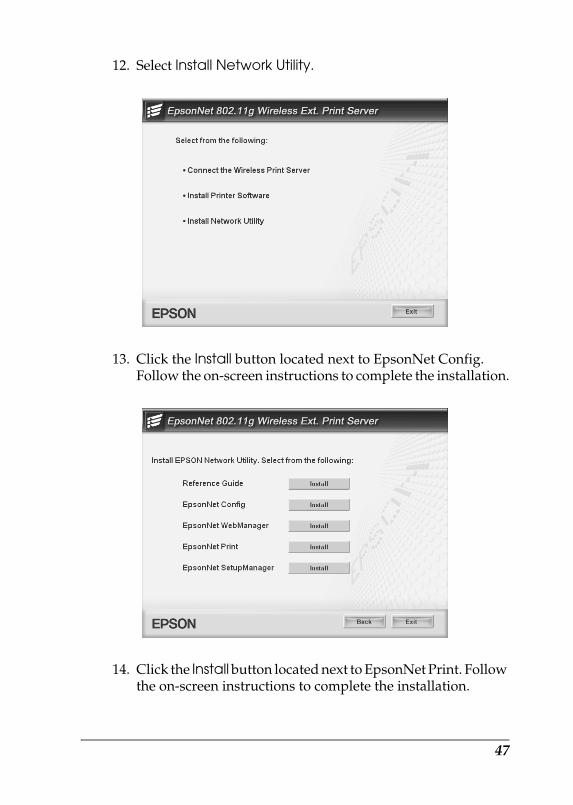
12. Select Install Network Utility.
13. Click the Install button located next to EpsonNet Config. Follow the on-screen instructions to complete the installation.
14. Click the Install button located next to EpsonNet Print. Follow the on-screen instructions to complete the installation.
47
R4CB860html.bk Rev. FSTART.FM A5 size10/19/04
L Proof Sign-off:KOW N.Mizuno H.TomizawaT.TakahashiNOC K. Lee
15. Click Exit.
16. Configure the network interface using EpsonNet Config. See “Configuring the network interface” for details.
Configuring the network interface
Note:It is a good idea to write down the SSID and WEP Key or WPA Personal password before taking the steps below.
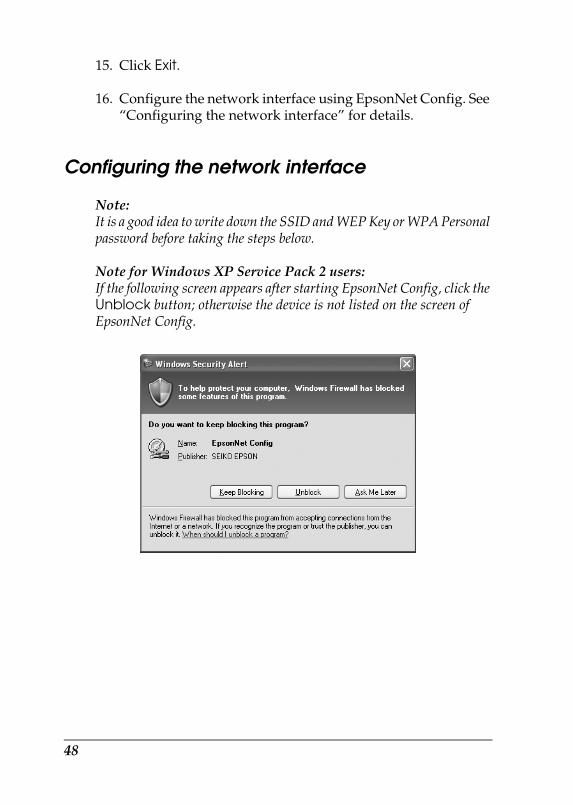
Note for Windows XP Service Pack 2 users:If the following screen appears after starting EpsonNet Config, click the Unblock button; otherwise the device is not listed on the screen of EpsonNet Config.
48
R4CB860html.bk Rev. FSTART.FM A5 size10/19/04
RProof Sign-off:KOW N.Mizuno H.TomizawaT.TakahashiNOC K. Lee
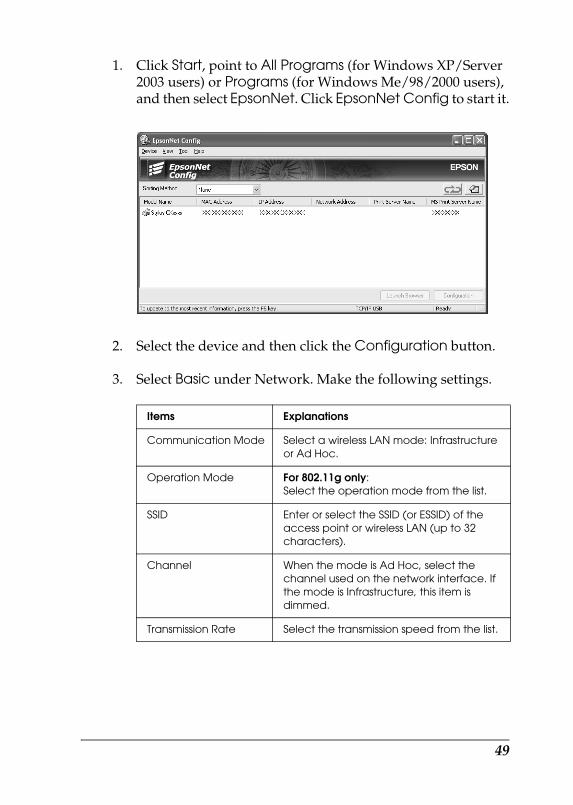
1. Click Start, point to All Programs (for Windows XP/Server 2003 users) or Programs (for Windows Me/98/2000 users), and then select EpsonNet. Click EpsonNet Config to start it.
2. Select the device and then click the Configuration button.
3. Select Basic under Network. Make the following settings.
Items Explanations
Communication Mode Select a wireless LAN mode: Infrastructure or Ad Hoc.
Operation Mode For 802.11g only:Select the operation mode from the list.
SSID Enter or select the SSID (or ESSID) of the access point or wireless LAN (up to 32 characters).
Channel When the mode is Ad Hoc, select the channel used on the network interface. If the mode is Infrastructure, this item is dimmed.
Transmission Rate Select the transmission speed from the list.
49
R4CB860html.bk Rev. FSTART.FM A5 size10/19/04
L Proof Sign-off:KOW N.Mizuno H.TomizawaT.TakahashiNOC K. Lee
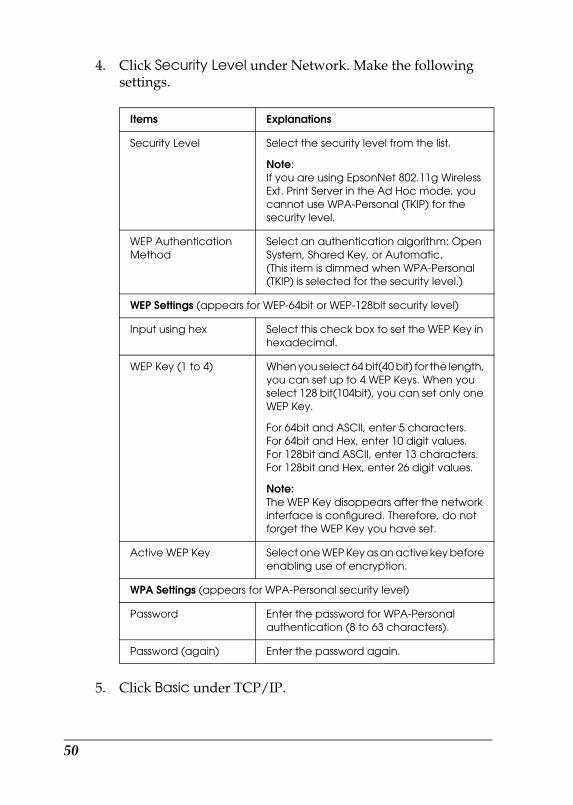
4. Click Security Level under Network. Make the following settings.
5. Click Basic under TCP/IP.
Items Explanations
Security Level Select the security level from the list.
Note:If you are using EpsonNet 802.11g Wireless Ext. Print Server in the Ad Hoc mode, you cannot use WPA-Personal (TKIP) for the security level.
WEP Authentication Method
Select an authentication algorithm: Open System, Shared Key, or Automatic. (This item is dimmed when WPA-Personal (TKIP) is selected for the security level.)
WEP Settings (appears for WEP-64bit or WEP-128bit security level)
Input using hex Select this check box to set the WEP Key in hexadecimal.
WEP Key (1 to 4) When you select 64 bit(40 bit) for the length, you can set up to 4 WEP Keys. When you select 128 bit(104bit), you can set only one WEP Key.
For 64bit and ASCII, enter 5 characters.For 64bit and Hex, enter 10 digit values.For 128bit and ASCII, enter 13 characters.For 128bit and Hex, enter 26 digit values.
Note:The WEP Key disappears after the network interface is configured. Therefore, do not forget the WEP Key you have set.
Active WEP Key Select one WEP Key as an active key before enabling use of encryption.
WPA Settings (appears for WPA-Personal security level)
Password Enter the password for WPA-Personal authentication (8 to 63 characters).
Password (again) Enter the password again.
50
R4CB860html.bk Rev. FSTART.FM A5 size10/19/04
RProof Sign-off:KOW N.Mizuno H.TomizawaT.TakahashiNOC K. Lee
6. Select a method for specifying the IP address. If you select Automatic, DHCP becomes available and assigns an IP address automatically. If you want to set the IP address manually, select Manual and enter the IP address, subnet mask, and default gateway.
7. Click the Send button to send the settings to the network interface.
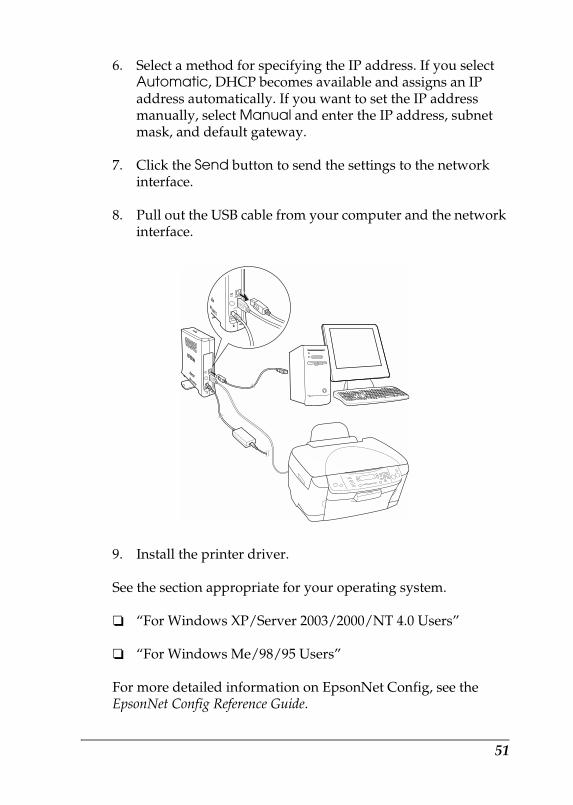
8. Pull out the USB cable from your computer and the network interface.
9. Install the printer driver.
See the section appropriate for your operating system.
❏ “For Windows XP/Server 2003/2000/NT 4.0 Users”
❏ “For Windows Me/98/95 Users”
For more detailed information on EpsonNet Config, see the EpsonNet Config Reference Guide.
51
R4CB860html.bk Rev. FSTART.FM A5 size10/19/04
L Proof Sign-off:KOW N.Mizuno H.TomizawaT.TakahashiNOC K. Lee
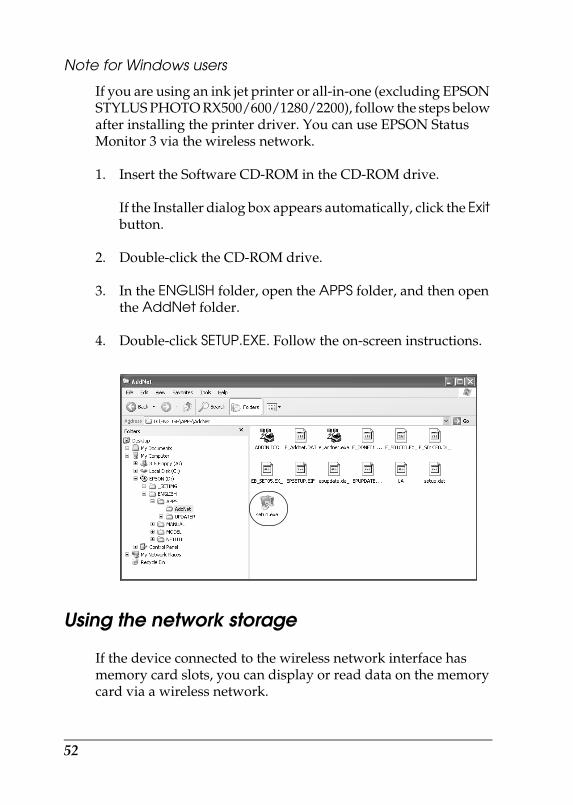
Note for Windows users
If you are using an ink jet printer or all-in-one (excluding EPSON STYLUS PHOTO RX500/600/1280/2200), follow the steps below after installing the printer driver. You can use EPSON Status Monitor 3 via the wireless network.
1. Insert the Software CD-ROM in the CD-ROM drive.
If the Installer dialog box appears automatically, click the Exit button.
2. Double-click the CD-ROM drive.
3. In the ENGLISH folder, open the APPS folder, and then open the AddNet folder.
4. Double-click SETUP.EXE. Follow the on-screen instructions.
Using the network storage
If the device connected to the wireless network interface has memory card slots, you can display or read data on the memory card via a wireless network.
52
R4CB860html.bk Rev. FSTART.FM A5 size10/19/04
RProof Sign-off:KOW N.Mizuno H.TomizawaT.TakahashiNOC K. Lee
Note:❏ You can use this function on Windows XP/2000 only.
❏ You can only display or read data on the memory card.
❏ When you access the Network Storage and delete data on the memory card, the data disappears. However, the data is not actually deleted so the data appears again when you select Refresh from the View menu.
Accessing the network storage
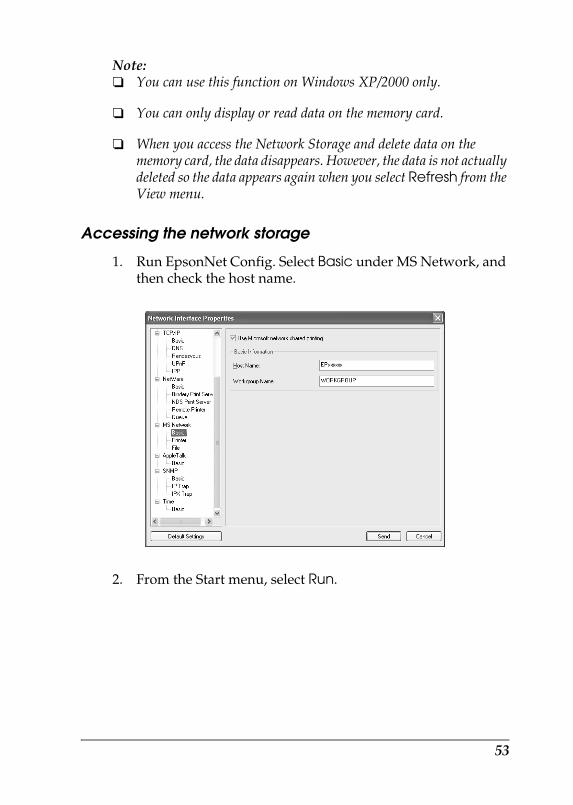
1. Run EpsonNet Config. Select Basic under MS Network, and then check the host name.
2. From the Start menu, select Run.
53
R4CB860html.bk Rev. FSTART.FM A5 size10/19/04
L Proof Sign-off:KOW N.Mizuno H.TomizawaT.TakahashiNOC K. Lee
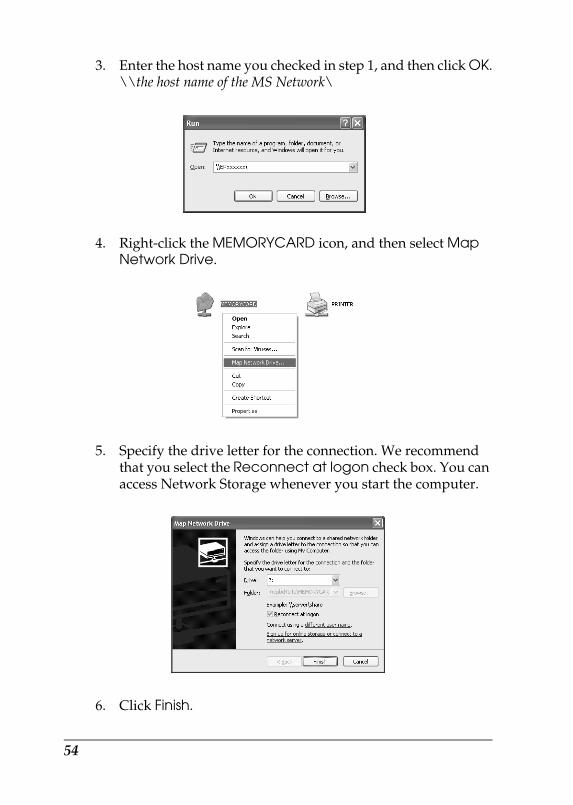
3. Enter the host name you checked in step 1, and then click OK.\\the host name of the MS Network\
4. Right-click the MEMORYCARD icon, and then select Map Network Drive.
5. Specify the drive letter for the connection. We recommend that you select the Reconnect at logon check box. You can access Network Storage whenever you start the computer.
6. Click Finish.
54
R4CB860html.bk Rev. FSTART.FM A5 size10/19/04
RProof Sign-off:KOW N.Mizuno H.TomizawaT.TakahashiNOC K. Lee
7. The network drive you mapped appears in My Computer. To display or read the file, double-click the network drive icon.
Disconnecting the network storage
To disconnect the network drive of the network storage, right-click the network drive icon, and then select Disconnect.
Changing the network storage information
You can change the host name or the storage name you specified in the Run dialog box by using EpsonNet Config. For more detailed information, see EpsonNet Config Reference Guide or “About EpsonNet Config”.
For Macintosh
Connecting the network interface
Use EpsonNet Config to configure the network interface for use on the TCP/IP network and set up the printer on your computer.
Note:This section explains the instructions using Mac OS X. The instructions are almost the same for Mac OS 9.
1. Insert the Software CD-ROM in the CD-ROM drive.
55
R4CB860html.bk Rev. FSTART.FM A5 size10/19/04
L Proof Sign-off:KOW N.Mizuno H.TomizawaT.TakahashiNOC K. Lee
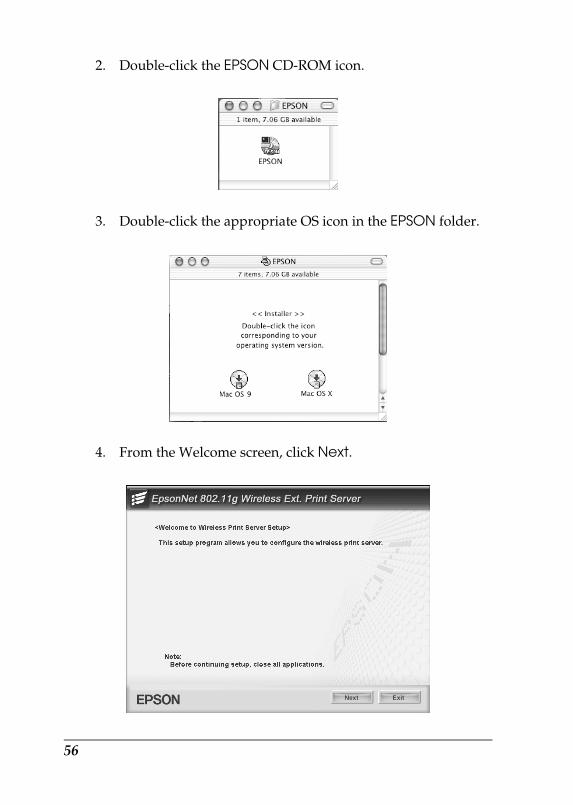
2. Double-click the EPSON CD-ROM icon.
3. Double-click the appropriate OS icon in the EPSON folder.
4. From the Welcome screen, click Next.
56
R4CB860html.bk Rev. FSTART.FM A5 size10/19/04
RProof Sign-off:KOW N.Mizuno H.TomizawaT.TakahashiNOC K. Lee
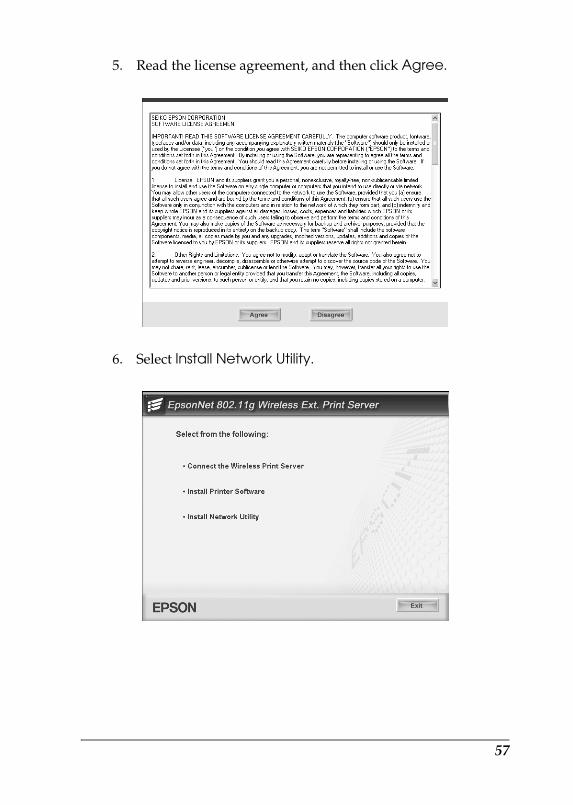
5. Read the license agreement, and then click Agree.
6. Select Install Network Utility.
57
R4CB860html.bk Rev. FSTART.FM A5 size10/19/04
L Proof Sign-off:KOW N.Mizuno H.TomizawaT.TakahashiNOC K. Lee
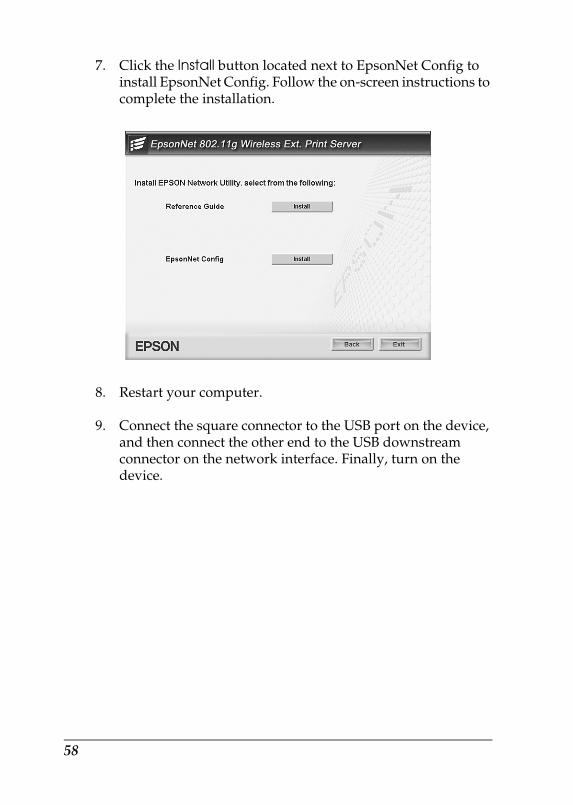
7. Click the Install button located next to EpsonNet Config to install EpsonNet Config. Follow the on-screen instructions to complete the installation.
8. Restart your computer.
9. Connect the square connector to the USB port on the device, and then connect the other end to the USB downstream connector on the network interface. Finally, turn on the device.
58
R4CB860html.bk Rev. FSTART.FM A5 size10/19/04
RProof Sign-off:KOW N.Mizuno H.TomizawaT.TakahashiNOC K. Lee
Note:Be sure to use the USB cable that comes with the network interface.
10. Connect the square connector on the USB cable to the USB upstream connector on the network interface, and then connect the other end to the USB port on the computer.
59
R4CB860html.bk Rev. FSTART.FM A5 size10/19/04
L Proof Sign-off:KOW N.Mizuno H.TomizawaT.TakahashiNOC K. Lee
11. Connect the power cord to the AC adapter, and then plug the AC adapter into the network interface's DC-IN connector. Finally, plug the power cord into a properly grounded wall outlet.
12. Configure the network interface using EpsonNet Config. See “Configuring the network interface” for details.
Configuring the network interface
Note:It is a good idea to write down the SSID and WEP Key or WPA Personal password before taking the steps below.
60
R4CB860html.bk Rev. FSTART.FM A5 size10/19/04
RProof Sign-off:KOW N.Mizuno H.TomizawaT.TakahashiNOC K. Lee
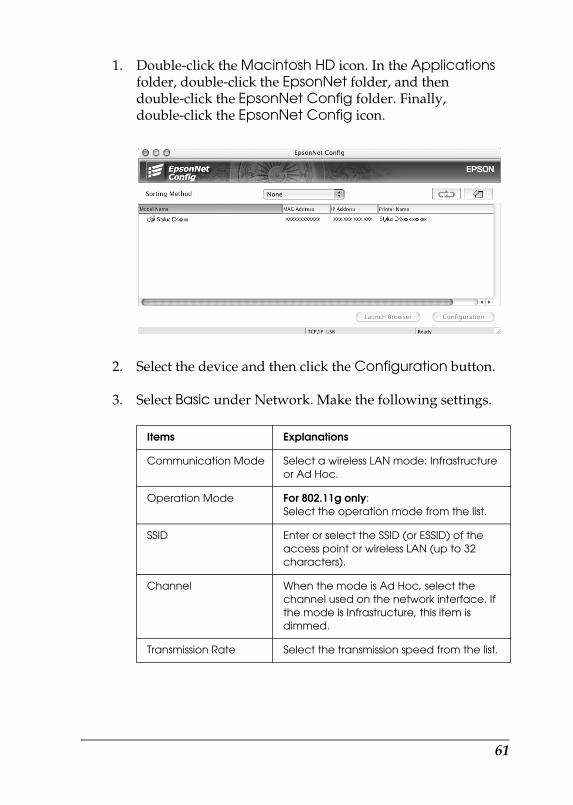
1. Double-click the Macintosh HD icon. In the Applications folder, double-click the EpsonNet folder, and then double-click the EpsonNet Config folder. Finally, double-click the EpsonNet Config icon.
2. Select the device and then click the Configuration button.
3. Select Basic under Network. Make the following settings.
Items Explanations
Communication Mode Select a wireless LAN mode: Infrastructure or Ad Hoc.
Operation Mode For 802.11g only:Select the operation mode from the list.
SSID Enter or select the SSID (or ESSID) of the access point or wireless LAN (up to 32 characters).
Channel When the mode is Ad Hoc, select the channel used on the network interface. If the mode is Infrastructure, this item is dimmed.
Transmission Rate Select the transmission speed from the list.
61
R4CB860html.bk Rev. FSTART.FM A5 size10/19/04
L Proof Sign-off:KOW N.Mizuno H.TomizawaT.TakahashiNOC K. Lee
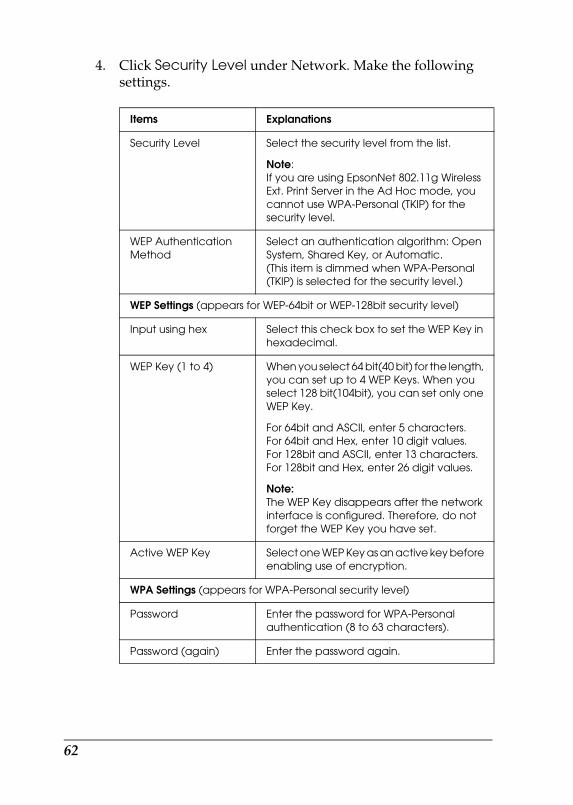
4. Click Security Level under Network. Make the following settings.
Items Explanations
Security Level Select the security level from the list.
Note:If you are using EpsonNet 802.11g Wireless Ext. Print Server in the Ad Hoc mode, you cannot use WPA-Personal (TKIP) for the security level.
WEP Authentication Method
Select an authentication algorithm: Open System, Shared Key, or Automatic. (This item is dimmed when WPA-Personal (TKIP) is selected for the security level.)
WEP Settings (appears for WEP-64bit or WEP-128bit security level)
Input using hex Select this check box to set the WEP Key in hexadecimal.
WEP Key (1 to 4) When you select 64 bit(40 bit) for the length, you can set up to 4 WEP Keys. When you select 128 bit(104bit), you can set only one WEP Key.
For 64bit and ASCII, enter 5 characters.For 64bit and Hex, enter 10 digit values.For 128bit and ASCII, enter 13 characters.For 128bit and Hex, enter 26 digit values.
Note:The WEP Key disappears after the network interface is configured. Therefore, do not forget the WEP Key you have set.
Active WEP Key Select one WEP Key as an active key before enabling use of encryption.
WPA Settings (appears for WPA-Personal security level)
Password Enter the password for WPA-Personal authentication (8 to 63 characters).
Password (again) Enter the password again.
62
R4CB860html.bk Rev. FSTART.FM A5 size10/19/04
RProof Sign-off:KOW N.Mizuno H.TomizawaT.TakahashiNOC K. Lee
5. For Mac OS X:Click Basic under TCP/IP. Select a method for specifying the IP address. If you select Automatic, DHCP becomes available and assigns an IP address automatically. If you want to set the IP address manually, select Manual and enter the IP address, subnet mask, and default gateway.
For Mac OS 9:Click Basic under AppleTalk. Make sure the Use AppleTalk check box is selected, and then make the necessary settings.
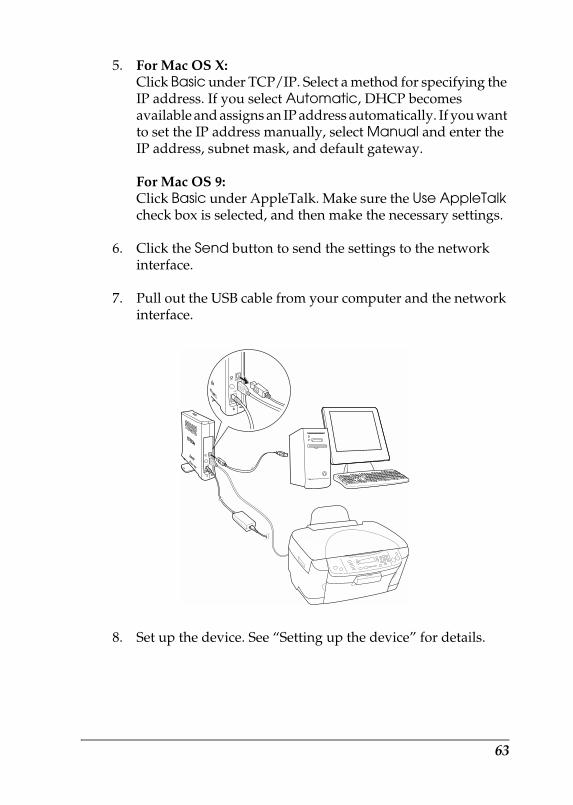
6. Click the Send button to send the settings to the network interface.
7. Pull out the USB cable from your computer and the network interface.
8. Set up the device. See “Setting up the device” for details.
63
R4CB860html.bk Rev. FSTART.FM A5 size10/19/04
L Proof Sign-off:KOW N.Mizuno H.TomizawaT.TakahashiNOC K. Lee
Setting up the device
The printer driver must be installed on the computer before you can set up the device. See the device’s manual for information on installing the printer driver.
Mac OS X
1. Open the Applications folder.
2. Open the Utilities folder.
3. Open Print Center (for Mac OS X 10.2 or below) or Printer Setup Utility (for Mac OS X 10.3), and then click Add.
4. Select Rendezvous from the drop-down list.
5. Select the printer model from the list.
6. Click Add.
Mac OS 9
1. Open Chooser from the Apple menu.
2. Click the printer icon.
3. Select the zone containing the printer.
4. Select the printer name from the list.
5. Make sure AppleTalk is active.
6. Close Chooser.
Now you can use the device on the wireless network.
64
R4CB860html.bk Rev. FSPC.FM A5 size10/19/04
RProof Sign-off:KOW N.Mizuno H.TomizawaT.TakahashiNOC K. Lee
For EPSON STYLUS PHOTO RX500/600 and EPSON STYLUS CX4600/6400/6600 Users
For Windows
Configuring the network interface
Configure the network interface for use on the TCP/IP network, and install the drivers and the utility for the all-in-one on your computer.
Make sure the all-in-one is set up and the software for the all-in-one is installed on your computer before taking the steps below. See the manual shipped with the all-in-one for detailed instructions.
Note:❏ If EpsonNet WinAssist is installed on your computer, uninstall it
before following the steps below.
❏ It is a good idea to write down the SSID and WEP Key or WPA Personal password before taking the steps below.
❏ Windows Server 2003 does not support this function.
1. Insert the Software CD-ROM in the CD-ROM drive.
If the Installer dialog box does not appear automatically, double-click EPSETUP.EXE on the CD-ROM.
65
R4CB860html.bk Rev. FSPC.FM A5 size10/19/04
L Proof Sign-off:KOW N.Mizuno H.TomizawaT.TakahashiNOC K. Lee
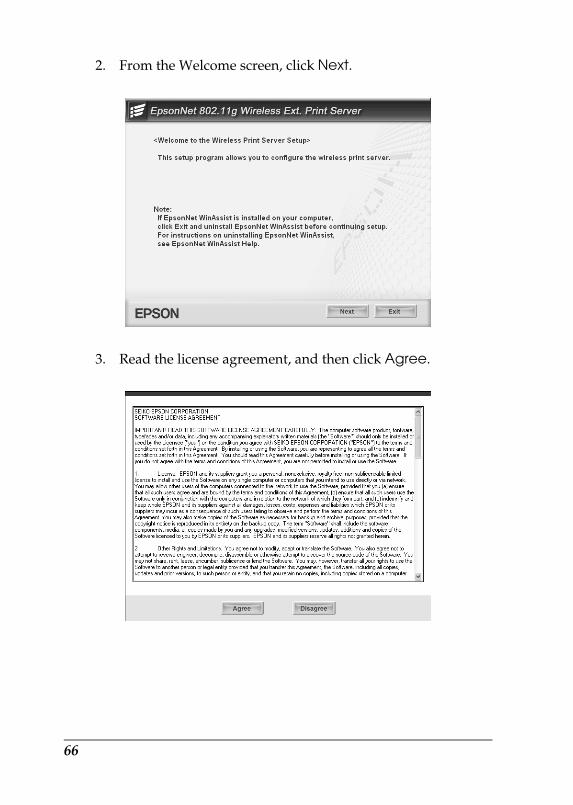
2. From the Welcome screen, click Next.
3. Read the license agreement, and then click Agree.
66
R4CB860html.bk Rev. FSPC.FM A5 size10/19/04
RProof Sign-off:KOW N.Mizuno H.TomizawaT.TakahashiNOC K. Lee
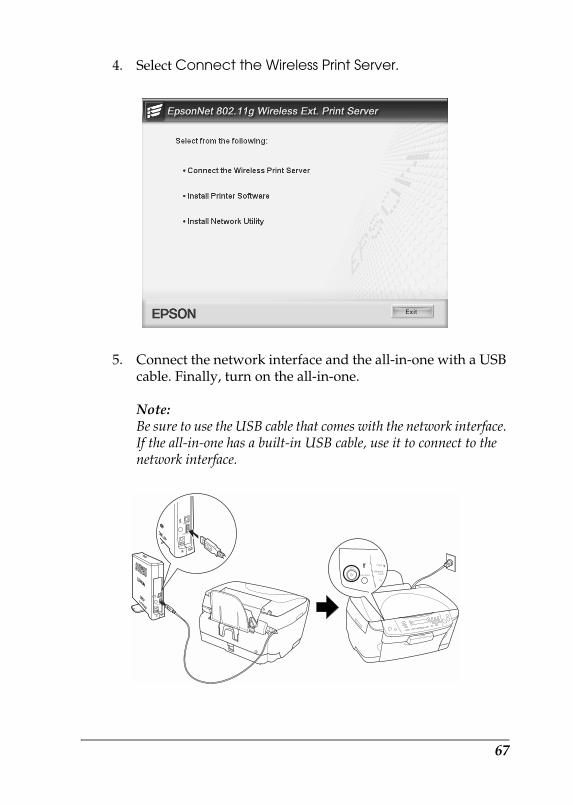
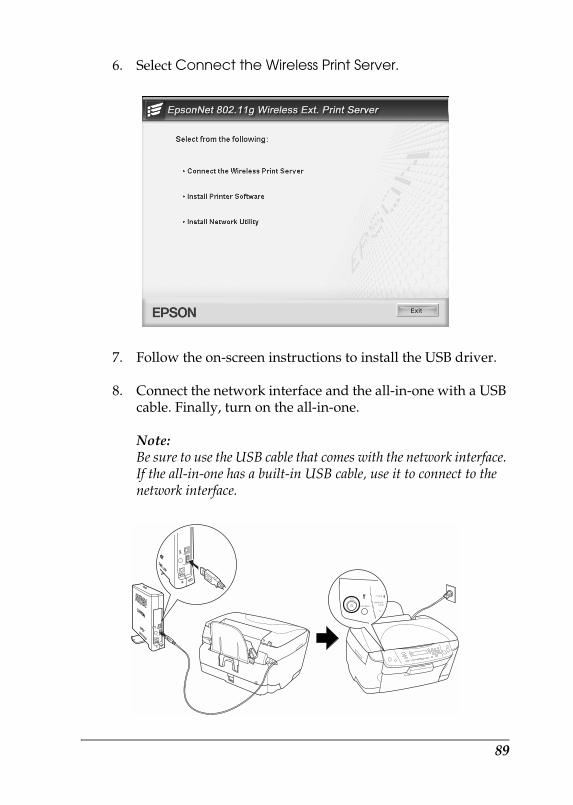
4. Select Connect the Wireless Print Server.
5. Connect the network interface and the all-in-one with a USB cable. Finally, turn on the all-in-one.
Note:Be sure to use the USB cable that comes with the network interface. If the all-in-one has a built-in USB cable, use it to connect to the network interface.
67
R4CB860html.bk Rev. FSPC.FM A5 size10/19/04
L Proof Sign-off:KOW N.Mizuno H.TomizawaT.TakahashiNOC K. Lee
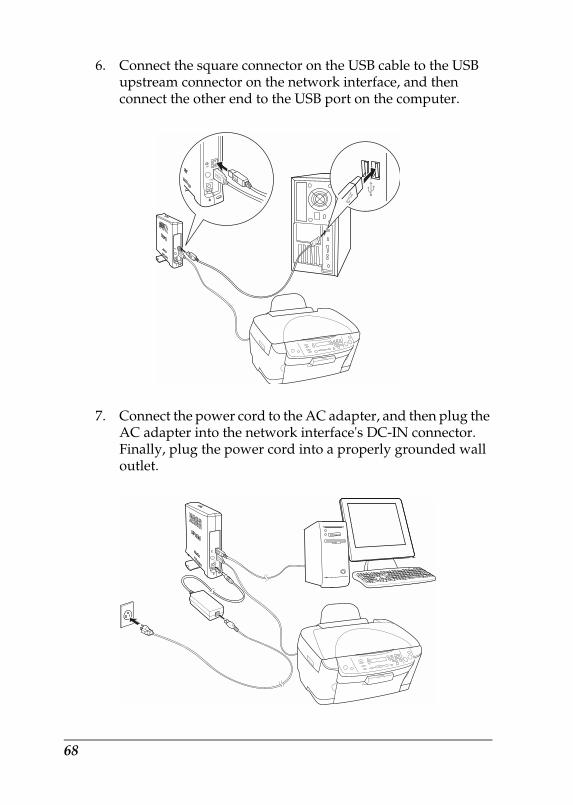
6. Connect the square connector on the USB cable to the USB upstream connector on the network interface, and then connect the other end to the USB port on the computer.
7. Connect the power cord to the AC adapter, and then plug the AC adapter into the network interface's DC-IN connector. Finally, plug the power cord into a properly grounded wall outlet.
68
R4CB860html.bk Rev. FSPC.FM A5 size10/19/04
RProof Sign-off:KOW N.Mizuno H.TomizawaT.TakahashiNOC K. Lee
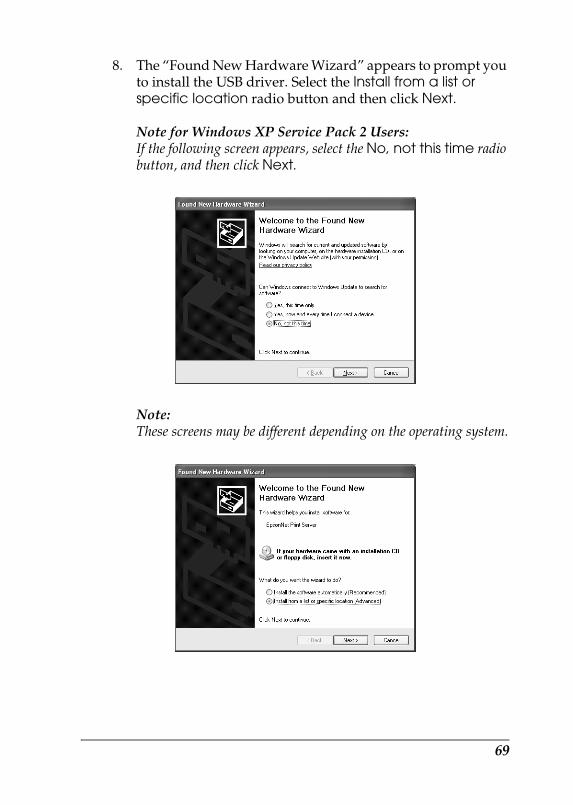
8. The “Found New Hardware Wizard” appears to prompt you to install the USB driver. Select the Install from a list or specific location radio button and then click Next.
Note for Windows XP Service Pack 2 Users:If the following screen appears, select the No, not this time radio button, and then click Next.
Note:These screens may be different depending on the operating system.
69
R4CB860html.bk Rev. FSPC.FM A5 size10/19/04
L Proof Sign-off:KOW N.Mizuno H.TomizawaT.TakahashiNOC K. Lee
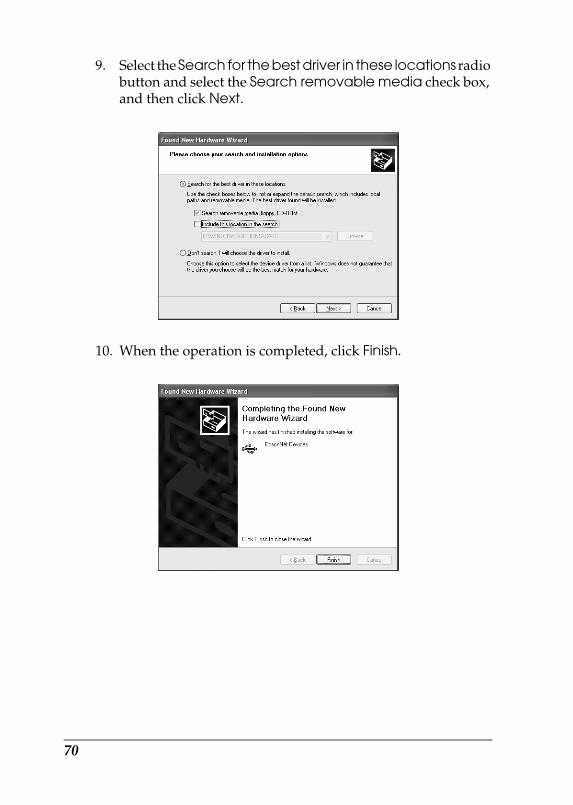
9. Select the Search for the best driver in these locations radio button and select the Search removable media check box, and then click Next.
10. When the operation is completed, click Finish.
70
R4CB860html.bk Rev. FSPC.FM A5 size10/19/04
RProof Sign-off:KOW N.Mizuno H.TomizawaT.TakahashiNOC K. Lee
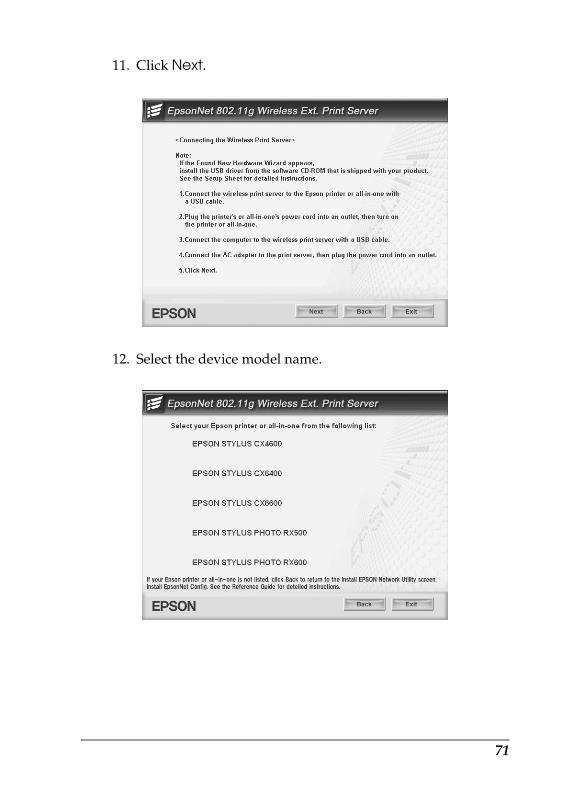
11. Click Next.
12. Select the device model name.
71
R4CB860html.bk Rev. FSPC.FM A5 size10/19/04
L Proof Sign-off:KOW N.Mizuno H.TomizawaT.TakahashiNOC K. Lee
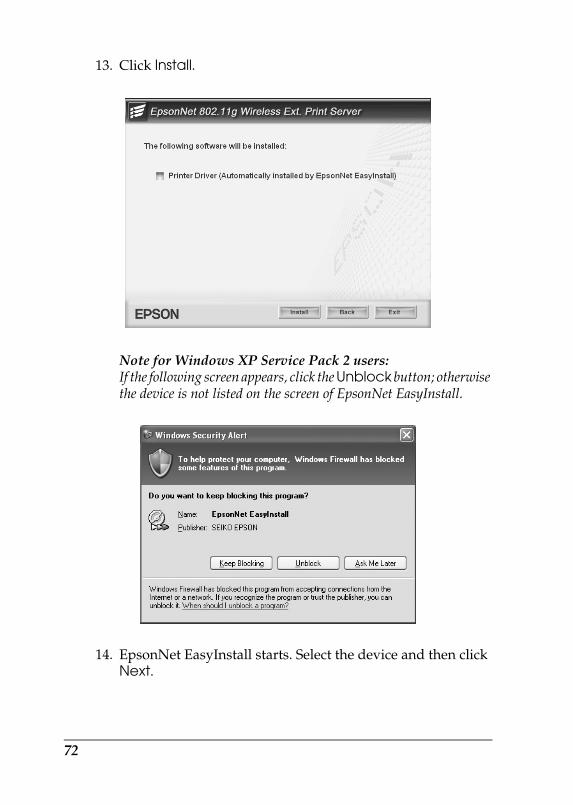
13. Click Install.
Note for Windows XP Service Pack 2 users:If the following screen appears, click the Unblock button; otherwise the device is not listed on the screen of EpsonNet EasyInstall.
14. EpsonNet EasyInstall starts. Select the device and then click Next.
72
R4CB860html.bk Rev. FSPC.FM A5 size10/19/04
RProof Sign-off:KOW N.Mizuno H.TomizawaT.TakahashiNOC K. Lee
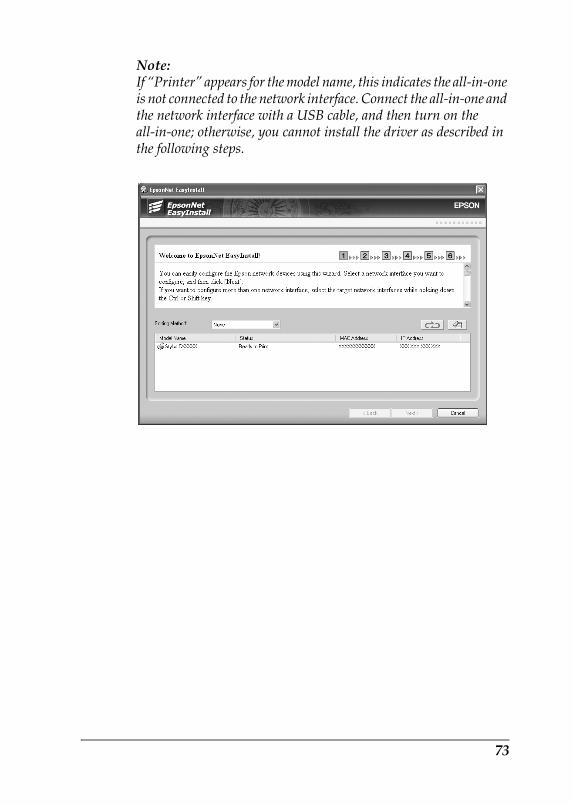
Note:If “Printer” appears for the model name, this indicates the all-in-one is not connected to the network interface. Connect the all-in-one and the network interface with a USB cable, and then turn on the all-in-one; otherwise, you cannot install the driver as described in the following steps.
73
R4CB860html.bk Rev. FSPC.FM A5 size10/19/04
L Proof Sign-off:KOW N.Mizuno H.TomizawaT.TakahashiNOC K. Lee
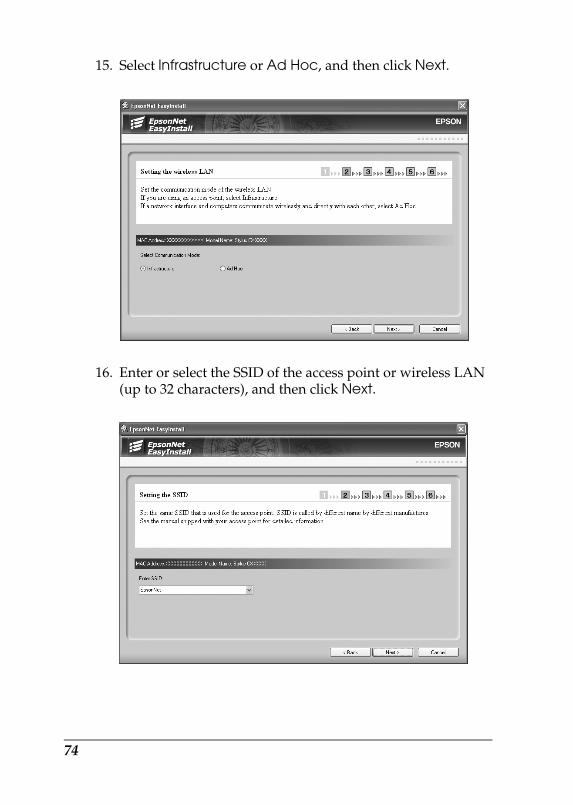
15. Select Infrastructure or Ad Hoc, and then click Next.
16. Enter or select the SSID of the access point or wireless LAN (up to 32 characters), and then click Next.
74
R4CB860html.bk Rev. FSPC.FM A5 size10/19/04
RProof Sign-off:KOW N.Mizuno H.TomizawaT.TakahashiNOC K. Lee
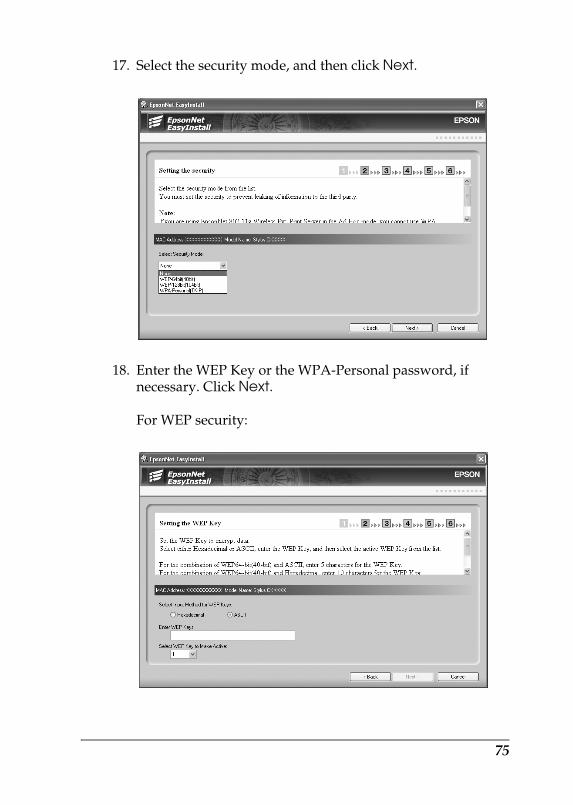
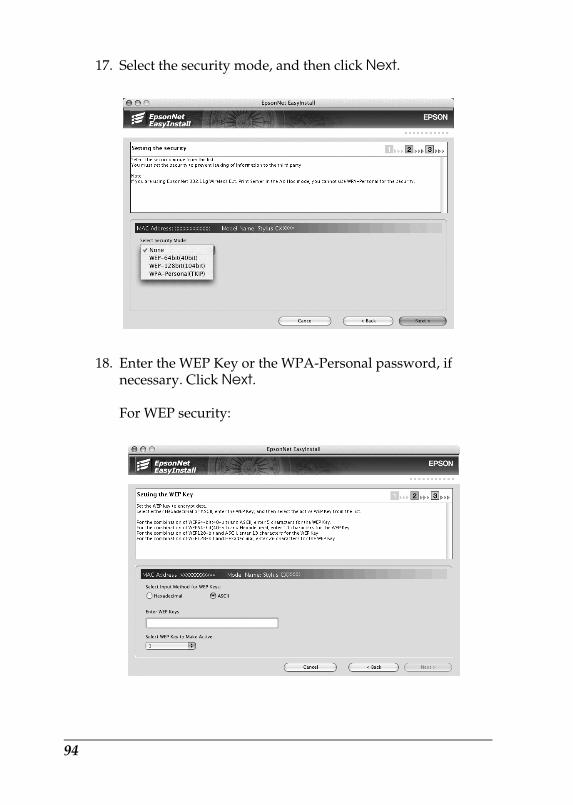
17. Select the security mode, and then click Next.
18. Enter the WEP Key or the WPA-Personal password, if necessary. Click Next.
For WEP security:
75
R4CB860html.bk Rev. FSPC.FM A5 size10/19/04
L Proof Sign-off:KOW N.Mizuno H.TomizawaT.TakahashiNOC K. Lee
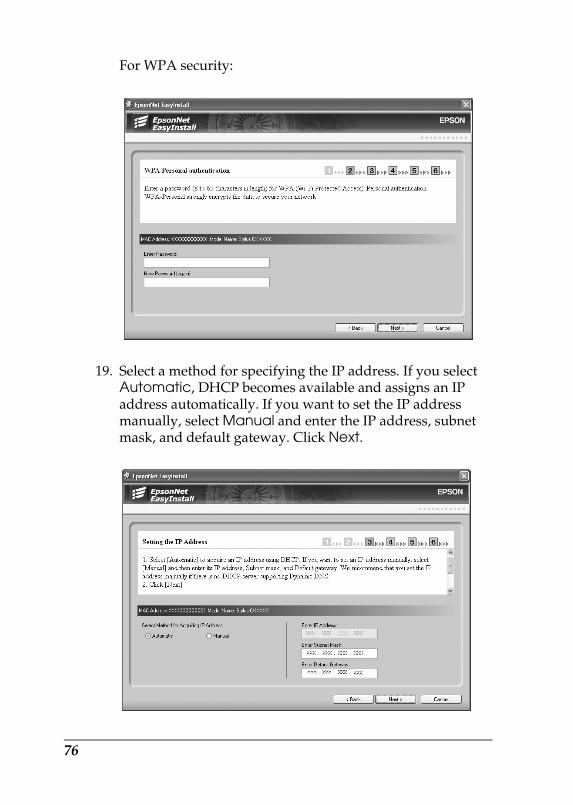
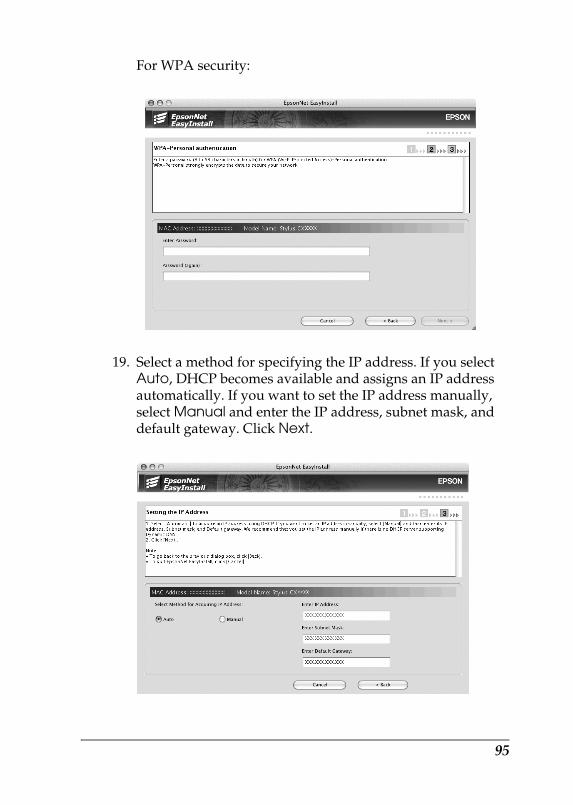
For WPA security:
19. Select a method for specifying the IP address. If you select Automatic, DHCP becomes available and assigns an IP address automatically. If you want to set the IP address manually, select Manual and enter the IP address, subnet mask, and default gateway. Click Next.
76
R4CB860html.bk Rev. FSPC.FM A5 size10/19/04
RProof Sign-off:KOW N.Mizuno H.TomizawaT.TakahashiNOC K. Lee
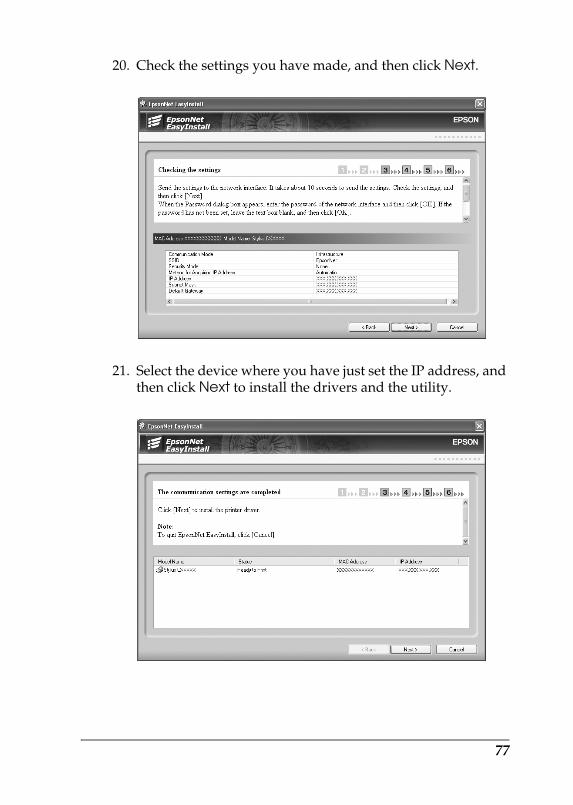
20. Check the settings you have made, and then click Next.
21. Select the device where you have just set the IP address, and then click Next to install the drivers and the utility.
77
R4CB860html.bk Rev. FSPC.FM A5 size10/19/04
L Proof Sign-off:KOW N.Mizuno H.TomizawaT.TakahashiNOC K. Lee
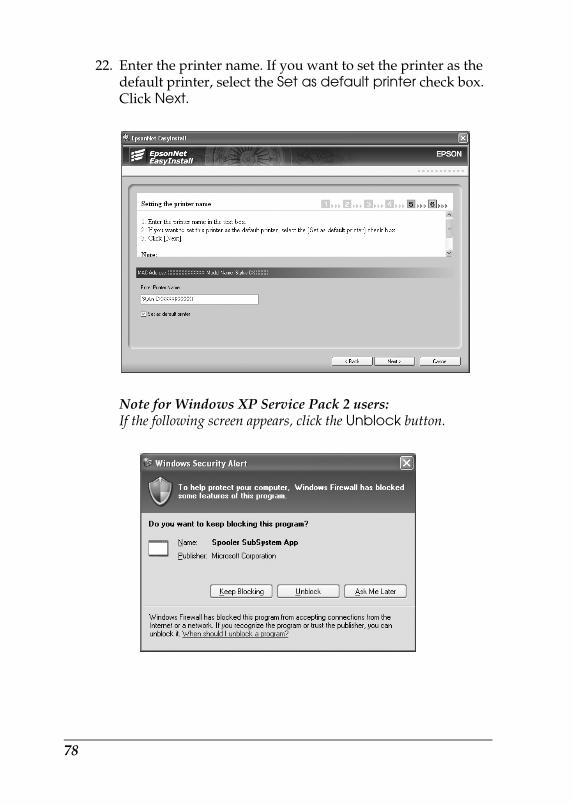
22. Enter the printer name. If you want to set the printer as the default printer, select the Set as default printer check box. Click Next.
Note for Windows XP Service Pack 2 users:If the following screen appears, click the Unblock button.
78
R4CB860html.bk Rev. FSPC.FM A5 size10/19/04
RProof Sign-off:KOW N.Mizuno H.TomizawaT.TakahashiNOC K. Lee
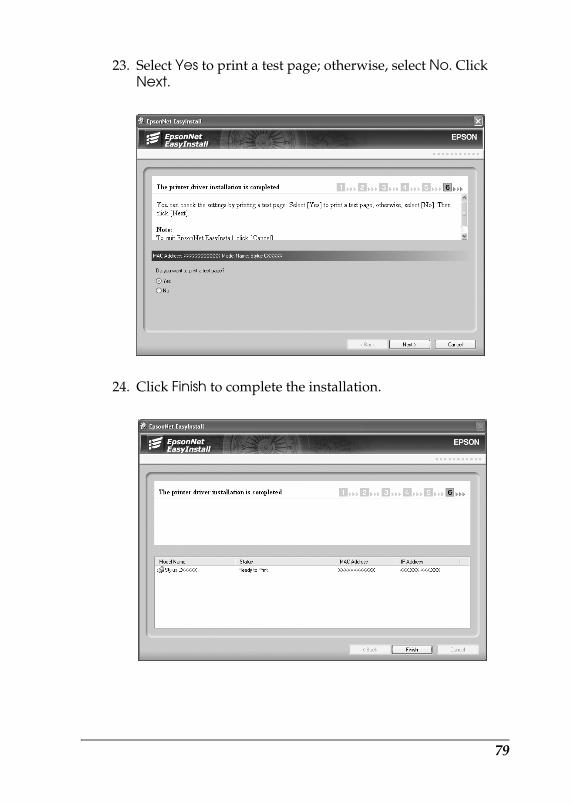
23. Select Yes to print a test page; otherwise, select No. Click Next.
24. Click Finish to complete the installation.
79
R4CB860html.bk Rev. FSPC.FM A5 size10/19/04
L Proof Sign-off:KOW N.Mizuno H.TomizawaT.TakahashiNOC K. Lee
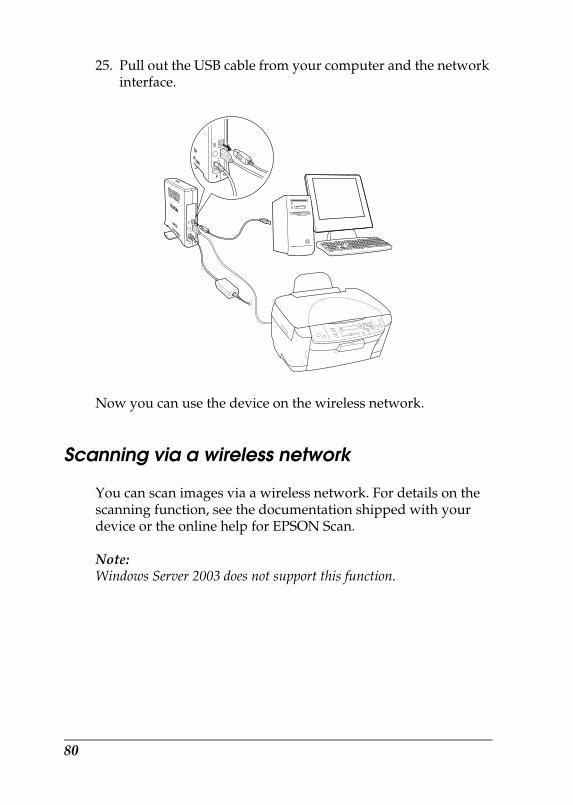
25. Pull out the USB cable from your computer and the network interface.
Now you can use the device on the wireless network.
Scanning via a wireless network
You can scan images via a wireless network. For details on the scanning function, see the documentation shipped with your device or the online help for EPSON Scan.
Note:Windows Server 2003 does not support this function.
80
R4CB860html.bk Rev. FSPC.FM A5 size10/19/04
RProof Sign-off:KOW N.Mizuno H.TomizawaT.TakahashiNOC K. Lee
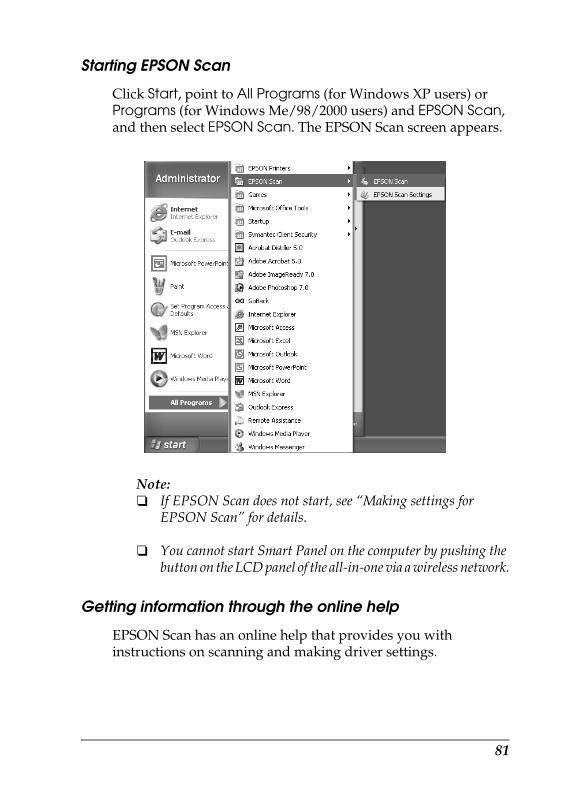
Starting EPSON Scan
Click Start, point to All Programs (for Windows XP users) or Programs (for Windows Me/98/2000 users) and EPSON Scan, and then select EPSON Scan. The EPSON Scan screen appears.
Note:❏ If EPSON Scan does not start, see “Making settings for
EPSON Scan” for details.
❏ You cannot start Smart Panel on the computer by pushing the button on the LCD panel of the all-in-one via a wireless network.
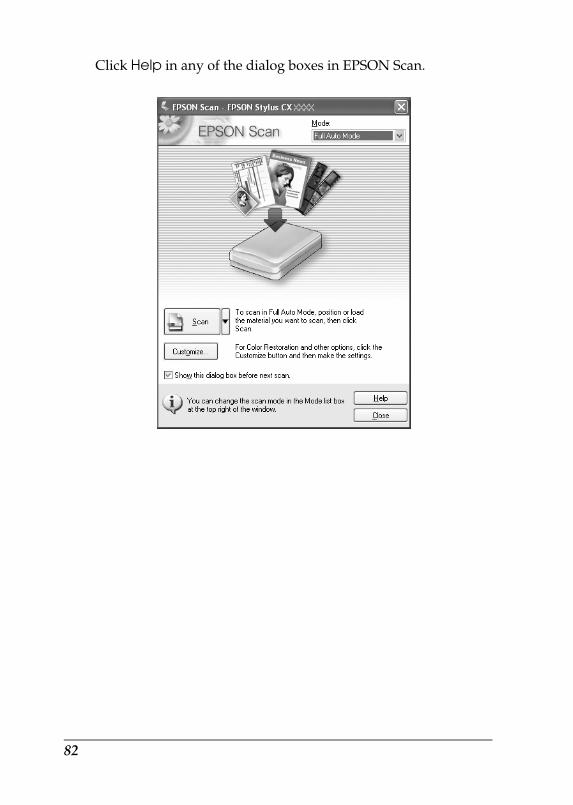
Getting information through the online help
EPSON Scan has an online help that provides you with instructions on scanning and making driver settings.
81
R4CB860html.bk Rev. FSPC.FM A5 size10/19/04
L Proof Sign-off:KOW N.Mizuno H.TomizawaT.TakahashiNOC K. Lee
Click Help in any of the dialog boxes in EPSON Scan.
82

R4CB860html.bk Rev. FSPC.FM A5 size10/19/04
RProof Sign-off:KOW N.Mizuno H.TomizawaT.TakahashiNOC K. Lee
Making settings for EPSON Scan
1. Click Start, point to All Programs (for Windows XP users) or Programs (for Windows Me/98/2000 users) and EPSON Scan, and then select EPSON Scan Settings. The EPSON Scan Settings dialog box appears.
2. Select the model name of your device from the Select Scanner drop-down list.
83

R4CB860html.bk Rev. FSPC.FM A5 size10/19/04
L Proof Sign-off:KOW N.Mizuno H.TomizawaT.TakahashiNOC K. Lee
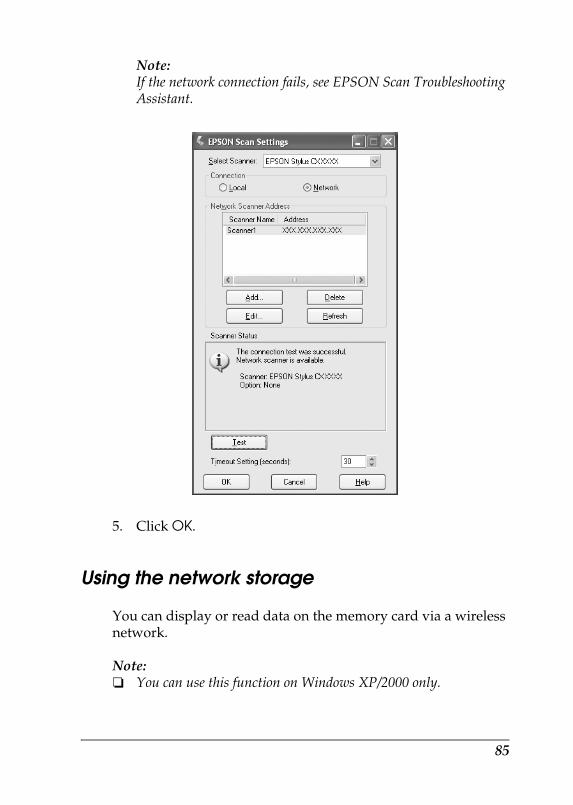
3. Select the Network radio button.
4. Click the Test button. Make sure the device in the Scanner Status text box is available for use on the network.
84
R4CB860html.bk Rev. FSPC.FM A5 size10/19/04
RProof Sign-off:KOW N.Mizuno H.TomizawaT.TakahashiNOC K. Lee
Note:If the network connection fails, see EPSON Scan Troubleshooting Assistant.
5. Click OK.
Using the network storage
You can display or read data on the memory card via a wireless network.
Note:❏ You can use this function on Windows XP/2000 only.
85
R4CB860html.bk Rev. FSPC.FM A5 size10/19/04
L Proof Sign-off:KOW N.Mizuno H.TomizawaT.TakahashiNOC K. Lee
❏ You can only display or read data on the memory card.
❏ When you access the Network Storage and delete data on the memory card, the data disappears. However, the data is not actually deleted so the data appears again when you select Refresh from the View menu.
Accessing the network storage
The network drive you mapped appears in My Computer. To display or read the file, double-click the network drive icon.
Note:When the network drive does not appear in My Computer, connect it manually. See “Using the network storage” for more details.
Disconnecting the network storage
To disconnect the network drive of the network storage, right-click the network drive icon, and then select Disconnect.
Changing the network storage information
You can change the host name or the storage name you specified in the Run dialog box by using EpsonNet Config. For more detailed information, see EpsonNet Config Reference Guide or “About EpsonNet Config”.
For Macintosh
Configuring the network interface
Configure the network interface for use on the TCP/IP network, and install the drivers for the all-in-one and the utility on your computer.
86
R4CB860html.bk Rev. FSPC.FM A5 size10/19/04
RProof Sign-off:KOW N.Mizuno H.TomizawaT.TakahashiNOC K. Lee
Make sure the all-in-one is set up and the software for the all-in-one is installed on your computer before taking the steps below. See the manual shipped with the all-in-one for detailed instructions.
Note:❏ This section explains the instructions using Mac OS X. The
instructions are almost the same for Mac OS 9.
❏ It is a good idea to write down the SSID and WEP Key or WPA Personal password before taking the steps below.
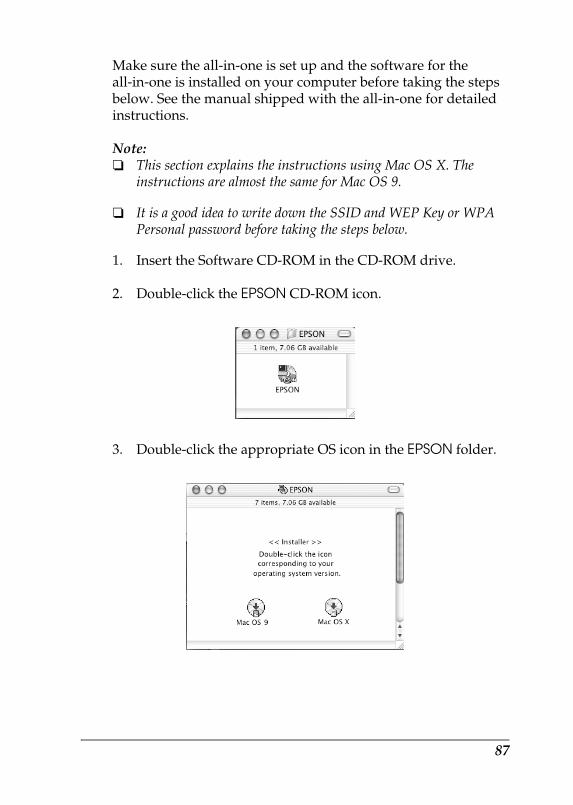
1. Insert the Software CD-ROM in the CD-ROM drive.
2. Double-click the EPSON CD-ROM icon.
3. Double-click the appropriate OS icon in the EPSON folder.
87
R4CB860html.bk Rev. FSPC.FM A5 size10/19/04
L Proof Sign-off:KOW N.Mizuno H.TomizawaT.TakahashiNOC K. Lee
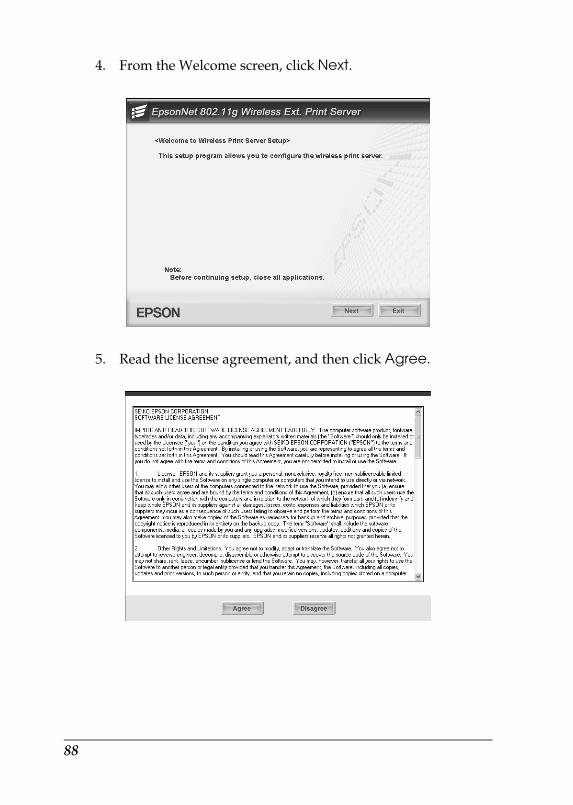
4. From the Welcome screen, click Next.
5. Read the license agreement, and then click Agree.
88
R4CB860html.bk Rev. FSPC.FM A5 size10/19/04
RProof Sign-off:KOW N.Mizuno H.TomizawaT.TakahashiNOC K. Lee
6. Select Connect the Wireless Print Server.
7. Follow the on-screen instructions to install the USB driver.
8. Connect the network interface and the all-in-one with a USB cable. Finally, turn on the all-in-one.
Note:Be sure to use the USB cable that comes with the network interface. If the all-in-one has a built-in USB cable, use it to connect to the network interface.
89

R4CB860html.bk Rev. FSPC.FM A5 size10/19/04
L Proof Sign-off:KOW N.Mizuno H.TomizawaT.TakahashiNOC K. Lee
9. Connect the square connector on the USB cable to the USB upstream connector on the network interface, and then connect the other end to the USB port on the computer.
10. Connect the power cord to the AC adapter, and then plug the AC adapter into the network interface's DC-IN connector. Finally, plug the power cord into a properly grounded wall outlet.
90
R4CB860html.bk Rev. FSPC.FM A5 size10/19/04
RProof Sign-off:KOW N.Mizuno H.TomizawaT.TakahashiNOC K. Lee
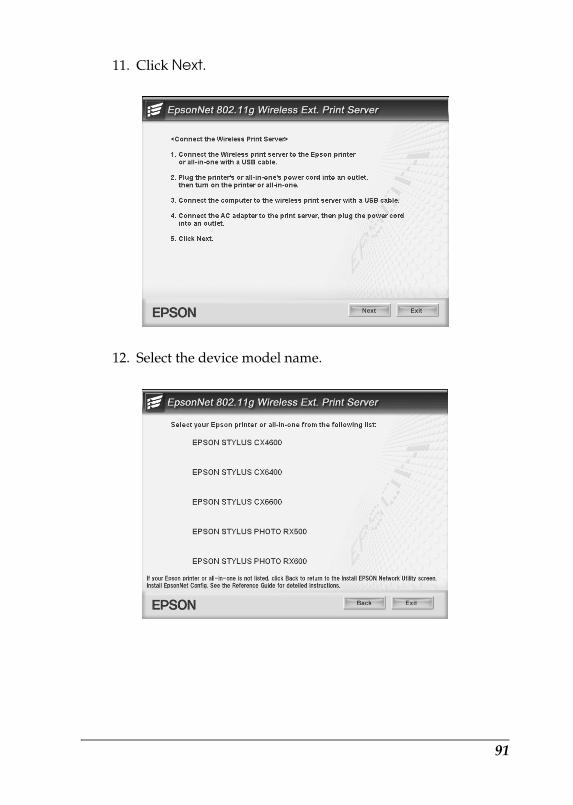
11. Click Next.
12. Select the device model name.
91
R4CB860html.bk Rev. FSPC.FM A5 size10/19/04
L Proof Sign-off:KOW N.Mizuno H.TomizawaT.TakahashiNOC K. Lee
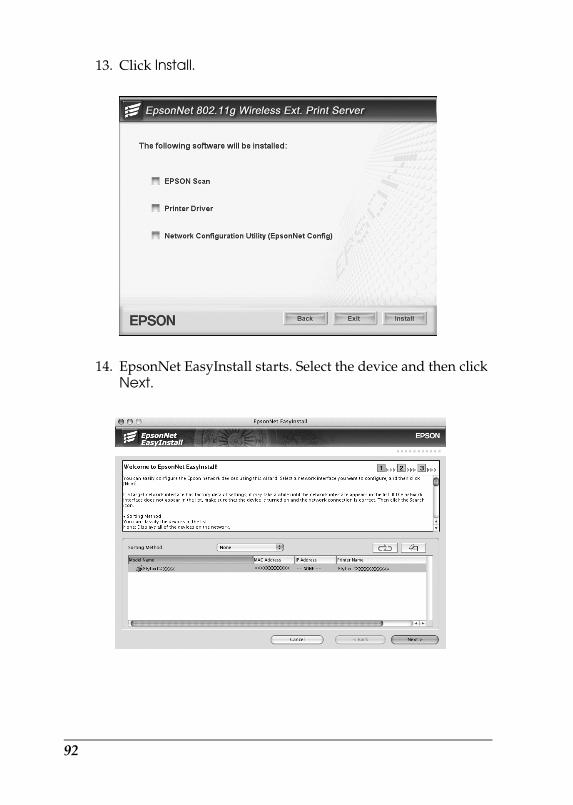
13. Click Install.
14. EpsonNet EasyInstall starts. Select the device and then click Next.
92
R4CB860html.bk Rev. FSPC.FM A5 size10/19/04
RProof Sign-off:KOW N.Mizuno H.TomizawaT.TakahashiNOC K. Lee
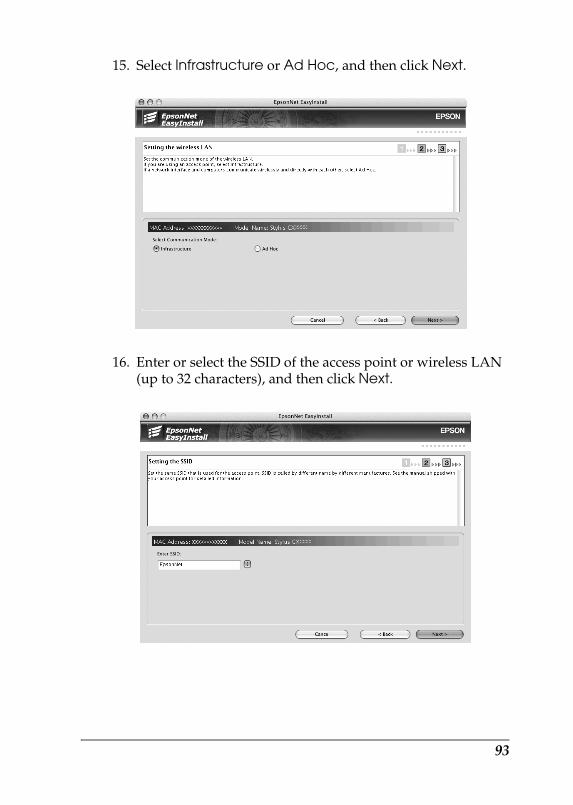
15. Select Infrastructure or Ad Hoc, and then click Next.
16. Enter or select the SSID of the access point or wireless LAN (up to 32 characters), and then click Next.
93
R4CB860html.bk Rev. FSPC.FM A5 size10/19/04
L Proof Sign-off:KOW N.Mizuno H.TomizawaT.TakahashiNOC K. Lee
17. Select the security mode, and then click Next.
18. Enter the WEP Key or the WPA-Personal password, if necessary. Click Next.
For WEP security:
94
R4CB860html.bk Rev. FSPC.FM A5 size10/19/04
RProof Sign-off:KOW N.Mizuno H.TomizawaT.TakahashiNOC K. Lee
For WPA security:
19. Select a method for specifying the IP address. If you select Auto, DHCP becomes available and assigns an IP address automatically. If you want to set the IP address manually, select Manual and enter the IP address, subnet mask, and default gateway. Click Next.
95
R4CB860html.bk Rev. FSPC.FM A5 size10/19/04
L Proof Sign-off:KOW N.Mizuno H.TomizawaT.TakahashiNOC K. Lee
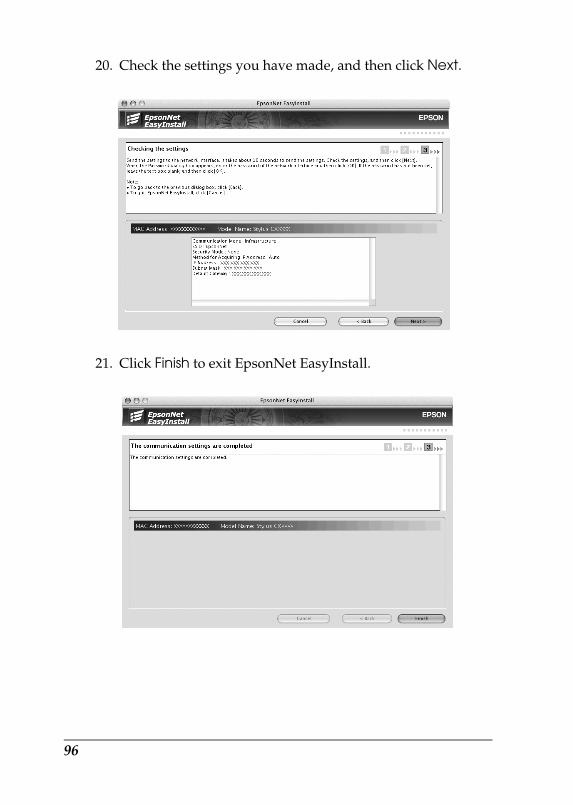
20. Check the settings you have made, and then click Next.
21. Click Finish to exit EpsonNet EasyInstall.
96
R4CB860html.bk Rev. FSPC.FM A5 size10/19/04
RProof Sign-off:KOW N.Mizuno H.TomizawaT.TakahashiNOC K. Lee
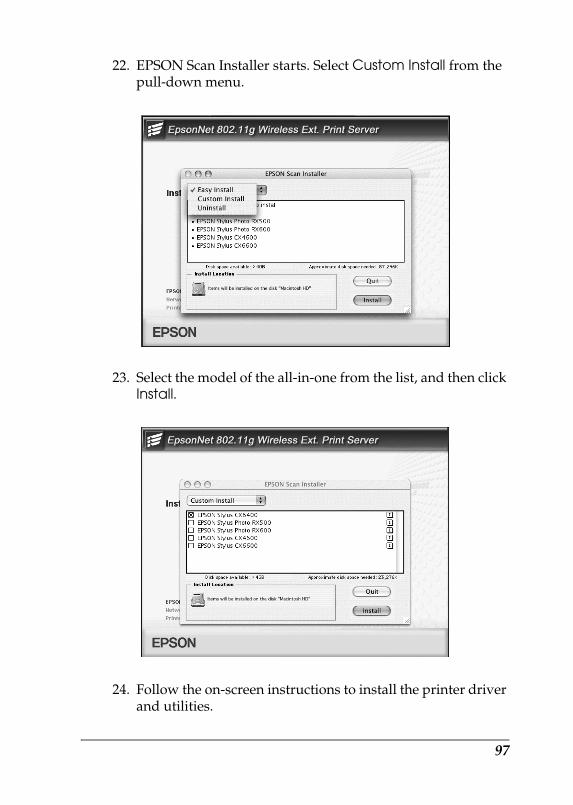
22. EPSON Scan Installer starts. Select Custom Install from the pull-down menu.
23. Select the model of the all-in-one from the list, and then click Install.
24. Follow the on-screen instructions to install the printer driver and utilities.
97
R4CB860html.bk Rev. FSPC.FM A5 size10/19/04
L Proof Sign-off:KOW N.Mizuno H.TomizawaT.TakahashiNOC K. Lee
25. Restart your computer.
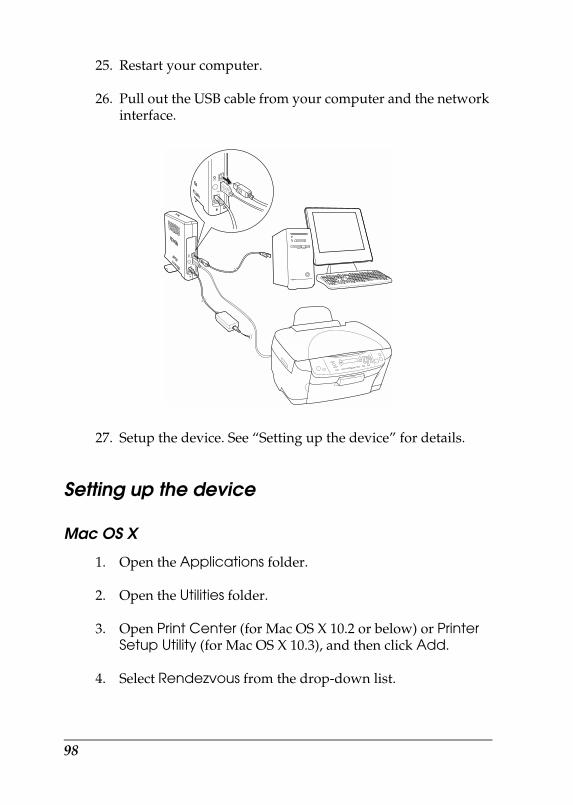
26. Pull out the USB cable from your computer and the network interface.
27. Setup the device. See “Setting up the device” for details.
Setting up the device
Mac OS X
1. Open the Applications folder.
2. Open the Utilities folder.
3. Open Print Center (for Mac OS X 10.2 or below) or Printer Setup Utility (for Mac OS X 10.3), and then click Add.
4. Select Rendezvous from the drop-down list.
98
R4CB860html.bk Rev. FSPC.FM A5 size10/19/04
RProof Sign-off:KOW N.Mizuno H.TomizawaT.TakahashiNOC K. Lee
5. Select the device model from the list.
6. Click Add.
Mac OS 9
1. Double-click the Macintosh HD icon. In the Applications folder, double-click the EpsonNet folder, and then double-click the EpsonNet Config folder. Finally, double-click the EpsonNet Config icon.
2. Select the device and then click the Configuration button.
3. Click Basic under AppleTalk. Make sure the Use AppleTalk check box is selected, and then make the necessary settings.
4. Click the Send button to send the settings to the network interface.
5. Open Chooser from the Apple menu.
6. Click the printer icon.
7. Select the zone containing the printer.
8. Select the printer name from the list.
9. Make sure AppleTalk is active.
10. Close Chooser.
Now you can use the device on the wireless network.
Scanning via a wireless network
You can scan images via a wireless network. For details on the scanning function, see the documentation shipped with your device or the online help for EPSON Scan.
99
R4CB860html.bk Rev. FSPC.FM A5 size10/19/04
L Proof Sign-off:KOW N.Mizuno H.TomizawaT.TakahashiNOC K. Lee
Making settings for EPSON Scan
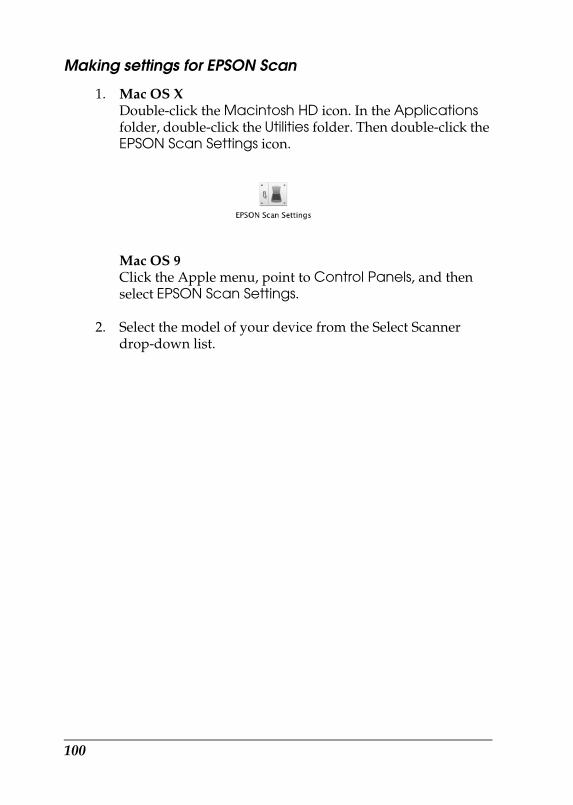
1. Mac OS XDouble-click the Macintosh HD icon. In the Applications folder, double-click the Utilities folder. Then double-click the EPSON Scan Settings icon.
Mac OS 9Click the Apple menu, point to Control Panels, and then select EPSON Scan Settings.
2. Select the model of your device from the Select Scanner drop-down list.
100
R4CB860html.bk Rev. FSPC.FM A5 size10/19/04
RProof Sign-off:KOW N.Mizuno H.TomizawaT.TakahashiNOC K. Lee
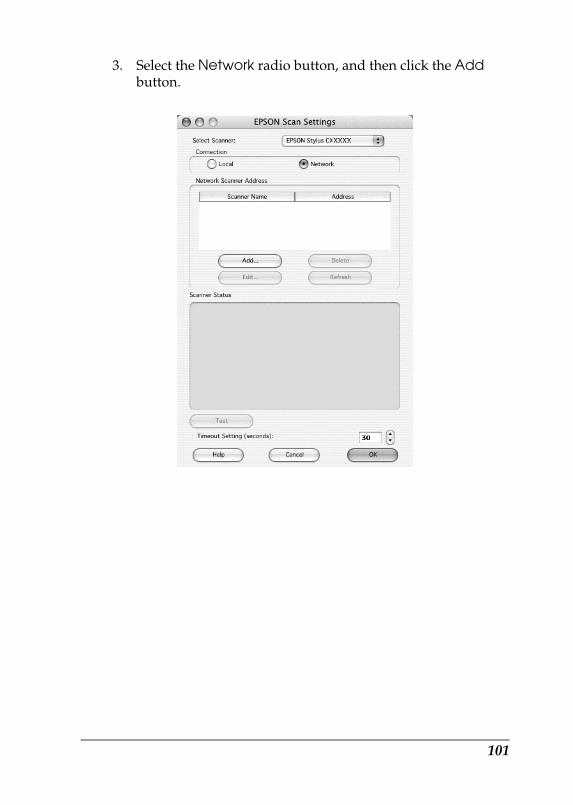
3. Select the Network radio button, and then click the Add button.
101
R4CB860html.bk Rev. FSPC.FM A5 size10/19/04
L Proof Sign-off:KOW N.Mizuno H.TomizawaT.TakahashiNOC K. Lee
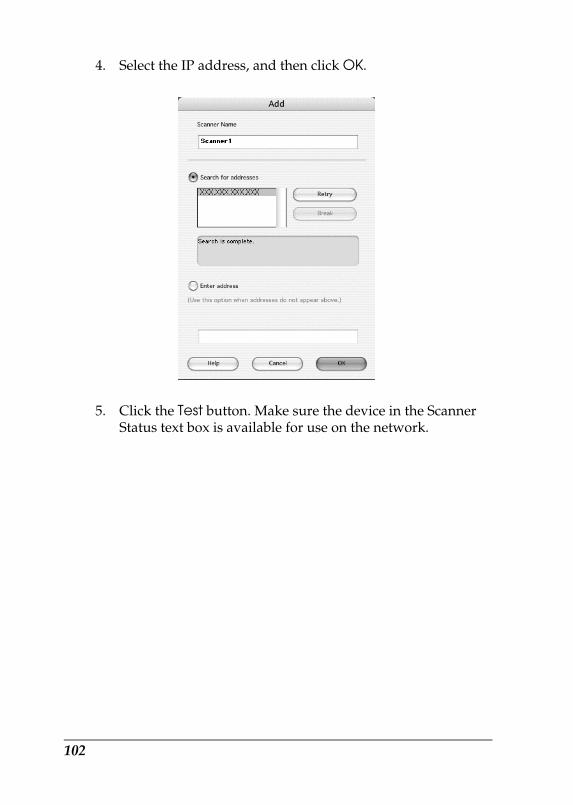
4. Select the IP address, and then click OK.
5. Click the Test button. Make sure the device in the Scanner Status text box is available for use on the network.
102
R4CB860html.bk Rev. FSPC.FM A5 size10/19/04
RProof Sign-off:KOW N.Mizuno H.TomizawaT.TakahashiNOC K. Lee
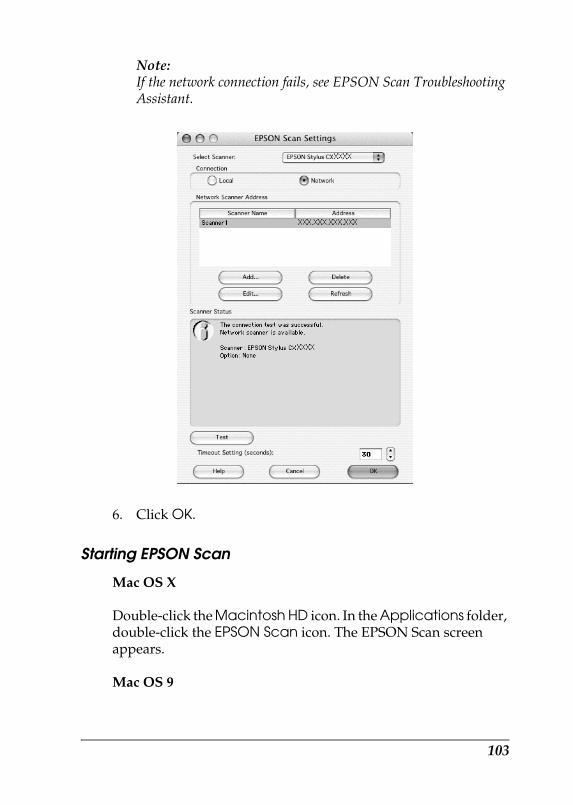
Note:If the network connection fails, see EPSON Scan Troubleshooting Assistant.
6. Click OK.
Starting EPSON Scan
Mac OS X
Double-click the Macintosh HD icon. In the Applications folder, double-click the EPSON Scan icon. The EPSON Scan screen appears.
Mac OS 9
103

R4CB860html.bk Rev. FSPC.FM A5 size10/19/04
L Proof Sign-off:KOW N.Mizuno H.TomizawaT.TakahashiNOC K. Lee
From the Apple menu, select EPSON Scan. The EPSON Scan screen appears.
Note for Mac OS X and 9:❏ If EPSON Scan does not start, see “Making settings for EPSON
Scan” for details.
❏ You cannot start Smart Panel on the computer by pushing the button on the LCD panel of the all-in-one via a wireless network.
Getting information through the online help
EPSON Scan has an online help that provides you with instructions on scanning and making driver settings.
Click Help in any of the dialog boxes in EPSON Scan.
104

R4CB860html.bk Rev. FINSTL.FM A5 size10/19/04
RProof Sign-off:KOW N.Mizuno H.TomizawaT.TakahashiNOC K. Lee
Installing the Printer Driver
About Installing the Printer Driver
To print to the network device, you need to install the printer driver on the computer. See the section appropriate for your operating system.
“Windows XP”
“Windows Me/98”
“Windows Server 2003”
“Windows 2000”
“Macintosh”
“OS/2”
Windows XP
For Windows XP, the printer driver installation procedure differs depending on the printing method you prefer. Epson recommends printing with EpsonNet Print. See “For Windows XP/Server 2003/2000/NT 4.0 Users”.
LPR printing
Note:If you are using EpsonNet Print, the setup procedure is different. See “About EpsonNet Print” for details.
105
R4CB860html.bk Rev. FINSTL.FM A5 size10/19/04
L Proof Sign-off:KOW N.Mizuno H.TomizawaT.TakahashiNOC K. Lee
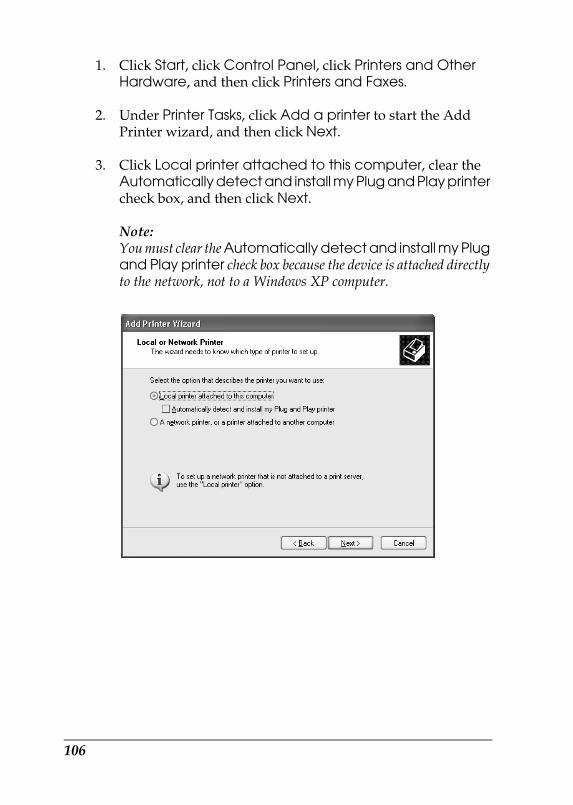
1. Click Start, click Control Panel, click Printers and Other Hardware, and then click Printers and Faxes.
2. Under Printer Tasks, click Add a printer to start the Add Printer wizard, and then click Next.
3. Click Local printer attached to this computer, clear the Automatically detect and install my Plug and Play printer check box, and then click Next.
Note:You must clear the Automatically detect and install my Plug and Play printer check box because the device is attached directly to the network, not to a Windows XP computer.
106
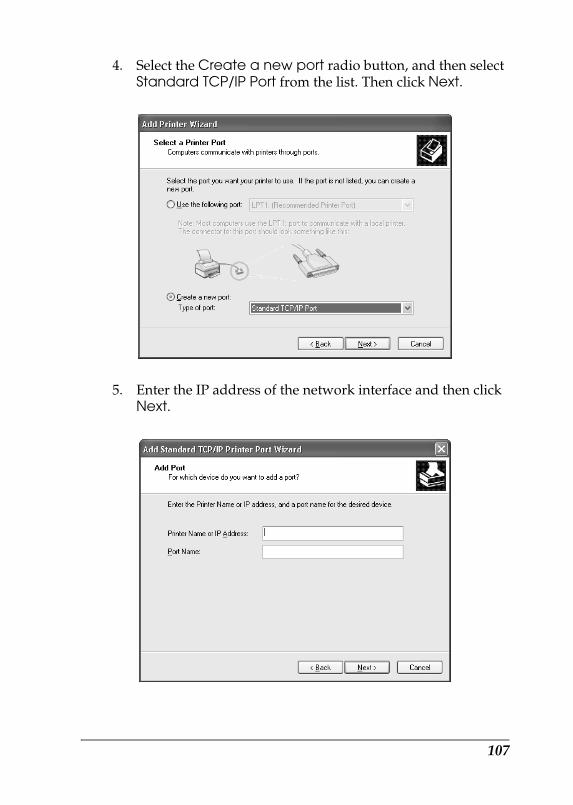
R4CB860html.bk Rev. FINSTL.FM A5 size10/19/04
RProof Sign-off:KOW N.Mizuno H.TomizawaT.TakahashiNOC K. Lee
4. Select the Create a new port radio button, and then select Standard TCP/IP Port from the list. Then click Next.
5. Enter the IP address of the network interface and then click Next.
107
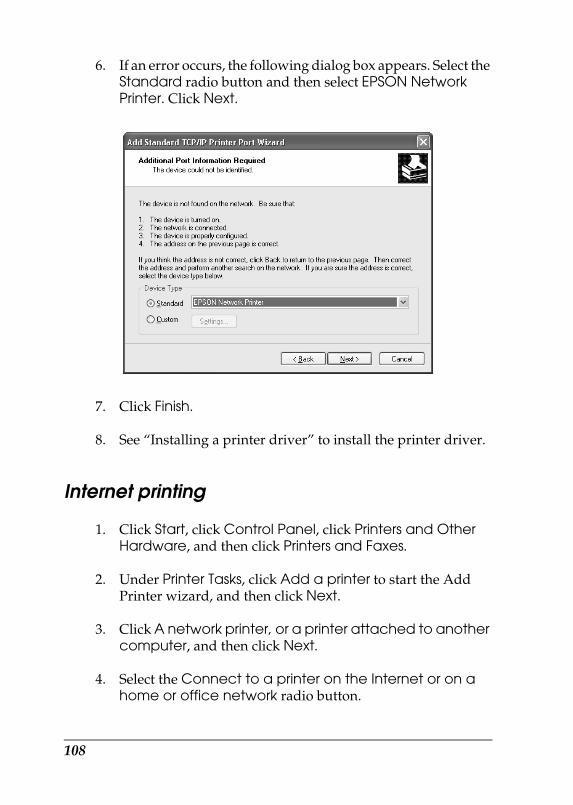
R4CB860html.bk Rev. FINSTL.FM A5 size10/19/04
L Proof Sign-off:KOW N.Mizuno H.TomizawaT.TakahashiNOC K. Lee
6. If an error occurs, the following dialog box appears. Select the Standard radio button and then select EPSON Network Printer. Click Next.
7. Click Finish.
8. See “Installing a printer driver” to install the printer driver.
Internet printing
1. Click Start, click Control Panel, click Printers and Other Hardware, and then click Printers and Faxes.
2. Under Printer Tasks, click Add a printer to start the Add Printer wizard, and then click Next.
3. Click A network printer, or a printer attached to another computer, and then click Next.
4. Select the Connect to a printer on the Internet or on a home or office network radio button.
108

R4CB860html.bk Rev. FINSTL.FM A5 size10/19/04
RProof Sign-off:KOW N.Mizuno H.TomizawaT.TakahashiNOC K. Lee
5. Enter the URL of the target device using the format below. The URL should be same as the URL you set on EpsonNet Config’s IPP configuration page.
http://IP address of network interface:631/Printer name
Example: http://192.168.100.201:631/EPSON_IPP_Printer
Note:To check the IP address of the network interface, use EpsonNet Config. See “About EpsonNet Config” for details.
6. Follow the on-screen instructions to set up the device. See “Installing a printer driver” if necessary.
Microsoft Network Shared printing
1. Click Start, click Control Panel, click Printers and Other Hardware, and then click Printers and Faxes.
109

R4CB860html.bk Rev. FINSTL.FM A5 size10/19/04
L Proof Sign-off:KOW N.Mizuno H.TomizawaT.TakahashiNOC K. Lee
2. Under Printer Tasks, click Add a printer to start the Add Printer wizard, and then click Next.
3. Click A network printer, or a printer attached to another computer, and then click Next.
4. Select the Browse for a printer radio button, and then click Next.
5. Enter the following in the Printer box or select the device you want to use from the Shared printers list box, and then click Next.
\\NetBIOS name of network interface\Device name of network interface
6. Follow the on-screen instructions to set up the device. See “Installing a printer driver” if necessary.
Installing a printer driver
1. Insert the Software CD-ROM shipped with the device.
2. Close the EPSON Software Installation screen if it appears.
3. Click the Have Disk button. The Install From Disk dialog box appears.
4. Click Browse.
5. Select the CD-ROM drive for Drives, and double-click the WINXP_2K folder. Click Open.
6. Click OK in the Install From Disk dialog box.
7. Select the model name of the device, and then click Next.
110
R4CB860html.bk Rev. FINSTL.FM A5 size10/19/04
RProof Sign-off:KOW N.Mizuno H.TomizawaT.TakahashiNOC K. Lee
Note:If the Add Printer wizard prompts you to select either Keep existing driver or Replace existing driver, be sure to select the Replace existing driver radio button.
8. Click Finish and follow the on-screen instructions to complete the setup.
When you print using Microsoft Network Shared printing in the Windows XP/Server 2003/2000/NT environment, see “Using the NET USE command” for more details.
Note for Windows users
Follow the steps below after installing the printer driver. You can use EPSON Status Monitor 3 via the wireless network.
1. Insert the Software CD-ROM in the CD-ROM drive.
If the Installer dialog box appears automatically, click the Exit button.
2. Double-click the CD-ROM drive.
3. In the ENGLISH folder, open the APPS folder, and then open the AddNet folder.
111
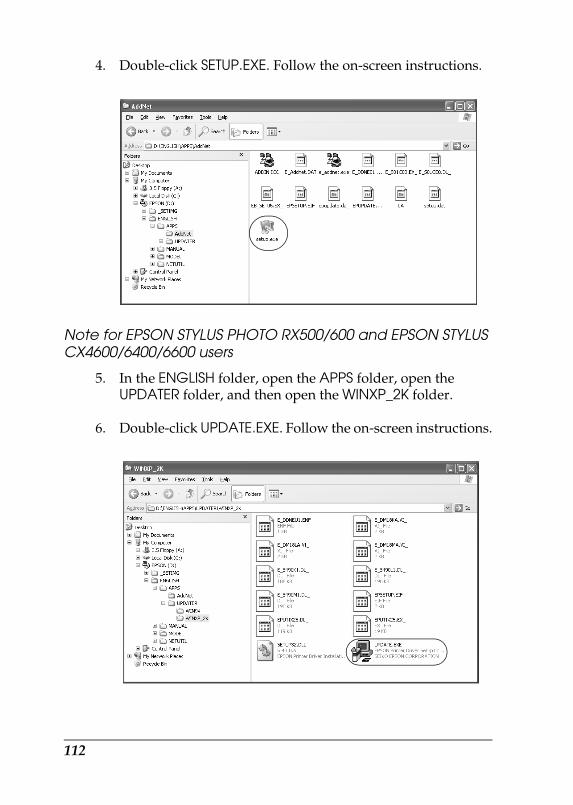
R4CB860html.bk Rev. FINSTL.FM A5 size10/19/04
L Proof Sign-off:KOW N.Mizuno H.TomizawaT.TakahashiNOC K. Lee
4. Double-click SETUP.EXE. Follow the on-screen instructions.
Note for EPSON STYLUS PHOTO RX500/600 and EPSON STYLUS CX4600/6400/6600 users
5. In the ENGLISH folder, open the APPS folder, open the UPDATER folder, and then open the WINXP_2K folder.
6. Double-click UPDATE.EXE. Follow the on-screen instructions.
112
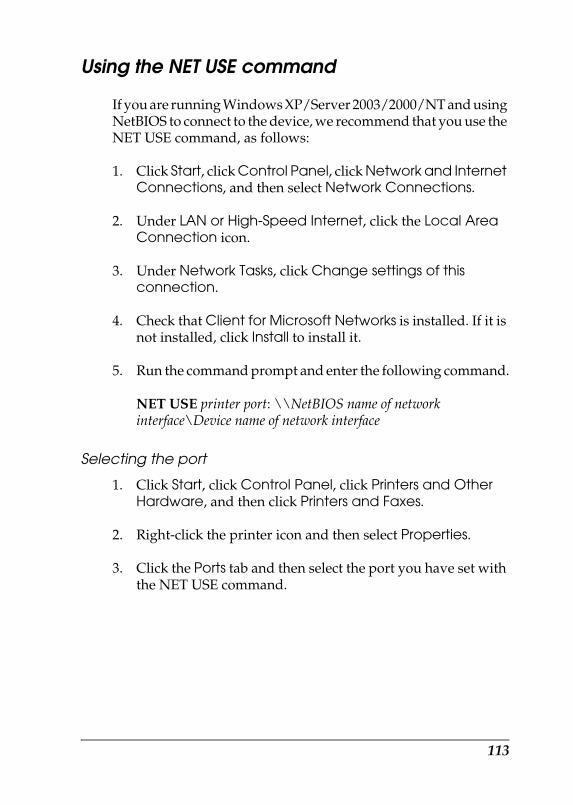
R4CB860html.bk Rev. FINSTL.FM A5 size10/19/04
RProof Sign-off:KOW N.Mizuno H.TomizawaT.TakahashiNOC K. Lee
Using the NET USE command
If you are running Windows XP/Server 2003/2000/NT and using NetBIOS to connect to the device, we recommend that you use the NET USE command, as follows:
1. Click Start, click Control Panel, click Network and Internet Connections, and then select Network Connections.
2. Under LAN or High-Speed Internet, click the Local Area Connection icon.
3. Under Network Tasks, click Change settings of this connection.
4. Check that Client for Microsoft Networks is installed. If it is not installed, click Install to install it.
5. Run the command prompt and enter the following command.
NET USE printer port: \\NetBIOS name of network interface\Device name of network interface
Selecting the port
1. Click Start, click Control Panel, click Printers and Other Hardware, and then click Printers and Faxes.
2. Right-click the printer icon and then select Properties.
3. Click the Ports tab and then select the port you have set with the NET USE command.
113
R4CB860html.bk Rev. FINSTL.FM A5 size10/19/04
L Proof Sign-off:KOW N.Mizuno H.TomizawaT.TakahashiNOC K. Lee
Windows Me/98
For Windows Me/98, the printer driver installation procedure differs depending on the printing method you prefer. Epson recommends printing with EpsonNet Print. See “For Windows Me/98/95 Users”.
LPR printing
Since Windows Me/98 does not support LPR, standard TCP/IP printing cannot be used. However, you can print via TCP/IP using the EpsonNet Print utility included on the Software CD-ROM. First, install EpsonNet Print. Then, install the printer driver. See “About EpsonNet Print” for more details.
Internet printing (Windows 98)
Internet printing is possible by using the EpsonNet Internet Print utility included on the Software CD-ROM. First, install EpsonNet Internet Print. Then, install the printer driver and set the printer port. See “About EpsonNet Internet Print” for more details.
Internet printing (Windows Me)
Installing the IPP client
The IPP client must be installed on your computer. Follow the steps below to install it.
1. Insert the Windows Me CD-ROM.
2. Select the add-ons folder, and then select the IPP folder.
114
R4CB860html.bk Rev. FINSTL.FM A5 size10/19/04
RProof Sign-off:KOW N.Mizuno H.TomizawaT.TakahashiNOC K. Lee
3. Double-click wpnpins.exe. Then follow the on-screen instructions.
4. Click OK to restart your computer.
Setting up the device
Connect your computer to a device through IPP.
1. Click Start, point to Settings, and then select Printers.
2. Double-click Add Printer, and then click Next.
3. Select the Network Printer radio button, and then click Next.
4. Type the URL of the device, and then click Next.
http://IP address of network interface:631/printer name
Example: http://192.168.100.201:631/EPSON_IPP_Printer
Note:To check the IP address of the network interface, use EpsonNet Config. See “About EpsonNet Config” for details.
5. See “Installing a printer driver” to install the printer driver.
Microsoft Network Shared printing
1. Click Start, point to Settings, and then select Printers.
2. Double-click Add Printer, and then click Next.
3. Select the Network Printer radio button, and then click Next.
4. Click Browse, and then select the network path from the list. If you cannot browse, enter the following in the Network path or queue name box.
115
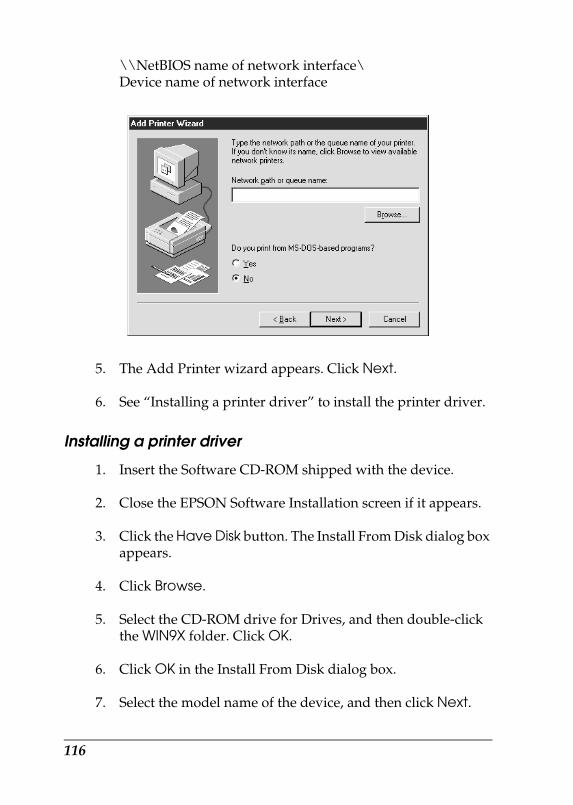
R4CB860html.bk Rev. FINSTL.FM A5 size10/19/04
L Proof Sign-off:KOW N.Mizuno H.TomizawaT.TakahashiNOC K. Lee
\\NetBIOS name of network interface\Device name of network interface
5. The Add Printer wizard appears. Click Next.
6. See “Installing a printer driver” to install the printer driver.
Installing a printer driver
1. Insert the Software CD-ROM shipped with the device.
2. Close the EPSON Software Installation screen if it appears.
3. Click the Have Disk button. The Install From Disk dialog box appears.
4. Click Browse.
5. Select the CD-ROM drive for Drives, and then double-click the WIN9X folder. Click OK.
6. Click OK in the Install From Disk dialog box.
7. Select the model name of the device, and then click Next.
116
R4CB860html.bk Rev. FINSTL.FM A5 size10/19/04
RProof Sign-off:KOW N.Mizuno H.TomizawaT.TakahashiNOC K. Lee
Note:If the Add Printer wizard prompts you to select either Keep existing driver or Replace existing driver, be sure to select the Replace existing driver radio button.
8. Click Finish and follow the on-screen instructions to complete the setup.
When you print using Microsoft Network Shared printing in the Windows XP/Server 2003/2000/NT environment, see “Using the NET USE command” for more details.
Note for Windows users
Follow the steps below after installing the printer driver. You can use EPSON Status Monitor 3 via the wireless network.
1. Insert the Software CD-ROM in the CD-ROM drive.
If the Installer dialog box appears automatically, click the Exit button.
2. Double-click the CD-ROM drive.
3. In the ENGLISH folder, open the APPS folder, and then open the AddNet folder.
4. Double-click SETUP.EXE. Follow the on-screen instructions.
Note for EPSON STYLUS PHOTO RX500/600 and EPSON STYLUS CX4600/6400/6600 users
5. In the ENGLISH folder, open the APPS folder, open the UPDATER folder, and then open the WIN9X folder.
6. Double-click UPDATE.EXE. Follow the on-screen instructions.
117

R4CB860html.bk Rev. FINSTL.FM A5 size10/19/04
L Proof Sign-off:KOW N.Mizuno H.TomizawaT.TakahashiNOC K. Lee
Using the NET USE command
If you are running Windows XP/Server 2003/2000/NT and using NetBIOS to connect to the device, we recommend that you use the NET USE command, as follows:
1. Right-click the Network Neighborhood icon or My Network Places icon and then select Properties.
2. Check that Client for Microsoft Networks is in the Components list. If it is not installed, click Add to install it.
3. Run the command prompt and enter the following command.
NET USE printer port: \\NetBIOS name of network interface\Device name of network interface
Selecting the port
1. Click Start, point to Settings, and then select Printers.
2. Right-click the printer icon and select Properties.
3. Click the Details tab and select the port you have set with the NET USE command.
Windows Server 2003
For Windows Server 2003, the printer driver installation procedure differs depending on the printing method you prefer. Epson recommends printing with EpsonNet Print. See “For Windows XP/Server 2003/2000/NT 4.0 Users”.
118
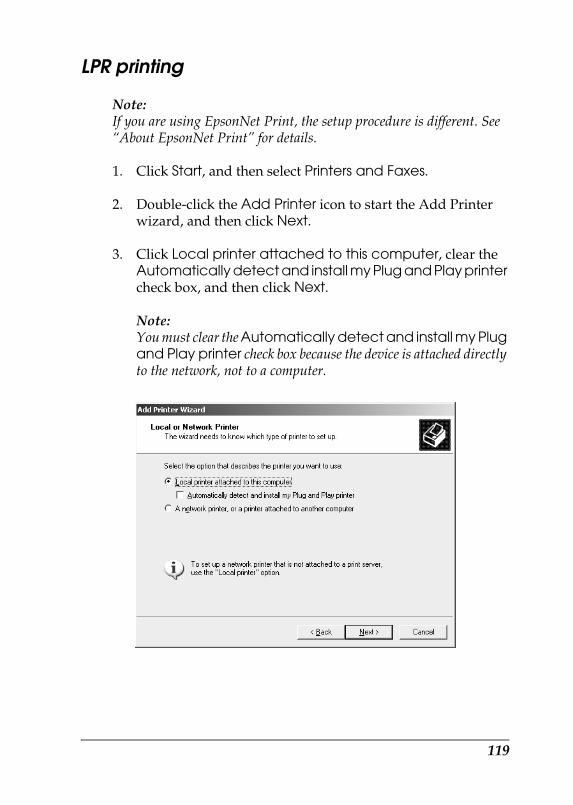
R4CB860html.bk Rev. FINSTL.FM A5 size10/19/04
RProof Sign-off:KOW N.Mizuno H.TomizawaT.TakahashiNOC K. Lee
LPR printing
Note:If you are using EpsonNet Print, the setup procedure is different. See “About EpsonNet Print” for details.
1. Click Start, and then select Printers and Faxes.
2. Double-click the Add Printer icon to start the Add Printer wizard, and then click Next.
3. Click Local printer attached to this computer, clear the Automatically detect and install my Plug and Play printer check box, and then click Next.
Note:You must clear the Automatically detect and install my Plug and Play printer check box because the device is attached directly to the network, not to a computer.
119
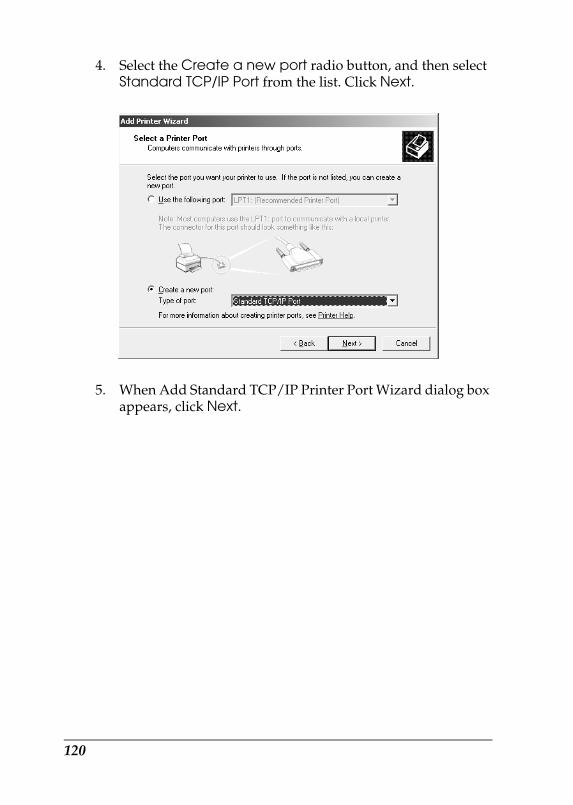
R4CB860html.bk Rev. FINSTL.FM A5 size10/19/04
L Proof Sign-off:KOW N.Mizuno H.TomizawaT.TakahashiNOC K. Lee
4. Select the Create a new port radio button, and then select Standard TCP/IP Port from the list. Click Next.
5. When Add Standard TCP/IP Printer Port Wizard dialog box appears, click Next.
120
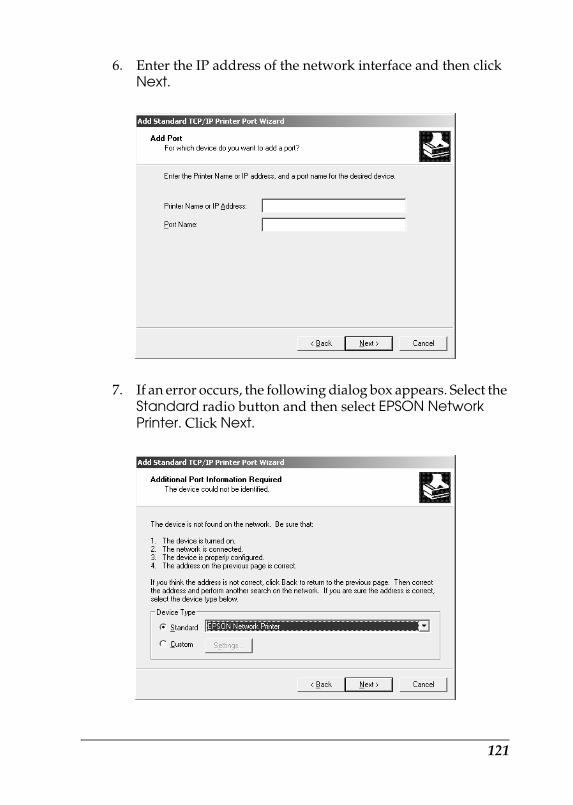
R4CB860html.bk Rev. FINSTL.FM A5 size10/19/04
RProof Sign-off:KOW N.Mizuno H.TomizawaT.TakahashiNOC K. Lee
6. Enter the IP address of the network interface and then click Next.
7. If an error occurs, the following dialog box appears. Select the Standard radio button and then select EPSON Network Printer. Click Next.
121
R4CB860html.bk Rev. FINSTL.FM A5 size10/19/04
L Proof Sign-off:KOW N.Mizuno H.TomizawaT.TakahashiNOC K. Lee
8. Click Finish.
9. See “Installing a printer driver” to install the printer driver.
Internet printing
1. Click Start, and then select Printers and Faxes.
2. Double-click the Add Printer icon to start the Add Printer wizard, and then click Next.
3. Select A network printer, or a printer attached to another computer, and then click Next.
4. Select the Connect to a printer on the Internet or on a home or office network radio button.
5. Enter the URL of the target device using the format below. The URL must be the same URL you set on EpsonNet Config’s IPP configuration page.
http://IP address of network interface:631/Printer name
122
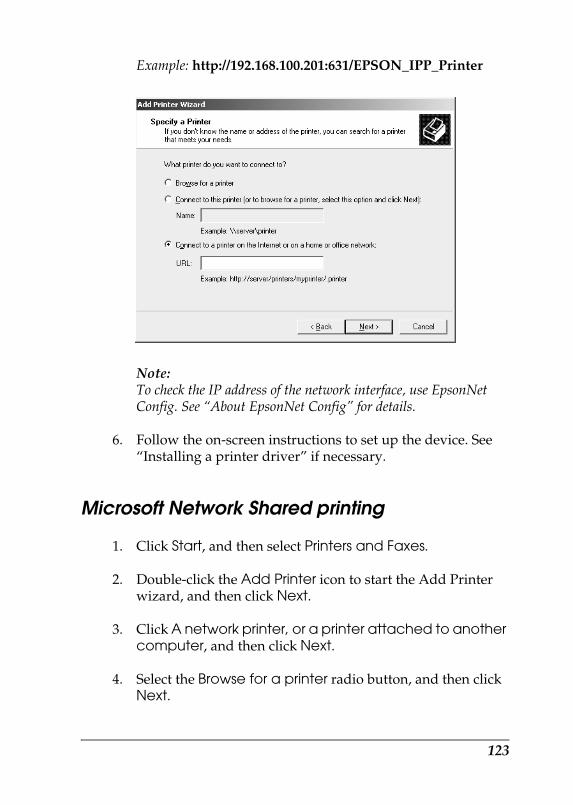
R4CB860html.bk Rev. FINSTL.FM A5 size10/19/04
RProof Sign-off:KOW N.Mizuno H.TomizawaT.TakahashiNOC K. Lee
Example: http://192.168.100.201:631/EPSON_IPP_Printer
Note:To check the IP address of the network interface, use EpsonNet Config. See “About EpsonNet Config” for details.
6. Follow the on-screen instructions to set up the device. See “Installing a printer driver” if necessary.
Microsoft Network Shared printing
1. Click Start, and then select Printers and Faxes.
2. Double-click the Add Printer icon to start the Add Printer wizard, and then click Next.
3. Click A network printer, or a printer attached to another computer, and then click Next.
4. Select the Browse for a printer radio button, and then click Next.
123
R4CB860html.bk Rev. FINSTL.FM A5 size10/19/04
L Proof Sign-off:KOW N.Mizuno H.TomizawaT.TakahashiNOC K. Lee
5. Enter the following in the Printer box or select the device you want to use from the Shared printers list box. Click Next.
\\NetBIOS name of network interface\Device name of network interface
6. Follow the on-screen instructions to set up the device. See “Installing a printer driver” if necessary.
Installing a printer driver
1. Insert the Software CD-ROM shipped with the device.
2. Close the EPSON Software Installation screen if it appears.
3. Click the Have Disk button. The Install From Disk dialog box appears.
4. Click Browse.
5. Select the CD-ROM drive for Drives, and then double-click the WinXP_2K or WIN2000 folder. Click Open.
6. Click OK in the Install From Disk dialog box.
7. Select the model name of the device, and then click Next.
Note:If the Add Printer wizard prompts you to select either Keep existing driver or Replace existing driver, be sure to select the Replace existing driver radio button.
8. Click Finish and then follow the on-screen instructions to complete the setup.
When you print using Microsoft Network Shared printing in the Windows XP/Server 2003/2000/NT environment, see “Using the NET USE command” for more details.
124
R4CB860html.bk Rev. FINSTL.FM A5 size10/19/04
RProof Sign-off:KOW N.Mizuno H.TomizawaT.TakahashiNOC K. Lee
Using the NET USE command
If you are running Windows XP/Server 2003/2000/NT and using NetBIOS to connect to the device, we recommend that you use the NET USE command, as follows:
1. Click Start, point to Control Panel, and then select Network Connections. Click Local Area Connections.
2. Click the Properties button.
3. Check that Client for Microsoft Networks is installed. If necessary, click Install to install it.
4. Run the command prompt and then enter the following command.
NET USE printer port: \\NetBIOS name of network interface\Device name of network interface
Selecting the port
1. Click Start, and then select Printers and Faxes.
2. Right-click the printer icon and then select Properties.
3. Click the Ports tab and then select the port you have set using the NET USE command.
Windows 2000
For Windows 2000, the printer driver installation procedure differs depending on the printing method you prefer. Epson recommends printing with EpsonNet Print. See “For Windows XP/Server 2003/2000/NT 4.0 Users”.
125
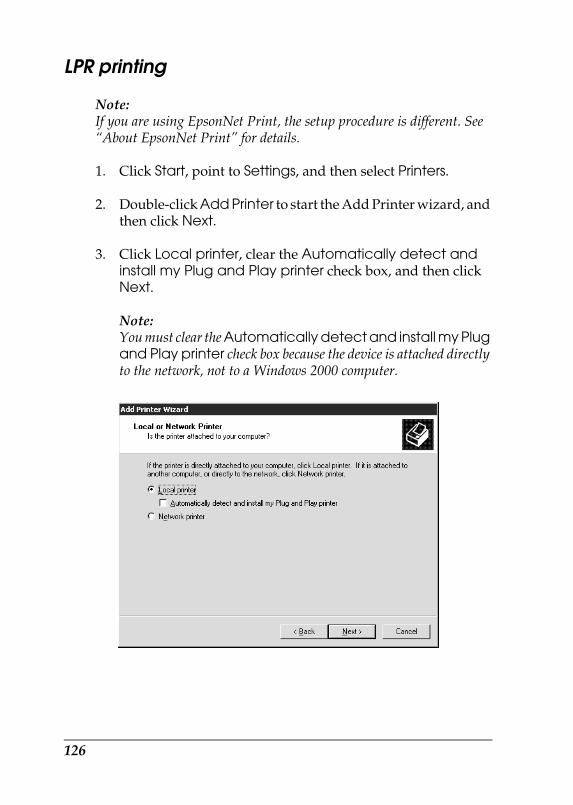
R4CB860html.bk Rev. FINSTL.FM A5 size10/19/04
L Proof Sign-off:KOW N.Mizuno H.TomizawaT.TakahashiNOC K. Lee
LPR printing
Note:If you are using EpsonNet Print, the setup procedure is different. See “About EpsonNet Print” for details.
1. Click Start, point to Settings, and then select Printers.
2. Double-click Add Printer to start the Add Printer wizard, and then click Next.
3. Click Local printer, clear the Automatically detect and install my Plug and Play printer check box, and then click Next.
Note:You must clear the Automatically detect and install my Plug and Play printer check box because the device is attached directly to the network, not to a Windows 2000 computer.
126
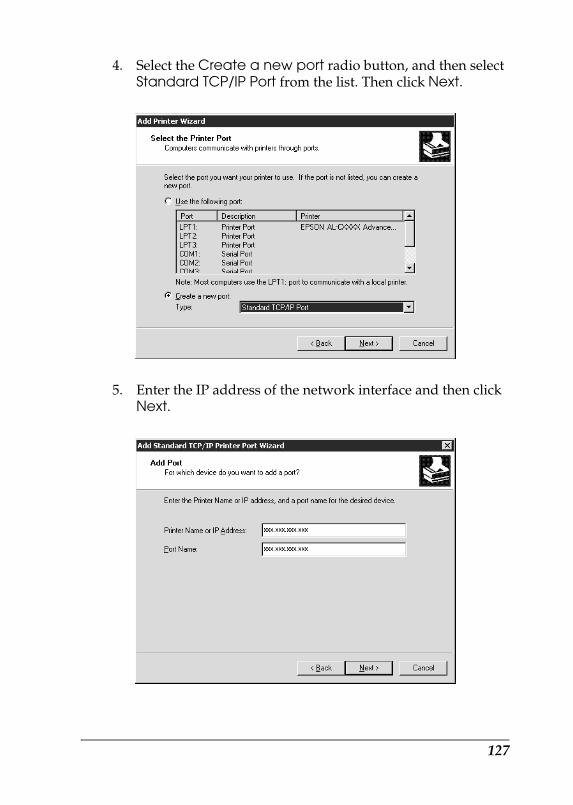
R4CB860html.bk Rev. FINSTL.FM A5 size10/19/04
RProof Sign-off:KOW N.Mizuno H.TomizawaT.TakahashiNOC K. Lee
4. Select the Create a new port radio button, and then select Standard TCP/IP Port from the list. Then click Next.
5. Enter the IP address of the network interface and then click Next.
127
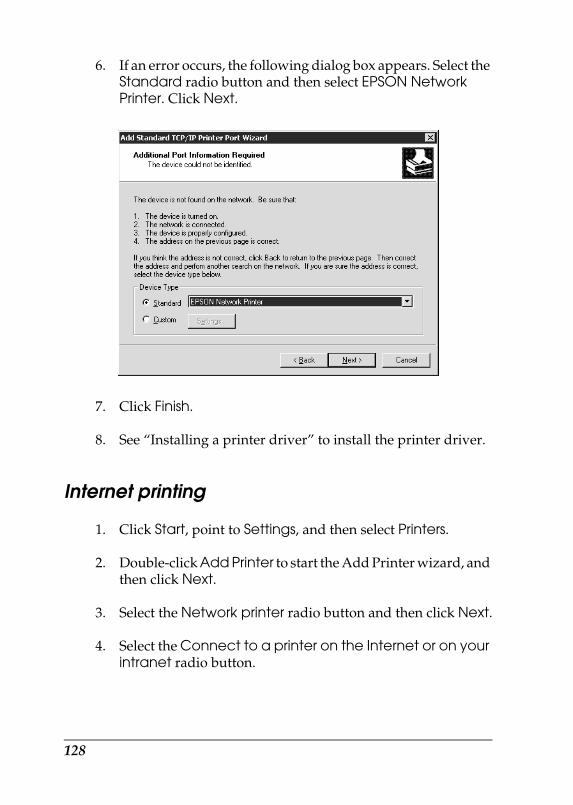
R4CB860html.bk Rev. FINSTL.FM A5 size10/19/04
L Proof Sign-off:KOW N.Mizuno H.TomizawaT.TakahashiNOC K. Lee
6. If an error occurs, the following dialog box appears. Select the Standard radio button and then select EPSON Network Printer. Click Next.
7. Click Finish.
8. See “Installing a printer driver” to install the printer driver.
Internet printing
1. Click Start, point to Settings, and then select Printers.
2. Double-click Add Printer to start the Add Printer wizard, and then click Next.
3. Select the Network printer radio button and then click Next.
4. Select the Connect to a printer on the Internet or on your intranet radio button.
128
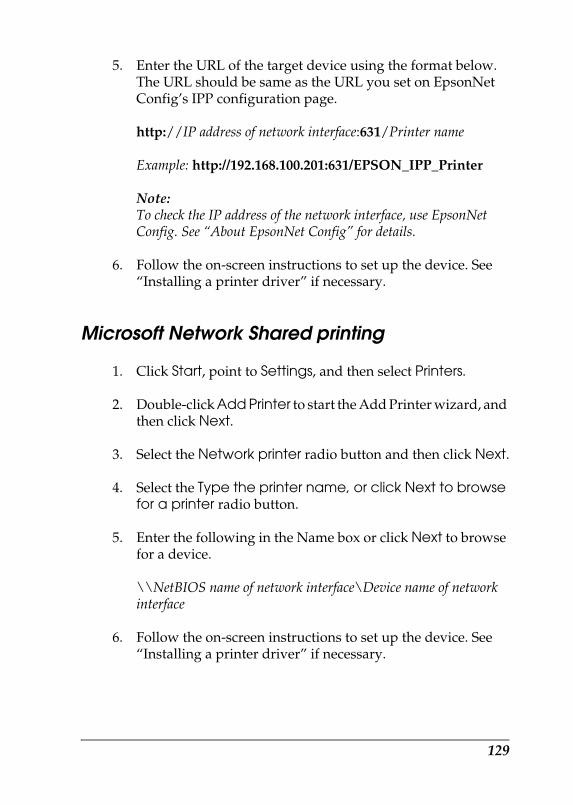
R4CB860html.bk Rev. FINSTL.FM A5 size10/19/04
RProof Sign-off:KOW N.Mizuno H.TomizawaT.TakahashiNOC K. Lee
5. Enter the URL of the target device using the format below. The URL should be same as the URL you set on EpsonNet Config’s IPP configuration page.
http://IP address of network interface:631/Printer name
Example: http://192.168.100.201:631/EPSON_IPP_Printer
Note:To check the IP address of the network interface, use EpsonNet Config. See “About EpsonNet Config” for details.
6. Follow the on-screen instructions to set up the device. See “Installing a printer driver” if necessary.
Microsoft Network Shared printing
1. Click Start, point to Settings, and then select Printers.
2. Double-click Add Printer to start the Add Printer wizard, and then click Next.
3. Select the Network printer radio button and then click Next.
4. Select the Type the printer name, or click Next to browse for a printer radio button.
5. Enter the following in the Name box or click Next to browse for a device.
\\NetBIOS name of network interface\Device name of network interface
6. Follow the on-screen instructions to set up the device. See “Installing a printer driver” if necessary.
129
R4CB860html.bk Rev. FINSTL.FM A5 size10/19/04
L Proof Sign-off:KOW N.Mizuno H.TomizawaT.TakahashiNOC K. Lee
Installing a printer driver
1. Insert the Software CD-ROM shipped with the device.
2. Close the EPSON Software Installation screen if it appears.
3. Click the Have Disk button. The Install From Disk dialog box appears.
4. Click Browse.
5. Select the CD-ROM drive for Drives, and double-click the WINXP_2K or WIN2000 folder. Click Open.
6. Click OK in the Install From Disk dialog box.
7. Select the model name of the device, and then click Next.
Note:If the Add Printer wizard prompts you to select either Keep existing driver or Replace existing driver, be sure to select the Replace existing driver radio button.
8. Click Finish and follow the on-screen instructions to complete the setup.
When you print using Microsoft Network Shared printing in the Windows XP/Server 2003/2000/NT environment, see “Using the NET USE command” for more details.
Note for Windows users
Follow the steps below after installing the printer driver. You can use EPSON Status Monitor 3 via the wireless network.
1. Insert the Software CD-ROM in the CD-ROM drive.
If the Installer dialog box appears automatically, click the Exit button.
130
R4CB860html.bk Rev. FINSTL.FM A5 size10/19/04
RProof Sign-off:KOW N.Mizuno H.TomizawaT.TakahashiNOC K. Lee
2. Double-click the CD-ROM drive.
3. In the ENGLISH folder, open the APPS folder, and then open the AddNet folder.
4. Double-click SETUP.EXE. Follow the on-screen instructions.
Note for EPSON STYLUS PHOTO RX500/600 and EPSON STYLUS CX4600/6400/6600 users
5. In the ENGLISH folder, open the APPS folder, open the UPDATER folder, and then open the WINXP_2K folder.
6. Double-click UPDATE.EXE. Follow the on-screen instructions.
Using the NET USE command
If you are running Windows XP/Server 2003/2000/NT and using NetBIOS to connect to the device, we recommend that you use the NET USE command, as follows:
1. Right-click the My Network Places icon and then select Properties.
2. Right-click the Local Area Connections icon and then select Properties.
3. Check that Client for Microsoft Networks is in the Components list. If it is not installed, click Install to install it.
4. Run the command prompt and enter the following command.
NET USE printer port: \\NetBIOS name of network interface\Device name of network interface
Selecting the port
1. Click Start, point to Settings, and then select Printers.
131
R4CB860html.bk Rev. FINSTL.FM A5 size10/19/04
L Proof Sign-off:KOW N.Mizuno H.TomizawaT.TakahashiNOC K. Lee
2. Right-click the printer icon and then select Properties.
3. Click the Ports tab and then select the port you have set with the NET USE command.
Macintosh
Follow the steps below to set a device.
Note:Make sure that the printer driver is installed on your Macintosh before following the steps below. See the manual shipped with your device for instructions on how to install the printer driver.
Mac OS X
Rendezvous printing
1. Open the Applications folder.
2. Open the Utilities folder.
3. Open Print Center (for Mac OS X 10.2 or below) or Printer Setup Utility (for Mac OS X 10.3), and then click Add.
4. Select Rendezvous from the drop-down list.
5. Select the device model from the list.
6. Click Add.
TCP/IP printing
1. Open the Applications folder.
132
R4CB860html.bk Rev. FINSTL.FM A5 size10/19/04
RProof Sign-off:KOW N.Mizuno H.TomizawaT.TakahashiNOC K. Lee
2. Open the Utilities folder.
3. Open Print Center (for Mac OS X 10.2 or below) or Printer Setup Utility (for Mac OX 10.3), and then click Add.
4. Select EPSON TCP/IP from the drop down list.
5. Select the printer model from the list.
6. Click Add.
AppleTalk printing
1. Open the Applications folder.
2. Open the Utilities folder.
3. Open Print Center (for Mac OS X 10.2 or below) or Printer Setup Utility (for Mac OS X 10.3), and then click Add.
4. Select EPSON AppleTalk from the drop down list.
5. Select the zone from the drop down list.
6. Select the printer name from the list.
7. Click Add.
Mac OS 9
AppleTalk printing
1. Open Chooser from the Apple menu.
2. Click the printer icon.
3. Select the zone containing the printer.
133
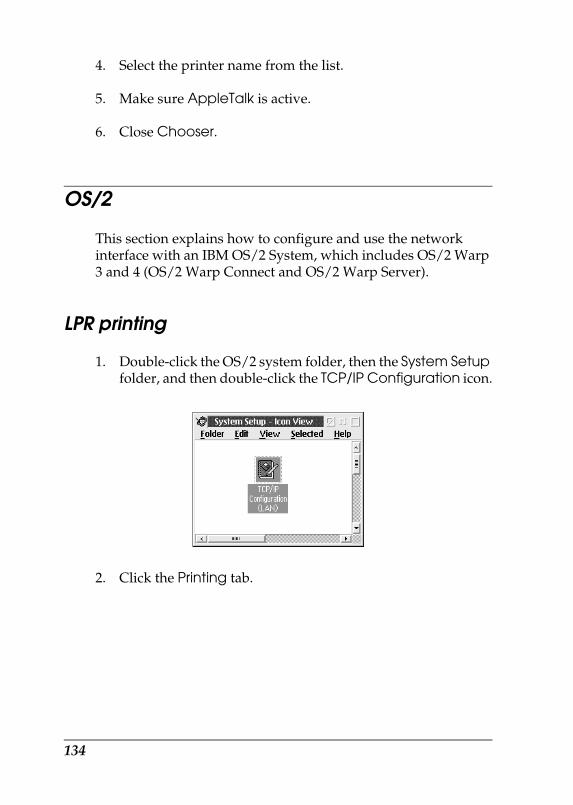
R4CB860html.bk Rev. FINSTL.FM A5 size10/19/04
L Proof Sign-off:KOW N.Mizuno H.TomizawaT.TakahashiNOC K. Lee
4. Select the printer name from the list.
5. Make sure AppleTalk is active.
6. Close Chooser.
OS/2
This section explains how to configure and use the network interface with an IBM OS/2 System, which includes OS/2 Warp 3 and 4 (OS/2 Warp Connect and OS/2 Warp Server).
LPR printing
1. Double-click the OS/2 system folder, then the System Setup folder, and then double-click the TCP/IP Configuration icon.
2. Click the Printing tab.
134
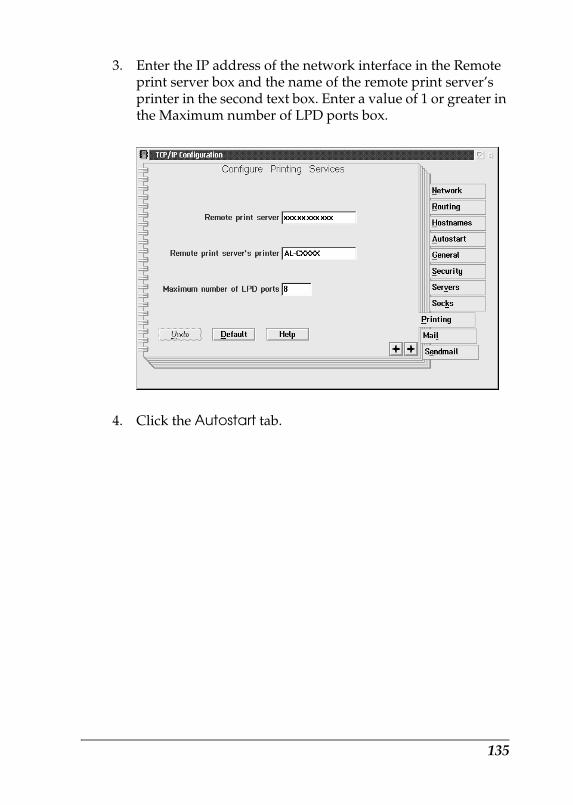
R4CB860html.bk Rev. FINSTL.FM A5 size10/19/04
RProof Sign-off:KOW N.Mizuno H.TomizawaT.TakahashiNOC K. Lee
3. Enter the IP address of the network interface in the Remote print server box and the name of the remote print server’s printer in the second text box. Enter a value of 1 or greater in the Maximum number of LPD ports box.
4. Click the Autostart tab.
135
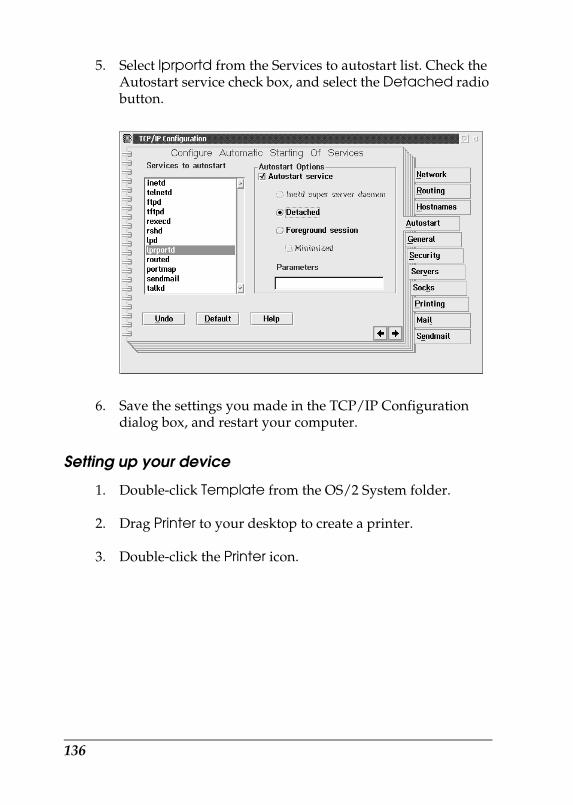
R4CB860html.bk Rev. FINSTL.FM A5 size10/19/04
L Proof Sign-off:KOW N.Mizuno H.TomizawaT.TakahashiNOC K. Lee
5. Select lprportd from the Services to autostart list. Check the Autostart service check box, and select the Detached radio button.
6. Save the settings you made in the TCP/IP Configuration dialog box, and restart your computer.
Setting up your device
1. Double-click Template from the OS/2 System folder.
2. Drag Printer to your desktop to create a printer.
3. Double-click the Printer icon.
136
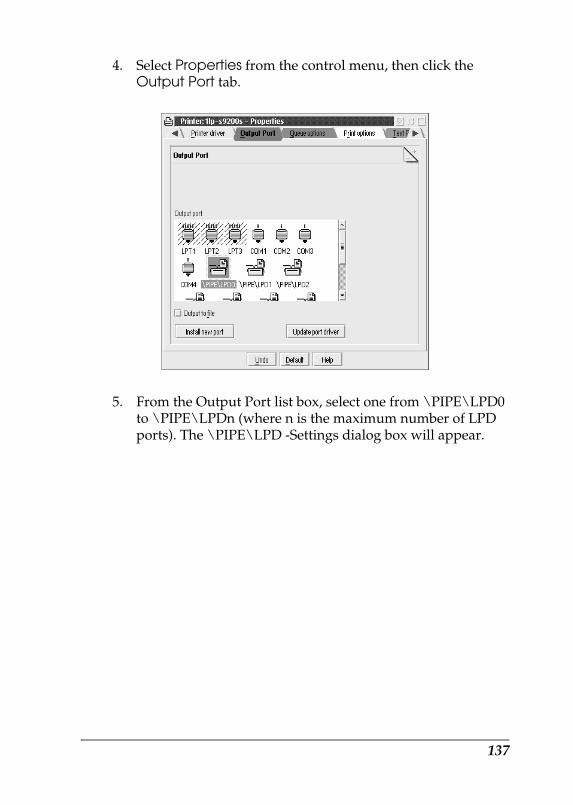
R4CB860html.bk Rev. FINSTL.FM A5 size10/19/04
RProof Sign-off:KOW N.Mizuno H.TomizawaT.TakahashiNOC K. Lee
4. Select Properties from the control menu, then click the Output Port tab.
5. From the Output Port list box, select one from \PIPE\LPD0 to \PIPE\LPDn (where n is the maximum number of LPD ports). The \PIPE\LPD -Settings dialog box will appear.
137
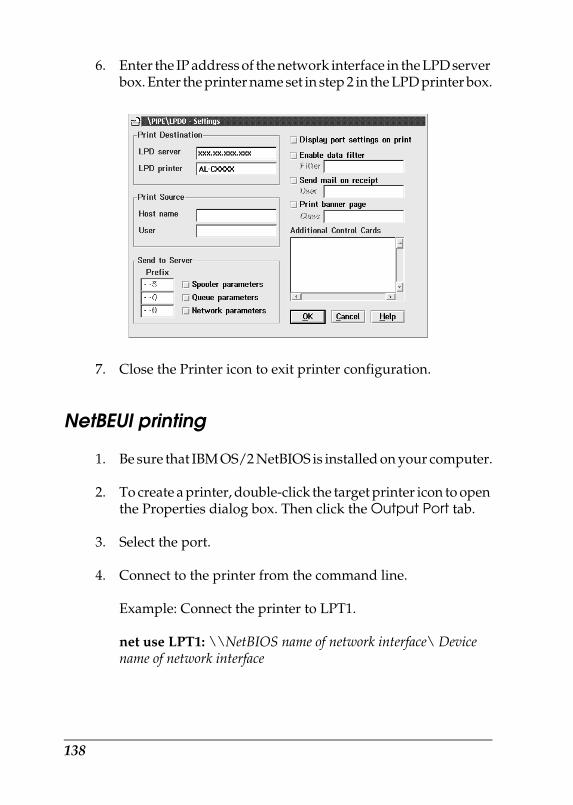
R4CB860html.bk Rev. FINSTL.FM A5 size10/19/04
L Proof Sign-off:KOW N.Mizuno H.TomizawaT.TakahashiNOC K. Lee
6. Enter the IP address of the network interface in the LPD server box. Enter the printer name set in step 2 in the LPD printer box.
7. Close the Printer icon to exit printer configuration.
NetBEUI printing
1. Be sure that IBM OS/2 NetBIOS is installed on your computer.
2. To create a printer, double-click the target printer icon to open the Properties dialog box. Then click the Output Port tab.
3. Select the port.
4. Connect to the printer from the command line.
Example: Connect the printer to LPT1.
net use LPT1: \\NetBIOS name of network interface\ Device name of network interface
138

R4CB860html.bk Rev. FINSTL.FM A5 size10/19/04
RProof Sign-off:KOW N.Mizuno H.TomizawaT.TakahashiNOC K. Lee
Note:To change the NetBIOS name and device name, use EpsonNet Config running on Windows.
139

R4CB860html.bk Rev. FINSTL.FM A5 size10/19/04
L Proof Sign-off:KOW N.Mizuno H.TomizawaT.TakahashiNOC K. Lee
140
R4CB860html.bk Rev. FEPWIN.FM A5 size10/19/04
RProof Sign-off:KOW N.Mizuno H.TomizawaT.TakahashiNOC K. Lee
Network Software
EpsonNet Config for Windows
About EpsonNet Config
EpsonNet Config is a Windows-based configuration software for administrators to configure the network interface for TCP/IP, NetWare, MS Network, AppleTalk, IPP, and SNMP.
Note:❏ Be sure to use EpsonNet Config included on the Software CD-ROM
shipped with this product.
❏ EpsonNet Config installed on Windows XP/Server 2003 does not support NetBEUI as a search protocol because officially the NetBEUI protocol is not supported on Windows XP/Server 2003.
❏ If you are using the device in a dial-up environment not running NetWare, clear the Use NetWare check box on the NetWare screen. If this check box is selected, the extra account may be charged when you use the dial-up router.
❏ When configuring the network interface for NetWare, use the IPX protocol and log in to the NetWare server or the NDS context with supervisor privileges.
❏ When you configure the network interface for NetWare 5.x, you must log in to the NetWare server using an IPX connection. If you log in to the NetWare server using an IP connection, the NetWare screen and the IPX trap setting of SNMP are not available.
141
R4CB860html.bk Rev. FEPWIN.FM A5 size10/19/04
L Proof Sign-off:KOW N.Mizuno H.TomizawaT.TakahashiNOC K. Lee
System Requirements
The following table lists the system requirements of EpsonNet Config.
Installing EpsonNet Config
Follow the steps below to install EpsonNet Config on your computer to configure the network interface.
Note:If you add or delete protocols or services from your operating system after installing EpsonNet Config, EpsonNet Config may not work correctly. If this happens, uninstall EpsonNet Config and then install it again.
1. Insert the Software CD-ROM in the CD-ROM drive.
If the Installer dialog box does not appear automatically, double-click EPSETUP.EXE on the CD-ROM.
2. In the Welcome screen, click the Next button.
3. Read the license agreement, and then click the Agree button.
Operating systems Windows XP Home Edition/Professional
Windows Me
Windows 98/98 Second Edition
Windows 95 OSR2 or higher
Windows Server 2003
Windows 2000 Server/Professional
Windows NT 4.0 Server/Workstation with Service Pack 5.0 or higher
Hard disk drive space 10 MB
142
R4CB860html.bk Rev. FEPWIN.FM A5 size10/19/04
RProof Sign-off:KOW N.Mizuno H.TomizawaT.TakahashiNOC K. Lee
4. Select Install Network Utility.
5. Click the Install button located next to EpsonNet Config.
6. Follow the on-screen instructions to complete the installation.
Note for Windows XP Service Pack 2 users:If the following screen appears after you start EpsonNet Config, click the Unblock button; otherwise the devices are not listed on the screen of EpsonNet Config.
Accessing the EpsonNet Config Reference Guide
The EpsonNet Config Reference Guide contains detailed information on EpsonNet Config. Follow the steps below to access the EpsonNet Config Reference Guide.
143

R4CB860html.bk Rev. FEPWIN.FM A5 size10/19/04
L Proof Sign-off:KOW N.Mizuno H.TomizawaT.TakahashiNOC K. Lee
1. Click Start, point to All Programs (for Windows XP/Server 2003 users) or Programs (for Windows Me/98/95/2000/NT 4.0 users), and then select EpsonNet. Click EpsonNet Config to start it.
2. From the Help menu, select EpsonNet Config Help.
The EpsonNet Config Reference Guide appears. By clicking the links on the left side of the screen, you can get information on using EpsonNet Config.
144
R4CB860html.bk Rev. FEPMAC.FM A5 size10/19/04
RProof Sign-off:KOW N.Mizuno H.TomizawaT.TakahashiNOC K. Lee
EpsonNet Config for Macintosh
About EpsonNet Config
EpsonNet Config for Macintosh is a Macintosh-based configuration software for administrators that allows you to configure the network interface for TCP/IP, AppleTalk, and IPP.
Note:Be sure to use EpsonNet Config included on the Software CD-ROM shipped with this product.
System Requirements
The following table lists the system requirements of EpsonNet Config.
Installing EpsonNet Config
Follow the steps below to install EpsonNet Config to configure the network interface.
1. Insert the Software CD-ROM in the CD-ROM drive.
2. Double-click the EPSON CD-ROM icon.
Operating systems Mac OS 10.x/9.x/8.x
Models PowerPC Macintosh
Hard disk drive space 10 MB
145
R4CB860html.bk Rev. FEPMAC.FM A5 size10/19/04
L Proof Sign-off:KOW N.Mizuno H.TomizawaT.TakahashiNOC K. Lee
3. Double-click the appropriate OS icon in the EPSON folder.
4. In the Welcome screen, click the Next button.
5. Read the license agreement, and then click the Agree button.
6. Select Install Network Utility.
7. Click the Install button located next to EpsonNet Config to install EpsonNet Config. Follow the on-screen instructions to complete the installation.
8. Restart your computer.
Accessing the EpsonNet Config Reference Guide
The EpsonNet Config Reference Guide contains detailed information on EpsonNet Config. Follow the steps below to access the EpsonNet Config Reference Guide.
146

R4CB860html.bk Rev. FEPMAC.FM A5 size10/19/04
RProof Sign-off:KOW N.Mizuno H.TomizawaT.TakahashiNOC K. Lee
1. Double-click the Macintosh HD icon. In the Applications folder, double-click the EpsonNet folder, and then double-click the EpsonNet Config folder. Finally, double-click the EpsonNet Config icon.
2. From the Help menu, select EpsonNet Config Help.
The EpsonNet Config Reference Guide appears. By clicking the links on the left side of the screen, you can get information on using EpsonNet Config.
147

R4CB860html.bk Rev. FEPMAC.FM A5 size10/19/04
L Proof Sign-off:KOW N.Mizuno H.TomizawaT.TakahashiNOC K. Lee
148
R4CB860html.bk Rev. FEPWEB.FM A5 size10/19/04
RProof Sign-off:KOW N.Mizuno H.TomizawaT.TakahashiNOC K. Lee
EpsonNet Config with Web Browser
About EpsonNet Config
EpsonNet Config with Web Browser is a Web-based utility designed to configure the network interface for use on a network.
By typing the IP address of the network interface for the URL in your browser, you can start EpsonNet Config to allow you to configure the network interface for TCP/IP, NetWare, MS Network, AppleTalk, IPP, and SNMP.
Supported Web browser
❏ Microsoft Internet Explorer version 4.0 or later
❏ Netscape Communicator version 4.0 or later
❏ Netscape Navigator version 3.02 or later
About Web browser setting
When running EpsonNet Config with Web Browser, be sure not to use a proxy server to access the Internet. If the Access the Internet using a proxy server check box is selected, you cannot use EpsonNet Config with Web Browser. Use the following steps to clear the Access the Internet using a proxy server check box.
1. Right-click the Internet Explorer icon on the desktop, and then select Properties.
2. Click the Connection tab.
149
R4CB860html.bk Rev. FEPWEB.FM A5 size10/19/04
L Proof Sign-off:KOW N.Mizuno H.TomizawaT.TakahashiNOC K. Lee
3. Clear the Access the Internet using a proxy server check box.
Configuring the Network Interface Using EpsonNet Config
After you have assigned an IP address to the network interface using EpsonNet EasyInstall, EpsonNet Config for Windows or Macintosh, or the arp/ping command, you can configure the network interface using Web-based EpsonNet Config.
Note:❏ A Web browser must be installed on your computer.
❏ TCP/IP must be correctly set for the computer and the network interface.
❏ Do not run both EpsonNet Config for Windows or Macintosh and Web-based EpsonNet Config at the same time.
❏ Your browser may restrict some characters you can use. For details, see your browser or operating system documentation.
❏ If you are using the dial-up environment and not using NetWare, select Disable on the NetWare screen. If Enable is selected, the extra account may be charged when you are using the dial-up router.
Follow the steps below to change the IP address using EpsonNet Config.
1. Turn on the device.
2. Run EpsonNet Config using one of the following ways.
❏ Run EpsonNet Config for Windows or Macintosh. Select the device you want to configure from the list and then click Launch Browser.
150
R4CB860html.bk Rev. FEPWEB.FM A5 size10/19/04
RProof Sign-off:KOW N.Mizuno H.TomizawaT.TakahashiNOC K. Lee
❏ Open your browser, and then type in the IP address of the network interface directly. Do not run EpsonNet Config for Windows or Macintosh.
http://IP address of network interface/
Example: http://192.168.100.201/
Note:To check the IP address of the network interface, use EpsonNet Config. For details, see “About EpsonNet Config” for Windows users, or “About EpsonNet Config” for Macintosh users.
Note on NetWare setting:❏ From any NetWare client, log in to the target NetWare server
or NDS context with supervisor privileges.
❏ You cannot create a print server, print queue, or printer with Web-based EpsonNet Config. You must create these objects before using Web-based EpsonNet Config.
3. Click TCP/IP under Network on the Configuration menu to display the TCP/IP setting screen.
Note:If you want to configure a protocol other than TCP/IP, see “Configuration - Network Screens”.
4. Select a method for acquiring the IP address. When you select Auto, DHCP becomes available and assigns an IP address automatically. If you want to set the IP address manually, select Manual.
Note:❏ The network administrator must check any changes made to the
IP address settings.
151
R4CB860html.bk Rev. FEPWEB.FM A5 size10/19/04
L Proof Sign-off:KOW N.Mizuno H.TomizawaT.TakahashiNOC K. Lee
❏ When Auto is selected, DHCP becomes available. To use the DHCP server, make sure it is installed on your computer and correctly configured. See your operating system’s online help for detailed instructions.
❏ If Set Using Automatic Private IP Addressing (APIPA) is enabled, a private IP address is automatically assigned to the network interface even when there are no DHCP servers on your system or your network.
❏ If the Dynamic DNS function is not supported, we recommend that you select Manual and then enter an IP address. This is because if you select Auto, the IP address of the network interface changes every time you turn on the device so that you need to change the printer port setting accordingly.
5. To assign an IP address manually, enter the IP address, the subnet mask, and the default gateway. Be sure the IP address does not conflict with any other devices on the network.
Note:If there is a server or a router functioning as a gateway, enter the IP address of the server or the router for the gateway address. If there is no gateway, leave the default values there.
6. If you want to get a private address between 169.254.1.1 and 169.254.254.254 automatically when an IP address cannot be obtained by the DHCP server, leave it at Enable for Set Using Automatic Private IP Addressing (APIPA); otherwise, select Disable.
7. When setting an IP address using the ping command, select Enable for Set Using PING. Select Disable when setting an IP address with EpsonNet Config; this prevents any unexpected change of the IP address.
Note:Be sure to select Disable when not using ping; this prevents an unexpected change of the IP address by EpsonNet WebManager.
152
R4CB860html.bk Rev. FEPWEB.FM A5 size10/19/04
RProof Sign-off:KOW N.Mizuno H.TomizawaT.TakahashiNOC K. Lee
8. Select Enable for Acquire DNS Server Address Automatically if you want to acquire the DNS server address using the DHCP server.
If you want to enter the DNS server address manually, select Disable and then enter the IP address of the DNS server.
9. Select Enable for Acquire Host Name and Domain Name Automatically if you want to acquire the host name and the domain name using the DHCP server.
If you want to specify manually, enter the host name and the domain name in the text boxes.
10. Select Enable for Register Network Interface Address to DNS Server if you want to register the host name and domain name to the DNS server through the DHCP server that supports Dynamic DNS.
If you want to register the host name and the domain name directly to the DNS server, select Enable for Register Network Interface Address Directly to DNS Server.
11. Select Enable or Disable for Use Universal Plug and Play. Select Enable if you want to use the Universal Plug and Play function on Windows Me or future operating systems.
12. Change the default Universal Plug and Play device name, if desired. This device name is used for Windows that supports the Universal Plug and Play function.
13. Mac OS X only:Select Enable or Disable for Use Rendezvous. If you select Enable, enter the Rendezvous Name and the Rendezvous Printer Name. If your network environment supports DHCP, you can use the printer on the network just by enabling this setting.
153
R4CB860html.bk Rev. FEPWEB.FM A5 size10/19/04
L Proof Sign-off:KOW N.Mizuno H.TomizawaT.TakahashiNOC K. Lee
14. Click Submit and then enter the password to update the settings. See “Password” for more information on setting the password.
Note:If you have set the Administrator Name in the Administrator screen, enter the administrator name for the user name.
15. If the message “Configuration change is complete!” appears on your screen, the update is complete. Do not exit the Web browser and do not send a job to the device until this message appears. Follow the on-screen instructions to reset the device.
Note:❏ Since the new IP address becomes available after the device is reset,
you need to restart EpsonNet Config by entering the new IP address.
❏ Only changes on the page where you press the Submit button take effect.
154
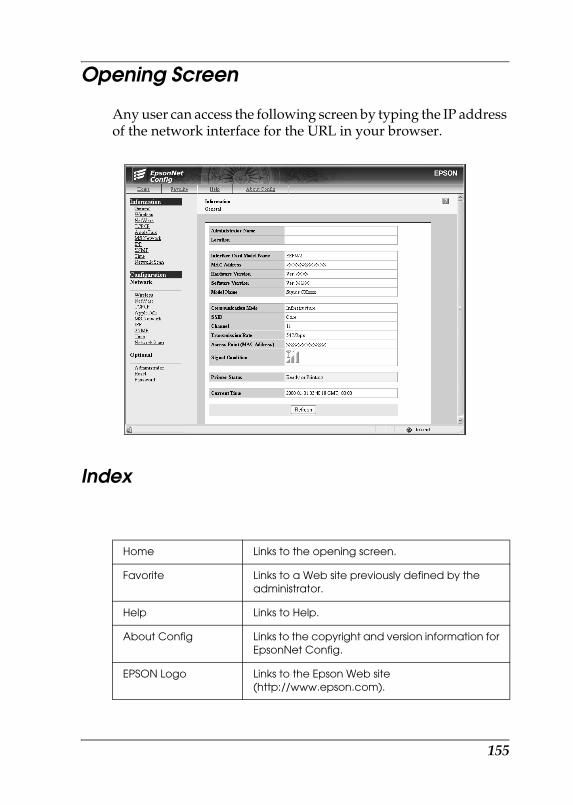
R4CB860html.bk Rev. FEPWEB.FM A5 size10/19/04
RProof Sign-off:KOW N.Mizuno H.TomizawaT.TakahashiNOC K. Lee
Opening Screen
Any user can access the following screen by typing the IP address of the network interface for the URL in your browser.
Index
Home Links to the opening screen.
Favorite Links to a Web site previously defined by the administrator.
Help Links to Help.
About Config Links to the copyright and version information for EpsonNet Config.
EPSON Logo Links to the Epson Web site (http://www.epson.com).
155
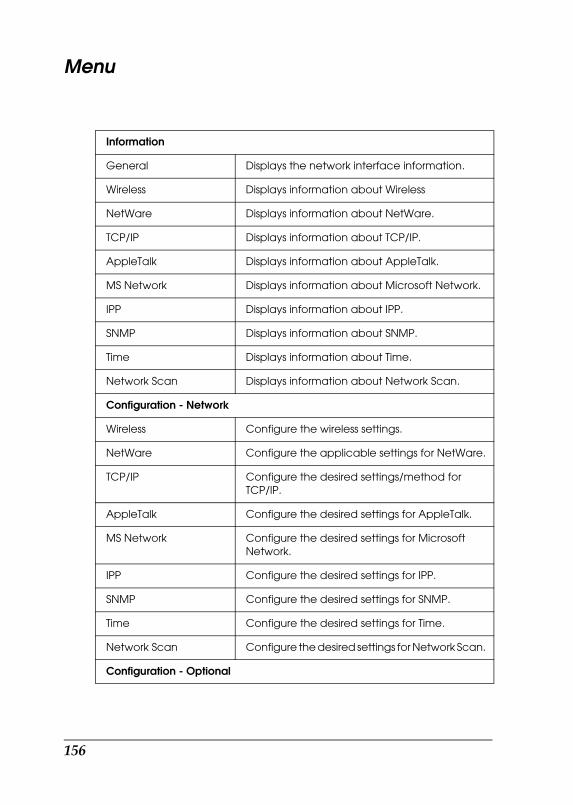
R4CB860html.bk Rev. FEPWEB.FM A5 size10/19/04
L Proof Sign-off:KOW N.Mizuno H.TomizawaT.TakahashiNOC K. Lee
Menu
Information
General Displays the network interface information.
Wireless Displays information about Wireless
NetWare Displays information about NetWare.
TCP/IP Displays information about TCP/IP.
AppleTalk Displays information about AppleTalk.
MS Network Displays information about Microsoft Network.
IPP Displays information about IPP.
SNMP Displays information about SNMP.
Time Displays information about Time.
Network Scan Displays information about Network Scan.
Configuration - Network
Wireless Configure the wireless settings.
NetWare Configure the applicable settings for NetWare.
TCP/IP Configure the desired settings/method for TCP/IP.
AppleTalk Configure the desired settings for AppleTalk.
MS Network Configure the desired settings for Microsoft Network.
IPP Configure the desired settings for IPP.
SNMP Configure the desired settings for SNMP.
Time Configure the desired settings for Time.
Network Scan Configure the desired settings for Network Scan.
Configuration - Optional
156
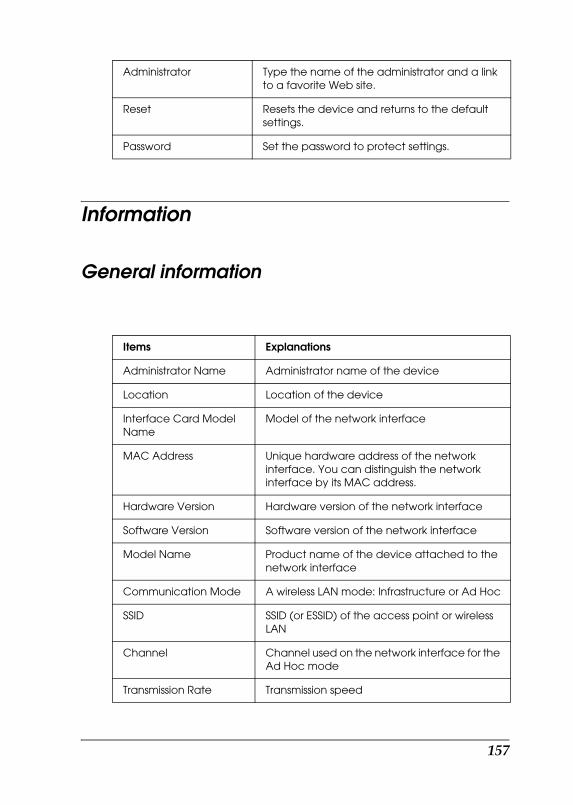
R4CB860html.bk Rev. FEPWEB.FM A5 size10/19/04
RProof Sign-off:KOW N.Mizuno H.TomizawaT.TakahashiNOC K. Lee
Information
General information
Administrator Type the name of the administrator and a link to a favorite Web site.
Reset Resets the device and returns to the default settings.
Password Set the password to protect settings.
Items Explanations
Administrator Name Administrator name of the device
Location Location of the device
Interface Card Model Name
Model of the network interface
MAC Address Unique hardware address of the network interface. You can distinguish the network interface by its MAC address.
Hardware Version Hardware version of the network interface
Software Version Software version of the network interface
Model Name Product name of the device attached to the network interface
Communication Mode A wireless LAN mode: Infrastructure or Ad Hoc
SSID SSID (or ESSID) of the access point or wireless LAN
Channel Channel used on the network interface for the Ad Hoc mode
Transmission Rate Transmission speed
157

R4CB860html.bk Rev. FEPWEB.FM A5 size10/19/04
L Proof Sign-off:KOW N.Mizuno H.TomizawaT.TakahashiNOC K. Lee
Configuration - Network Screens
Wireless
Wireless Basic Settings
Access Point (MAC Address)
Access point used for wireless LAN in the Infrastructure mode
Signal Condition Condition of the radio wave, as follows: Three antennas: ExcellentTwo antennas: GoodOne antenna: Poor None: No connection
Printer Status The background color of the text box indicates the device's status. Green indicates that the device is idle or printing. Yellow indicates that either the paper or toner is low. Red indicates that either the paper or toner is completely out, the device is offline, there is a paper jam, the cover is open, or an error has occurred.
Current Time Displays the current time.
Refresh button Refreshes the device status. The device status is not updated automatically. Press Refresh to display the latest device information.
Items Explanations
Communication Mode Select a wireless LAN mode: Infrastructure or Ad Hoc.
Operation Mode Select the operation mode from the list.
SSID Enter the SSID (or ESSID) of the access point or wireless LAN (up to 32 characters).
Channel When the mode is Ad Hoc, select the channel used on the network interface.
158
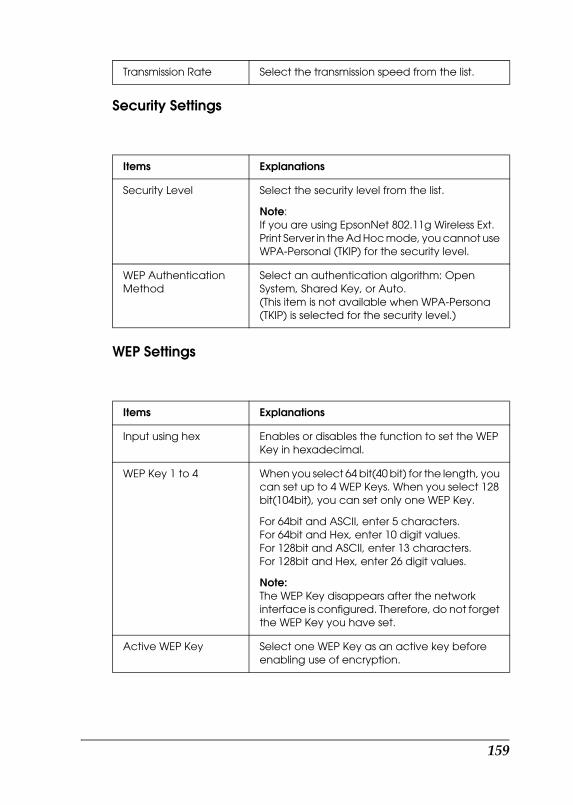
R4CB860html.bk Rev. FEPWEB.FM A5 size10/19/04
RProof Sign-off:KOW N.Mizuno H.TomizawaT.TakahashiNOC K. Lee
Security Settings
WEP Settings
Transmission Rate Select the transmission speed from the list.
Items Explanations
Security Level Select the security level from the list.
Note:If you are using EpsonNet 802.11g Wireless Ext. Print Server in the Ad Hoc mode, you cannot use WPA-Personal (TKIP) for the security level.
WEP Authentication Method
Select an authentication algorithm: Open System, Shared Key, or Auto. (This item is not available when WPA-Persona (TKIP) is selected for the security level.)
Items Explanations
Input using hex Enables or disables the function to set the WEP Key in hexadecimal.
WEP Key 1 to 4 When you select 64 bit(40 bit) for the length, you can set up to 4 WEP Keys. When you select 128 bit(104bit), you can set only one WEP Key.
For 64bit and ASCII, enter 5 characters.For 64bit and Hex, enter 10 digit values.For 128bit and ASCII, enter 13 characters.For 128bit and Hex, enter 26 digit values.
Note:The WEP Key disappears after the network interface is configured. Therefore, do not forget the WEP Key you have set.
Active WEP Key Select one WEP Key as an active key before enabling use of encryption.
159
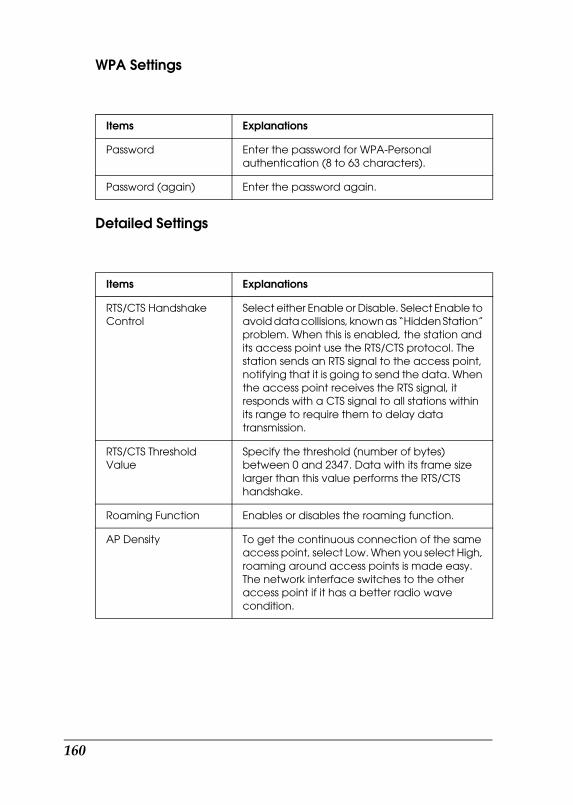
R4CB860html.bk Rev. FEPWEB.FM A5 size10/19/04
L Proof Sign-off:KOW N.Mizuno H.TomizawaT.TakahashiNOC K. Lee
WPA Settings
Detailed Settings
Items Explanations
Password Enter the password for WPA-Personal authentication (8 to 63 characters).
Password (again) Enter the password again.
Items Explanations
RTS/CTS Handshake Control
Select either Enable or Disable. Select Enable to avoid data collisions, known as “Hidden Station” problem. When this is enabled, the station and its access point use the RTS/CTS protocol. The station sends an RTS signal to the access point, notifying that it is going to send the data. When the access point receives the RTS signal, it responds with a CTS signal to all stations within its range to require them to delay data transmission.
RTS/CTS Threshold Value
Specify the threshold (number of bytes) between 0 and 2347. Data with its frame size larger than this value performs the RTS/CTS handshake.
Roaming Function Enables or disables the roaming function.
AP Density To get the continuous connection of the same access point, select Low. When you select High, roaming around access points is made easy. The network interface switches to the other access point if it has a better radio wave condition.
160
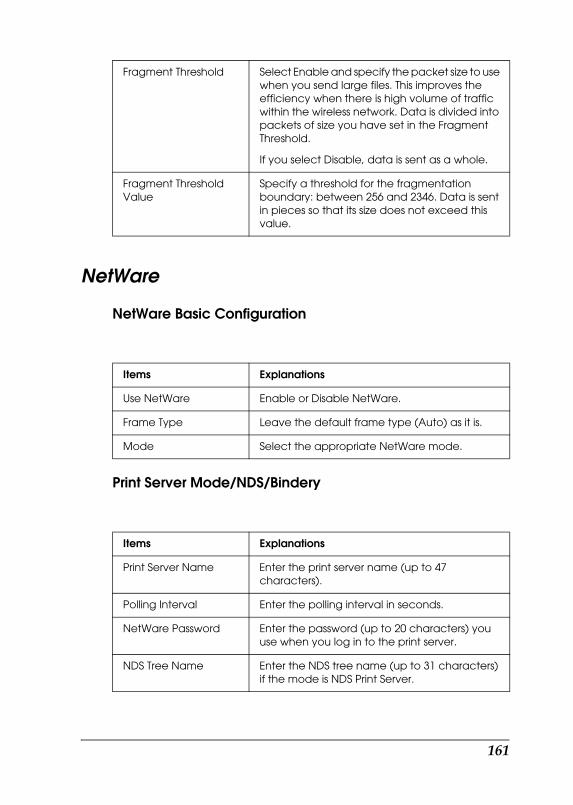
R4CB860html.bk Rev. FEPWEB.FM A5 size10/19/04
RProof Sign-off:KOW N.Mizuno H.TomizawaT.TakahashiNOC K. Lee
NetWare
NetWare Basic Configuration
Print Server Mode/NDS/Bindery
Fragment Threshold Select Enable and specify the packet size to use when you send large files. This improves the efficiency when there is high volume of traffic within the wireless network. Data is divided into packets of size you have set in the Fragment Threshold.
If you select Disable, data is sent as a whole.
Fragment Threshold Value
Specify a threshold for the fragmentation boundary: between 256 and 2346. Data is sent in pieces so that its size does not exceed this value.
Items Explanations
Use NetWare Enable or Disable NetWare.
Frame Type Leave the default frame type (Auto) as it is.
Mode Select the appropriate NetWare mode.
Items Explanations
Print Server Name Enter the print server name (up to 47 characters).
Polling Interval Enter the polling interval in seconds.
NetWare Password Enter the password (up to 20 characters) you use when you log in to the print server.
NDS Tree Name Enter the NDS tree name (up to 31 characters) if the mode is NDS Print Server.
161
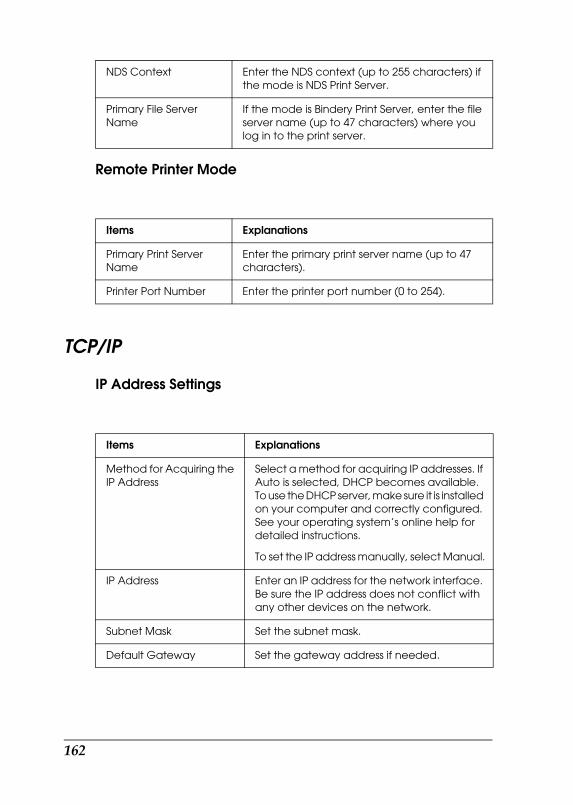
R4CB860html.bk Rev. FEPWEB.FM A5 size10/19/04
L Proof Sign-off:KOW N.Mizuno H.TomizawaT.TakahashiNOC K. Lee
Remote Printer Mode
TCP/IP
IP Address Settings
NDS Context Enter the NDS context (up to 255 characters) if the mode is NDS Print Server.
Primary File Server Name
If the mode is Bindery Print Server, enter the file server name (up to 47 characters) where you log in to the print server.
Items Explanations
Primary Print Server Name
Enter the primary print server name (up to 47 characters).
Printer Port Number Enter the printer port number (0 to 254).
Items Explanations
Method for Acquiring the IP Address
Select a method for acquiring IP addresses. If Auto is selected, DHCP becomes available. To use the DHCP server, make sure it is installed on your computer and correctly configured. See your operating system’s online help for detailed instructions.
To set the IP address manually, select Manual.
IP Address Enter an IP address for the network interface. Be sure the IP address does not conflict with any other devices on the network.
Subnet Mask Set the subnet mask.
Default Gateway Set the gateway address if needed.
162
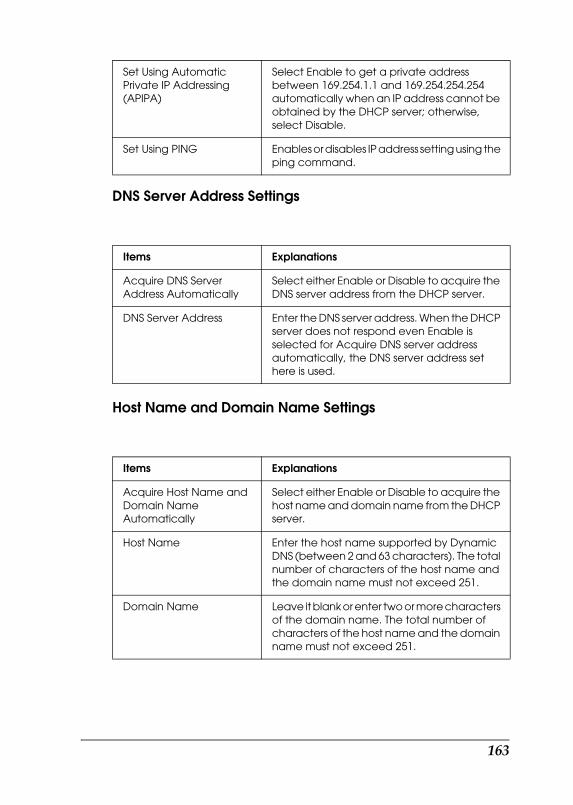
R4CB860html.bk Rev. FEPWEB.FM A5 size10/19/04
RProof Sign-off:KOW N.Mizuno H.TomizawaT.TakahashiNOC K. Lee
DNS Server Address Settings
Host Name and Domain Name Settings
Set Using Automatic Private IP Addressing (APIPA)
Select Enable to get a private address between 169.254.1.1 and 169.254.254.254 automatically when an IP address cannot be obtained by the DHCP server; otherwise, select Disable.
Set Using PING Enables or disables IP address setting using the ping command.
Items Explanations
Acquire DNS Server Address Automatically
Select either Enable or Disable to acquire the DNS server address from the DHCP server.
DNS Server Address Enter the DNS server address. When the DHCP server does not respond even Enable is selected for Acquire DNS server address automatically, the DNS server address set here is used.
Items Explanations
Acquire Host Name and Domain Name Automatically
Select either Enable or Disable to acquire the host name and domain name from the DHCP server.
Host Name Enter the host name supported by Dynamic DNS (between 2 and 63 characters). The total number of characters of the host name and the domain name must not exceed 251.
Domain Name Leave it blank or enter two or more characters of the domain name. The total number of characters of the host name and the domain name must not exceed 251.
163
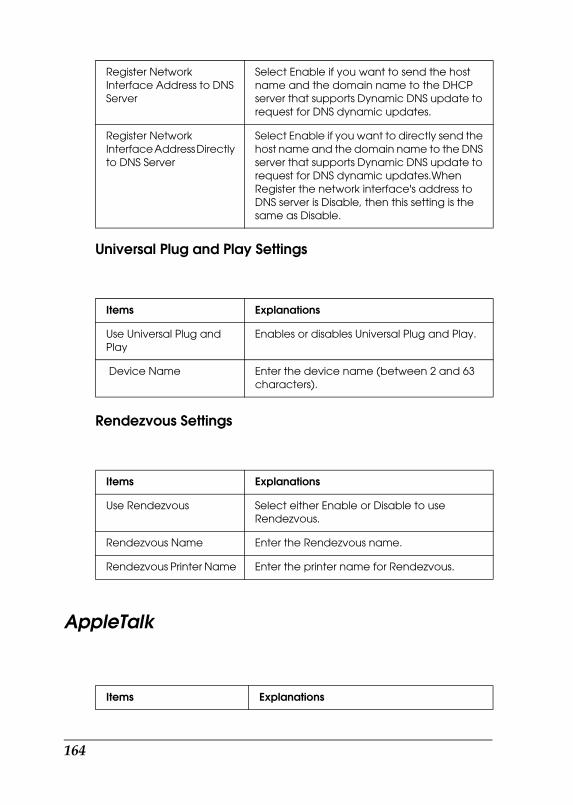
R4CB860html.bk Rev. FEPWEB.FM A5 size10/19/04
L Proof Sign-off:KOW N.Mizuno H.TomizawaT.TakahashiNOC K. Lee
Universal Plug and Play Settings
Rendezvous Settings
AppleTalk
Register Network Interface Address to DNS Server
Select Enable if you want to send the host name and the domain name to the DHCP server that supports Dynamic DNS update to request for DNS dynamic updates.
Register Network Interface Address Directly to DNS Server
Select Enable if you want to directly send the host name and the domain name to the DNS server that supports Dynamic DNS update to request for DNS dynamic updates.When Register the network interface's address to DNS server is Disable, then this setting is the same as Disable.
Items Explanations
Use Universal Plug and Play
Enables or disables Universal Plug and Play.
Device Name Enter the device name (between 2 and 63 characters).
Items Explanations
Use Rendezvous Select either Enable or Disable to use Rendezvous.
Rendezvous Name Enter the Rendezvous name.
Rendezvous Printer Name Enter the printer name for Rendezvous.
Items Explanations
164
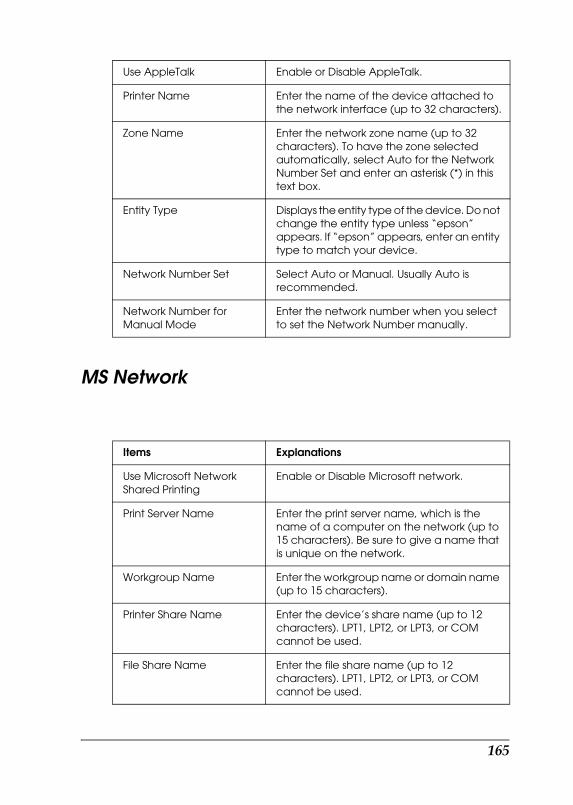
R4CB860html.bk Rev. FEPWEB.FM A5 size10/19/04
RProof Sign-off:KOW N.Mizuno H.TomizawaT.TakahashiNOC K. Lee
MS Network
Use AppleTalk Enable or Disable AppleTalk.
Printer Name Enter the name of the device attached to the network interface (up to 32 characters).
Zone Name Enter the network zone name (up to 32 characters). To have the zone selected automatically, select Auto for the Network Number Set and enter an asterisk (*) in this text box.
Entity Type Displays the entity type of the device. Do not change the entity type unless “epson” appears. If “epson” appears, enter an entity type to match your device.
Network Number Set Select Auto or Manual. Usually Auto is recommended.
Network Number for Manual Mode
Enter the network number when you select to set the Network Number manually.
Items Explanations
Use Microsoft Network Shared Printing
Enable or Disable Microsoft network.
Print Server Name Enter the print server name, which is the name of a computer on the network (up to 15 characters). Be sure to give a name that is unique on the network.
Workgroup Name Enter the workgroup name or domain name (up to 15 characters).
Printer Share Name Enter the device’s share name (up to 12 characters). LPT1, LPT2, or LPT3, or COM cannot be used.
File Share Name Enter the file share name (up to 12 characters). LPT1, LPT2, or LPT3, or COM cannot be used.
165
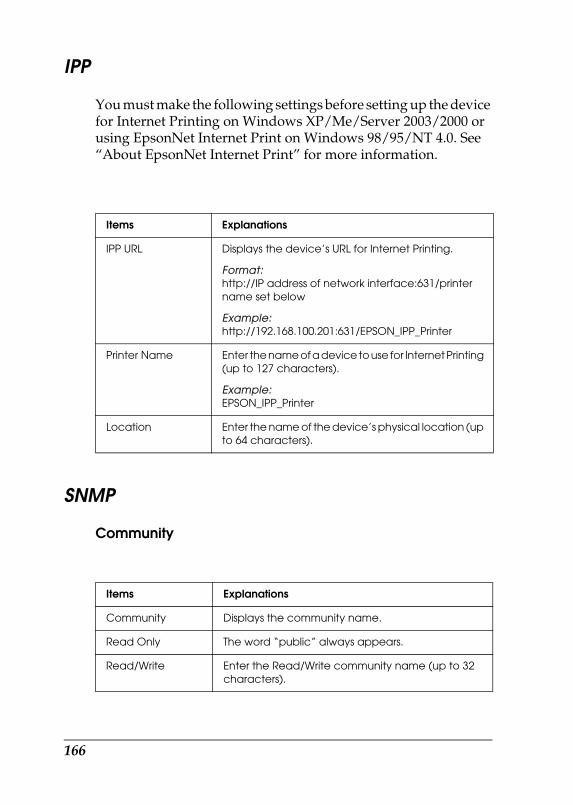
R4CB860html.bk Rev. FEPWEB.FM A5 size10/19/04
L Proof Sign-off:KOW N.Mizuno H.TomizawaT.TakahashiNOC K. Lee
IPP
You must make the following settings before setting up the device for Internet Printing on Windows XP/Me/Server 2003/2000 or using EpsonNet Internet Print on Windows 98/95/NT 4.0. See “About EpsonNet Internet Print” for more information.
SNMP
Community
Items Explanations
IPP URL Displays the device’s URL for Internet Printing.
Format:http://IP address of network interface:631/printer name set below
Example:http://192.168.100.201:631/EPSON_IPP_Printer
Printer Name Enter the name of a device to use for Internet Printing (up to 127 characters).
Example:EPSON_IPP_Printer
Location Enter the name of the device’s physical location (up to 64 characters).
Items Explanations
Community Displays the community name.
Read Only The word “public” always appears.
Read/Write Enter the Read/Write community name (up to 32 characters).
166
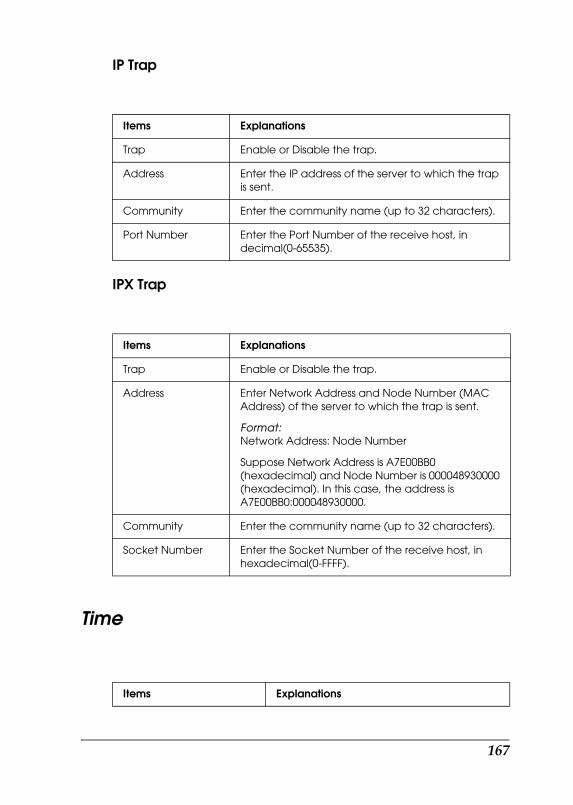
R4CB860html.bk Rev. FEPWEB.FM A5 size10/19/04
RProof Sign-off:KOW N.Mizuno H.TomizawaT.TakahashiNOC K. Lee
IP Trap
IPX Trap
Time
Items Explanations
Trap Enable or Disable the trap.
Address Enter the IP address of the server to which the trap is sent.
Community Enter the community name (up to 32 characters).
Port Number Enter the Port Number of the receive host, in decimal(0-65535).
Items Explanations
Trap Enable or Disable the trap.
Address Enter Network Address and Node Number (MAC Address) of the server to which the trap is sent.
Format:Network Address: Node Number
Suppose Network Address is A7E00BB0 (hexadecimal) and Node Number is 000048930000 (hexadecimal). In this case, the address is A7E00BB0:000048930000.
Community Enter the community name (up to 32 characters).
Socket Number Enter the Socket Number of the receive host, in hexadecimal(0-FFFF).
Items Explanations
167
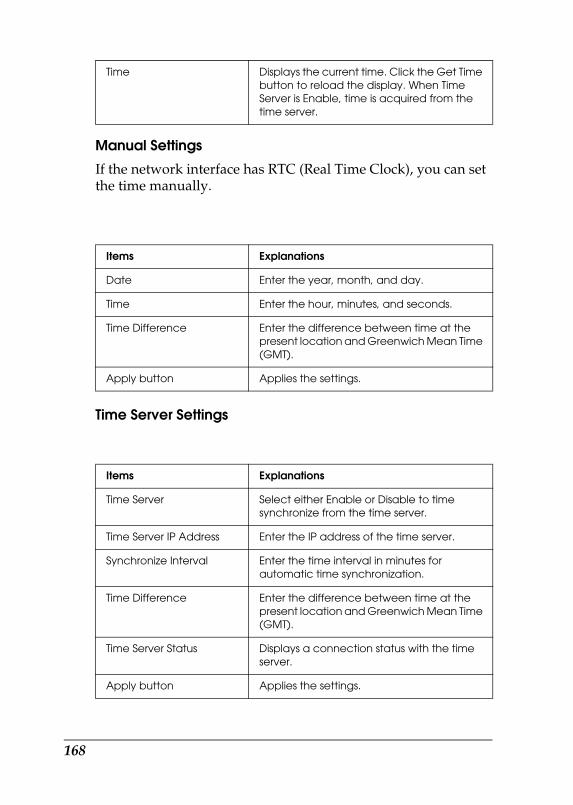
R4CB860html.bk Rev. FEPWEB.FM A5 size10/19/04
L Proof Sign-off:KOW N.Mizuno H.TomizawaT.TakahashiNOC K. Lee
Manual Settings
If the network interface has RTC (Real Time Clock), you can set the time manually.
Time Server Settings
Time Displays the current time. Click the Get Time button to reload the display. When Time Server is Enable, time is acquired from the time server.
Items Explanations
Date Enter the year, month, and day.
Time Enter the hour, minutes, and seconds.
Time Difference Enter the difference between time at the present location and Greenwich Mean Time (GMT).
Apply button Applies the settings.
Items Explanations
Time Server Select either Enable or Disable to time synchronize from the time server.
Time Server IP Address Enter the IP address of the time server.
Synchronize Interval Enter the time interval in minutes for automatic time synchronization.
Time Difference Enter the difference between time at the present location and Greenwich Mean Time (GMT).
Time Server Status Displays a connection status with the time server.
Apply button Applies the settings.
168
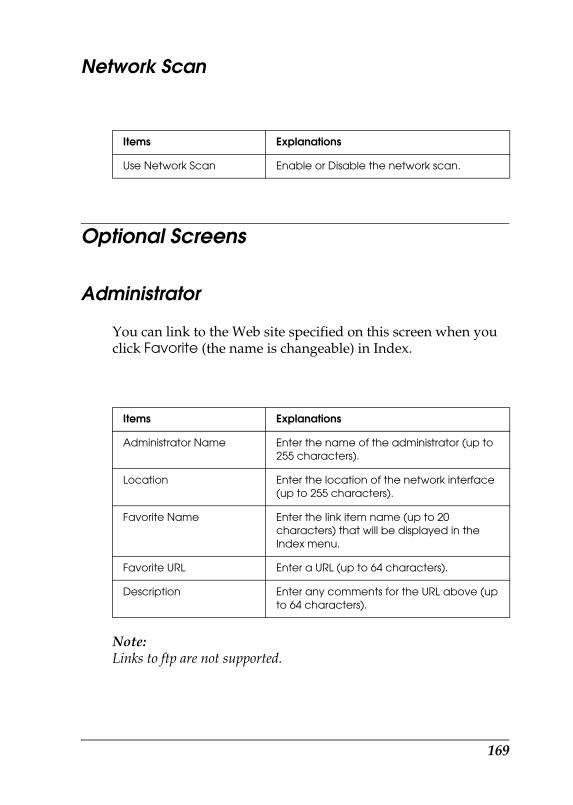
R4CB860html.bk Rev. FEPWEB.FM A5 size10/19/04
RProof Sign-off:KOW N.Mizuno H.TomizawaT.TakahashiNOC K. Lee
Network Scan
Optional Screens
Administrator
You can link to the Web site specified on this screen when you click Favorite (the name is changeable) in Index.
Note:Links to ftp are not supported.
Items Explanations
Use Network Scan Enable or Disable the network scan.
Items Explanations
Administrator Name Enter the name of the administrator (up to 255 characters).
Location Enter the location of the network interface (up to 255 characters).
Favorite Name Enter the link item name (up to 20 characters) that will be displayed in the Index menu.
Favorite URL Enter a URL (up to 64 characters).
Description Enter any comments for the URL above (up to 64 characters).
169
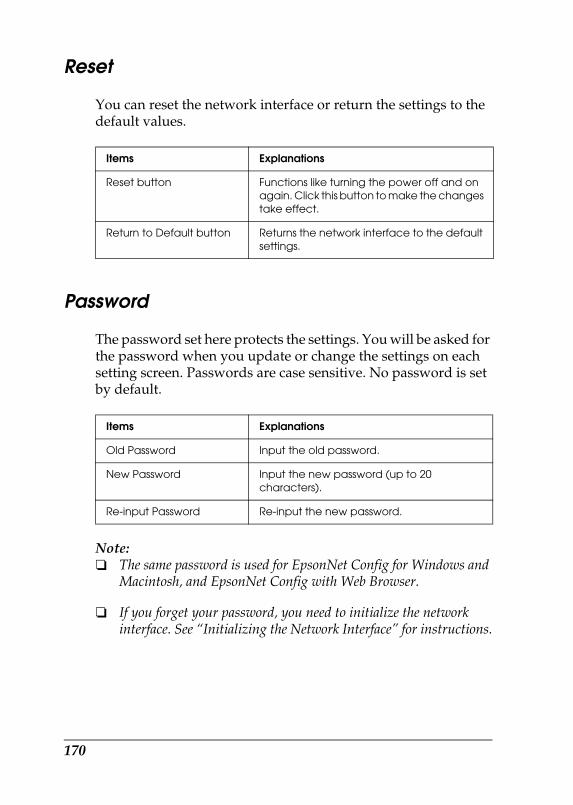
R4CB860html.bk Rev. FEPWEB.FM A5 size10/19/04
L Proof Sign-off:KOW N.Mizuno H.TomizawaT.TakahashiNOC K. Lee
Reset
You can reset the network interface or return the settings to the default values.
Password
The password set here protects the settings. You will be asked for the password when you update or change the settings on each setting screen. Passwords are case sensitive. No password is set by default.
Note:❏ The same password is used for EpsonNet Config for Windows and
Macintosh, and EpsonNet Config with Web Browser.
❏ If you forget your password, you need to initialize the network interface. See “Initializing the Network Interface” for instructions.
Items Explanations
Reset button Functions like turning the power off and on again. Click this button to make the changes take effect.
Return to Default button Returns the network interface to the default settings.
Items Explanations
Old Password Input the old password.
New Password Input the new password (up to 20 characters).
Re-input Password Re-input the new password.
170
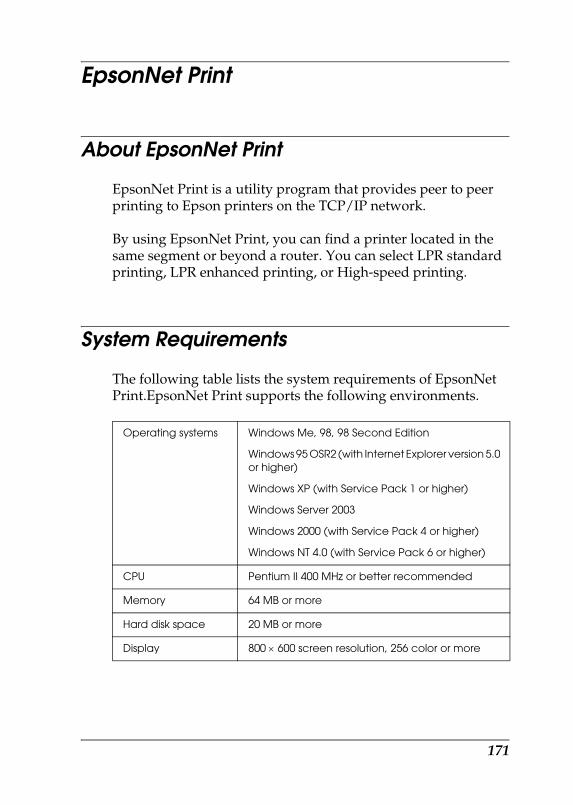
R4CB860html.bk Rev. FEPDCT.FM A5 size10/19/04
RProof Sign-off:KOW N.Mizuno H.TomizawaT.TakahashiNOC K. Lee
EpsonNet Print
About EpsonNet Print
EpsonNet Print is a utility program that provides peer to peer printing to Epson printers on the TCP/IP network.
By using EpsonNet Print, you can find a printer located in the same segment or beyond a router. You can select LPR standard printing, LPR enhanced printing, or High-speed printing.
System Requirements
The following table lists the system requirements of EpsonNet Print.EpsonNet Print supports the following environments.
Operating systems Windows Me, 98, 98 Second Edition
Windows 95 OSR2 (with Internet Explorer version 5.0 or higher)
Windows XP (with Service Pack 1 or higher)
Windows Server 2003
Windows 2000 (with Service Pack 4 or higher)
Windows NT 4.0 (with Service Pack 6 or higher)
CPU Pentium II 400 MHz or better recommended
Memory 64 MB or more
Hard disk space 20 MB or more
Display 800 × 600 screen resolution, 256 color or more
171
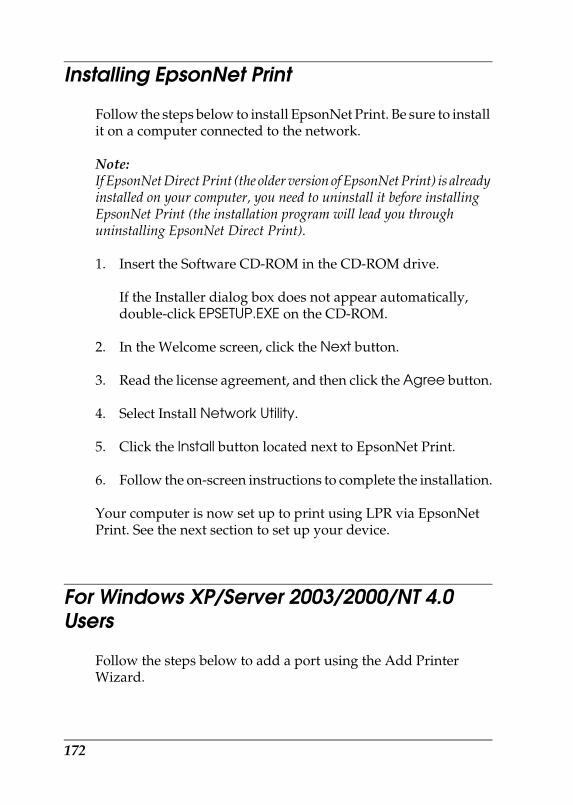
R4CB860html.bk Rev. FEPDCT.FM A5 size10/19/04
L Proof Sign-off:KOW N.Mizuno H.TomizawaT.TakahashiNOC K. Lee
Installing EpsonNet Print
Follow the steps below to install EpsonNet Print. Be sure to install it on a computer connected to the network.
Note:If EpsonNet Direct Print (the older version of EpsonNet Print) is already installed on your computer, you need to uninstall it before installing EpsonNet Print (the installation program will lead you through uninstalling EpsonNet Direct Print).
1. Insert the Software CD-ROM in the CD-ROM drive.
If the Installer dialog box does not appear automatically, double-click EPSETUP.EXE on the CD-ROM.
2. In the Welcome screen, click the Next button.
3. Read the license agreement, and then click the Agree button.
4. Select Install Network Utility.
5. Click the Install button located next to EpsonNet Print.
6. Follow the on-screen instructions to complete the installation.
Your computer is now set up to print using LPR via EpsonNet Print. See the next section to set up your device.
For Windows XP/Server 2003/2000/NT 4.0 Users
Follow the steps below to add a port using the Add Printer Wizard.
172
R4CB860html.bk Rev. FEPDCT.FM A5 size10/19/04
RProof Sign-off:KOW N.Mizuno H.TomizawaT.TakahashiNOC K. Lee
❏ If you want to add a port for a printer with its IP address assigned automatically by the DHCP server or router, see “Adding a port for a printer assigned with a dynamic IP address”.
❏ If you want to add a port for a printer with its IP address assigned manually, see “Adding a port for a printer assigned with a static IP address”.
Note:❏ Be sure that the computer is connected to the network and TCP/IP
is correctly set.
❏ A valid IP address must be assigned to the printer.
Adding a port for a printer assigned with a dynamic IP address
1. For Windows XP: Click Start and then Printers and Faxes. Under Printer Tasks, click Add a printer to start the Add Printer Wizard.
For Windows Server 2003: Click Start and then Printers and Faxes. Double-click Add Printer in the Printers folder to start the Add Printer Wizard.
For Windows 2000: Click Start, point to Settings, and then select Printers. Double-click Add Printer in the Printers folder to start the Add Printer Wizard.
For Windows NT 4.0: Click Start, point to Settings, and then select Printers. Double-click the Add Printers icon.
2. Click Next.
173
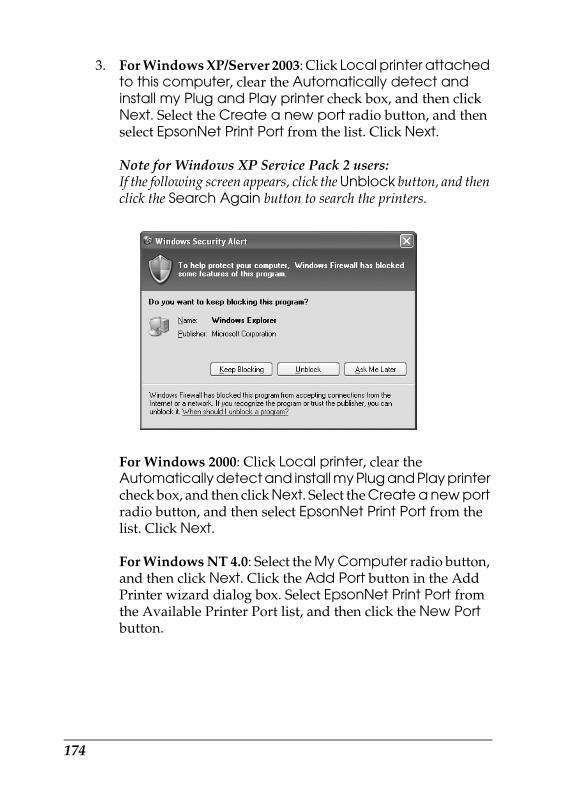
R4CB860html.bk Rev. FEPDCT.FM A5 size10/19/04
L Proof Sign-off:KOW N.Mizuno H.TomizawaT.TakahashiNOC K. Lee
3. For Windows XP/Server 2003: Click Local printer attached to this computer, clear the Automatically detect and install my Plug and Play printer check box, and then click Next. Select the Create a new port radio button, and then select EpsonNet Print Port from the list. Click Next.
Note for Windows XP Service Pack 2 users:If the following screen appears, click the Unblock button, and then click the Search Again button to search the printers.
For Windows 2000: Click Local printer, clear the Automatically detect and install my Plug and Play printer check box, and then click Next. Select the Create a new port radio button, and then select EpsonNet Print Port from the list. Click Next.
For Windows NT 4.0: Select the My Computer radio button, and then click Next. Click the Add Port button in the Add Printer wizard dialog box. Select EpsonNet Print Port from the Available Printer Port list, and then click the New Port button.
174
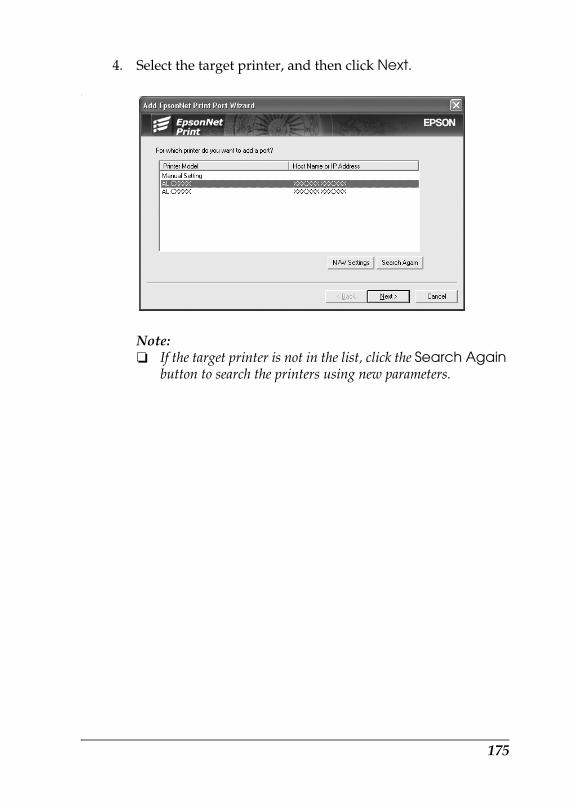
R4CB860html.bk Rev. FEPDCT.FM A5 size10/19/04
RProof Sign-off:KOW N.Mizuno H.TomizawaT.TakahashiNOC K. Lee
4. Select the target printer, and then click Next.
\
Note:❏ If the target printer is not in the list, click the Search Again
button to search the printers using new parameters.
175
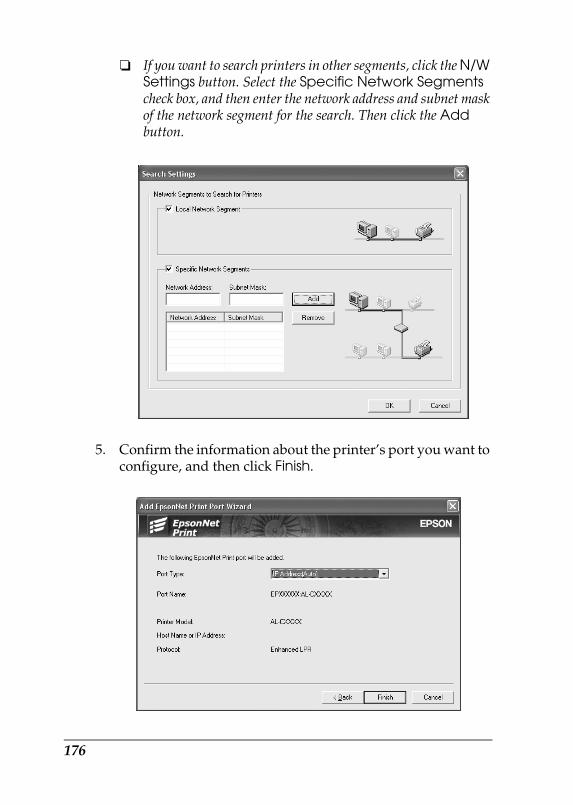
R4CB860html.bk Rev. FEPDCT.FM A5 size10/19/04
L Proof Sign-off:KOW N.Mizuno H.TomizawaT.TakahashiNOC K. Lee
❏ If you want to search printers in other segments, click the N/W Settings button. Select the Specific Network Segments check box, and then enter the network address and subnet mask of the network segment for the search. Then click the Add button.
5. Confirm the information about the printer’s port you want to configure, and then click Finish.
176
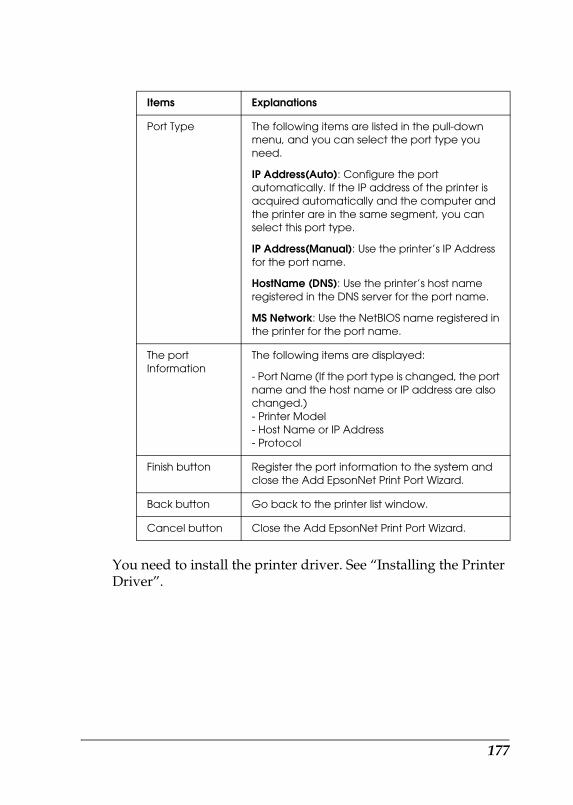
R4CB860html.bk Rev. FEPDCT.FM A5 size10/19/04
RProof Sign-off:KOW N.Mizuno H.TomizawaT.TakahashiNOC K. Lee
You need to install the printer driver. See “Installing the Printer Driver”.
Items Explanations
Port Type The following items are listed in the pull-down menu, and you can select the port type you need.
IP Address(Auto): Configure the port automatically. If the IP address of the printer is acquired automatically and the computer and the printer are in the same segment, you can select this port type.
IP Address(Manual): Use the printer’s IP Address for the port name.
HostName (DNS): Use the printer’s host name registered in the DNS server for the port name.
MS Network: Use the NetBIOS name registered in the printer for the port name.
The port Information
The following items are displayed:
- Port Name (If the port type is changed, the port name and the host name or IP address are also changed.)- Printer Model- Host Name or IP Address- Protocol
Finish button Register the port information to the system and close the Add EpsonNet Print Port Wizard.
Back button Go back to the printer list window.
Cancel button Close the Add EpsonNet Print Port Wizard.
177
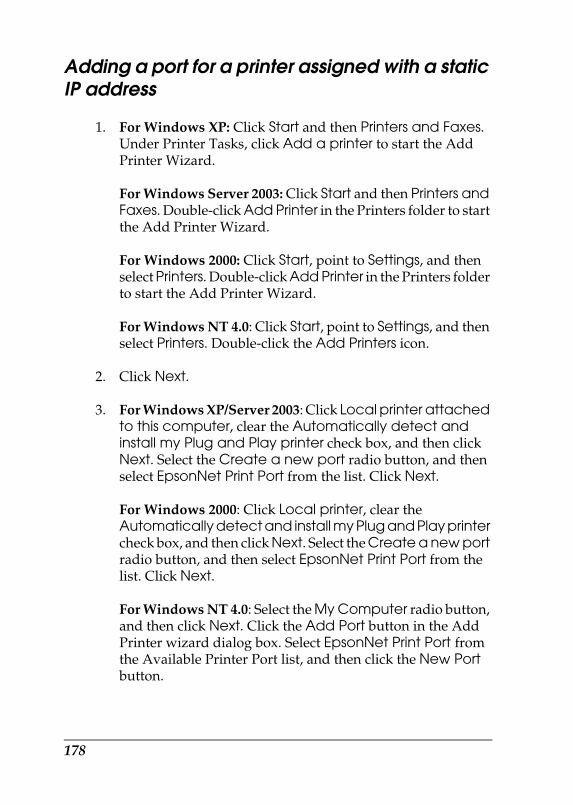
R4CB860html.bk Rev. FEPDCT.FM A5 size10/19/04
L Proof Sign-off:KOW N.Mizuno H.TomizawaT.TakahashiNOC K. Lee
Adding a port for a printer assigned with a static IP address
1. For Windows XP: Click Start and then Printers and Faxes. Under Printer Tasks, click Add a printer to start the Add Printer Wizard.
For Windows Server 2003: Click Start and then Printers and Faxes. Double-click Add Printer in the Printers folder to start the Add Printer Wizard.
For Windows 2000: Click Start, point to Settings, and then select Printers. Double-click Add Printer in the Printers folder to start the Add Printer Wizard.
For Windows NT 4.0: Click Start, point to Settings, and then select Printers. Double-click the Add Printers icon.
2. Click Next.
3. For Windows XP/Server 2003: Click Local printer attached to this computer, clear the Automatically detect and install my Plug and Play printer check box, and then click Next. Select the Create a new port radio button, and then select EpsonNet Print Port from the list. Click Next.
For Windows 2000: Click Local printer, clear the Automatically detect and install my Plug and Play printer check box, and then click Next. Select the Create a new port radio button, and then select EpsonNet Print Port from the list. Click Next.
For Windows NT 4.0: Select the My Computer radio button, and then click Next. Click the Add Port button in the Add Printer wizard dialog box. Select EpsonNet Print Port from the Available Printer Port list, and then click the New Port button.
178
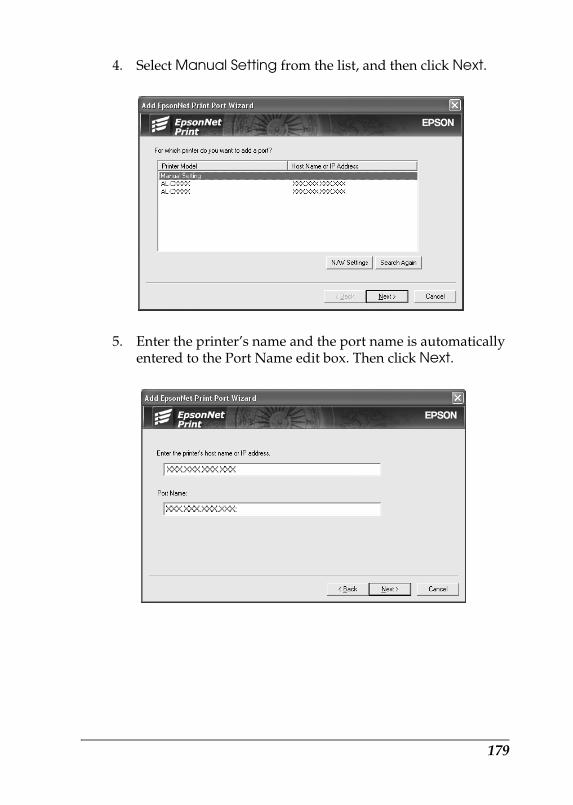
R4CB860html.bk Rev. FEPDCT.FM A5 size10/19/04
RProof Sign-off:KOW N.Mizuno H.TomizawaT.TakahashiNOC K. Lee
4. Select Manual Setting from the list, and then click Next.
5. Enter the printer’s name and the port name is automatically entered to the Port Name edit box. Then click Next.
179
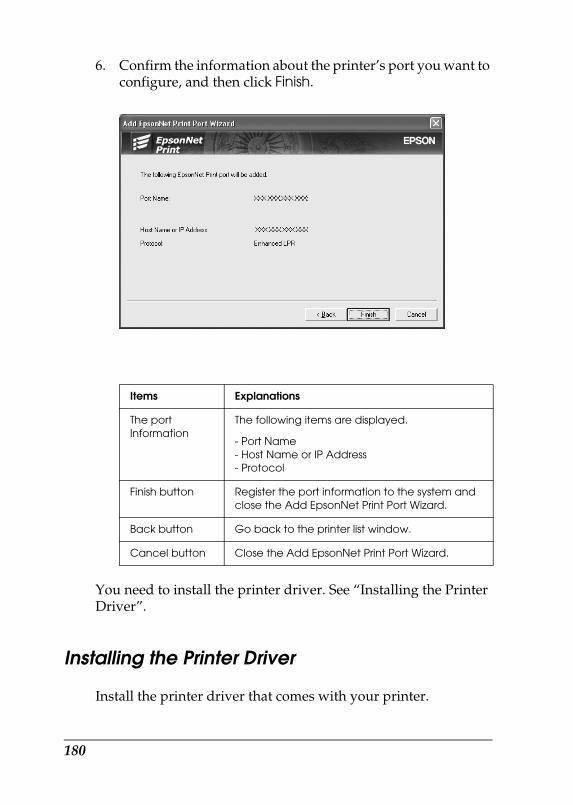
R4CB860html.bk Rev. FEPDCT.FM A5 size10/19/04
L Proof Sign-off:KOW N.Mizuno H.TomizawaT.TakahashiNOC K. Lee
6. Confirm the information about the printer’s port you want to configure, and then click Finish.
You need to install the printer driver. See “Installing the Printer Driver”.
Installing the Printer Driver
Install the printer driver that comes with your printer.
Items Explanations
The port Information
The following items are displayed.
- Port Name- Host Name or IP Address- Protocol
Finish button Register the port information to the system and close the Add EpsonNet Print Port Wizard.
Back button Go back to the printer list window.
Cancel button Close the Add EpsonNet Print Port Wizard.
180

R4CB860html.bk Rev. FEPDCT.FM A5 size10/19/04
RProof Sign-off:KOW N.Mizuno H.TomizawaT.TakahashiNOC K. Lee
1. Insert the Software CD-ROM shipped with the printer.
2. Close the EPSON Installation Program screen if it appears.
3. Click the Have Disk button. The Install From Disk dialog box appears.
4. Click Browse.
5. Select the CD-ROM drive for Drives, and double-click the appropriate folder for your operating system. Click OK.
6. Click OK in the Install From Disk dialog box.
7. Select the model name of the printer, and then click Next.
Note:If the Add Printer wizard asks you to select either Keep existing driver or Replace existing driver, be sure to select the Replace existing driver radio button. Click Next.
8. Click Finish and follow the on-screen instructions to complete the setup.
The printer is now ready for peer-to-peer printing. To configure the printer port, go to “Configuring the Printer Port”.
For Windows Me/98/95 Users
Follow the steps below to add a port using the Add Printer Wizard.
❏ If you want to add a port for the printer with its IP address assigned automatically from the DHCP server or router, see “Adding a port for a printer assigned with a dynamic IP address”.
181
R4CB860html.bk Rev. FEPDCT.FM A5 size10/19/04
L Proof Sign-off:KOW N.Mizuno H.TomizawaT.TakahashiNOC K. Lee
❏ If you want to add a port for the printer with its IP address assigned manually, see “Adding a port for a printer assigned with a static IP address”.
Note:❏ Be sure that the computer is connected to the network and TCP/IP
is correctly set.
❏ A valid IP address must be assigned to the printer.
Adding a port for a printer assigned with a dynamic IP address
Install the printer driver before adding a port for the printer. See the manual shipped with your printer for instructions on how to install the printer driver.
1. Click Start, point to Settings, and then select Printers.
2. Right-click the target printer icon, and then select Properties.
3. Click the Details tab, and then click the Add Port button. Select the Other radio button, and then select EpsonNet Print Port. Click OK.
182

R4CB860html.bk Rev. FEPDCT.FM A5 size10/19/04
RProof Sign-off:KOW N.Mizuno H.TomizawaT.TakahashiNOC K. Lee
4. Select the target printer, and then click Next.
Note:❏ If the target printer is not in the list, click the Search Again
button to search the printers using new parameters.
183
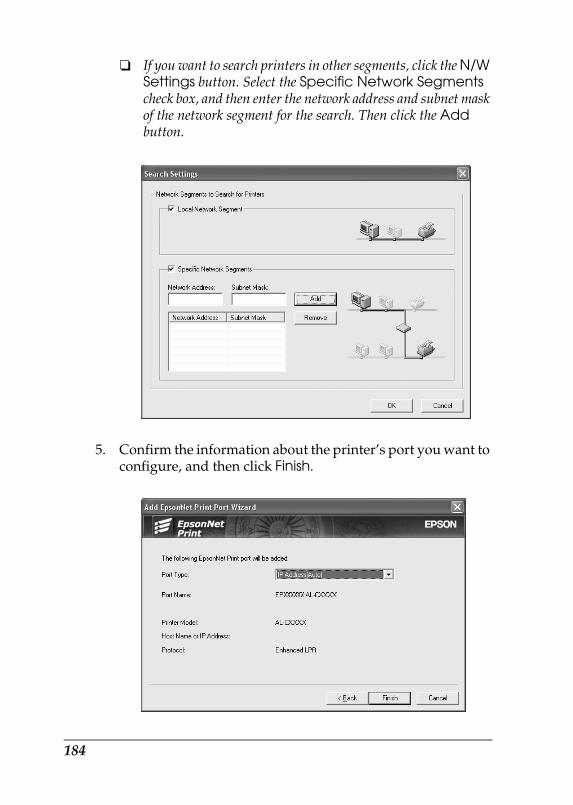
R4CB860html.bk Rev. FEPDCT.FM A5 size10/19/04
L Proof Sign-off:KOW N.Mizuno H.TomizawaT.TakahashiNOC K. Lee
❏ If you want to search printers in other segments, click the N/W Settings button. Select the Specific Network Segments check box, and then enter the network address and subnet mask of the network segment for the search. Then click the Add button.
5. Confirm the information about the printer’s port you want to configure, and then click Finish.
184
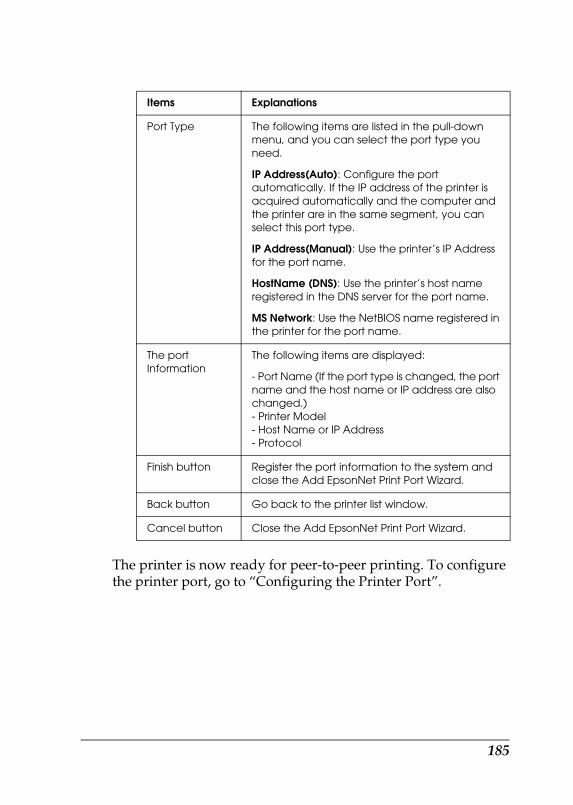
R4CB860html.bk Rev. FEPDCT.FM A5 size10/19/04
RProof Sign-off:KOW N.Mizuno H.TomizawaT.TakahashiNOC K. Lee
The printer is now ready for peer-to-peer printing. To configure the printer port, go to “Configuring the Printer Port”.
Items Explanations
Port Type The following items are listed in the pull-down menu, and you can select the port type you need.
IP Address(Auto): Configure the port automatically. If the IP address of the printer is acquired automatically and the computer and the printer are in the same segment, you can select this port type.
IP Address(Manual): Use the printer’s IP Address for the port name.
HostName (DNS): Use the printer’s host name registered in the DNS server for the port name.
MS Network: Use the NetBIOS name registered in the printer for the port name.
The port Information
The following items are displayed:
- Port Name (If the port type is changed, the port name and the host name or IP address are also changed.)- Printer Model- Host Name or IP Address- Protocol
Finish button Register the port information to the system and close the Add EpsonNet Print Port Wizard.
Back button Go back to the printer list window.
Cancel button Close the Add EpsonNet Print Port Wizard.
185
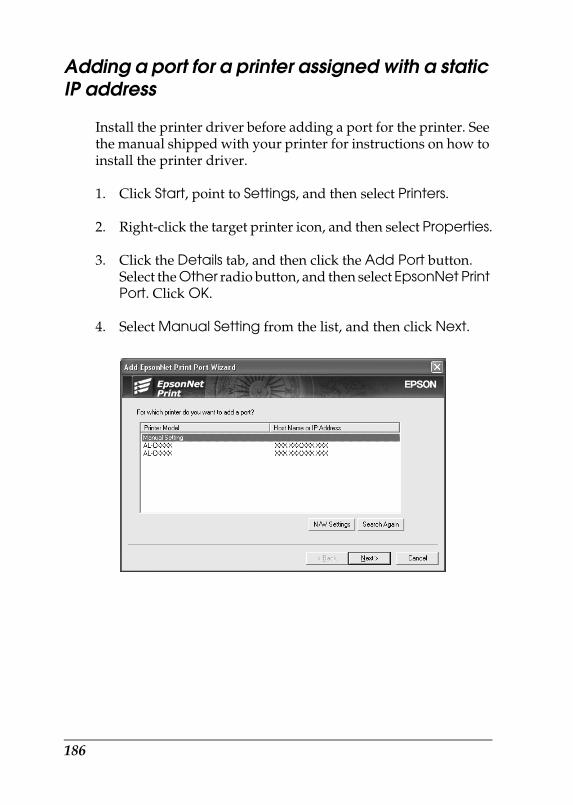
R4CB860html.bk Rev. FEPDCT.FM A5 size10/19/04
L Proof Sign-off:KOW N.Mizuno H.TomizawaT.TakahashiNOC K. Lee
Adding a port for a printer assigned with a static IP address
Install the printer driver before adding a port for the printer. See the manual shipped with your printer for instructions on how to install the printer driver.
1. Click Start, point to Settings, and then select Printers.
2. Right-click the target printer icon, and then select Properties.
3. Click the Details tab, and then click the Add Port button. Select the Other radio button, and then select EpsonNet Print Port. Click OK.
4. Select Manual Setting from the list, and then click Next.
186
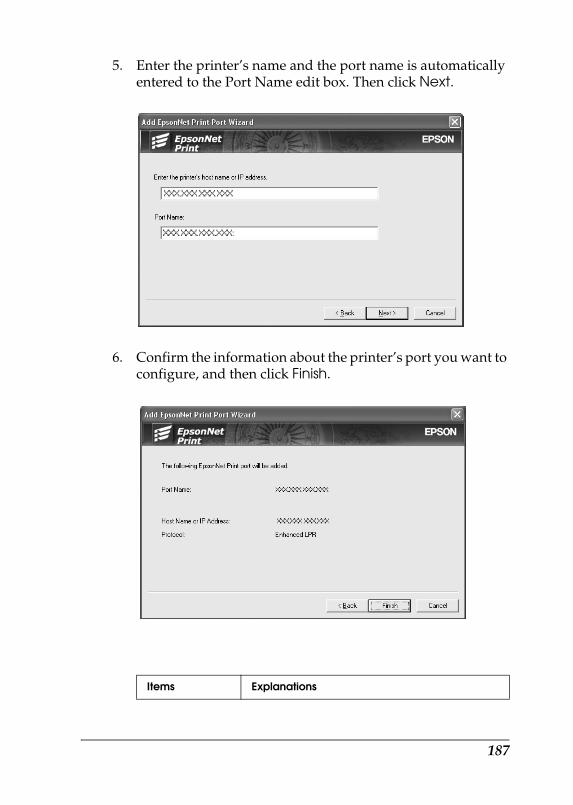
R4CB860html.bk Rev. FEPDCT.FM A5 size10/19/04
RProof Sign-off:KOW N.Mizuno H.TomizawaT.TakahashiNOC K. Lee
5. Enter the printer’s name and the port name is automatically entered to the Port Name edit box. Then click Next.
6. Confirm the information about the printer’s port you want to configure, and then click Finish.
Items Explanations
187
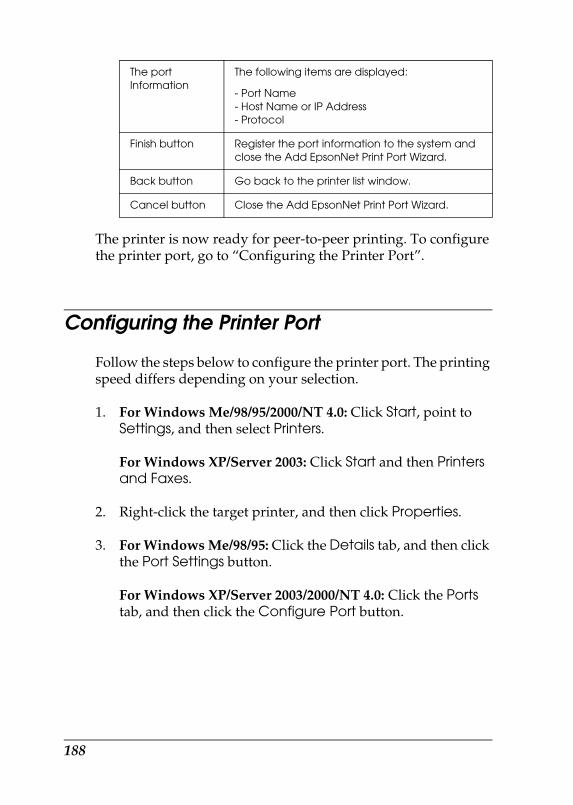
R4CB860html.bk Rev. FEPDCT.FM A5 size10/19/04
L Proof Sign-off:KOW N.Mizuno H.TomizawaT.TakahashiNOC K. Lee
The printer is now ready for peer-to-peer printing. To configure the printer port, go to “Configuring the Printer Port”.
Configuring the Printer Port
Follow the steps below to configure the printer port. The printing speed differs depending on your selection.
1. For Windows Me/98/95/2000/NT 4.0: Click Start, point to Settings, and then select Printers.
For Windows XP/Server 2003: Click Start and then Printers and Faxes.
2. Right-click the target printer, and then click Properties.
3. For Windows Me/98/95: Click the Details tab, and then click the Port Settings button.
For Windows XP/Server 2003/2000/NT 4.0: Click the Ports tab, and then click the Configure Port button.
The port Information
The following items are displayed:
- Port Name- Host Name or IP Address- Protocol
Finish button Register the port information to the system and close the Add EpsonNet Print Port Wizard.
Back button Go back to the printer list window.
Cancel button Close the Add EpsonNet Print Port Wizard.
188
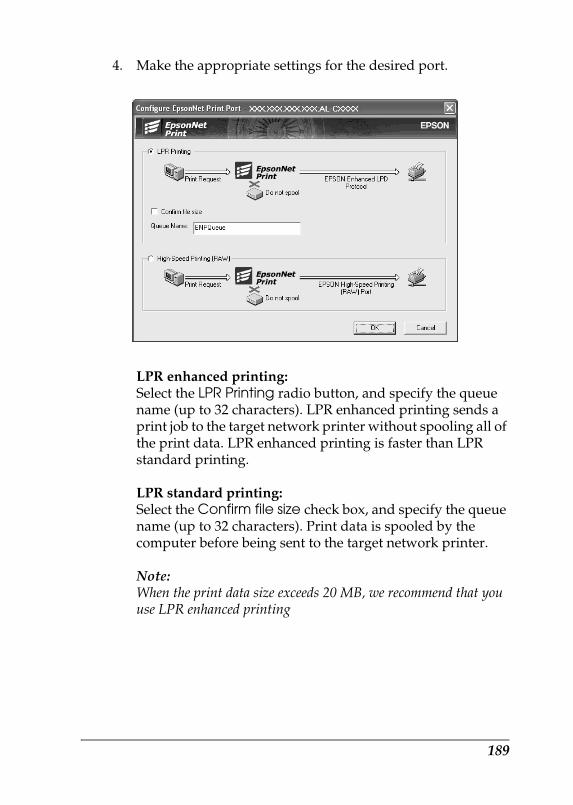
R4CB860html.bk Rev. FEPDCT.FM A5 size10/19/04
RProof Sign-off:KOW N.Mizuno H.TomizawaT.TakahashiNOC K. Lee
4. Make the appropriate settings for the desired port.
LPR enhanced printing:Select the LPR Printing radio button, and specify the queue name (up to 32 characters). LPR enhanced printing sends a print job to the target network printer without spooling all of the print data. LPR enhanced printing is faster than LPR standard printing.
LPR standard printing:Select the Confirm file size check box, and specify the queue name (up to 32 characters). Print data is spooled by the computer before being sent to the target network printer.
Note:When the print data size exceeds 20 MB, we recommend that you use LPR enhanced printing
189
R4CB860html.bk Rev. FEPDCT.FM A5 size10/19/04
L Proof Sign-off:KOW N.Mizuno H.TomizawaT.TakahashiNOC K. Lee
High-Speed printing:Select the High-Speed Printing (RAW) radio button. The Epson high-speed printing port sends a print job to the target network printer without spooling all of the print data. High-Speed printing is faster than the other two printing methods.
5. Click OK.
If you select the High-Speed Printing (RAW) radio button and if the printer does not support High-Speed printing, an error message appears. Follow the message to remedy the problem.
190
R4CB860html.bk Rev. FEPINT.FM A5 size10/19/04
RProof Sign-off:KOW N.Mizuno H.TomizawaT.TakahashiNOC K. Lee
EpsonNet Internet Print
About EpsonNet Internet Print
EpsonNet Internet Print is a utility program that supports printing across the Internet using Internet Printing Protocol (IPP). Since the network interface supports IPP, Internet printing is possible using this utility. You can print or make printer settings from Windows 98/95/NT 4.0 systems that can access the Internet. You can also print via a proxy server using this utility.
Before using the EpsonNet Internet Print utility, be sure to read the Readme.txt file found in the EpsonNet Internet Print folder. This file contains the latest information on the EpsonNet Internet Print.
Note:❏ EPSON Status Monitor is a utility program that monitors your
device and gives you information about its current status. Because this utility does not support IPP, devices connected to the Internet cannot be monitored with EPSON Status Monitor. If you use EpsonNet Internet Print on a computer which has EPSON Status Monitor installed, a communication error message may appear when you view printer properties. To avoid this, click the Optional Settings tab in the target printer’s properties dialog box and click the Update the Printer Option Information Manually radio button.
❏ For Windows XP/Me/2000, use the OS standard IPP client for the Internet printing.
191
R4CB860html.bk Rev. FEPINT.FM A5 size10/19/04
L Proof Sign-off:KOW N.Mizuno H.TomizawaT.TakahashiNOC K. Lee
System Requirements
Operating systems
❏ Windows 98, Windows 95, or Windows NT 4.0 Server and Workstation
❏ An Intel x86 series or compatible processor
Supported products
❏ Epson network interfaces that support IPP (EpsonNet Internet Print comes with Epson network interface products that support IPP)
Installing EpsonNet Internet Print
Follow the steps below to install EpsonNet Internet Print.
1. Insert the Software CD-ROM in the CD-ROM drive.
If the Installer dialog box does not appear automatically, double-click EPSETUP.EXE on the CD-ROM.
2. In the Welcome screen, click the Next button.
3. Read the license agreement, and then click the Agree button.
4. Select Install Network Utility.
5. Click the Install button located next to EpsonNet Internet Print.
6. Follow the on-screen instructions to complete the installation.
7. Restart the computer after installation is complete.
192
R4CB860html.bk Rev. FEPINT.FM A5 size10/19/04
RProof Sign-off:KOW N.Mizuno H.TomizawaT.TakahashiNOC K. Lee
Setting Up Your Device Using EpsonNet Internet Print
EpsonNet Internet Print supports printing across the Internet using Internet Printing Protocol. Follow the steps below to set up the device.
Note:Before following the steps below, you must make the appropriate IPP settings in EpsonNet Config. See the EpsonNet Config Reference Guide or “IPP” for instructions on setting up IPP. In the steps below, you will be asked for the IPP URL you set in the IPP setting screen in EpsonNet Config.
Windows 98/95
1. Make sure that TCP/IP is correctly installed and setup in the computer and a valid IP address is set for the computer and device.
2. Make sure that the IPP settings in EpsonNet Config are correct. See the EpsonNet Config Reference Guide or “IPP” for instructions on settings for IPP.
3. To start EpsonNet Internet Print, click Start, point to Programs and then EpsonNet Internet Print, then click Add EpsonNet Internet Print Port.
193
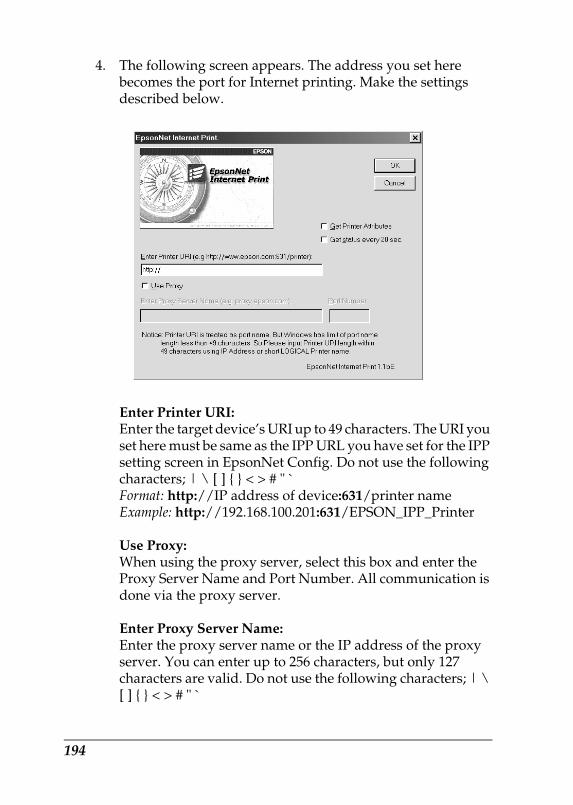
R4CB860html.bk Rev. FEPINT.FM A5 size10/19/04
L Proof Sign-off:KOW N.Mizuno H.TomizawaT.TakahashiNOC K. Lee
4. The following screen appears. The address you set here becomes the port for Internet printing. Make the settings described below.
Enter Printer URI:Enter the target device’s URI up to 49 characters. The URI you set here must be same as the IPP URL you have set for the IPP setting screen in EpsonNet Config. Do not use the following characters; | \ [ ] { } < > # " `Format: http://IP address of device:631/printer nameExample: http://192.168.100.201:631/EPSON_IPP_Printer
Use Proxy:When using the proxy server, select this box and enter the Proxy Server Name and Port Number. All communication is done via the proxy server.
Enter Proxy Server Name:Enter the proxy server name or the IP address of the proxy server. You can enter up to 256 characters, but only 127 characters are valid. Do not use the following characters; | \ [ ] { } < > # " `
194
R4CB860html.bk Rev. FEPINT.FM A5 size10/19/04
RProof Sign-off:KOW N.Mizuno H.TomizawaT.TakahashiNOC K. Lee
Port Number:Enter the port number of the proxy server (from 0 to 65535).
Get Printer Attributes:When you select this box and click OK, EpsonNet Internet Print communicates with the device and acquires information, so it may take a few minutes before a message appears. This setting is available only when creating a port.
Get status every 20 sec.:Select this box when you want to receive printer status updates at regular intervals (every 5 seconds during printing and every 20 seconds when idle). If you select this box, a message will appear if an error occurs during printing. You can also check the printer status by double-clicking the printer icon.
OK button:Saves the settings.
Cancel button:Cancels any changes.
Note:❏ The settings you make above can be changed from the printer
driver. In the printer Properties dialog box, click the Details tab, and click the Port Settings button to change the settings.
❏ Be aware that when connecting to the Internet using a dial-up router and selecting the Get status every 20 sec check box, you may be charged for the extra line connection.
❏ When you check the Get Printer Attributes check box and click OK, an error message may appear. Be sure that the device power is on, and the device is correctly connected on the network.
195
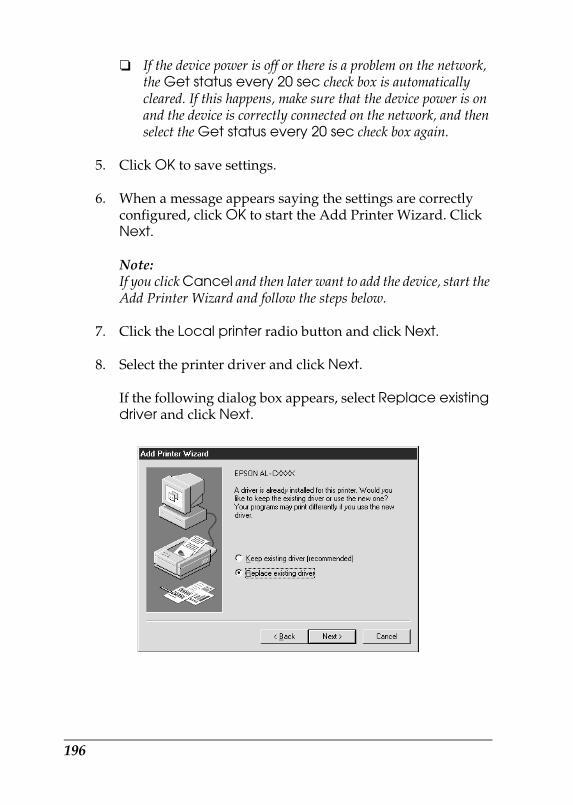
R4CB860html.bk Rev. FEPINT.FM A5 size10/19/04
L Proof Sign-off:KOW N.Mizuno H.TomizawaT.TakahashiNOC K. Lee
❏ If the device power is off or there is a problem on the network, the Get status every 20 sec check box is automatically cleared. If this happens, make sure that the device power is on and the device is correctly connected on the network, and then select the Get status every 20 sec check box again.
5. Click OK to save settings.
6. When a message appears saying the settings are correctly configured, click OK to start the Add Printer Wizard. Click Next.
Note:If you click Cancel and then later want to add the device, start the Add Printer Wizard and follow the steps below.
7. Click the Local printer radio button and click Next.
8. Select the printer driver and click Next.
If the following dialog box appears, select Replace existing driver and click Next.
196
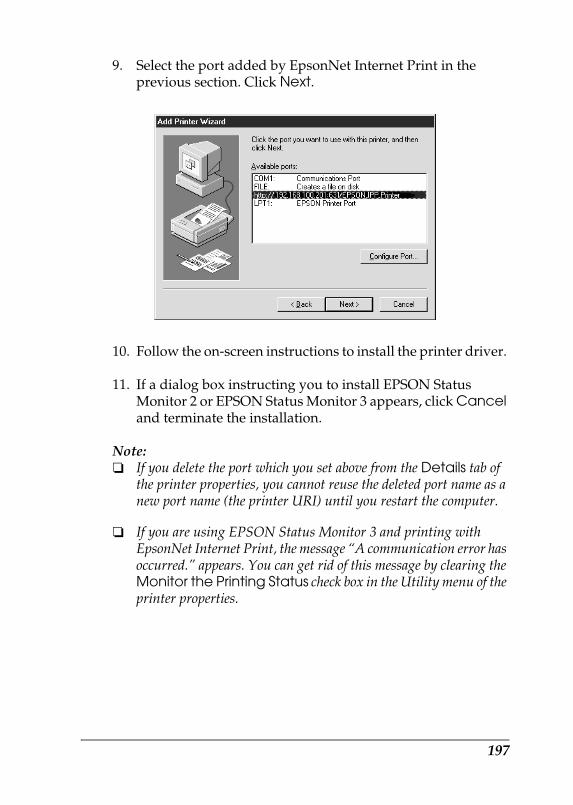
R4CB860html.bk Rev. FEPINT.FM A5 size10/19/04
RProof Sign-off:KOW N.Mizuno H.TomizawaT.TakahashiNOC K. Lee
9. Select the port added by EpsonNet Internet Print in the previous section. Click Next.
10. Follow the on-screen instructions to install the printer driver.
11. If a dialog box instructing you to install EPSON Status Monitor 2 or EPSON Status Monitor 3 appears, click Cancel and terminate the installation.
Note:❏ If you delete the port which you set above from the Details tab of
the printer properties, you cannot reuse the deleted port name as a new port name (the printer URI) until you restart the computer.
❏ If you are using EPSON Status Monitor 3 and printing with EpsonNet Internet Print, the message “A communication error has occurred.” appears. You can get rid of this message by clearing the Monitor the Printing Status check box in the Utility menu of the printer properties.
197
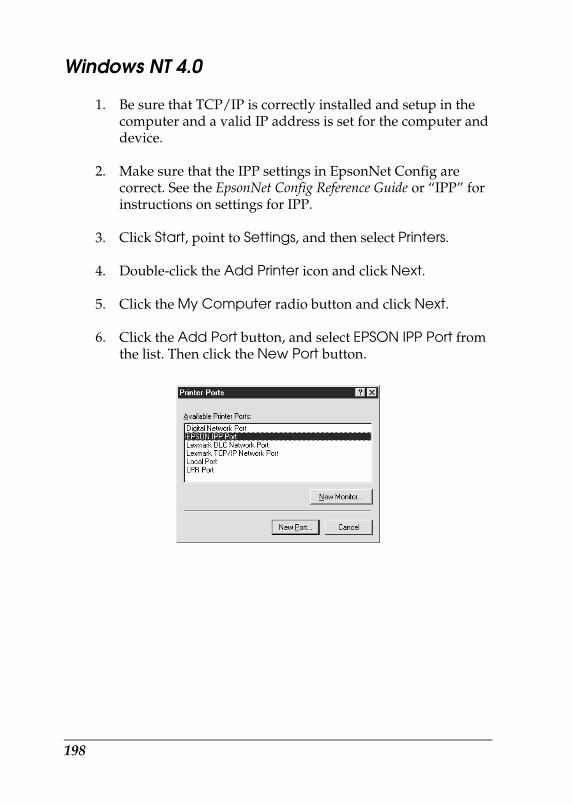
R4CB860html.bk Rev. FEPINT.FM A5 size10/19/04
L Proof Sign-off:KOW N.Mizuno H.TomizawaT.TakahashiNOC K. Lee
Windows NT 4.0
1. Be sure that TCP/IP is correctly installed and setup in the computer and a valid IP address is set for the computer and device.
2. Make sure that the IPP settings in EpsonNet Config are correct. See the EpsonNet Config Reference Guide or “IPP” for instructions on settings for IPP.
3. Click Start, point to Settings, and then select Printers.
4. Double-click the Add Printer icon and click Next.
5. Click the My Computer radio button and click Next.
6. Click the Add Port button, and select EPSON IPP Port from the list. Then click the New Port button.
198
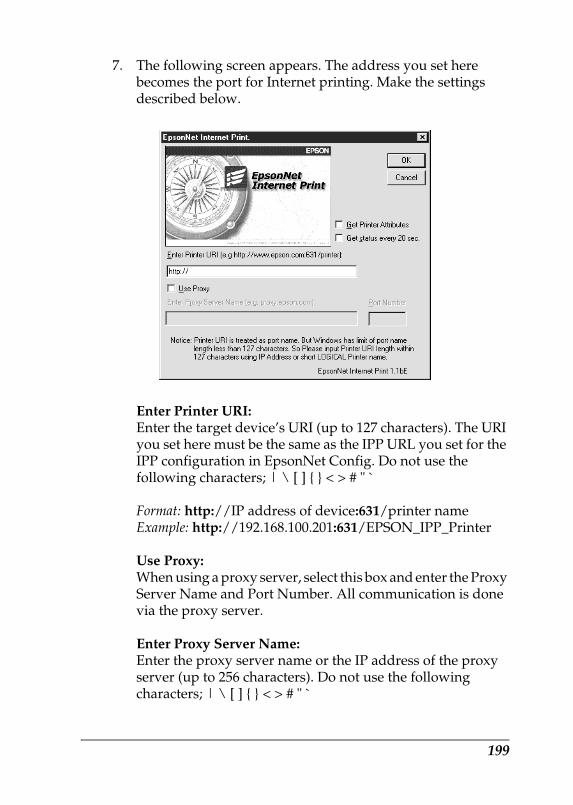
R4CB860html.bk Rev. FEPINT.FM A5 size10/19/04
RProof Sign-off:KOW N.Mizuno H.TomizawaT.TakahashiNOC K. Lee
7. The following screen appears. The address you set here becomes the port for Internet printing. Make the settings described below.
Enter Printer URI:Enter the target device’s URI (up to 127 characters). The URI you set here must be the same as the IPP URL you set for the IPP configuration in EpsonNet Config. Do not use the following characters; | \ [ ] { } < > # " `
Format: http://IP address of device:631/printer nameExample: http://192.168.100.201:631/EPSON_IPP_Printer
Use Proxy:When using a proxy server, select this box and enter the Proxy Server Name and Port Number. All communication is done via the proxy server.
Enter Proxy Server Name:Enter the proxy server name or the IP address of the proxy server (up to 256 characters). Do not use the following characters; | \ [ ] { } < > # " `
199
R4CB860html.bk Rev. FEPINT.FM A5 size10/19/04
L Proof Sign-off:KOW N.Mizuno H.TomizawaT.TakahashiNOC K. Lee
Port Number:Enter the port number of the proxy server (from 0 to 65535).
Get Printer Attributes:When you select this box and click OK, EpsonNet Internet Print communicates with the device and acquires information, so it may take a few minutes before a message appears. This setting is available only when creating a port.
Get status every 20 sec.:Select this box when you want to receive printer status updates at regular intervals (every 5 seconds during printing and every 20 seconds when idle). If you select this box, a message will appear if an error occurs during printing. You can also check the printer status by double-clicking the printer icon.
OK button:Saves the settings.
Cancel button:Cancels any changes.
Note:❏ The settings can be changed after setting up the device. In the
printer Properties dialog box, click the Ports tab, and click the Configure Port button to change the settings.
❏ Be aware that if you connect to the Internet using a dial-up router and select the Get status every 20 sec check box, you may be charged for the extra line connection.
❏ When you select the Get Printer Attributes check box and click OK, an error message may appear. Be sure that the device power is on, and the device is connected to the network.
200
R4CB860html.bk Rev. FEPINT.FM A5 size10/19/04
RProof Sign-off:KOW N.Mizuno H.TomizawaT.TakahashiNOC K. Lee
❏ If the device power is off or there is a problem in the network, the Get status every 20 sec check box is automatically cleared. If this happens, make sure that the device power is on and the device is correctly connected on the network, and then select the Get status every 20 sec check box again.
8. Click OK to save the settings.
9. Select the printer driver, and follow the on-screen instructions to install the printer driver.
Note:When you are using EPSON Status Monitor 3 and printing from EpsonNet Internet Print, the message "A communication error has occurred." appears. To clear this message, right-click the printer icon, select Document Defaults, and select the Utility tab. Then select the Monitor the Printing Status check box.
Status Alert Window
The EpsonNet Internet Print utility updates the status of the IPP printer if you have selected the Get status every 20 sec check box in the EpsonNet Internet Print dialog box.
The status alert window appears when the device is out of paper, toner, or ink, if paper is jammed, the cover is open, or when the device is offline.
The EpsonNet Internet Print utility checks the printer status every 5 seconds during printing and every 20 seconds when idle. If you do not want to check the printer status, clear the Get status every 20 sec check box in the EpsonNet Internet Print dialog box.
201

R4CB860html.bk Rev. FEPINT.FM A5 size10/19/04
L Proof Sign-off:KOW N.Mizuno H.TomizawaT.TakahashiNOC K. Lee
202
R4CB860html.bk Rev. FWBMGR.FM A5 size10/19/04
RProof Sign-off:KOW N.Mizuno H.TomizawaT.TakahashiNOC K. Lee
EpsonNet WebManager
About EpsonNet WebManager
EpsonNet WebManager is an application designed to manage network devices. It allows network administrators to easily control network devices. EpsonNet WebManager offers the following features:
❏ It supports Windows, Macintosh, and UNIX platforms to give network administrators flexibility in managing network devices.
❏ It allows you to search and monitor network devices, and make settings for network devices.
❏ It offers a Group Management function that helps you manage devices as a group.
❏ It provides printer driver management functions: such as the ability to store printer drivers on the EpsonNet WebManager server, and easy installation of printer drivers on client PCs.
Note:❏ Before installing and using EpsonNet WebManager, be sure to read
the Readme.txt file. This file contains the latest information on EpsonNet WebManager.
❏ The term “device” refers to a printer, interface card, or network adapter.
203
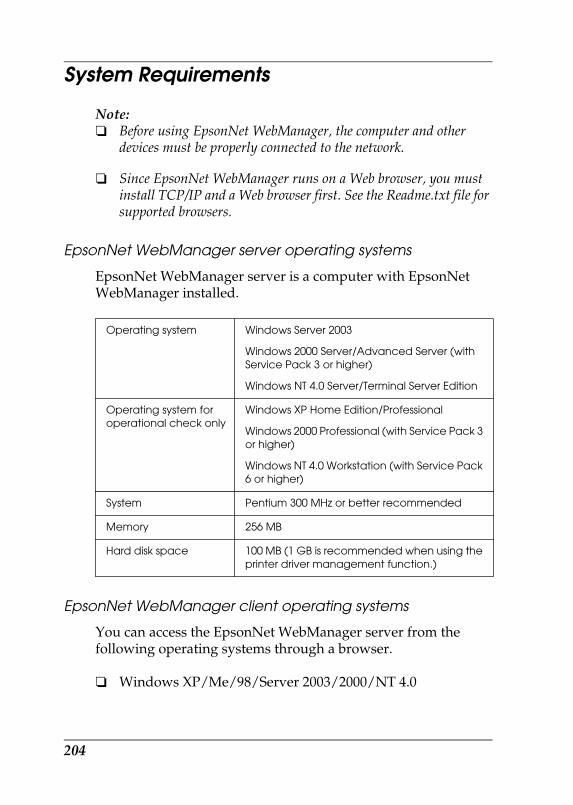
R4CB860html.bk Rev. FWBMGR.FM A5 size10/19/04
L Proof Sign-off:KOW N.Mizuno H.TomizawaT.TakahashiNOC K. Lee
System Requirements
Note:❏ Before using EpsonNet WebManager, the computer and other
devices must be properly connected to the network.
❏ Since EpsonNet WebManager runs on a Web browser, you must install TCP/IP and a Web browser first. See the Readme.txt file for supported browsers.
EpsonNet WebManager server operating systems
EpsonNet WebManager server is a computer with EpsonNet WebManager installed.
EpsonNet WebManager client operating systems
You can access the EpsonNet WebManager server from the following operating systems through a browser.
❏ Windows XP/Me/98/Server 2003/2000/NT 4.0
Operating system Windows Server 2003
Windows 2000 Server/Advanced Server (with Service Pack 3 or higher)
Windows NT 4.0 Server/Terminal Server Edition
Operating system for operational check only
Windows XP Home Edition/Professional
Windows 2000 Professional (with Service Pack 3 or higher)
Windows NT 4.0 Workstation (with Service Pack 6 or higher)
System Pentium 300 MHz or better recommended
Memory 256 MB
Hard disk space 100 MB (1 GB is recommended when using the printer driver management function.)
204
R4CB860html.bk Rev. FWBMGR.FM A5 size10/19/04
RProof Sign-off:KOW N.Mizuno H.TomizawaT.TakahashiNOC K. Lee
❏ Macintosh
❏ UNIX (see the Readme.txt file for supported UNIX systems)
❏ Monitor: 1024 x 768 or higher resolution VGA monitorwith support for 65535 or more display colors
EpsonNet WebManager Functions
EpsonNet WebManager provides you with the following functions:
❏ Device list functionSearches for devices on the network and displays a device list with current status.
❏ Device details functionYou can make or change the printer settings through EpsonNet WebManager. The setting items in the Device details function will differ depending on the device.
❏ Network settings functionYou can make or change the network interface settings through EpsonNet WebManager.
❏ Group management functionGroups can help you manage network devices more effectively.
❏ Printer driver managementDownloading and updating the printer driver through the Internet automatically, and easy installation of the printer driver on client PCs.
205
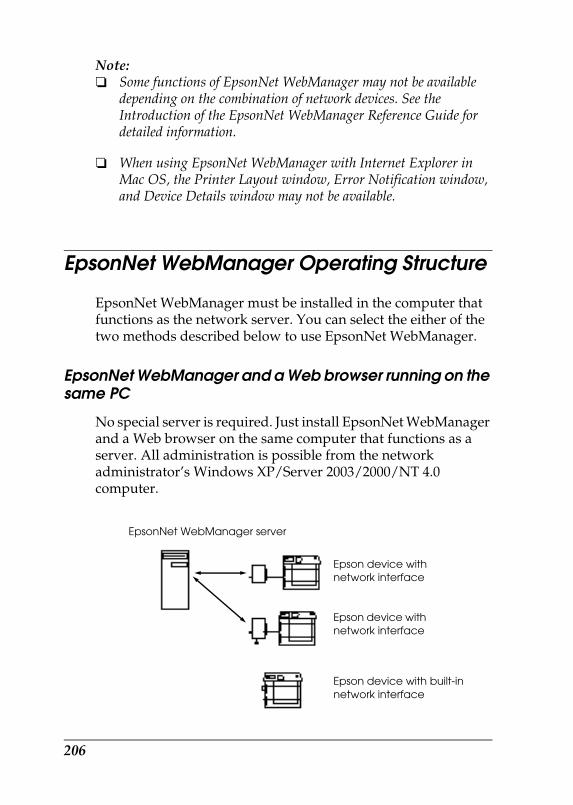
R4CB860html.bk Rev. FWBMGR.FM A5 size10/19/04
L Proof Sign-off:KOW N.Mizuno H.TomizawaT.TakahashiNOC K. Lee
Note:❏ Some functions of EpsonNet WebManager may not be available
depending on the combination of network devices. See the Introduction of the EpsonNet WebManager Reference Guide for detailed information.
❏ When using EpsonNet WebManager with Internet Explorer in Mac OS, the Printer Layout window, Error Notification window, and Device Details window may not be available.
EpsonNet WebManager Operating Structure
EpsonNet WebManager must be installed in the computer that functions as the network server. You can select the either of the two methods described below to use EpsonNet WebManager.
EpsonNet WebManager and a Web browser running on the same PC
No special server is required. Just install EpsonNet WebManager and a Web browser on the same computer that functions as a server. All administration is possible from the network administrator’s Windows XP/Server 2003/2000/NT 4.0 computer.
EpsonNet WebManager server
Epson device with network interface
Epson device with network interface
Epson device with built-in network interface
206
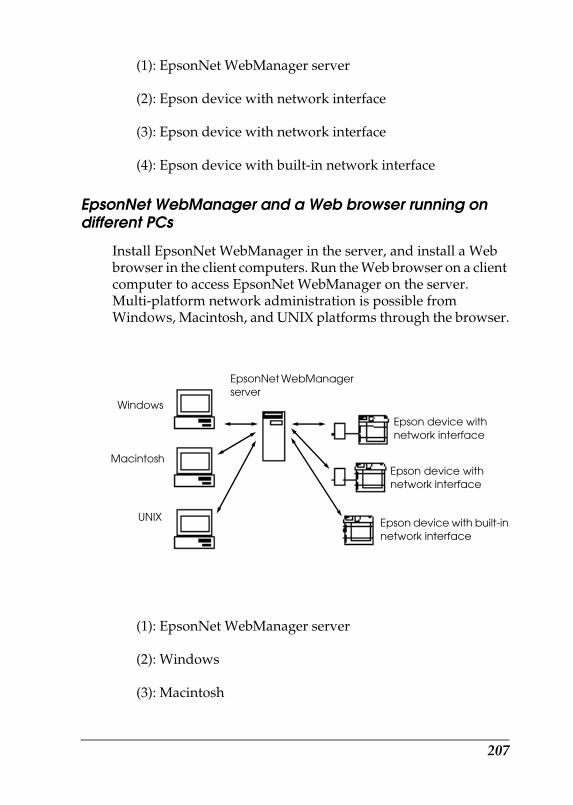
R4CB860html.bk Rev. FWBMGR.FM A5 size10/19/04
RProof Sign-off:KOW N.Mizuno H.TomizawaT.TakahashiNOC K. Lee
(1): EpsonNet WebManager server
(2): Epson device with network interface
(3): Epson device with network interface
(4): Epson device with built-in network interface
EpsonNet WebManager and a Web browser running on different PCs
Install EpsonNet WebManager in the server, and install a Web browser in the client computers. Run the Web browser on a client computer to access EpsonNet WebManager on the server. Multi-platform network administration is possible from Windows, Macintosh, and UNIX platforms through the browser.
(1): EpsonNet WebManager server
(2): Windows
(3): Macintosh
Windows
Macintosh
UNIX
EpsonNet WebManager server
Epson device with network interface
Epson device with built-in network interface
Epson device with network interface
207
R4CB860html.bk Rev. FWBMGR.FM A5 size10/19/04
L Proof Sign-off:KOW N.Mizuno H.TomizawaT.TakahashiNOC K. Lee
(4): UNIX
(5): Epson device with network interface
(6): Epson device with network interface
(7): Epson device with built-in network interface
Installing EpsonNet WebManager
Follow the steps below to install EpsonNet WebManager.
1. Insert the Software CD-ROM in the CD-ROM drive.
If the Installer dialog box does not appear automatically, double-click EPSETUP.EXE on the CD-ROM.
2. In the Welcome screen, click the Next button.
3. Read the license agreement, and then click the Agree button.
4. Select Install Network Utility.
5. Click the Install button located next to EpsonNet WebManager.
6. Follow the on-screen instructions to complete the installation.
Note:❏ You do not need to install EpsonNet WebManager in the client
computer. Just announce the IP address or host name of the server to any clients who use EpsonNet WebManager from a client computer.
❏ To use the printer driver management function, you need to select Custom and then select the check box during installation.
208
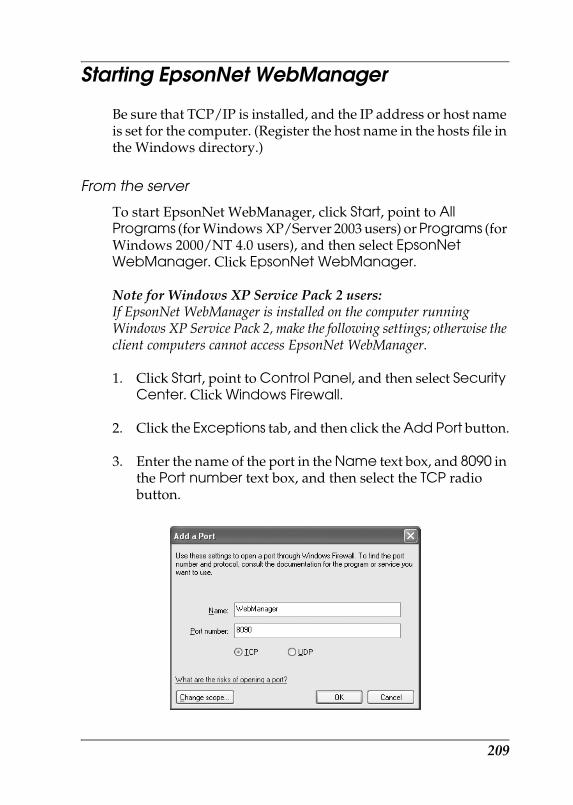
R4CB860html.bk Rev. FWBMGR.FM A5 size10/19/04
RProof Sign-off:KOW N.Mizuno H.TomizawaT.TakahashiNOC K. Lee
Starting EpsonNet WebManager
Be sure that TCP/IP is installed, and the IP address or host name is set for the computer. (Register the host name in the hosts file in the Windows directory.)
From the server
To start EpsonNet WebManager, click Start, point to All Programs (for Windows XP/Server 2003 users) or Programs (for Windows 2000/NT 4.0 users), and then select EpsonNet WebManager. Click EpsonNet WebManager.
Note for Windows XP Service Pack 2 users:If EpsonNet WebManager is installed on the computer running Windows XP Service Pack 2, make the following settings; otherwise the client computers cannot access EpsonNet WebManager.
1. Click Start, point to Control Panel, and then select Security Center. Click Windows Firewall.
2. Click the Exceptions tab, and then click the Add Port button.
3. Enter the name of the port in the Name text box, and 8090 in the Port number text box, and then select the TCP radio button.
209
R4CB860html.bk Rev. FWBMGR.FM A5 size10/19/04
L Proof Sign-off:KOW N.Mizuno H.TomizawaT.TakahashiNOC K. Lee
Note:If necessary, click the Change scope button, and then specify the IP addresses of the client computers for which the port is unblocked.
4. Click OK.
From the client
Run the Web browser and then type the IP address (or the host name) of the server and default port number.
❏ Format:http://IP address or host name of server:8090/wm
❏ Example:http://192.168.100.201:8090/wm
Opening the Online Guide
After starting EpsonNet WebManager, be sure to read the EpsonNet WebManager’s online reference guide. It provides important information and instructions on using EpsonNet WebManager.
You can access the online guide by using any of the following methods:
❏ Run EpsonNet WebManager. From the Help menu, select Online Guide.
❏ Click the question mark button on the current screen so that a help screen appears describing the functions on that page.
210

R4CB860html.bk Rev. FWBMGR.FM A5 size10/19/04
RProof Sign-off:KOW N.Mizuno H.TomizawaT.TakahashiNOC K. Lee
❏ Click Start, point to All Programs (for Windows XP/Server 2003 users) or Programs (for Windows 2000/NT 4.0 users), and then select EpsonNet WebManager. Click Online Guide.
211

R4CB860html.bk Rev. FWBMGR.FM A5 size10/19/04
L Proof Sign-off:KOW N.Mizuno H.TomizawaT.TakahashiNOC K. Lee
212
R4CB860html.bk Rev. FEPSET.FM A5 size10/19/04
RProof Sign-off:KOW N.Mizuno H.TomizawaT.TakahashiNOC K. Lee
EpsonNet SetupManager
About EpsonNet SetupManager
EpsonNet SetupManager is a utility that provides a simple printer installation and configuration tool for network administrators, and an easy network printer installation process for clients. EpsonNet SetupManager installs the printer driver for printers newly connected to the network, and helps network administrators and clients efficiently install and configure new network printers on Windows operating systems running TCP/IP.
EpsonNet SetupManager provides the following functions.
❏ Installs the printer driver easily.
❏ Installs the port monitor (EpsonNet Print) automatically.
❏ Creates a printer port.
❏ Creates a shortcut (an icon that executes the script file on the server) or a package (which contains all files needed for the installation) for automatic printer driver installation.
❏ Outputs the result of the printer driver installation using the script file.
❏ Edits more than one script file at a time.
❏ Registers unconnected printers in a script file.
❏ Installs utilities such as EPSON Status Monitor 3 and EPSON Scan that support automatic installation.
213
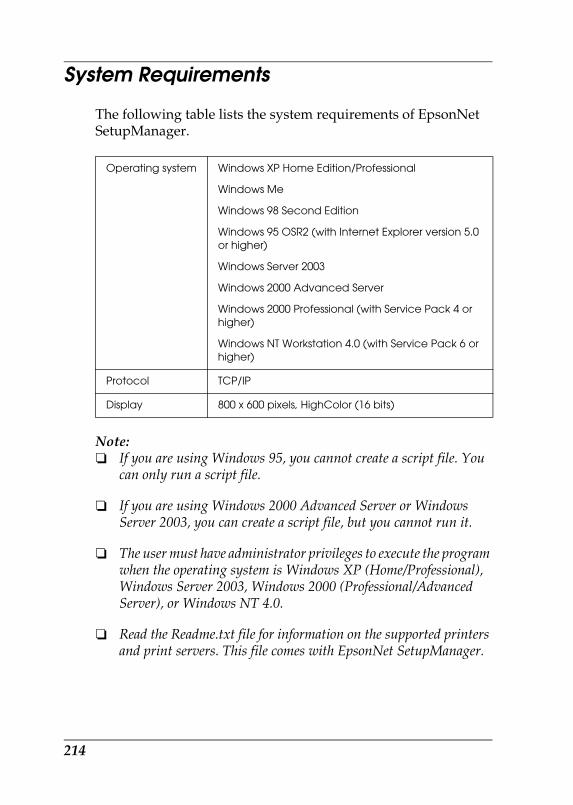
R4CB860html.bk Rev. FEPSET.FM A5 size10/19/04
L Proof Sign-off:KOW N.Mizuno H.TomizawaT.TakahashiNOC K. Lee
System Requirements
The following table lists the system requirements of EpsonNet SetupManager.
Note:❏ If you are using Windows 95, you cannot create a script file. You
can only run a script file.
❏ If you are using Windows 2000 Advanced Server or Windows Server 2003, you can create a script file, but you cannot run it.
❏ The user must have administrator privileges to execute the program when the operating system is Windows XP (Home/Professional), Windows Server 2003, Windows 2000 (Professional/Advanced Server), or Windows NT 4.0.
❏ Read the Readme.txt file for information on the supported printers and print servers. This file comes with EpsonNet SetupManager.
Operating system Windows XP Home Edition/Professional
Windows Me
Windows 98 Second Edition
Windows 95 OSR2 (with Internet Explorer version 5.0 or higher)
Windows Server 2003
Windows 2000 Advanced Server
Windows 2000 Professional (with Service Pack 4 or higher)
Windows NT Workstation 4.0 (with Service Pack 6 or higher)
Protocol TCP/IP
Display 800 x 600 pixels, HighColor (16 bits)
214
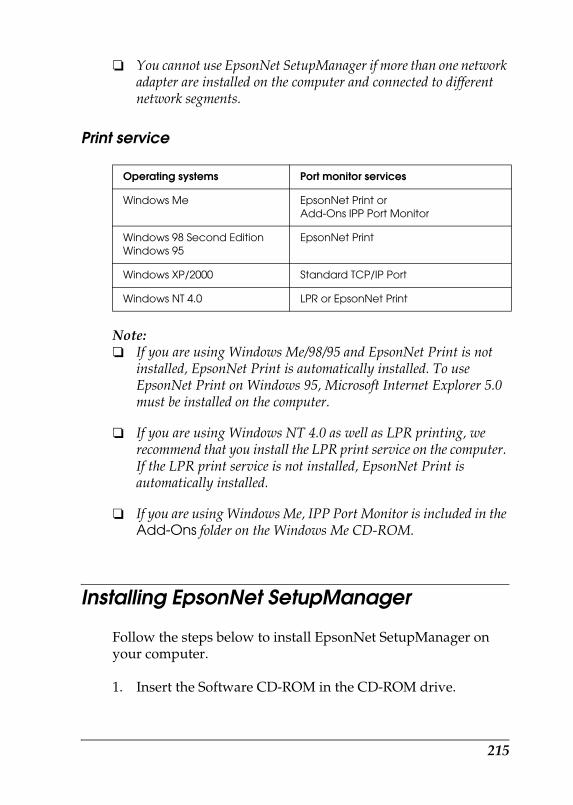
R4CB860html.bk Rev. FEPSET.FM A5 size10/19/04
RProof Sign-off:KOW N.Mizuno H.TomizawaT.TakahashiNOC K. Lee
❏ You cannot use EpsonNet SetupManager if more than one network adapter are installed on the computer and connected to different network segments.
Print service
Note:❏ If you are using Windows Me/98/95 and EpsonNet Print is not
installed, EpsonNet Print is automatically installed. To use EpsonNet Print on Windows 95, Microsoft Internet Explorer 5.0 must be installed on the computer.
❏ If you are using Windows NT 4.0 as well as LPR printing, we recommend that you install the LPR print service on the computer. If the LPR print service is not installed, EpsonNet Print is automatically installed.
❏ If you are using Windows Me, IPP Port Monitor is included in the Add-Ons folder on the Windows Me CD-ROM.
Installing EpsonNet SetupManager
Follow the steps below to install EpsonNet SetupManager on your computer.
1. Insert the Software CD-ROM in the CD-ROM drive.
Operating systems Port monitor services
Windows Me EpsonNet Print or Add-Ons IPP Port Monitor
Windows 98 Second EditionWindows 95
EpsonNet Print
Windows XP/2000 Standard TCP/IP Port
Windows NT 4.0 LPR or EpsonNet Print
215
R4CB860html.bk Rev. FEPSET.FM A5 size10/19/04
L Proof Sign-off:KOW N.Mizuno H.TomizawaT.TakahashiNOC K. Lee
If the Installer dialog box does not appear automatically, double-click EPSETUP.EXE on the CD-ROM.
2. From the Welcome screen, click the Next button.
3. Read the license agreement, and then click the Agree button.
4. Select Install Network Utility.
5. Click the Install button located next to EpsonNet SetupManager.
6. Follow the on-screen instructions to complete the installation.
Accessing the User’s Guide for EpsonNet SetupManager
The EpsonNet SetupManager User’s Guide contains detailed information on EpsonNet SetupManager. Follow the steps below to access the EpsonNet SetupManager User’s Guide.
Click Start, point to All Programs (for Windows XP/Server 2003 users) or Programs (for Windows Me/98/Server 2003/2000/NT 4.0 users), and then select EpsonNet. Click EpsonNet SetupManager, and then select UserGuide to open it.
The EpsonNet SetupManager User’s Guide appears. You can get information on using EpsonNet SetupManager.
216
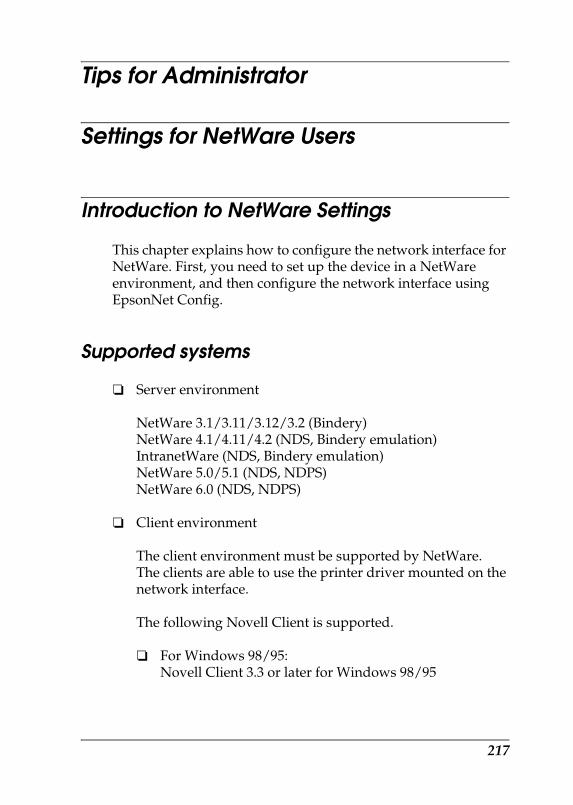
R4CB860html.bk Rev. FSETNW.FM A5 size10/19/04
RProof Sign-off:KOW N.Mizuno H.TomizawaT.TakahashiNOC K. Lee
Tips for Administrator
Settings for NetWare Users
Introduction to NetWare Settings
This chapter explains how to configure the network interface for NetWare. First, you need to set up the device in a NetWare environment, and then configure the network interface using EpsonNet Config.
Supported systems
❏ Server environment
NetWare 3.1/3.11/3.12/3.2 (Bindery)NetWare 4.1/4.11/4.2 (NDS, Bindery emulation)IntranetWare (NDS, Bindery emulation)NetWare 5.0/5.1 (NDS, NDPS)NetWare 6.0 (NDS, NDPS)
❏ Client environment
The client environment must be supported by NetWare. The clients are able to use the printer driver mounted on the network interface.
The following Novell Client is supported.
❏ For Windows 98/95:Novell Client 3.3 or later for Windows 98/95
217
R4CB860html.bk Rev. FSETNW.FM A5 size10/19/04
L Proof Sign-off:KOW N.Mizuno H.TomizawaT.TakahashiNOC K. Lee
❏ For Windows 2000/NT 4.0:Novell Client 4.8 or later for Windows 2000/NT 4.0
❏ For Windows XP:Novell Client 4.9 or later for Windows XP
About modes
You can choose either the Print Server, Remote Printer, or Standby mode. We recommend that you use the Print Server mode unless the number of users exceeds the limit.
Features of these modes are described below.
Print Server mode (NDS/Bindery Print Server):
❏ High-speed printing with direct printing
❏ Uses the NetWare user account
❏ Can connect up to 8 file servers simultaneously
❏ Can register up to 32 print queues
Remote Printer mode:
❏ A NetWare user account is not required.
❏ A print server is needed to control the remote printer.
❏ Can attach up to 16 printers for NetWare 3.x, and up to 255 for NetWare 4.x or later.
Note:When you turn on the device, the user account is temporarily accessed in the Remote Printer mode. If there is no user account available, turn on the device before connecting the client to the network.
218
R4CB860html.bk Rev. FSETNW.FM A5 size10/19/04
RProof Sign-off:KOW N.Mizuno H.TomizawaT.TakahashiNOC K. Lee
Standby mode (factory default mode):
The Standby mode is the default mode. This mode disables all NetWare related functions. Use the Standby mode when you are not using the network interface in a NetWare environment.
Instructions for Using NetWare
Printing a text file
When you print a text file using the NPRINT command of NetWare or DOS, redirection, misconversion or a gap in characters may occur depending on the client environment.
IPX routing protocol “NLSP”
It is possible to set the IPX routing protocol “NLSP” from NetWare 4.x or later; however, the network interface does not support NLSP. RIP/SAP controls the communication.
You can select the routing protocol from a) NLSP with RIP/SAP Compatibility, or b) RIP/SAP Only. If you remove the bind of RIP or SAP when NLSP with RIP/SAP Compatibility is specified, the network interface then cannot communicate with the file server and NDS. (See “Protocols” and “Bindings” in NetWare’s INETCFG utility.)
Bindery and NDS
❏ You can check the bindery context path from the server console by using the SET BINDERY CONTEXT command.
❏ If the bindery context path has not been set, or if you want to use the printing environment of another context from a non-NDS client, you need to specify the context for the bindery context. Use the SET BINDERY CONTEXT command to set the context in the AUTOEXEC.NCF file.
219
R4CB860html.bk Rev. FSETNW.FM A5 size10/19/04
L Proof Sign-off:KOW N.Mizuno H.TomizawaT.TakahashiNOC K. Lee
❏ You cannot use the bindery print server mode with EpsonNet Config if you are running Novell Client for Windows 95/98 version 3.00 or Novell Client for Windows NT version 4.50. To configure the network interface for bindery mode, use Novell IntranetWare Client or EpsonNet Config with Web Browser.
See your NetWare documentation for more information.
Time required to recognize the network interface
It takes up to two minutes for the NetWare server to recognize the network interface, after the device is turned on. During this start-up time, the status sheet does not show the correct information.
Frame type
The same frame type should be used for the NetWare server and IPX router on the same network. If more than one frame type is used on the same network, bind all the frame types to the NetWare servers and IPX routers.
For NetWare 5.x
The IPX protocol must be installed (bound) on the NetWare 5.x server.
About modes
If the mode you have logged in is different from the mode you set for the network interface, a message appears when you try to configure the network interface for NetWare. If you do not want to change the current settings, click Cancel and log in again using the same mode set for the network interface.
220
R4CB860html.bk Rev. FSETNW.FM A5 size10/19/04
RProof Sign-off:KOW N.Mizuno H.TomizawaT.TakahashiNOC K. Lee
Using Bindery Print Server (NetWare 3.x/4.x)
This section contains instructions on using the network interface in the Print Server mode on NetWare 3.x/4.x/IntranetWare with Bindery emulation.
Note:The network interface in the Print Server mode of NetWare 3.x does not allow you to use the Print Server status display control with PCONSOLE.
1. Turn on the device.
2. From any NetWare client, log in to the target NetWare server with supervisor privileges. You must log in with the bindery connection.
3. Configure the network interface using EpsonNet Config. See the EpsonNet Config Reference Guide for details.
If NetWare objects are already created, you can also use EpsonNet Config with Web Browser. See “NetWare” for details.
Using NDS Print Server (NetWare 4.x/5.x/6.0)
This section contains instructions for using the network interface in the Print Server mode on NetWare 4.x, IntranetWare, NetWare 5.x, or NetWare 6.0 with NDS mode.
1. Turn on the device.
2. From any NetWare client, log in to the target context of the NDS tree as an ADMIN.
221
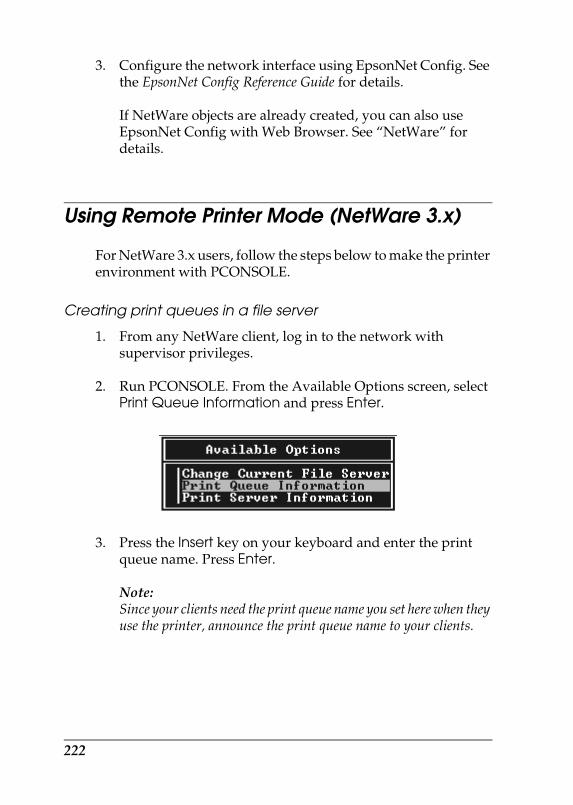
R4CB860html.bk Rev. FSETNW.FM A5 size10/19/04
L Proof Sign-off:KOW N.Mizuno H.TomizawaT.TakahashiNOC K. Lee
3. Configure the network interface using EpsonNet Config. See the EpsonNet Config Reference Guide for details.
If NetWare objects are already created, you can also use EpsonNet Config with Web Browser. See “NetWare” for details.
Using Remote Printer Mode (NetWare 3.x)
For NetWare 3.x users, follow the steps below to make the printer environment with PCONSOLE.
Creating print queues in a file server
1. From any NetWare client, log in to the network with supervisor privileges.
2. Run PCONSOLE. From the Available Options screen, select Print Queue Information and press Enter.
3. Press the Insert key on your keyboard and enter the print queue name. Press Enter.
Note:Since your clients need the print queue name you set here when they use the printer, announce the print queue name to your clients.
222
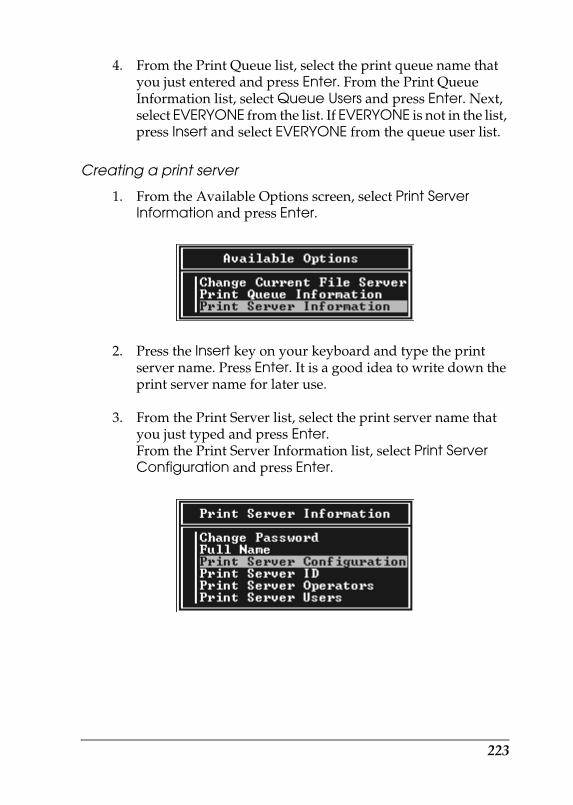
R4CB860html.bk Rev. FSETNW.FM A5 size10/19/04
RProof Sign-off:KOW N.Mizuno H.TomizawaT.TakahashiNOC K. Lee
4. From the Print Queue list, select the print queue name that you just entered and press Enter. From the Print Queue Information list, select Queue Users and press Enter. Next, select EVERYONE from the list. If EVERYONE is not in the list, press Insert and select EVERYONE from the queue user list.
Creating a print server
1. From the Available Options screen, select Print Server Information and press Enter.
2. Press the Insert key on your keyboard and type the print server name. Press Enter. It is a good idea to write down the print server name for later use.
3. From the Print Server list, select the print server name that you just typed and press Enter.From the Print Server Information list, select Print Server Configuration and press Enter.
223
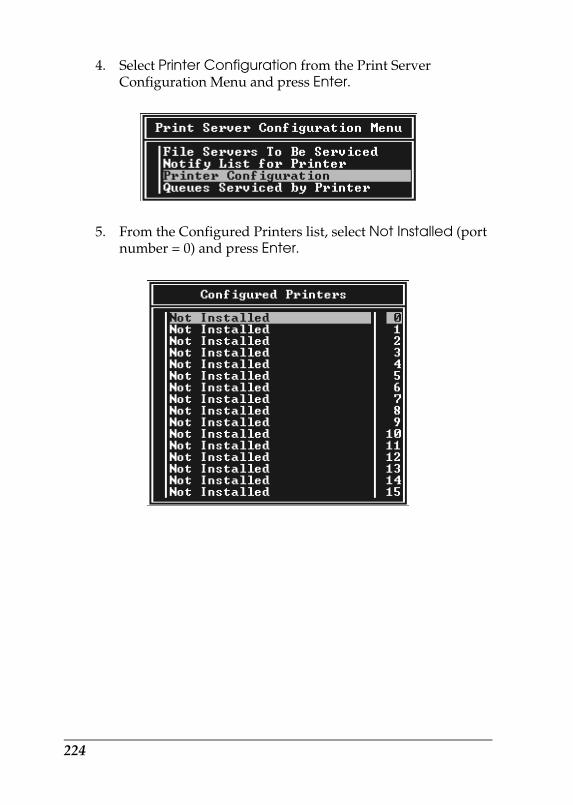
R4CB860html.bk Rev. FSETNW.FM A5 size10/19/04
L Proof Sign-off:KOW N.Mizuno H.TomizawaT.TakahashiNOC K. Lee
4. Select Printer Configuration from the Print Server Configuration Menu and press Enter.
5. From the Configured Printers list, select Not Installed (port number = 0) and press Enter.
224
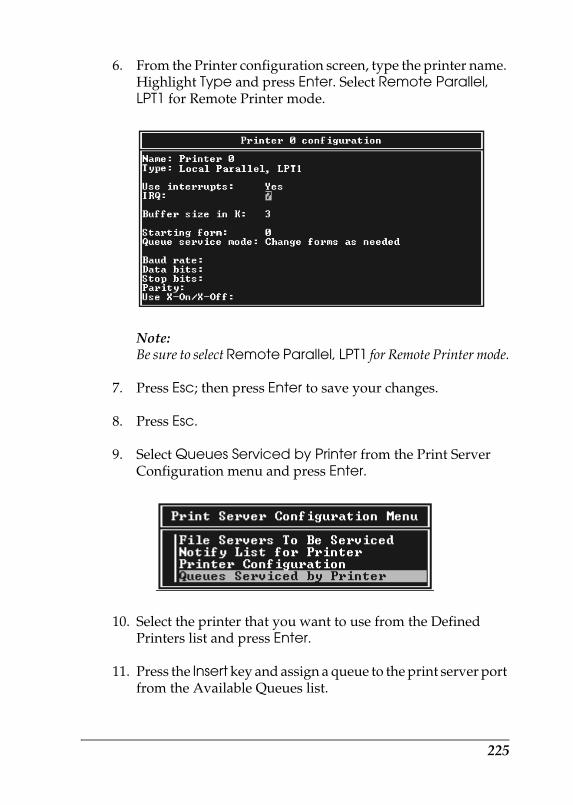
R4CB860html.bk Rev. FSETNW.FM A5 size10/19/04
RProof Sign-off:KOW N.Mizuno H.TomizawaT.TakahashiNOC K. Lee
6. From the Printer configuration screen, type the printer name. Highlight Type and press Enter. Select Remote Parallel, LPT1 for Remote Printer mode.
Note:Be sure to select Remote Parallel, LPT1 for Remote Printer mode.
7. Press Esc; then press Enter to save your changes.
8. Press Esc.
9. Select Queues Serviced by Printer from the Print Server Configuration menu and press Enter.
10. Select the printer that you want to use from the Defined Printers list and press Enter.
11. Press the Insert key and assign a queue to the print server port from the Available Queues list.
225
R4CB860html.bk Rev. FSETNW.FM A5 size10/19/04
L Proof Sign-off:KOW N.Mizuno H.TomizawaT.TakahashiNOC K. Lee
12. Specify a priority level between 1 to 10. One is top priority.
13. Press Esc to exit PCONSOLE.
Configuring for NetWare using EpsonNet Config
1. Turn on the device.
2. Load the print server from the file server’s system console which the print queue volume is set.>LOAD PSERVER print server name you set using PCONSOLE
3. Configure the network interface using EpsonNet Config. See the EpsonNet Config Reference Guide for details.
If NetWare objects are already created, you can also use EpsonNet Config with Web Browser. See “NetWare” for details.
Using Bindery Remote Printer Mode (NetWare 4.x)
Follow the steps below to make the printer environment on NetWare 4.x and IntranetWare with Bindery emulation.
Note:❏ Assign Trusteeships for users if necessary.
❏ Be sure to use PCONSOLE to set the print queue and print server instead of using NWAdmin.
Creating objects
1. From any NetWare client, log in to the server as an ADMIN. Make sure to log in with Bindery connection.
226
R4CB860html.bk Rev. FSETNW.FM A5 size10/19/04
RProof Sign-off:KOW N.Mizuno H.TomizawaT.TakahashiNOC K. Lee
Note:If the client using for this setting has been logged in with NDS mode, press F4 key while PCONSOLE is starting to switch to the bindery mode.
2. Run PCONSOLE. From the Available Options screen, select Print Queues and press Enter. Press Insert and type the print queue name. Press Enter.
Note:Since your clients need the print queue name you set here when they use the printer, announce the print queue name to your clients.
3. From the Print Queue list, select the print queue name that you just entered and press Enter. From the Print Queue Information list, select Queue Users and press Enter. Next, select EVERYONE from the list. If EVERYONE is not in the list, press Insert and select EVERYONE from the queue user list.
4. From the Available Options screen, select Print Servers and press Enter. Press Insert and type the print server name. Press Enter.
5. Press Esc to exit PCONSOLE, and log out from the server.
6. Log in to the server as an ADMIN. Be sure to log in with NDS connection.
7. Start NWAdmin.
8. To create the Printer Object, click the container specified as the Bindery context and select Create from the Object menu, then Printer. Type the printer name and click Create.
9. To assign the print queue, double-click the Printer object icon (created in step 8). The Printer dialog box appears.
10. Click Assignments and then click Add. From the print queue list, select the queue (created in step 2) and click OK.
227
R4CB860html.bk Rev. FSETNW.FM A5 size10/19/04
L Proof Sign-off:KOW N.Mizuno H.TomizawaT.TakahashiNOC K. Lee
11. Click Configuration in the Printer dialog box, and select Parallel from the Printer type pull-down menu.
12. Click Communication. The Parallel Communication dialog box appears.
13. Select LPT1 for Port; check Polled for Interrupts; and check Manual load (Remote from Print Server) for Connection type, then click OK.
14. Click OK in the Printer dialog box.
15. To assign the printer, double-click the Print Server object icon (created in step 4). The Print Server dialog box appears.
16. Click Assignments and then click Add. From the printer object list, select the printer object (created in step 8) and click OK.
17. In the Print Server dialog box, select the assigned printer from the printer object list, and click the Printer Number button to set the printer number from 0 to 15, then click OK.
18. To confirm the objects you have assigned, double-click the Print Server object icon. Click Print Layout, and check that the print server, printer, and print queue are connected.
Configuring for NetWare using EpsonNet Config
1. Turn on the device.
2. Load the print server from the file server’s system console which the print queue volume is set.>LOAD PSERVER print server name you set using PCONSOLE
3. Configure the network interface using EpsonNet Config. See the EpsonNet Config Reference Guide for details.
228
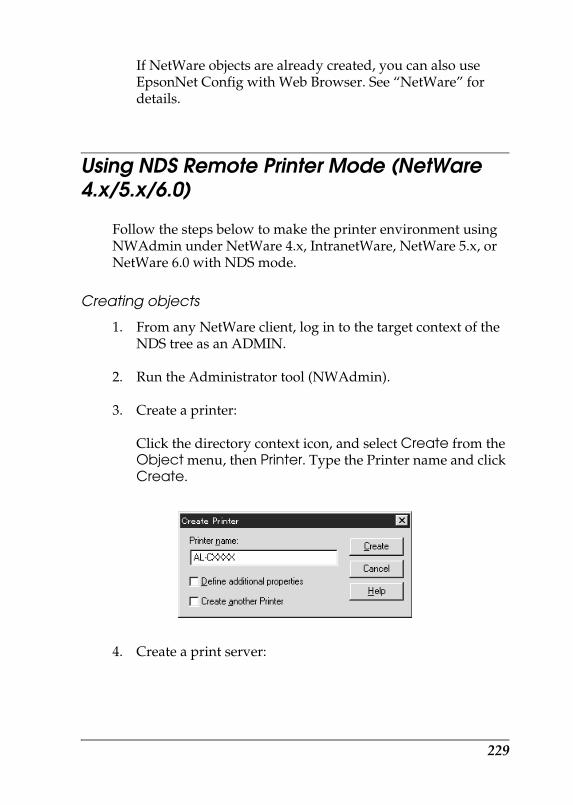
R4CB860html.bk Rev. FSETNW.FM A5 size10/19/04
RProof Sign-off:KOW N.Mizuno H.TomizawaT.TakahashiNOC K. Lee
If NetWare objects are already created, you can also use EpsonNet Config with Web Browser. See “NetWare” for details.
Using NDS Remote Printer Mode (NetWare 4.x/5.x/6.0)
Follow the steps below to make the printer environment using NWAdmin under NetWare 4.x, IntranetWare, NetWare 5.x, or NetWare 6.0 with NDS mode.
Creating objects
1. From any NetWare client, log in to the target context of the NDS tree as an ADMIN.
2. Run the Administrator tool (NWAdmin).
3. Create a printer:
Click the directory context icon, and select Create from the Object menu, then Printer. Type the Printer name and click Create.
4. Create a print server:
229
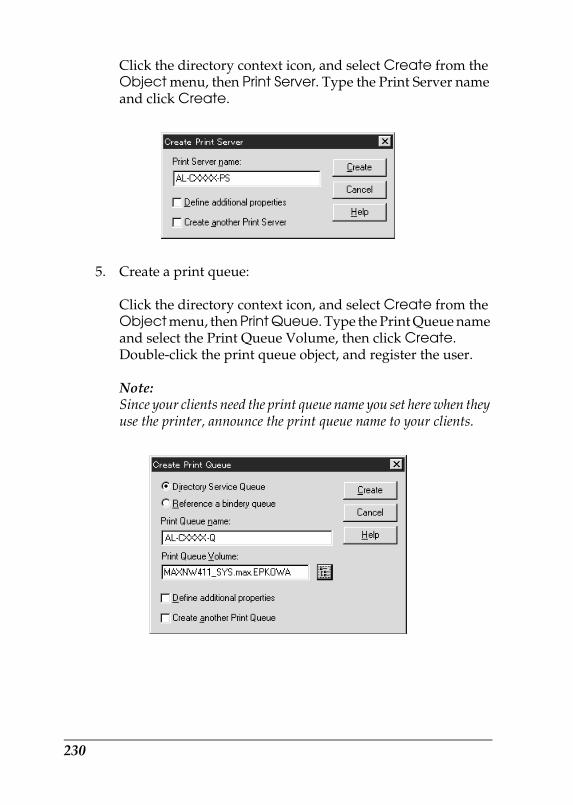
R4CB860html.bk Rev. FSETNW.FM A5 size10/19/04
L Proof Sign-off:KOW N.Mizuno H.TomizawaT.TakahashiNOC K. Lee
Click the directory context icon, and select Create from the Object menu, then Print Server. Type the Print Server name and click Create.
5. Create a print queue:
Click the directory context icon, and select Create from the Object menu, then Print Queue. Type the Print Queue name and select the Print Queue Volume, then click Create. Double-click the print queue object, and register the user.
Note:Since your clients need the print queue name you set here when they use the printer, announce the print queue name to your clients.
230
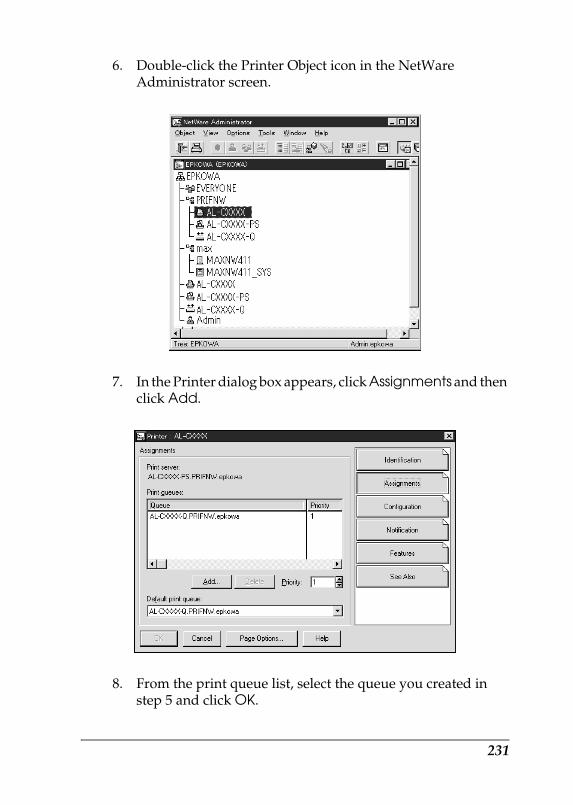
R4CB860html.bk Rev. FSETNW.FM A5 size10/19/04
RProof Sign-off:KOW N.Mizuno H.TomizawaT.TakahashiNOC K. Lee
6. Double-click the Printer Object icon in the NetWare Administrator screen.
7. In the Printer dialog box appears, click Assignments and then click Add.
8. From the print queue list, select the queue you created in step 5 and click OK.
231
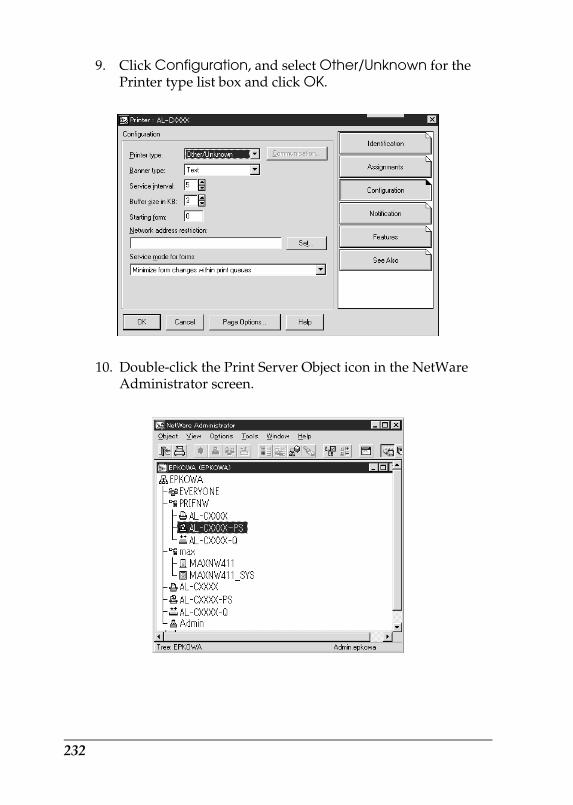
R4CB860html.bk Rev. FSETNW.FM A5 size10/19/04
L Proof Sign-off:KOW N.Mizuno H.TomizawaT.TakahashiNOC K. Lee
9. Click Configuration, and select Other/Unknown for the Printer type list box and click OK.
10. Double-click the Print Server Object icon in the NetWare Administrator screen.
232
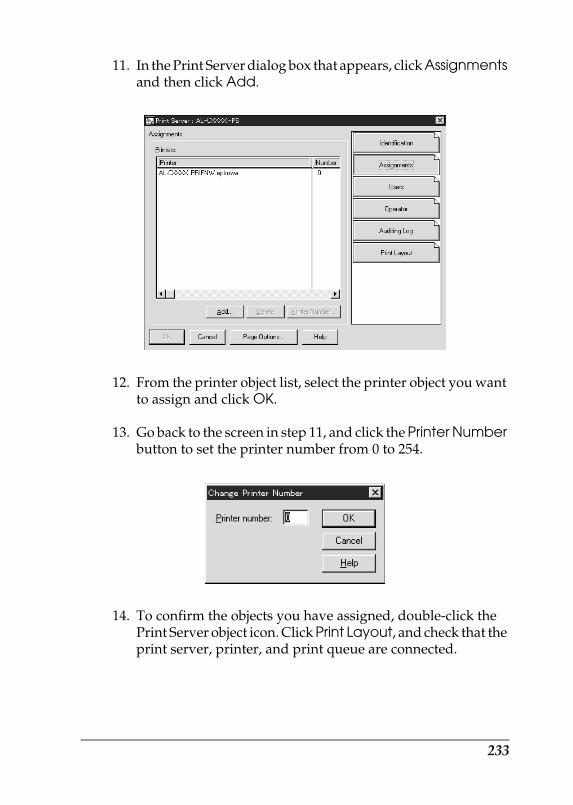
R4CB860html.bk Rev. FSETNW.FM A5 size10/19/04
RProof Sign-off:KOW N.Mizuno H.TomizawaT.TakahashiNOC K. Lee
11. In the Print Server dialog box that appears, click Assignments and then click Add.
12. From the printer object list, select the printer object you want to assign and click OK.
13. Go back to the screen in step 11, and click the Printer Number button to set the printer number from 0 to 254.
14. To confirm the objects you have assigned, double-click the Print Server object icon. Click Print Layout, and check that the print server, printer, and print queue are connected.
233
R4CB860html.bk Rev. FSETNW.FM A5 size10/19/04
L Proof Sign-off:KOW N.Mizuno H.TomizawaT.TakahashiNOC K. Lee
Configuring for NetWare using EpsonNet Config
1. Turn on the device.
2. Load the print server from the file server’s system console which the print queue volume is set.>LOAD PSERVER print server name you set using NWAdmin
3. Configure the network interface using EpsonNet Config. See the EpsonNet Config Reference Guide for details.
If you use the NetWare objects that are already created, you can use EpsonNet Config with Web Browser too. See “NetWare” for details.
Using the NDPS Gateway
This section contains instructions on printing using Novell Distributed Print Services® (NDPS®) with Novell® NetWare® 5.x/6.0. Novell Distributed Print Services (NDPS) is the new generation print services of NetWare.
Note:❏ Banners cannot be printed with NDPS.
❏ The Status Monitor 3 utility cannot be used with NDPS.
❏ Bind the IP or both IP or IPX protocols on the NetWare server that runs NDPSM.NLM and EPSONGW.NLM.
Check the following points before starting.
❏ Install the appropriate client software, such as Novell Client 3.3 or later for Windows 95/98, Novell Client 4.8 or later for Windows 2000/NT 4.0, or Novell Client 4.9 or later for Windows XP on client workstations. Make sure they install NDPS.
234
R4CB860html.bk Rev. FSETNW.FM A5 size10/19/04
RProof Sign-off:KOW N.Mizuno H.TomizawaT.TakahashiNOC K. Lee
❏ When you use the network interface with Bindery (either in the Print Server mode or the Remote Printer mode), you need PCONSOLE.EXE to create bindery objects such as Print Server and Print Queue objects. Since PCONSOLE.EXE does not come with NetWare 5.x/6.0, you need to get the file from Novell.
Outline of settings
The followings are basic steps to use the network interface with the NDPS printing system. Detailed procedures are described in the subsequent sections.
1. Select the Connection Type and make the printer environment on the Server and Clients.
2. Create an NDPS Manager object in NetWare Administrator.
3. Create a Printer Agent in NetWare Administrator.
4. Configure the network interface using EpsonNet Config.
5. Set the printer on the client workstations.
The environment to use, the settings you make, and the tools to use differ depending on the printer type and connection type you choose. You can create an NDPS Manager and Printer Agent in NetWare Administrator or partially via the Server Console. See the Novell online documentation for more details.
Making printer environment
1. Select the Connection Type from the following: Remote (rprinter on IPX), Remote (LPR on IP), or Forward jobs to a Queue (via the current legacy queue-based print services).
235
R4CB860html.bk Rev. FSETNW.FM A5 size10/19/04
L Proof Sign-off:KOW N.Mizuno H.TomizawaT.TakahashiNOC K. Lee
2. Install (bind) the following protocols on the server depending on the connection type you use.
❏ For Remote (rprinter on IPX) connection, install IPX
❏ For Remote (LPR on IP) connection, install TCP/IP
❏ For Forward jobs to a Queue connection, install IPX
3. Install the appropriate Client Software on client workstations. Make sure they install NDPS.
4. Install printer drivers on client workstations. See the printer manual for the installation.
236
R4CB860html.bk Rev. FSETNW.FM A5 size10/19/04
RProof Sign-off:KOW N.Mizuno H.TomizawaT.TakahashiNOC K. Lee
Note:❏ Do not install the printer drivers via the NetWare server.
❏ Do not add printers and do not install printer drivers using Novell Print Manager (NWPMW32.EXE).
Creating an NDPS Manager
1. Run NetWare Administrator (NWADMN32.EXE) on the client machine. The main browser window appears.
2. To create an NDPS Manager, click the Directory context icon, and then select Create from the Object menu.
3. Select NDPS Manager from the list.
4. Enter the NDPS Manager name in the NDPS Manager Name field.
5. Browse the Resident Server and select where you want the NDPS Manager assigned.
6. Browse the Database Volume and select where you want the NDPS Manager database assigned.
7. Click Create. The NDPS Manager icon appears in the main browser window.
8. Type LOAD NDPSM at the server console, and then select the NDPS Manager you have created.
237

R4CB860html.bk Rev. FSETNW.FM A5 size10/19/04
L Proof Sign-off:KOW N.Mizuno H.TomizawaT.TakahashiNOC K. Lee
Creating a Printer Agent
After creating an NDPS Manager, you can create Printer Agents, either public access printers or controlled access printers. The way to create a Printer Agent differs depending on the printer type you choose. The following are the features of public access printers and controlled access printers.
❏ Public Access Printers: NDPS printers that are available to all network users and not associated with an NDS object. Users can select and print to any public access printer they can view from their workstations. However, these printers do not take full advantage of services such as security and job event notification.
❏ Controlled Access Printers:NDPS printers that are added to the NDS tree by NetWare Administrator. They are only available to the workstation user through the NDS object list. These printers can take full advantage of the security and management features provided by NDS.
1. Select the printer type either public access printer or controlled access printer.
2. Create a public access printer. If you want to create a controlled access printer, go to step 3.
In NetWare Administrator, double-click the NDPS Manager you have created. Click Printer Agent List, then click New. Enter the Printer Agent name, and select Novell Printer Gateway for the Gateway Type. Click OK. Go step 4.
3. Create a controlled access printer.
238
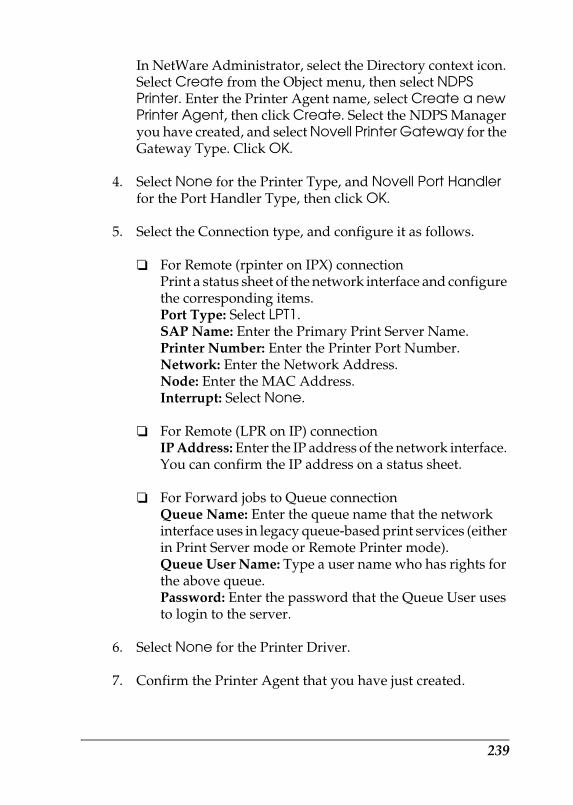
R4CB860html.bk Rev. FSETNW.FM A5 size10/19/04
RProof Sign-off:KOW N.Mizuno H.TomizawaT.TakahashiNOC K. Lee
In NetWare Administrator, select the Directory context icon. Select Create from the Object menu, then select NDPS Printer. Enter the Printer Agent name, select Create a new Printer Agent, then click Create. Select the NDPS Manager you have created, and select Novell Printer Gateway for the Gateway Type. Click OK.
4. Select None for the Printer Type, and Novell Port Handler for the Port Handler Type, then click OK.
5. Select the Connection type, and configure it as follows.
❏ For Remote (rpinter on IPX) connection Print a status sheet of the network interface and configure the corresponding items.Port Type: Select LPT1.SAP Name: Enter the Primary Print Server Name.Printer Number: Enter the Printer Port Number.Network: Enter the Network Address.Node: Enter the MAC Address.Interrupt: Select None.
❏ For Remote (LPR on IP) connectionIP Address: Enter the IP address of the network interface. You can confirm the IP address on a status sheet.
❏ For Forward jobs to Queue connectionQueue Name: Enter the queue name that the network interface uses in legacy queue-based print services (either in Print Server mode or Remote Printer mode).Queue User Name: Type a user name who has rights for the above queue.Password: Enter the password that the Queue User uses to login to the server.
6. Select None for the Printer Driver.
7. Confirm the Printer Agent that you have just created.
239
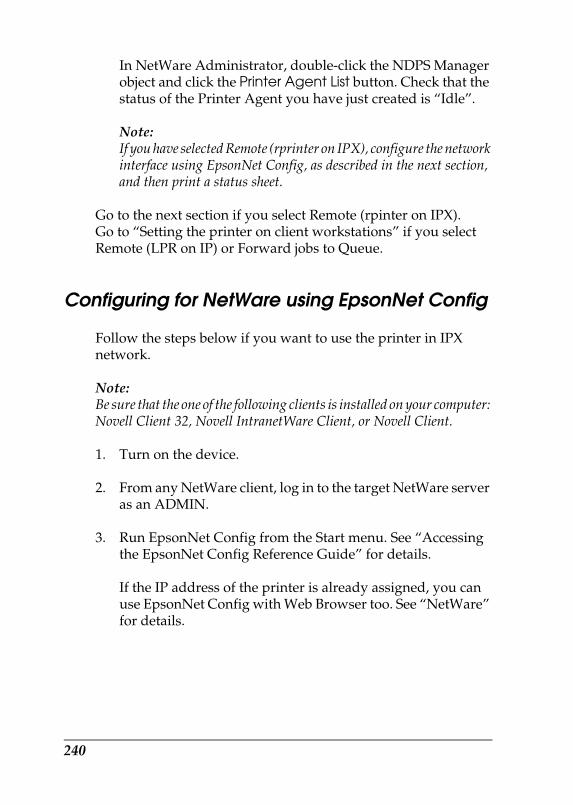
R4CB860html.bk Rev. FSETNW.FM A5 size10/19/04
L Proof Sign-off:KOW N.Mizuno H.TomizawaT.TakahashiNOC K. Lee
In NetWare Administrator, double-click the NDPS Manager object and click the Printer Agent List button. Check that the status of the Printer Agent you have just created is “Idle”.
Note:If you have selected Remote (rprinter on IPX), configure the network interface using EpsonNet Config, as described in the next section, and then print a status sheet.
Go to the next section if you select Remote (rpinter on IPX). Go to “Setting the printer on client workstations” if you select Remote (LPR on IP) or Forward jobs to Queue.
Configuring for NetWare using EpsonNet Config
Follow the steps below if you want to use the printer in IPX network.
Note:Be sure that the one of the following clients is installed on your computer: Novell Client 32, Novell IntranetWare Client, or Novell Client.
1. Turn on the device.
2. From any NetWare client, log in to the target NetWare server as an ADMIN.
3. Run EpsonNet Config from the Start menu. See “Accessing the EpsonNet Config Reference Guide” for details.
If the IP address of the printer is already assigned, you can use EpsonNet Config with Web Browser too. See “NetWare” for details.
240
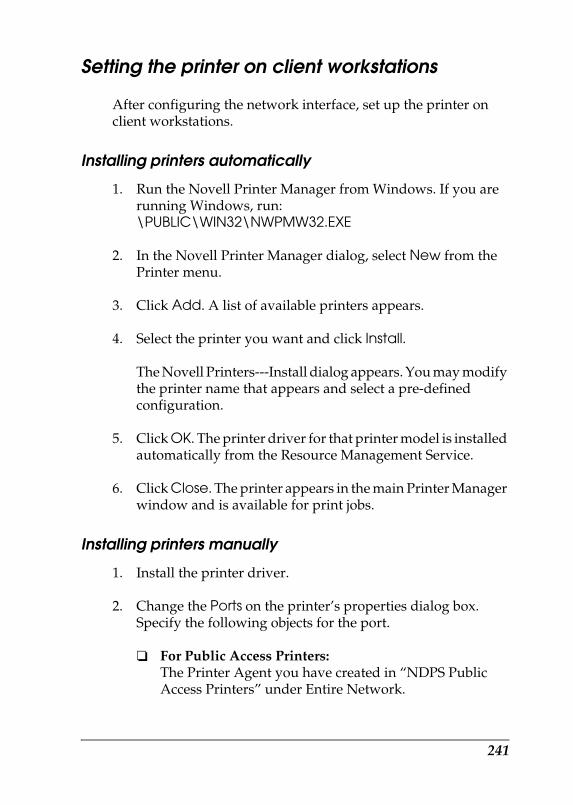
R4CB860html.bk Rev. FSETNW.FM A5 size10/19/04
RProof Sign-off:KOW N.Mizuno H.TomizawaT.TakahashiNOC K. Lee
Setting the printer on client workstations
After configuring the network interface, set up the printer on client workstations.
Installing printers automatically
1. Run the Novell Printer Manager from Windows. If you are running Windows, run:\PUBLIC\WIN32\NWPMW32.EXE
2. In the Novell Printer Manager dialog, select New from the Printer menu.
3. Click Add. A list of available printers appears.
4. Select the printer you want and click Install.
The Novell Printers---Install dialog appears. You may modify the printer name that appears and select a pre-defined configuration.
5. Click OK. The printer driver for that printer model is installed automatically from the Resource Management Service.
6. Click Close. The printer appears in the main Printer Manager window and is available for print jobs.
Installing printers manually
1. Install the printer driver.
2. Change the Ports on the printer’s properties dialog box. Specify the following objects for the port.
❏ For Public Access Printers:The Printer Agent you have created in “NDPS Public Access Printers” under Entire Network.
241
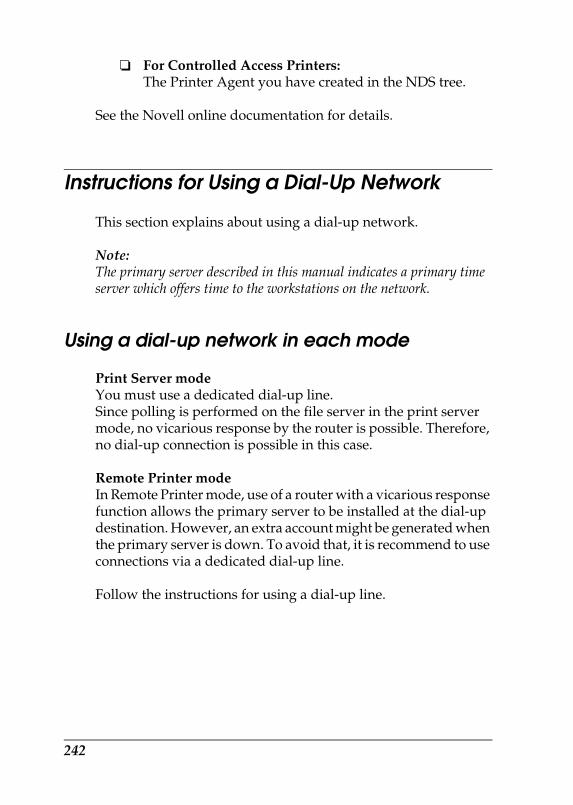
R4CB860html.bk Rev. FSETNW.FM A5 size10/19/04
L Proof Sign-off:KOW N.Mizuno H.TomizawaT.TakahashiNOC K. Lee
❏ For Controlled Access Printers:The Printer Agent you have created in the NDS tree.
See the Novell online documentation for details.
Instructions for Using a Dial-Up Network
This section explains about using a dial-up network.
Note:The primary server described in this manual indicates a primary time server which offers time to the workstations on the network.
Using a dial-up network in each mode
Print Server modeYou must use a dedicated dial-up line.Since polling is performed on the file server in the print server mode, no vicarious response by the router is possible. Therefore, no dial-up connection is possible in this case.
Remote Printer modeIn Remote Printer mode, use of a router with a vicarious response function allows the primary server to be installed at the dial-up destination. However, an extra account might be generated when the primary server is down. To avoid that, it is recommend to use connections via a dedicated dial-up line.
Follow the instructions for using a dial-up line.
242
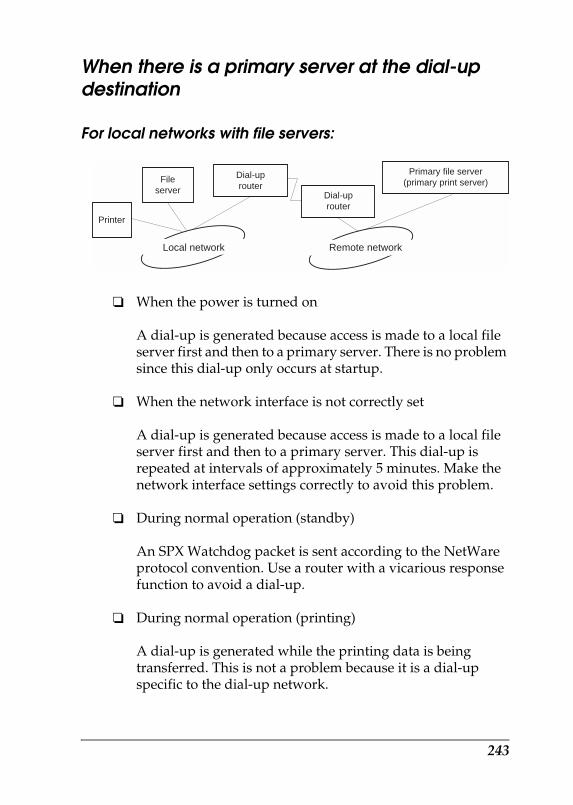
R4CB860html.bk Rev. FSETNW.FM A5 size10/19/04
RProof Sign-off:KOW N.Mizuno H.TomizawaT.TakahashiNOC K. Lee
When there is a primary server at the dial-up destination
For local networks with file servers:
❏ When the power is turned on
A dial-up is generated because access is made to a local file server first and then to a primary server. There is no problem since this dial-up only occurs at startup.
❏ When the network interface is not correctly set
A dial-up is generated because access is made to a local file server first and then to a primary server. This dial-up is repeated at intervals of approximately 5 minutes. Make the network interface settings correctly to avoid this problem.
❏ During normal operation (standby)
An SPX Watchdog packet is sent according to the NetWare protocol convention. Use a router with a vicarious response function to avoid a dial-up.
❏ During normal operation (printing)
A dial-up is generated while the printing data is being transferred. This is not a problem because it is a dial-up specific to the dial-up network.
Local network
Printer
Fileserver
Dial-uprouter
Dial-uprouter
Primary file server(primary print server)
Remote network
243
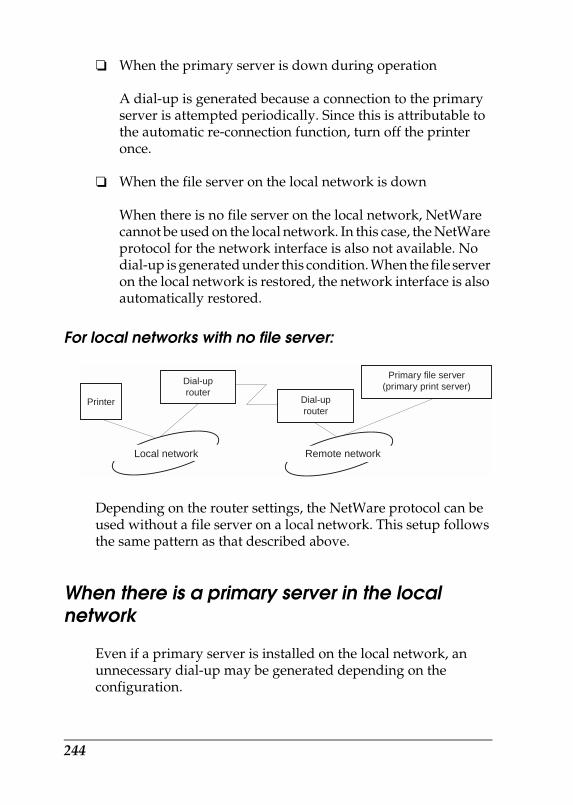
R4CB860html.bk Rev. FSETNW.FM A5 size10/19/04
L Proof Sign-off:KOW N.Mizuno H.TomizawaT.TakahashiNOC K. Lee
❏ When the primary server is down during operation
A dial-up is generated because a connection to the primary server is attempted periodically. Since this is attributable to the automatic re-connection function, turn off the printer once.
❏ When the file server on the local network is down
When there is no file server on the local network, NetWare cannot be used on the local network. In this case, the NetWare protocol for the network interface is also not available. No dial-up is generated under this condition. When the file server on the local network is restored, the network interface is also automatically restored.
For local networks with no file server:
Depending on the router settings, the NetWare protocol can be used without a file server on a local network. This setup follows the same pattern as that described above.
When there is a primary server in the local network
Even if a primary server is installed on the local network, an unnecessary dial-up may be generated depending on the configuration.
Local network
Printer
Dial-uprouter
Dial-uprouter
Primary file server(primary print server)
Remote network
244
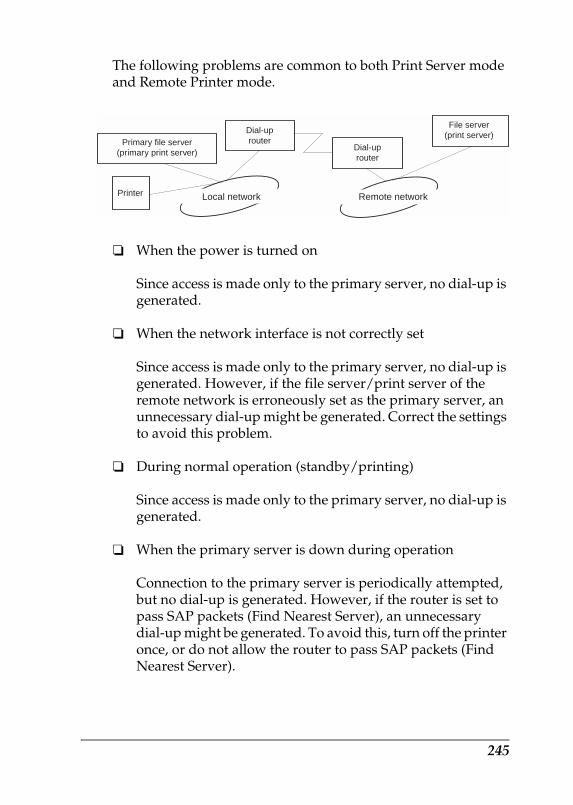
R4CB860html.bk Rev. FSETNW.FM A5 size10/19/04
RProof Sign-off:KOW N.Mizuno H.TomizawaT.TakahashiNOC K. Lee
The following problems are common to both Print Server mode and Remote Printer mode.
❏ When the power is turned on
Since access is made only to the primary server, no dial-up is generated.
❏ When the network interface is not correctly set
Since access is made only to the primary server, no dial-up is generated. However, if the file server/print server of the remote network is erroneously set as the primary server, an unnecessary dial-up might be generated. Correct the settings to avoid this problem.
❏ During normal operation (standby/printing)
Since access is made only to the primary server, no dial-up is generated.
❏ When the primary server is down during operation
Connection to the primary server is periodically attempted, but no dial-up is generated. However, if the router is set to pass SAP packets (Find Nearest Server), an unnecessary dial-up might be generated. To avoid this, turn off the printer once, or do not allow the router to pass SAP packets (Find Nearest Server).
Local networkPrinter
Dial-uprouter
Dial-uprouter
File server(print server)
Remote network
Primary file server(primary print server)
245

R4CB860html.bk Rev. FSETNW.FM A5 size10/19/04
L Proof Sign-off:KOW N.Mizuno H.TomizawaT.TakahashiNOC K. Lee
246
R4CB860html.bk Rev. FSETU.FM A5 size10/19/04
RProof Sign-off:KOW N.Mizuno H.TomizawaT.TakahashiNOC K. Lee
Settings for UNIX Users
Introduction to UNIX Settings
This chapter explains how to set up the device for different UNIX systems using the lpr command.
Your device is able to function as a remote printer on systems using TCP/IP Ethernet transfer with lpr remote printing protocol, or standard ftp (file transfer protocol).
Note:Because this device does not convert data into the printer control language, a printer driver and filter are necessary for each system.
lpr filters
Filters for lpr are controlled by the name given to the remote printer. When setting up an lpr printer entry, a name is entered for:
❏ the local printer name to be redirected
❏ the host name of the station to which the print is sent
❏ the remote printer name (name of the printer port on the remote station)
247
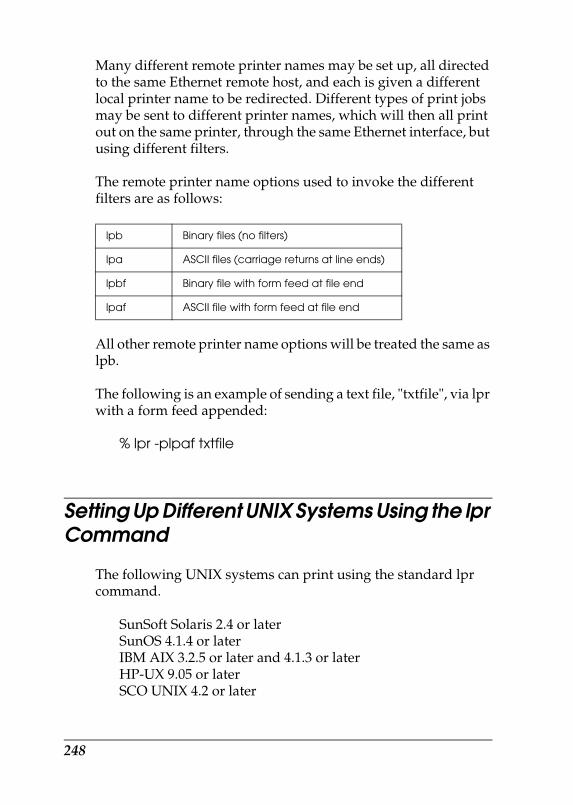
R4CB860html.bk Rev. FSETU.FM A5 size10/19/04
L Proof Sign-off:KOW N.Mizuno H.TomizawaT.TakahashiNOC K. Lee
Many different remote printer names may be set up, all directed to the same Ethernet remote host, and each is given a different local printer name to be redirected. Different types of print jobs may be sent to different printer names, which will then all print out on the same printer, through the same Ethernet interface, but using different filters.
The remote printer name options used to invoke the different filters are as follows:
All other remote printer name options will be treated the same as lpb.
The following is an example of sending a text file, "txtfile", via lpr with a form feed appended:
% lpr -plpaf txtfile
Setting Up Different UNIX Systems Using the lpr Command
The following UNIX systems can print using the standard lpr command.
SunSoft Solaris 2.4 or laterSunOS 4.1.4 or laterIBM AIX 3.2.5 or later and 4.1.3 or laterHP-UX 9.05 or later SCO UNIX 4.2 or later
lpb Binary files (no filters)
lpa ASCII files (carriage returns at line ends)
lpbf Binary file with form feed at file end
lpaf ASCII file with form feed at file end
248

R4CB860html.bk Rev. FSETU.FM A5 size10/19/04
RProof Sign-off:KOW N.Mizuno H.TomizawaT.TakahashiNOC K. Lee
Setting up for SunSoft Solaris 2.4 or later
In the following steps, substitute the name that your device will be known by for HOSTNAME, and the name by which you want your device to be known for Rprinter.
1. Add the IP address and printer host name to the \etc\hosts file.
For example:22.33.44.55 HOSTNAME
2. Define the host name as a print server.
For example:lpsystem -t bsd HOSTNAME
3. Create the printer.
For example:lpadmin -p Rprinter -s HOSTNAME\aux-T unknown-1any
4. Enable the device for use.
For example:accept Rprinterenable Rprinter
5. To print, use the lp command.
For example:lp -d RPrinter Print-File-Name
249
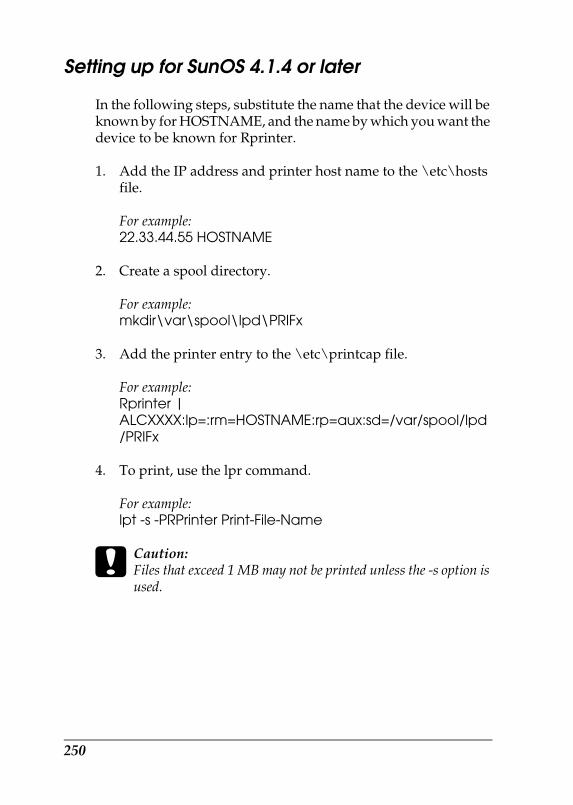
R4CB860html.bk Rev. FSETU.FM A5 size10/19/04
L Proof Sign-off:KOW N.Mizuno H.TomizawaT.TakahashiNOC K. Lee
Setting up for SunOS 4.1.4 or later
In the following steps, substitute the name that the device will be known by for HOSTNAME, and the name by which you want the device to be known for Rprinter.
1. Add the IP address and printer host name to the \etc\hosts file.
For example:22.33.44.55 HOSTNAME
2. Create a spool directory.
For example:mkdir\var\spool\lpd\PRIFx
3. Add the printer entry to the \etc\printcap file.
For example:Rprinter | ALCXXXX:lp=:rm=HOSTNAME:rp=aux:sd=/var/spool/lpd/PRIFx
4. To print, use the lpr command.
For example:lpt -s -PRPrinter Print-File-Name
cCaution:Files that exceed 1 MB may not be printed unless the -s option is used.
250
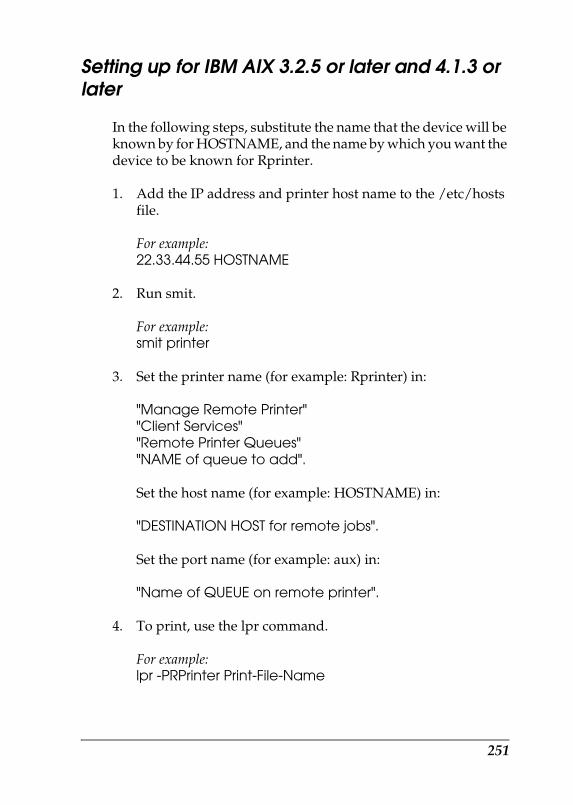
R4CB860html.bk Rev. FSETU.FM A5 size10/19/04
RProof Sign-off:KOW N.Mizuno H.TomizawaT.TakahashiNOC K. Lee
Setting up for IBM AIX 3.2.5 or later and 4.1.3 or later
In the following steps, substitute the name that the device will be known by for HOSTNAME, and the name by which you want the device to be known for Rprinter.
1. Add the IP address and printer host name to the /etc/hosts file.
For example:22.33.44.55 HOSTNAME
2. Run smit.
For example:smit printer
3. Set the printer name (for example: Rprinter) in:
"Manage Remote Printer""Client Services""Remote Printer Queues""NAME of queue to add".
Set the host name (for example: HOSTNAME) in:
"DESTINATION HOST for remote jobs".
Set the port name (for example: aux) in:
"Name of QUEUE on remote printer".
4. To print, use the lpr command.
For example:lpr -PRPrinter Print-File-Name
251
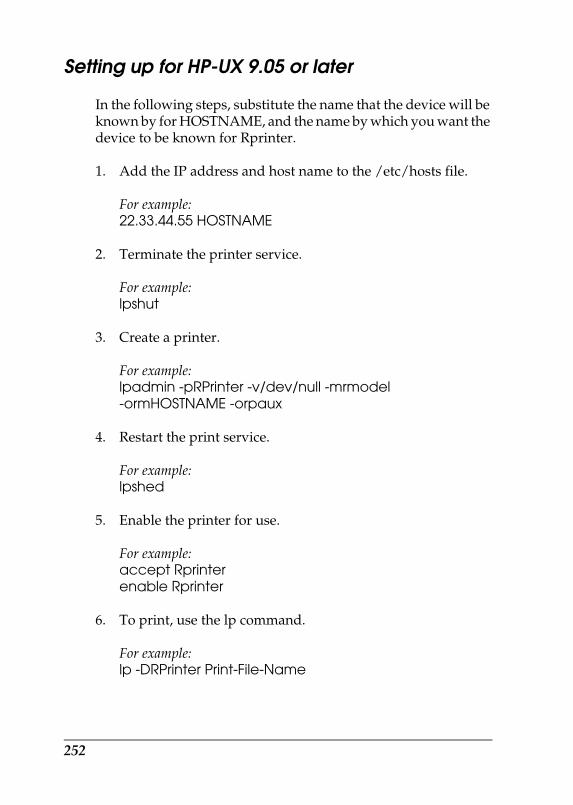
R4CB860html.bk Rev. FSETU.FM A5 size10/19/04
L Proof Sign-off:KOW N.Mizuno H.TomizawaT.TakahashiNOC K. Lee
Setting up for HP-UX 9.05 or later
In the following steps, substitute the name that the device will be known by for HOSTNAME, and the name by which you want the device to be known for Rprinter.
1. Add the IP address and host name to the /etc/hosts file.
For example:22.33.44.55 HOSTNAME
2. Terminate the printer service.
For example:lpshut
3. Create a printer.
For example:lpadmin -pRPrinter -v/dev/null -mrmodel-ormHOSTNAME -orpaux
4. Restart the print service.
For example:lpshed
5. Enable the printer for use.
For example:accept Rprinterenable Rprinter
6. To print, use the lp command.
For example:lp -DRPrinter Print-File-Name
252
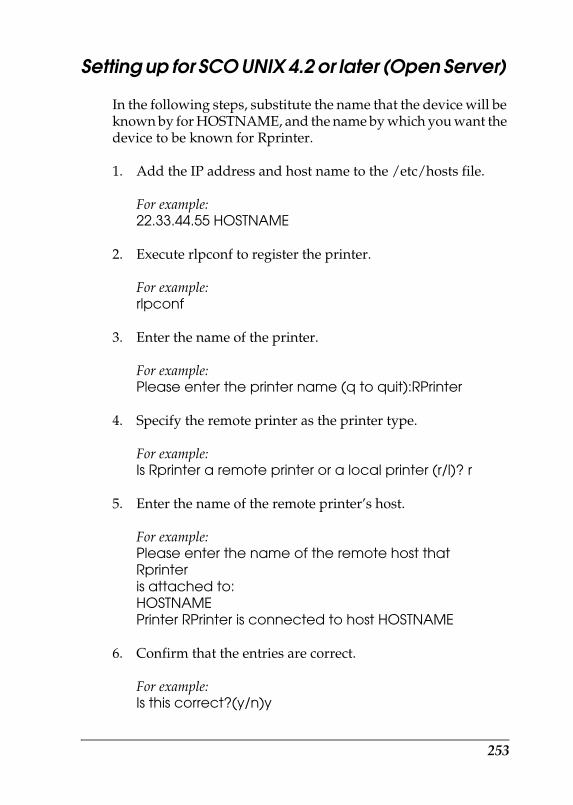
R4CB860html.bk Rev. FSETU.FM A5 size10/19/04
RProof Sign-off:KOW N.Mizuno H.TomizawaT.TakahashiNOC K. Lee
Setting up for SCO UNIX 4.2 or later (Open Server)
In the following steps, substitute the name that the device will be known by for HOSTNAME, and the name by which you want the device to be known for Rprinter.
1. Add the IP address and host name to the /etc/hosts file.
For example:22.33.44.55 HOSTNAME
2. Execute rlpconf to register the printer.
For example:rlpconf
3. Enter the name of the printer.
For example:Please enter the printer name (q to quit):RPrinter
4. Specify the remote printer as the printer type.
For example:Is Rprinter a remote printer or a local printer (r/l)? r
5. Enter the name of the remote printer’s host.
For example:Please enter the name of the remote host thatRprinter is attached to: HOSTNAMEPrinter RPrinter is connected to host HOSTNAME
6. Confirm that the entries are correct.
For example:Is this correct?(y/n)y
253
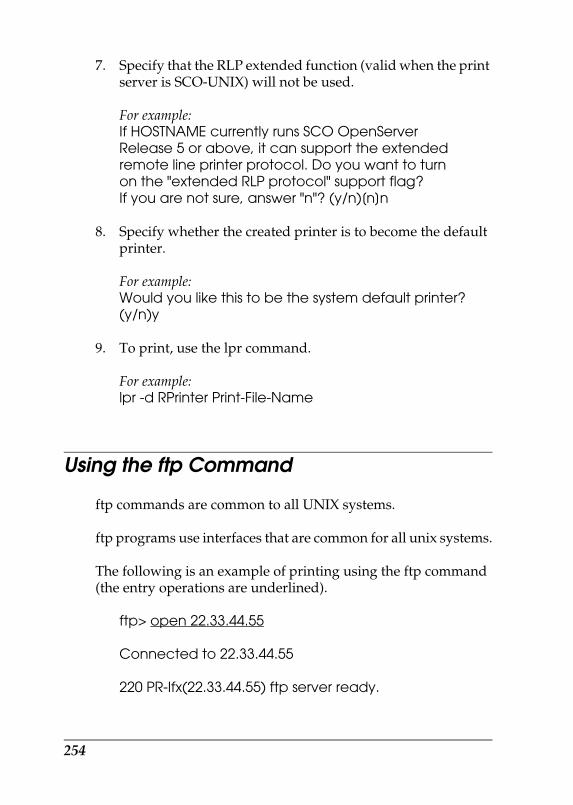
R4CB860html.bk Rev. FSETU.FM A5 size10/19/04
L Proof Sign-off:KOW N.Mizuno H.TomizawaT.TakahashiNOC K. Lee
7. Specify that the RLP extended function (valid when the print server is SCO-UNIX) will not be used.
For example:If HOSTNAME currently runs SCO OpenServerRelease 5 or above, it can support the extendedremote line printer protocol. Do you want to turnon the "extended RLP protocol" support flag?If you are not sure, answer "n"? (y/n)[n]n
8. Specify whether the created printer is to become the default printer.
For example:Would you like this to be the system default printer?(y/n)y
9. To print, use the lpr command.
For example:lpr -d RPrinter Print-File-Name
Using the ftp Command
ftp commands are common to all UNIX systems.
ftp programs use interfaces that are common for all unix systems.
The following is an example of printing using the ftp command (the entry operations are underlined).
ftp> open 22.33.44.55
Connected to 22.33.44.55
220 PR-Ifx(22.33.44.55) ftp server ready.
254
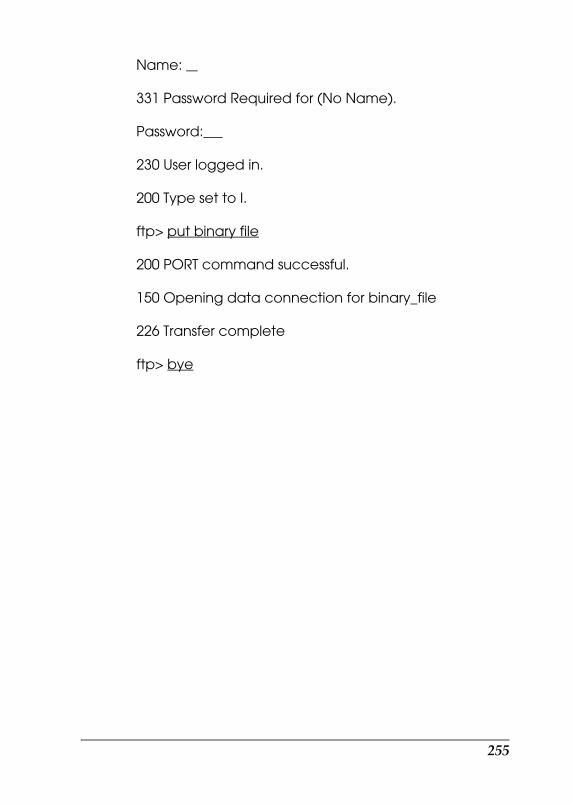
R4CB860html.bk Rev. FSETU.FM A5 size10/19/04
RProof Sign-off:KOW N.Mizuno H.TomizawaT.TakahashiNOC K. Lee
Name:
331 Password Required for (No Name).
Password:
230 User logged in.
200 Type set to I.
ftp> put binary file
200 PORT command successful.
150 Opening data connection for binary_file
226 Transfer complete
ftp> bye
255

R4CB860html.bk Rev. FSETU.FM A5 size10/19/04
L Proof Sign-off:KOW N.Mizuno H.TomizawaT.TakahashiNOC K. Lee
256

R4CB860html.bk Rev. FTIPS.FM A5 size10/19/04
RProof Sign-off:KOW N.Mizuno H.TomizawaT.TakahashiNOC K. Lee
Tips
Instructions on Using DHCP
When you assign an IP address to the network interface using the DHCP function, you need to change the printer port setting every time you turn on the device.
We recommend that you make one of the settings below on the DHCP server or the router and then assign a valid IP address to the network interface:
❏ Assign a valid IP address to the MAC address of the network interface.
❏ Assign an IP address that is within the range of the assignment of the DHCP server. Do not let the DHCP server assign the IP address to any other devices.
If you cannot make the above settings on the DHCP server, make one of the settings below:
❏ Assign an IP address that is not within the range of the assignment of the DHCP server.
❏ Assign an IP address that is within the range of the assignment of the DHCP server. In this case, you must turn on the network interface first, and then turn on the DHCP server.
257
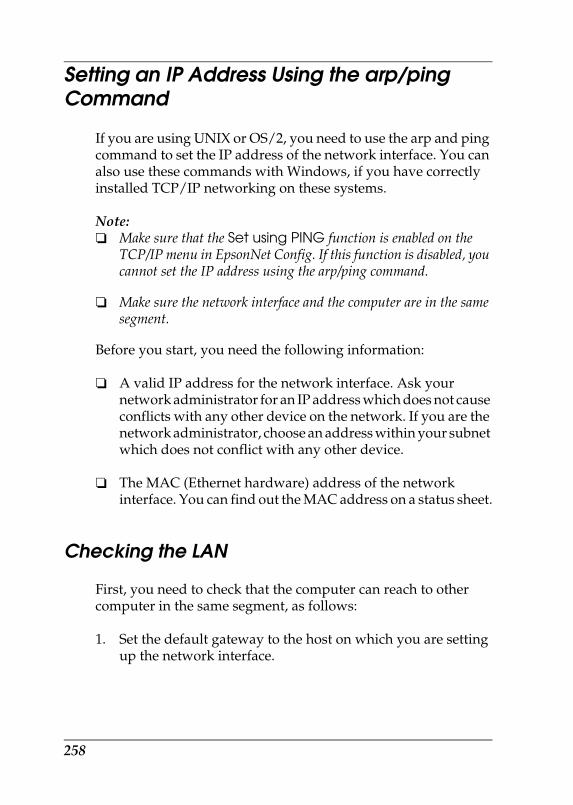
R4CB860html.bk Rev. FTIPS.FM A5 size10/19/04
L Proof Sign-off:KOW N.Mizuno H.TomizawaT.TakahashiNOC K. Lee
Setting an IP Address Using the arp/ping Command
If you are using UNIX or OS/2, you need to use the arp and ping command to set the IP address of the network interface. You can also use these commands with Windows, if you have correctly installed TCP/IP networking on these systems.
Note:❏ Make sure that the Set using PING function is enabled on the
TCP/IP menu in EpsonNet Config. If this function is disabled, you cannot set the IP address using the arp/ping command.
❏ Make sure the network interface and the computer are in the same segment.
Before you start, you need the following information:
❏ A valid IP address for the network interface. Ask your network administrator for an IP address which does not cause conflicts with any other device on the network. If you are the network administrator, choose an address within your subnet which does not conflict with any other device.
❏ The MAC (Ethernet hardware) address of the network interface. You can find out the MAC address on a status sheet.
Checking the LAN
First, you need to check that the computer can reach to other computer in the same segment, as follows:
1. Set the default gateway to the host on which you are setting up the network interface.
258
R4CB860html.bk Rev. FTIPS.FM A5 size10/19/04
RProof Sign-off:KOW N.Mizuno H.TomizawaT.TakahashiNOC K. Lee
If there is a server or a router which acts as a gateway, enter the address of the server or the router. If there is no gateway, enter the IP address of your computer as a gateway address.
2. Assume that you want to reach to the computer having the IP address “192.168.100.101”. Check that the computer is reachable by “pinging” it from the command line:ping 192.168.100.101
3. If the computer is reachable, you can see the following result (the exact form of the message depends on your operating system, and the time may vary):64 bytes from 192:168:100:101:icmp_seq=0. Time=34.ms
4. If the computer is unreachable, you may see something like this:PING 192:168:100:101:56 data bytes
If you press Ctrl-C, you may see something like this:192:168:100:101 PING Statistics3 packets transmitted, 0 packets received, 100% packet loss
Again, the exact wording of the message you see may differ from this, depending on your operating system. If you cannot “ping” the computer, check the following:
❏ The address in the ping command is correct.
❏ The Ethernet connection to the computer has been made correctly, and all hubs, routers, etc. are switched on.
Setting and checking the new IP address
To set the new IP address of the network interface which you have obtained from your network administrator, use the ping command and arp command with the -s flag (create an ARP entry).
259
R4CB860html.bk Rev. FTIPS.FM A5 size10/19/04
L Proof Sign-off:KOW N.Mizuno H.TomizawaT.TakahashiNOC K. Lee
Note:In the following procedure, we assume that the MAC address of your network interface is 00:00:48:93:00:00 (hexadecimal), and that the IP address which you will be assigning is 192.168.100.201 (decimal). Substitute your values for these addresses when you type in the commands.
1. From the command line, type:Example: arp -s 192.168.100.201 00-00-48-93-00-00
2. Execute the ping command to set the IP address by pinging it:Example: ping 192.168.100.201
3. The network interface should now respond to the ping. If it does not, you may have incorrectly typed the MAC address or the IP address in the arp -s command. Double-check and try again. If none of these actions are effective, re-initialize the network interface and try again.
4. Print a status sheet to check whether the new IP address has been assigned to the network interface.
Note:When the IP address is set by the ping command, the subnet mask is automatically changed by the class of the IP address. To change the subnet mask and the default gateway according to your network environment, use EpsonNet Config on Windows operating systems or EpsonNet Config in Macintosh.
Instructions on Using a Dial-Up Router
This section describes instructions on using a dial-up router.
260
R4CB860html.bk Rev. FTIPS.FM A5 size10/19/04
RProof Sign-off:KOW N.Mizuno H.TomizawaT.TakahashiNOC K. Lee
If DHCP is used to assign an IP address of the network interface and the Dynamic DNS function is not supported, you need to change the printer port setting every time you turn on the device. Therefore, we recommend that you set a valid IP address for the network interface by using the one of the following methods.
❏ Set the IP address for the network interface manually. Use EpsonNet Config. See the EpsonNet Config Reference Guide for details.
❏ Specify the network interface by using the bind of DHCP function.
❏ Set the exclusive address of the DHCP function.
Note:❏ Use NetBEUI printing if you do not want to go through these steps.
❏ See the manual of the Dial-Up router for more information on scorp range, bind, exclusive address of the DHCP function.
Function of Universal Plug and Play
When you connect your device to the network, the device is automatically assigned with an IP address, and the printer's icon appears in the My Network Places folder. By double-clicking the printer's icon, you can access EpsonNet Config with Web Browser for basic information about the device, such as manufacturer, model name, location, and administrator’s name.
Right-click the printer's icon in the My Network Places folder and select Properties. You can check the brief information of the network interface.
261
R4CB860html.bk Rev. FTIPS.FM A5 size10/19/04
L Proof Sign-off:KOW N.Mizuno H.TomizawaT.TakahashiNOC K. Lee
To use this function, the Universal Plug and Play must be installed on Windows Me or future operating systems. For information on how to install Universal Plug and Play, see the Windows Me online help.
Note:Before using the Universal Plug and Play function, you must enable the Universal Plug and Play function in EpsonNet Config. See the EpsonNet Config Reference Guide or “Configuring the Network Interface Using EpsonNet Config”.
Uninstalling Software
Follow the steps below to uninstall the network software.
Windows XP/Server 2003
1. Click Start, click Control Panel, and then click Add or Remove Programs.
2. Select the utility you want to uninstall, and then click the Change/Remove button.
3. Follow the on-screen instructions to complete uninstallation.
Windows Me/98/95/2000/NT 4.0
1. Click Start, point to Settings, and then select Control Panel.
2. Double-click the Add/Remove Programs icon.
3. Select the utility you want to uninstall, and then click the Add/Remove button (Windows Me/98/95/NT 4.0) or the Change/Remove button (Windows 2000).
262
R4CB860html.bk Rev. FTIPS.FM A5 size10/19/04
RProof Sign-off:KOW N.Mizuno H.TomizawaT.TakahashiNOC K. Lee
4. Follow the on-screen instructions to complete uninstallation.
Macintosh
1. Double-click the EpsonNet Config Installer icon.
2. Click the Continue button.
3. In the License dialog box, read the License Agreement, and then click the Accept button.
4. Select Uninstall from the pull-down menu.
5. Click the Uninstall button.
6. Follow the on-screen instructions to complete uninstallation.
Note:You can also uninstall the software by dragging the EpsonNet folder to the Trash.
263

R4CB860html.bk Rev. FTIPS.FM A5 size10/19/04
L Proof Sign-off:KOW N.Mizuno H.TomizawaT.TakahashiNOC K. Lee
264
R4CB860html.bk Rev. FTRBLE.FM A5 size10/19/04
RProof Sign-off:KOW N.Mizuno H.TomizawaT.TakahashiNOC K. Lee
Problem Solver
General Problems
Cannot configure the network interface or cannot print from the network.
Cause What to do
The printer settings or network settings may be wrong.
First, check to see if you can print a status sheet, as described in “Status sheet button”. If you can print a status sheet, check the network settings; otherwise, set the interface mode of the printer’s control panel to Auto or Option.
Cannot print even if you have assigned the IP address to the computer and the network interface.
Cause What to do
You have assigned an IP address to the computer manually, but you assigned the IP address to the network interface by Automatic Private IP Addressing (APIPA).
Assign the IP address for the network interface so that it belongs to the same segment of the computer. Use EpsonNet Config or the printer’s control panel.
Unable to start EpsonNet Config.
Cause What to do
265
R4CB860html.bk Rev. FTRBLE.FM A5 size10/19/04
L Proof Sign-off:KOW N.Mizuno H.TomizawaT.TakahashiNOC K. Lee
You have added or deleted protocols after installing EpsonNet Config.
Uninstall EpsonNet Config and then reinstall it. See “Uninstalling Software” and “Installing EpsonNet Config”.
The message “EpsonNet Config cannot be used because no network is installed.” appears when you start EpsonNet Config.
Cause What to do
Both TCP/IP and IPX/SPX are not installed on the computer.
Install the TCP/IP or IPX/SPX protocol.
TCP/IP is installed on the computer, but its IP address is not set correctly.
Set a correct IP address for the computer.
The message “Could not complete communicating configuration data” appears when you send settings to the network interface.
Cause What to do
This may happen when using a dial-up router.
Run Command Prompt from the computer on which EpsonNet Config is installed, and then enter the following command:
Format: >ROUTE_ADD_the IP address of the network interface_ the IP address of the computer (the under bar represents one space)
Example: >ROUTE ADD 192.168.192.168 22.33.44.55.
Unable to start EpsonNet Config with Web Browser.
Cause What to do
266
R4CB860html.bk Rev. FTRBLE.FM A5 size10/19/04
RProof Sign-off:KOW N.Mizuno H.TomizawaT.TakahashiNOC K. Lee
You have not set the IP address for the network interface.
Set the IP address for the network interface using EpsonNet Config for Windows or Macintosh, the printer’s control panel, or the arp/ping commands. You can check the IP address on a status sheet. See the EpsonNet Config Reference Guide or “Setting an IP Address Using the arp/ping Command”.
Unable to set the IP address using the arp/ping commands.
Cause What to do
The network interface is not connected to the network.
Connect the network interface to the network, and check the network environment.
The device is located beyond the router.
The device and the computer must be in the same segment.
The Model Name and IP Address do not appear in the EpsonNet Config dialog box.
Cause What to do
If the valid IP address is not set, the items indicated in the dialog box mentioned above may not appear.
Set a valid IP address.
Refresh the status by selecting Refresh from the View menu.
Increase the length of time before a timeout. To do this, select Options from the Tool menu, and then select Timeout. Note that doing so can cause EpsonNet Config to run more slowly.
An extra account is generated when using the dial-up network.
267
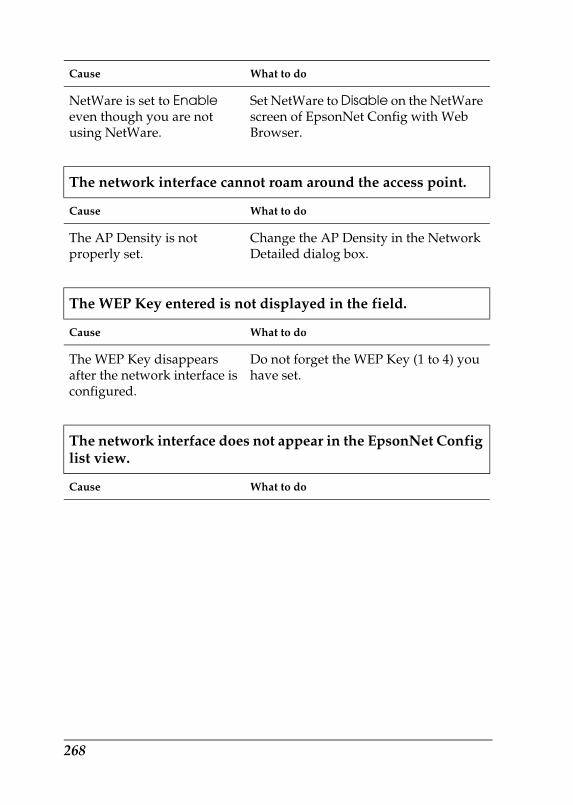
R4CB860html.bk Rev. FTRBLE.FM A5 size10/19/04
L Proof Sign-off:KOW N.Mizuno H.TomizawaT.TakahashiNOC K. Lee
Cause What to do
NetWare is set to Enable even though you are not using NetWare.
Set NetWare to Disable on the NetWare screen of EpsonNet Config with Web Browser.
The network interface cannot roam around the access point.
Cause What to do
The AP Density is not properly set.
Change the AP Density in the Network Detailed dialog box.
The WEP Key entered is not displayed in the field.
Cause What to do
The WEP Key disappears after the network interface is configured.
Do not forget the WEP Key (1 to 4) you have set.
The network interface does not appear in the EpsonNet Config list view.
Cause What to do
268
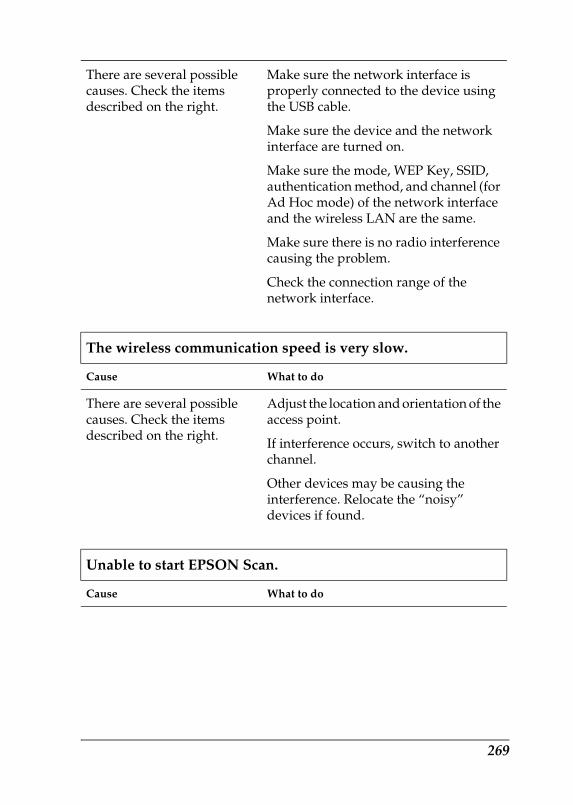
R4CB860html.bk Rev. FTRBLE.FM A5 size10/19/04
RProof Sign-off:KOW N.Mizuno H.TomizawaT.TakahashiNOC K. Lee
There are several possible causes. Check the items described on the right.
Make sure the network interface is properly connected to the device using the USB cable.
Make sure the device and the network interface are turned on.
Make sure the mode, WEP Key, SSID, authentication method, and channel (for Ad Hoc mode) of the network interface and the wireless LAN are the same.
Make sure there is no radio interference causing the problem.
Check the connection range of the network interface.
The wireless communication speed is very slow.
Cause What to do
There are several possible causes. Check the items described on the right.
Adjust the location and orientation of the access point.
If interference occurs, switch to another channel.
Other devices may be causing the interference. Relocate the “noisy” devices if found.
Unable to start EPSON Scan.
Cause What to do
269
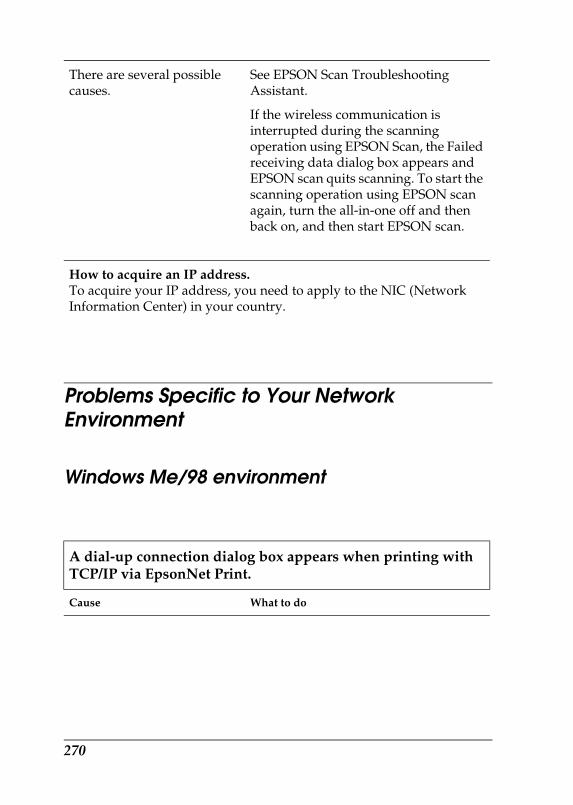
R4CB860html.bk Rev. FTRBLE.FM A5 size10/19/04
L Proof Sign-off:KOW N.Mizuno H.TomizawaT.TakahashiNOC K. Lee
Problems Specific to Your Network Environment
Windows Me/98 environment
There are several possible causes.
See EPSON Scan Troubleshooting Assistant.
If the wireless communication is interrupted during the scanning operation using EPSON Scan, the Failed receiving data dialog box appears and EPSON scan quits scanning. To start the scanning operation using EPSON scan again, turn the all-in-one off and then back on, and then start EPSON scan.
How to acquire an IP address.To acquire your IP address, you need to apply to the NIC (Network Information Center) in your country.
A dial-up connection dialog box appears when printing with TCP/IP via EpsonNet Print.
Cause What to do
270
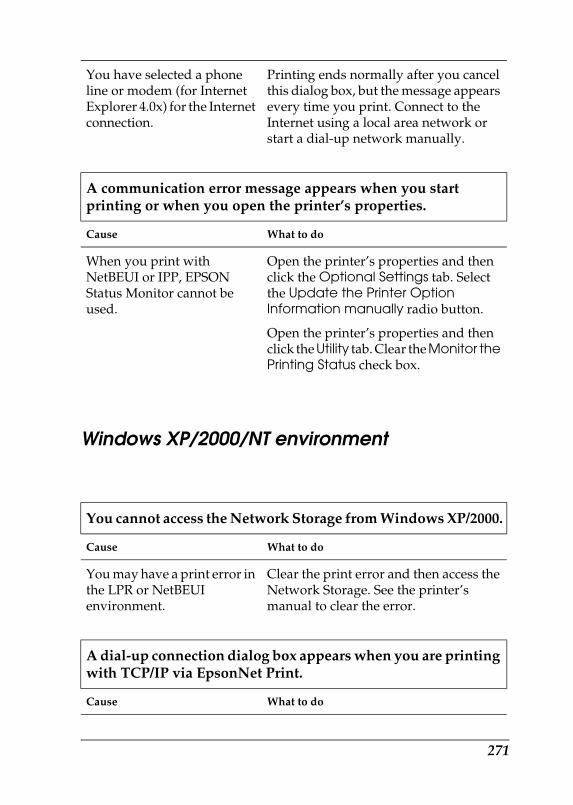
R4CB860html.bk Rev. FTRBLE.FM A5 size10/19/04
RProof Sign-off:KOW N.Mizuno H.TomizawaT.TakahashiNOC K. Lee
Windows XP/2000/NT environment
You have selected a phone line or modem (for Internet Explorer 4.0x) for the Internet connection.
Printing ends normally after you cancel this dialog box, but the message appears every time you print. Connect to the Internet using a local area network or start a dial-up network manually.
A communication error message appears when you start printing or when you open the printer’s properties.
Cause What to do
When you print with NetBEUI or IPP, EPSON Status Monitor cannot be used.
Open the printer’s properties and then click the Optional Settings tab. Select the Update the Printer Option Information manually radio button.
Open the printer’s properties and then click the Utility tab. Clear the Monitor the Printing Status check box.
You cannot access the Network Storage from Windows XP/2000.
Cause What to do
You may have a print error in the LPR or NetBEUI environment.
Clear the print error and then access the Network Storage. See the printer’s manual to clear the error.
A dial-up connection dialog box appears when you are printing with TCP/IP via EpsonNet Print.
Cause What to do
271
R4CB860html.bk Rev. FTRBLE.FM A5 size10/19/04
L Proof Sign-off:KOW N.Mizuno H.TomizawaT.TakahashiNOC K. Lee
You have selected a phone line or modem (for Internet Explorer 4.0x) for the Internet connection.
Printing ends normally after you cancel this dialog box, but the message appears every time you print. Connect to the Internet using a local area network or start a dial-up network manually.
A communication error message appears when you start printing or when you open the printer’s properties.
Cause What to do
When you print with NetBEUI or IPP, EPSON Status Monitor cannot be used.
Open the printer’s properties and then click the Optional Settings tab. Select the Update the Printer Option Information manually radio button.
Open the printer’s properties and then click the Utility tab. Clear the Monitor the Printing Status check box.
No clients except an administrator can print via Windows NT Server 4.0.
Cause What to do
CREATOR OWNER has been deleted from the Printer Permissions list, or CREATOR OWNER is set to Print or No Access.
Add CREATOR OWNER by clicking the Add button in the Printer Permissions dialog box, or set CREATOR OWNER to Manage Documents (default setting).
On Windows XP, you cannot search the scanner that is specified in the EPSON Scan Setting dialog box.
Cause What to do
272
R4CB860html.bk Rev. FTRBLE.FM A5 size10/19/04
RProof Sign-off:KOW N.Mizuno H.TomizawaT.TakahashiNOC K. Lee
Macintosh environment
NetWare environment
On the Advanced tab of the Local Area Connection Properties dialog box, the Internet Connection Firewall setting is on.
In the EPSON Scan Setting dialog box, click the Add button. In the Add dialog box, select the Enter address radio button and then enter the IP address.
Devices do not appear in Chooser.
Cause What to do
You may have selected a wrong one for “Connect via” in the AppleTalk Control Panel.
Make sure to select Built-in Ethernet or AirMac in AppleTalk Control Panel, and make sure AppleTalk is active in Chooser. Also, check the network equipment including the hub cable.
The Rendezvous printer setting is overwritten by the AppleTalk printer setting when the same printer is set up with AppleTalk after the printer is set up with Rendezvous.
Change the AppleTalk printer name so that it does not conflict with the Rendezvous printer name.
Nothing prints even though clients have sent data to the device.
273
R4CB860html.bk Rev. FTRBLE.FM A5 size10/19/04
L Proof Sign-off:KOW N.Mizuno H.TomizawaT.TakahashiNOC K. Lee
Cause What to do
Clients may not be registered, or the network interface may not be logged in to the NetWare server.
Make sure clients are registered as users of the print queue and the print server. Also, make sure the network interface is logged in to the NetWare server.
EpsonNet Config will not start correctly.
Cause What to do
Microsoft NetWare Directory Service is installed on your computer.
If you are using the NDS service, install the Novell NetWare Client service.
It takes a long time to start EpsonNet Config.
Cause What to do
The Novell Client service is installed.
Double-click Network in Control Panel, and then double-click the network adapter that does not use the IPX/SPX-compatible protocol. Clear the items related to IPX to unbind IPX.
The devices on the IPX network do not appear in the EpsonNet Config dialog box.
Cause What to do
The device is turned off. Turn on the device.
The device is not in the same segment as the computer where you installed EpsonNet Config.
To search for network interfaces in other segments, use Search options of EpsonNet Config.
274
R4CB860html.bk Rev. FTRBLE.FM A5 size10/19/04
RProof Sign-off:KOW N.Mizuno H.TomizawaT.TakahashiNOC K. Lee
Initializing the Network Interface
To initialize your network interface, turn on the device, and then plug the power cord of the network interface into a wall outlet while holding down the status sheet button of the network interface for twenty seconds. The length of time necessary to hold down the status sheet button varies depending on the device model. The green USB light flashes, indicating the network interface is being initialized.
After the initialization is complete, press the status sheet button to print a status sheet. Check the information on the status sheet.
Note:You can also initialize the network interface using EpsonNet Config by clicking the Default Settings button.
Restrictions on EPSON Status Monitor 3
The operation of EPSON Status Monitor 3 is different, depending on whether the printer or all-in-one is connected to the network interface for use in the wireless LAN environment or to the computer directly, as described below.
You have not logged in to the target NetWare server with supervisor privileges.
From the computer on which EpsonNet Config is installed, log in to the target NetWare server with supervisor privileges.
275
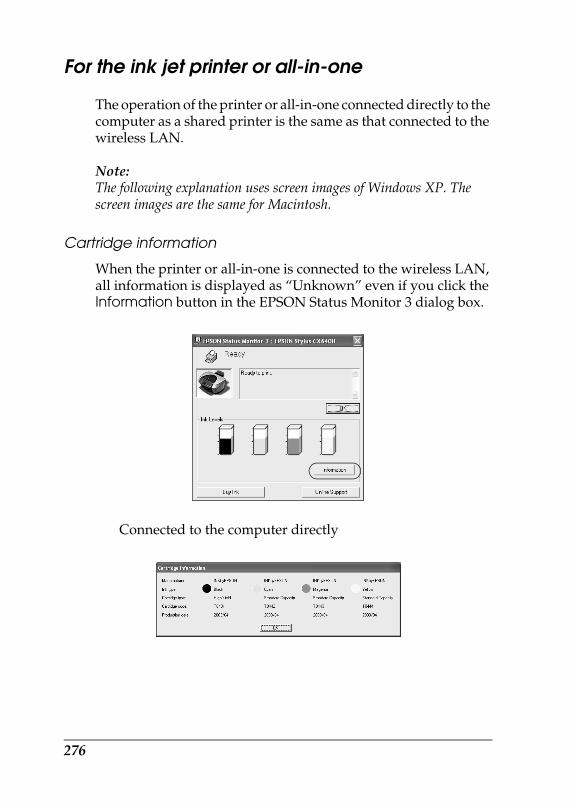
R4CB860html.bk Rev. FTRBLE.FM A5 size10/19/04
L Proof Sign-off:KOW N.Mizuno H.TomizawaT.TakahashiNOC K. Lee
For the ink jet printer or all-in-one
The operation of the printer or all-in-one connected directly to the computer as a shared printer is the same as that connected to the wireless LAN.
Note:The following explanation uses screen images of Windows XP. The screen images are the same for Macintosh.
Cartridge information
When the printer or all-in-one is connected to the wireless LAN, all information is displayed as “Unknown” even if you click the Information button in the EPSON Status Monitor 3 dialog box.
Connected to the computer directly
276
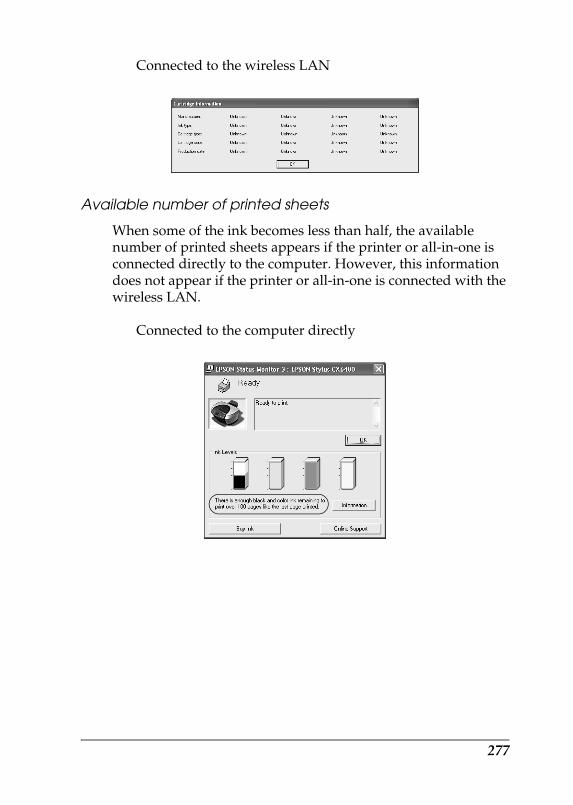
R4CB860html.bk Rev. FTRBLE.FM A5 size10/19/04
RProof Sign-off:KOW N.Mizuno H.TomizawaT.TakahashiNOC K. Lee
Connected to the wireless LAN
Available number of printed sheets
When some of the ink becomes less than half, the available number of printed sheets appears if the printer or all-in-one is connected directly to the computer. However, this information does not appear if the printer or all-in-one is connected with the wireless LAN.
Connected to the computer directly
277
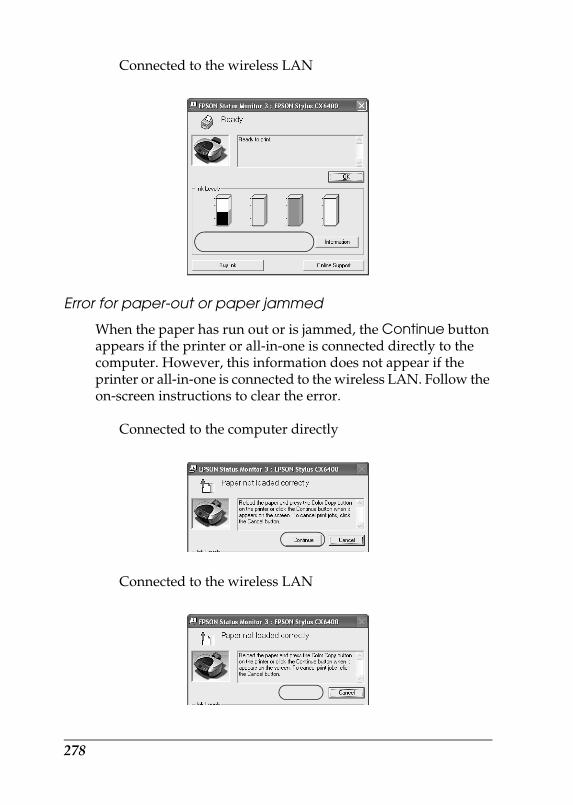
R4CB860html.bk Rev. FTRBLE.FM A5 size10/19/04
L Proof Sign-off:KOW N.Mizuno H.TomizawaT.TakahashiNOC K. Lee
Connected to the wireless LAN
Error for paper-out or paper jammed
When the paper has run out or is jammed, the Continue button appears if the printer or all-in-one is connected directly to the computer. However, this information does not appear if the printer or all-in-one is connected to the wireless LAN. Follow the on-screen instructions to clear the error.
Connected to the computer directly
Connected to the wireless LAN
278
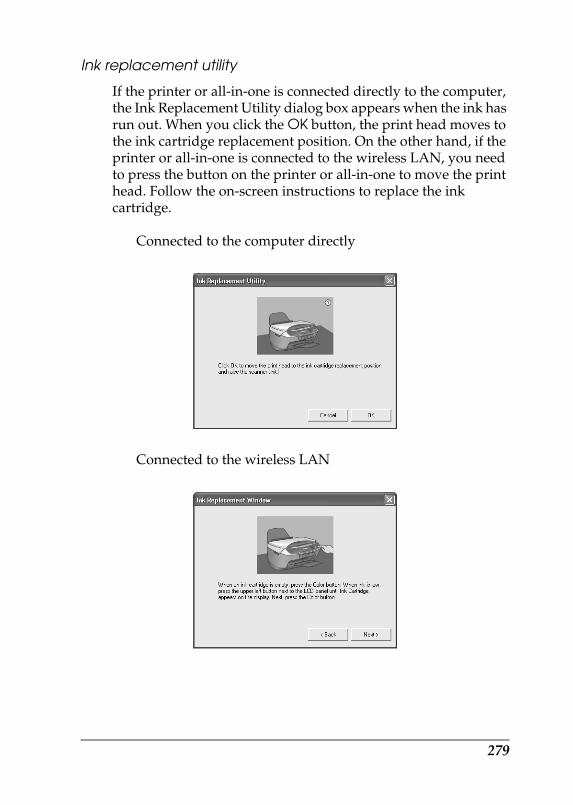
R4CB860html.bk Rev. FTRBLE.FM A5 size10/19/04
RProof Sign-off:KOW N.Mizuno H.TomizawaT.TakahashiNOC K. Lee
Ink replacement utility
If the printer or all-in-one is connected directly to the computer, the Ink Replacement Utility dialog box appears when the ink has run out. When you click the OK button, the print head moves to the ink cartridge replacement position. On the other hand, if the printer or all-in-one is connected to the wireless LAN, you need to press the button on the printer or all-in-one to move the print head. Follow the on-screen instructions to replace the ink cartridge.
Connected to the computer directly
Connected to the wireless LAN
279
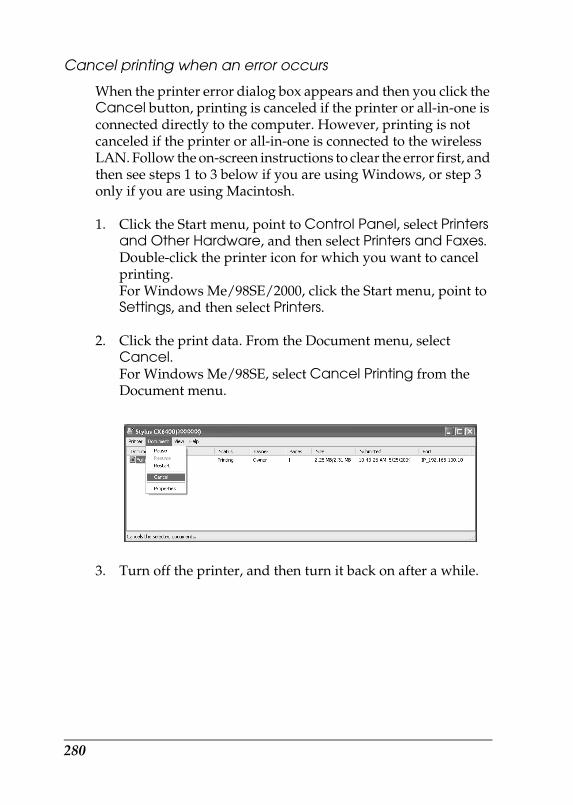
R4CB860html.bk Rev. FTRBLE.FM A5 size10/19/04
L Proof Sign-off:KOW N.Mizuno H.TomizawaT.TakahashiNOC K. Lee
Cancel printing when an error occurs
When the printer error dialog box appears and then you click the Cancel button, printing is canceled if the printer or all-in-one is connected directly to the computer. However, printing is not canceled if the printer or all-in-one is connected to the wireless LAN. Follow the on-screen instructions to clear the error first, and then see steps 1 to 3 below if you are using Windows, or step 3 only if you are using Macintosh.
1. Click the Start menu, point to Control Panel, select Printers and Other Hardware, and then select Printers and Faxes. Double-click the printer icon for which you want to cancel printing.For Windows Me/98SE/2000, click the Start menu, point to Settings, and then select Printers.
2. Click the print data. From the Document menu, select Cancel.For Windows Me/98SE, select Cancel Printing from the Document menu.
3. Turn off the printer, and then turn it back on after a while.
280
R4CB860html.bk Rev. FTRBLE.FM A5 size10/19/04
RProof Sign-off:KOW N.Mizuno H.TomizawaT.TakahashiNOC K. Lee
For the laser printer
For Windows XP Service Pack 2 Users
If you share the laser printers on the computer running Windows XP Service Pack 2 on the network, client computers with the following conditions cannot monitor the printers using EPSON Status Monitor 3:
❏ Client computers running Windows Me/98/95
❏ Client computers located in another network segment
Solution
1. Click Start, point to Control Panel, and then select Security Center. Click Windows Firewall.
2. Click the Exceptions tab, and then click the Add Program button.
3. Click the Browse button.
4. Select the program located in the following folder, using the Look in pull-down menu.
C:\Program Files\Common Files\EPSON\EBAPI\EEBAgent.exe
Note:❏ Substitute the drive letter for your operating system.
❏ If you have upgraded EPSON Status Monitor 2 to EPSON Status Monitor 3, select the folder where EPSON Status Monitor 2 is installed.
5. Confirm that EEBAgent.exe is registered in the Programs list, and then click OK.
281
R4CB860html.bk Rev. FTRBLE.FM A5 size10/19/04
L Proof Sign-off:KOW N.Mizuno H.TomizawaT.TakahashiNOC K. Lee
6. Confirm that the check box for EEBAgent.exe is selected in the Programs and Services list, and then click OK.
The Job Management function cannot be used (except in the wired LAN connection)
In the Monitoring Preferences dialog box, the Job Management setting does not appear. Therefore, the Job Information tab and the Notification message when your print job is finished dialog box do not appear.
Note:The models available on the market after 2004 are excluded.
282
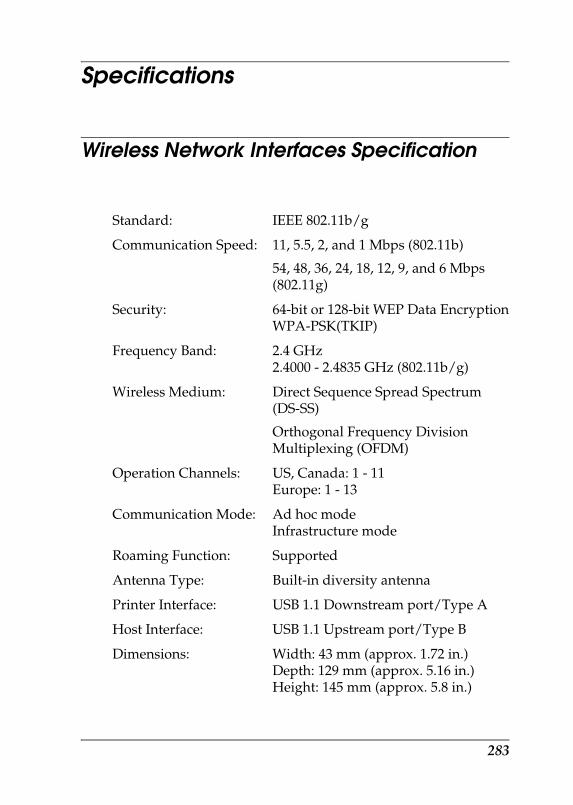
R4CB860html.bk Rev. FSPEC.FM A5 size10/19/04
RProof Sign-off:KOW N.Mizuno H.TomizawaT.TakahashiNOC K. Lee
Specifications
Wireless Network Interfaces Specification
Standard: IEEE 802.11b/g
Communication Speed: 11, 5.5, 2, and 1 Mbps (802.11b)
54, 48, 36, 24, 18, 12, 9, and 6 Mbps (802.11g)
Security: 64-bit or 128-bit WEP Data EncryptionWPA-PSK(TKIP)
Frequency Band: 2.4 GHz2.4000 - 2.4835 GHz (802.11b/g)
Wireless Medium: Direct Sequence Spread Spectrum (DS-SS)
Orthogonal Frequency Division Multiplexing (OFDM)
Operation Channels: US, Canada: 1 - 11Europe: 1 - 13
Communication Mode: Ad hoc modeInfrastructure mode
Roaming Function: Supported
Antenna Type: Built-in diversity antenna
Printer Interface: USB 1.1 Downstream port/Type A
Host Interface: USB 1.1 Upstream port/Type B
Dimensions: Width: 43 mm (approx. 1.72 in.)Depth: 129 mm (approx. 5.16 in.)Height: 145 mm (approx. 5.8 in.)
283
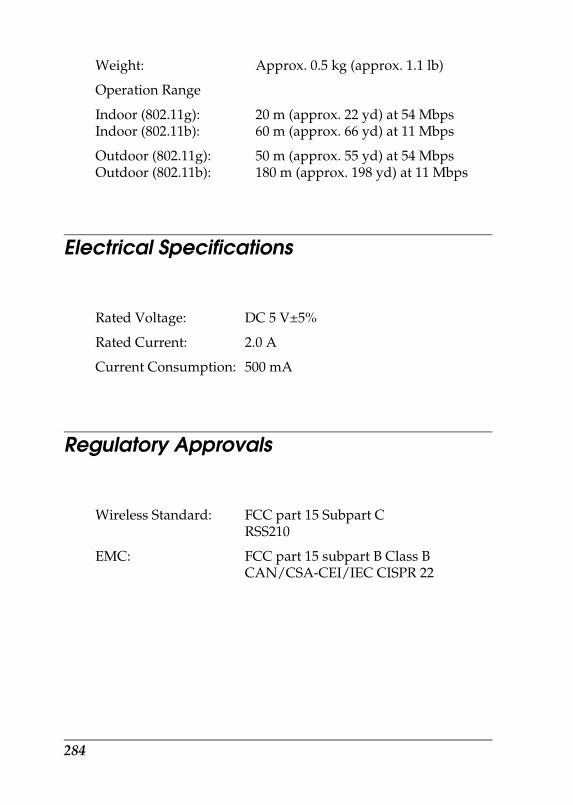
R4CB860html.bk Rev. FSPEC.FM A5 size10/19/04
L Proof Sign-off:KOW N.Mizuno H.TomizawaT.TakahashiNOC K. Lee
Electrical Specifications
Regulatory Approvals
Weight: Approx. 0.5 kg (approx. 1.1 lb)
Operation Range
Indoor (802.11g):Indoor (802.11b):
20 m (approx. 22 yd) at 54 Mbps60 m (approx. 66 yd) at 11 Mbps
Outdoor (802.11g):Outdoor (802.11b):
50 m (approx. 55 yd) at 54 Mbps180 m (approx. 198 yd) at 11 Mbps
Rated Voltage: DC 5 V±5%
Rated Current: 2.0 A
Current Consumption: 500 mA
Wireless Standard: FCC part 15 Subpart CRSS210
EMC: FCC part 15 subpart B Class B CAN/CSA-CEI/IEC CISPR 22
284
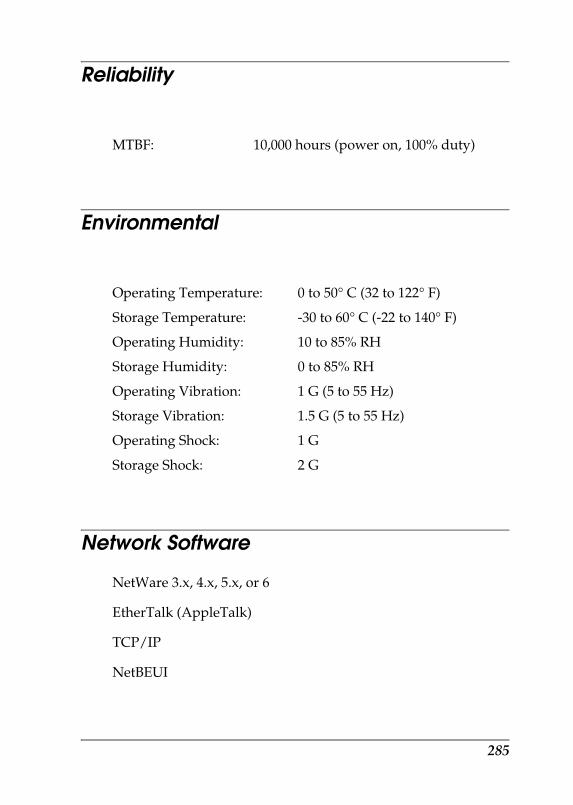
R4CB860html.bk Rev. FSPEC.FM A5 size10/19/04
RProof Sign-off:KOW N.Mizuno H.TomizawaT.TakahashiNOC K. Lee
Reliability
Environmental
Network Software
NetWare 3.x, 4.x, 5.x, or 6
EtherTalk (AppleTalk)
TCP/IP
NetBEUI
MTBF: 10,000 hours (power on, 100% duty)
Operating Temperature: 0 to 50° C (32 to 122° F)
Storage Temperature: -30 to 60° C (-22 to 140° F)
Operating Humidity: 10 to 85% RH
Storage Humidity: 0 to 85% RH
Operating Vibration: 1 G (5 to 55 Hz)
Storage Vibration: 1.5 G (5 to 55 Hz)
Operating Shock: 1 G
Storage Shock: 2 G
285
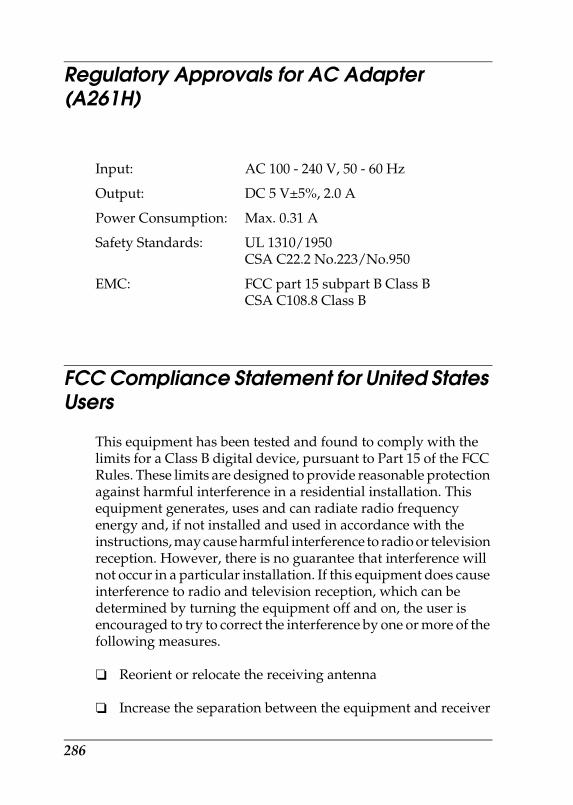
R4CB860html.bk Rev. FSPEC.FM A5 size10/19/04
L Proof Sign-off:KOW N.Mizuno H.TomizawaT.TakahashiNOC K. Lee
Regulatory Approvals for AC Adapter (A261H)
FCC Compliance Statement for United States Users
This equipment has been tested and found to comply with the limits for a Class B digital device, pursuant to Part 15 of the FCC Rules. These limits are designed to provide reasonable protection against harmful interference in a residential installation. This equipment generates, uses and can radiate radio frequency energy and, if not installed and used in accordance with the instructions, may cause harmful interference to radio or television reception. However, there is no guarantee that interference will not occur in a particular installation. If this equipment does cause interference to radio and television reception, which can be determined by turning the equipment off and on, the user is encouraged to try to correct the interference by one or more of the following measures.
❏ Reorient or relocate the receiving antenna
❏ Increase the separation between the equipment and receiver
Input: AC 100 - 240 V, 50 - 60 Hz
Output: DC 5 V±5%, 2.0 A
Power Consumption: Max. 0.31 A
Safety Standards: UL 1310/1950 CSA C22.2 No.223/No.950
EMC: FCC part 15 subpart B Class B CSA C108.8 Class B
286
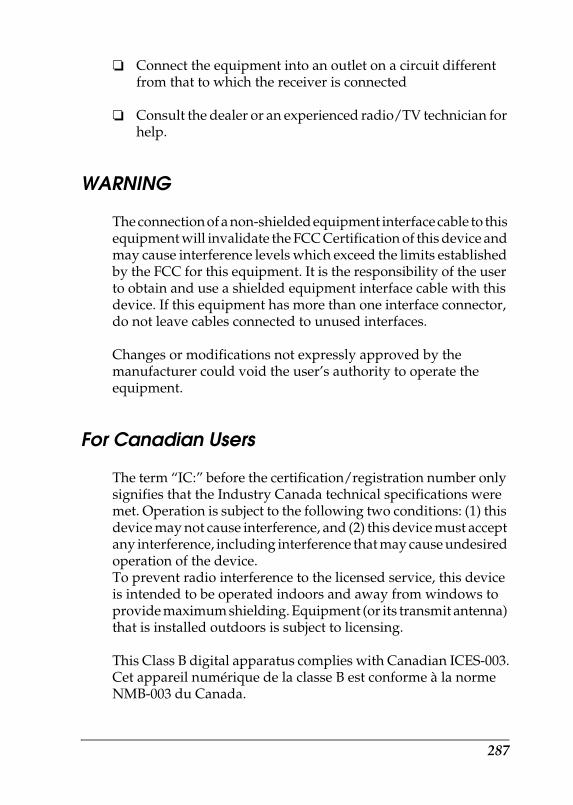
R4CB860html.bk Rev. FSPEC.FM A5 size10/19/04
RProof Sign-off:KOW N.Mizuno H.TomizawaT.TakahashiNOC K. Lee
❏ Connect the equipment into an outlet on a circuit different from that to which the receiver is connected
❏ Consult the dealer or an experienced radio/TV technician for help.
WARNING
The connection of a non-shielded equipment interface cable to this equipment will invalidate the FCC Certification of this device and may cause interference levels which exceed the limits established by the FCC for this equipment. It is the responsibility of the user to obtain and use a shielded equipment interface cable with this device. If this equipment has more than one interface connector, do not leave cables connected to unused interfaces.
Changes or modifications not expressly approved by the manufacturer could void the user’s authority to operate the equipment.
For Canadian Users
The term “IC:” before the certification/registration number only signifies that the Industry Canada technical specifications were met. Operation is subject to the following two conditions: (1) this device may not cause interference, and (2) this device must accept any interference, including interference that may cause undesired operation of the device. To prevent radio interference to the licensed service, this device is intended to be operated indoors and away from windows to provide maximum shielding. Equipment (or its transmit antenna) that is installed outdoors is subject to licensing.
This Class B digital apparatus complies with Canadian ICES-003.Cet appareil numérique de la classe B est conforme à la norme NMB-003 du Canada.
287
R4CB860html.bk Rev. FSPEC.FM A5 size10/19/04
L Proof Sign-off:KOW N.Mizuno H.TomizawaT.TakahashiNOC K. Lee
FCC Radiation Exposure Statement
This equipment complies with FCC radiation exposure limits set forth for an uncontrolled environment. This equipment should be installed and operated with minimum distance of 20 cm between the radiator & your body.
This transmitter must not be co-located or operating in conjunction with any other antenna or transmitter.
DECLARATION of CONFORMITY
According to 47CFR, Part 2 and 15 for Class B Personal Computers and Peripherals; and/or CPU Boards and Power Supplies used with Class B Personal Computers:
We: EPSON AMERICA, INC.
Located at: MS 6-43 3840 Kilroy Airport Way Long Beach, CA 90806-2469 Telephone: (562)290-5254
288
R4CB860html.bk Rev. FSPEC.FM A5 size10/19/04
RProof Sign-off:KOW N.Mizuno H.TomizawaT.TakahashiNOC K. Lee
Declare under sole responsibility that the product identified herein, complies with 47CFR Part 2 and 15 of the FCC rules as a Class B digital device. Each product marketed, is identical to the representative unit tested and found to be compliant with the standards. Records maintained continue to reflect the equipment being produced can be expected to be within the variation accepted, due to quantity production and testing on a statistical basis as required by 47CFR §2.909 Operation is subject to the following two conditions: (1) this device may not cause harmful interference, and (2) this device must accept any interference received, including interference that may cause undesired operation.
Trade Name: EPSON
Type of Product: EpsonNet 802.11g Wireless Ext. Print Server
Model: EU-82
289

R4CB860html.bk Rev. FSPEC.FM A5 size10/19/04
L Proof Sign-off:KOW N.Mizuno H.TomizawaT.TakahashiNOC K. Lee
290
R4CB860html.bk Rev. FHTML.TOC A5 size10/19/04
RProof Sign-off:KOW N.Mizuno H.TomizawaT.TakahashiNOC K. Lee
Introduction
About Your Network InterfaceAbout This GuideInstructions on Using the Network InterfacePackage ContentsOperating Environment
Supported operating systemsPrinting environmentsScanning environmentsNetwork Storage environments
Supported Epson DevicesFeatures of the Network InterfaceNetwork Interface OperationThe IEEE 802.11g Communication StandardWireless Environment
Operating modesSecurityRadio signal range
About the SoftwareTerms and Concepts
How To
Overview
Selecting a Printing Method
Printing from WindowsPrinting from MacintoshFeatures of the Printing Methods
LPR (TCP/IP) printingInternet printingMicrosoft Network Shared printing
Installing Components on Your Computer
291
R4CB860html.bk Rev. FHTML.TOC A5 size10/19/04
L Proof Sign-off:KOW N.Mizuno H.TomizawaT.TakahashiNOC K. Lee
About Installing Components on Your ComputerWindows XPWindows Me/98Windows Server 2003Windows 2000Macintosh
Mac OS XMac OS 9
How to Set Up the Network Interface
For WindowsConnecting the network interfaceConfiguring the network interfaceUsing the network storage
For MacintoshConnecting the network interfaceConfiguring the network interfaceSetting up the device
For EPSON STYLUS PHOTO RX500/600 and EPSON STYLUS CX4600/6400/6600 Users
For WindowsConfiguring the network interfaceScanning via a wireless networkUsing the network storage
For MacintoshConfiguring the network interfaceSetting up the deviceScanning via a wireless network
Installing the Printer Driver
About Installing the Printer DriverWindows XP
LPR printingInternet printingMicrosoft Network Shared printingUsing the NET USE command
292
R4CB860html.bk Rev. FHTML.TOC A5 size10/19/04
RProof Sign-off:KOW N.Mizuno H.TomizawaT.TakahashiNOC K. Lee
Windows Me/98LPR printingInternet printing (Windows 98)Internet printing (Windows Me)Microsoft Network Shared printingUsing the NET USE command
Windows Server 2003LPR printingInternet printingMicrosoft Network Shared printingUsing the NET USE command
Windows 2000LPR printingInternet printingMicrosoft Network Shared printingUsing the NET USE command
MacintoshMac OS XMac OS 9
OS/2LPR printingNetBEUI printing
Network Software
EpsonNet Config for Windows
About EpsonNet ConfigSystem RequirementsInstalling EpsonNet ConfigAccessing the EpsonNet Config Reference Guide
EpsonNet Config for Macintosh
About EpsonNet ConfigSystem RequirementsInstalling EpsonNet ConfigAccessing the EpsonNet Config Reference Guide
293
R4CB860html.bk Rev. FHTML.TOC A5 size10/19/04
L Proof Sign-off:KOW N.Mizuno H.TomizawaT.TakahashiNOC K. Lee
EpsonNet Config with Web Browser
About EpsonNet ConfigSupported Web browserAbout Web browser setting
Configuring the Network Interface Using EpsonNet ConfigOpening Screen
IndexMenu
InformationGeneral information
Configuration - Network ScreensWirelessNetWareTCP/IPAppleTalkMS NetworkIPPSNMPTimeNetwork Scan
Optional ScreensAdministratorResetPassword
EpsonNet Print
About EpsonNet PrintSystem RequirementsInstalling EpsonNet PrintFor Windows XP/Server 2003/2000/NT 4.0 Users
Adding a port for a printer assigned with a dynamic IP addressAdding a port for a printer assigned with a static IP addressInstalling the Printer Driver
For Windows Me/98/95 UsersAdding a port for a printer assigned with a dynamic IP addressAdding a port for a printer assigned with a static IP address
Configuring the Printer Port
294
R4CB860html.bk Rev. FHTML.TOC A5 size10/19/04
RProof Sign-off:KOW N.Mizuno H.TomizawaT.TakahashiNOC K. Lee
EpsonNet Internet Print
About EpsonNet Internet PrintSystem RequirementsInstalling EpsonNet Internet PrintSetting Up Your Device Using EpsonNet Internet Print
Windows 98/95Windows NT 4.0
Status Alert Window
EpsonNet WebManager
About EpsonNet WebManagerSystem RequirementsEpsonNet WebManager FunctionsEpsonNet WebManager Operating StructureInstalling EpsonNet WebManagerStarting EpsonNet WebManagerOpening the Online Guide
EpsonNet SetupManager
About EpsonNet SetupManagerSystem RequirementsInstalling EpsonNet SetupManagerAccessing the User’s Guide for EpsonNet SetupManager
Tips for Administrator
Settings for NetWare Users
Introduction to NetWare SettingsSupported systemsAbout modes
Instructions for Using NetWareUsing Bindery Print Server (NetWare 3.x/4.x)Using NDS Print Server (NetWare 4.x/5.x/6.0)Using Remote Printer Mode (NetWare 3.x)
295
R4CB860html.bk Rev. FHTML.TOC A5 size10/19/04
L Proof Sign-off:KOW N.Mizuno H.TomizawaT.TakahashiNOC K. Lee
Using Bindery Remote Printer Mode (NetWare 4.x)Using NDS Remote Printer Mode (NetWare 4.x/5.x/6.0)Using the NDPS Gateway
Outline of settingsMaking printer environmentCreating an NDPS ManagerCreating a Printer AgentConfiguring for NetWare using EpsonNet ConfigSetting the printer on client workstations
Instructions for Using a Dial-Up NetworkUsing a dial-up network in each modeWhen there is a primary server at the dial-up destinationWhen there is a primary server in the local network
Settings for UNIX Users
Introduction to UNIX Settingslpr filtersSetting Up Different UNIX Systems Using the lpr Command
Setting up for SunSoft Solaris 2.4 or laterSetting up for SunOS 4.1.4 or laterSetting up for IBM AIX 3.2.5 or later and 4.1.3 or laterSetting up for HP-UX 9.05 or laterSetting up for SCO UNIX 4.2 or later (Open Server)
Using the ftp Command
Tips
Instructions on Using DHCPSetting an IP Address Using the arp/ping Command
Checking the LANSetting and checking the new IP address
Instructions on Using a Dial-Up RouterFunction of Universal Plug and PlayUninstalling Software
Windows XP/Server 2003Windows Me/98/95/2000/NT 4.0Macintosh
296

R4CB860html.bk Rev. FHTML.TOC A5 size10/19/04
RProof Sign-off:KOW N.Mizuno H.TomizawaT.TakahashiNOC K. Lee
Problem Solver
General ProblemsProblems Specific to Your Network Environment
Windows Me/98 environmentWindows XP/2000/NT environmentMacintosh environmentNetWare environment
Initializing the Network InterfaceRestrictions on EPSON Status Monitor 3
For the ink jet printer or all-in-oneFor the laser printer
Specifications
Wireless Network Interfaces SpecificationElectrical SpecificationsRegulatory ApprovalsReliabilityEnvironmentalNetwork SoftwareRegulatory Approvals for AC Adapter (A261H)FCC Compliance Statement for United States Users
WARNINGFor Canadian Users
FCC Radiation Exposure StatementDECLARATION of CONFORMITYIndex
297

R4CB860html.bk Rev. FHTML.TOC A5 size10/19/04
L Proof Sign-off:KOW N.Mizuno H.TomizawaT.TakahashiNOC K. Lee
298
R4CB860html.bk Rev. FHTML.IX A5 size10/19/04
RProof Sign-off:KOW N.Mizuno H.TomizawaT.TakahashiNOC K. Lee
Index
A
Ad Hoc mode, 16, 49, 61, 157, 158arp, 258, 259Automatic Private IP Addressing (APIPA), 152
B
Bindery emulation, 219, 221
C
Channel, 49, 61Controlled Access Printers, 238, 242
D
DC-IN connector, 14Default gateway, 152Dial-up network, 242Dial-up router, 260Dynamic DNS, 153
E
EpsonNetConfig (Macintosh), 145Config (Web Browser), 149Config (Windows), 141Internet Print, 191Print, 171SetupManager, 213WebManager, 203
F
ftp, 254
I
IEEE 802.11g standard, 14Infrastructure mode, 16, 49, 61, 157, 158
299
R4CB860html.bk Rev. FHTML.IX A5 size10/19/04
L Proof Sign-off:KOW N.Mizuno H.TomizawaT.TakahashiNOC K. Lee
Initializing the network interface, 275Installation
EpsonNet Config (Macintosh), 145EpsonNet Config (Windows), 142EpsonNet Internet Print, 192EpsonNet Print, 172EpsonNet SetupManager, 215EpsonNet WebManager, 208
Internet printing, 193, 198Internet Printing Protocol, 191IntranetWare, 221IP address, 150, 258, 270
L
LPR filters, 247
M
MAC address, 157Microsoft network, 165
N
NDPS, 234NDPS Manager, 237NDPS Printer Agent, 238NDS, 219NET USE command, 125NetWare, 161
3.x, 221, 2224.x, 221, 226, 2295.x, 221, 229, 2346.0, 221, 229, 234
O
Operating environment, 6
P
Password forEpsonNet Config (Web Browser), 170
PCONSOLE, 222, 235Ping, 259
300
R4CB860html.bk Rev. FHTML.IX A5 size10/19/04
RProof Sign-off:KOW N.Mizuno H.TomizawaT.TakahashiNOC K. Lee
Print Server mode, 161, 218, 221, 242Protocols, 6Public Access Printers, 238, 241
R
Remote Printer mode, 162, 218, 222, 226, 229, 242Reset, 157, 170Return to default button, 170Rotary stand, 14Router, 152
S
SAP Name, 239Security lock, 14Setting the IP address, 150, 258Signal range, 17SSID, 17, 49, 61Status sheet button, 13Subnet mask, 152
T
TCP/IP, 151Transmission rate, 49, 61
U
Universal Plug and Play, 153UNIX, configure for different OS, 248USB downstream connector, 14USB upstream connector, 13Using the printer with
Macintosh, 132NetWare, 217OS/2, 134UNIX, 247Windows 2000, 125Windows Me/98, 114Windows Server 2003, 118Windows XP, 105
301

R4CB860html.bk Rev. FHTML.IX A5 size10/19/04
L Proof Sign-off:KOW N.Mizuno H.TomizawaT.TakahashiNOC K. Lee
W
WEP Key, 17Wi-Fi certification, 15WPA-PSK(TKIP), 17
302